

f0xtrooper
-
Posts
63 -
Joined
-
Last visited
Content Type
Profiles
Forums
Gallery
Articles
Everything posted by f0xtrooper
-
...
-
Could be the end of the road for my armour build Im 6ft 4" tall and although ive managed to get my armour together pouches etc; ive hit a massive problem...... I have T-21 blasters done, pouches done and ive shimmed and adjusted everything. It fits great except my chest piece. Its just too short. I have a large body length and no amount of adjusting will make it fit right (apart from moving the abdomin so far upwards that im crushing the jewels and the but plate begins to resemble a thong) I have an ABS ATA set of armour and the chest is relatively short anyway. It would seem I need a good 6-8cm more length on the chest piece. The funds are now completely dry and I dont know what to do here. I dont want to have to sell up my armour and "move along" not now im pretty much at the end of the build. Im outta ideas and feelin' that the dream is over......help anyone
-
Mother popped over tonight
f0xtrooper replied to TKmAx's topic in Build Threads Requireing Maintenance
Lol! All that's missing is an E-11 in one hand and a glass of wine in the other. -
Spent the last few days working on my ammo pouches... All the pouches are sewn, the completed toolkit pouch is still on the sewing machine. They are made from leatherete which is a leather topped plastic. Its cheap and easy to work with. It pretty much sews like denim so really easy to work with. Anyway im padding out the pouches to help maintain the shape and have come across 2 solutions that result in 2 different looks. Hopefully some opinions might help me get them finished. The straight pouch has a styrene insert to hold its shape where as the more curved pouch has a styrene reinforced back with a curved piece of "funny foam" holding its shape. Which do you think looks better?
-
Quick update: Took sith and Locutis's advice and went to 100% snaps! Just some comfort issues with the cod and butt plate to do. Waiting for my Icomm and Belt to arrive and then on to the weatherin'. Can almost see the finish line.....
-
Thighs, Shims and Cover Strips.....
f0xtrooper replied to f0xtrooper's topic in Assembly, Mods, and Painting
I have curved the internal shimso it doesnt change the overall shape and they fit great. Its just the look I need to know about. -
Just finished my thigh shims and was looking for some advice. I have glued inner strip and an outer cover strip for the front of the thighs at 20mm looks good if I do say so myself. But found that the thighs could not close completely at the back. I used a piece of 1mm styrene to create an internal shim and have velcroed it to the inside of the thighs. Obviously this left a small V shaped gap so I cut a bit of ABS to make a cover strip to hide the "V". The strip is larger than the front cover strip. Twice as large in fact but it gives the back of the thighs a tidier finish. Im going for deployed TD status and plan to do the calves the same way. Will this pass clearance?
-
Quick update on the build. Got my pauldron sorted and spent most of yesterday dying my boots. I used Dylon shoe colour and they came up with a nice even colour. As its a rub in dye and not paint it doesnt crack. Still got to order my canvas belt and glue in a few more snaps. Finally got a place to put all the completed pieces. My kids call it DAD2!
-
Simpilest ideas work the best. Just one of those builds made out of leftovers. I managed to locate some cheap non latex chemical clothes to put over the White gloves I used to cover the foam. they do look very effective and help make a £20 mannequin look very good.
-
Still getting my armour together and the missus has put up with a fair bit of mess But now ive been officially ordered to sort my armour in a more organised way. ARather than use standard PVC piping I went for "pushfit" as this makes it easier to modify the pose later on. Its a pretty simple build and there a a few examples here already. Although I couldnt find anything on making suitable poseable hands so I thought id share my solution.... You'll need: a Glue gun Flexi coupler Insulation tape Rubber glove (black is best) Cable tie upholstry foam Coat hanger or suitable rigid wire Draw around your hand in a nuetral positon onto 2 pieces of 1/2" upholstry foam. Cut some pieces of the wire coat hanger into lengths just larger than each finger. Using a glue gun glue the base and tip of each piece of wire and around the edge of the hand. sandwich the too hand outlines together. Cut small strips of insulation tape and wrap them around the base and top of the fingers. This will provide a good way of rounding the fingers and marking where you should bend when posing. finally place your foam hand into a rubber glove and place the coupler connector into the base. Secure the hand to the base with a cable tie. Now bend and pose the hands on your giant action figure
-
Ok hopefully chest is sorted now raised it as high as I can same with the AB plate (gonna need some lycra shorts under my suit ) Hopefully this will be high enough. Im presently using velcro and elastic to keep the chest overhang to the AB not sure if this is a good long term solution, does this hold up well trooping?
-
Being quite tall, mostly long in the upper body; the chest piece is really small on me. I have minimal overlap on the AB plate. Any advice on how to solve this would be gratefully recieved.....
-
Small build update...mostly cause I like seeing pictures of myself in my armour Finally got the back section sorted and the straps on the chest so at least now its a "clamshell" and I can get it on and off on my own. Chest is a bit small on me.....drawback of being a "talltrooper" but think my ammo pouch and pauldron will help cover a lot of the upper black area. whilst looking over the photos I've discovered that my neckseal is infact a piece of junk and will be looking at getting that changed as soon as I can. Recieved my "sandy" sniper plate and buttons today so I guess its time to work on those legs!!
-
Just what I needed. Gazmosis you are a gent
-
I posted this on my build thread but didn't get any response so I thought i'd try here for some help. I will have to shim the sides of my AB and Kidney section. I am a bit unsure where the 6 rivets on the left hand side will go. I have marked where I think they go however this will leave a large gap where the shim will go. are they in the right position or do I need to put 3 of the rivets onto the shim to maintain the distance apart? Hopefully the pic will show what I mean....
-
Ive trimmed out the main upper section of my armour. I finished off the edges with a dremmel grinding wheel on half speed. This left me smooth edges and allowed me to trim openings to my body shape. I figured I would strap up the upper sections to get a closer look at where the build would lead me. (Plus I really wanted to try a lot of it on together ) The armour straps together using mostly snaps and elastic strips to give some flexibility of movement. To enable me to dress more easily and stop my armour from moving around too much I made a harness to go underneath. The harness contains female poppers and I add more as and when is neccessary. Since the photo bellow I have added elastic for the shoulder bells. I will also be adding the voice wiring and suspenders for the thighs. Anyway a bottle of wine or 2 later I convinced my missus to help me with a test fit.........after a lot of jokes about my cod piece and butt plate we managed to get everything pretty much secured or taped to me.......Excuse the hair And thes side excuse the chest drop, the elastic was a little to strong for the cheap masking tape Lastly a cry for help. I will have to shim the sides a little but I am a bit unsure where the 6 rivets on the left hand side will go. I have marked where I think they go however this will leave a large gap between them because of the shim. are they in the right position? All comments (except about my hair) are greatfully recieved. Stay tuned
-
Sonnenschein Fantastic! come payday Im going to need a set of those plus hand gaurds. Clearly you are "Queen of Trooper Hands" not just the gaurds. Was getting concerned allergies might prevent me from going Swat!
-
Sonnenschein Cheers, will be in touch for some hand gaurds down the line as I want to go swat. Rubber though as im allergic to latex. Are your hand gaurds relative in size to the stock plastic gaurds?
-
Finally the box arrived..excited....nervous...put on the imperial march...checked it was all there....... .....then left it in the box for 3 weeks Truth is ive waited so long for this (not just 6 weeks list time) that I was just to plain scared to mess any of it up. Well after some supportive words from the wife (she threatened to sell my armour if I didnt get on with it!) I got to work. First up was the hand plates. I figured if theses went wrong i'd be able to replace them easy enough. After a bit of work with the lexan scissors...wow they made things easy...and a clean up with a file I had some quality handgaurds I created a velcro base and use some eyelets and elastic to attach then to my gloves. Full of a new found courage I set to work on my next piece. Figured i'd do something else easy so I decided to build the helmet It went together pretty easily more thanks to Terrels quality moulds rather than my abilities! I painted on the tears, traps teeth using Humbrol paints just waiting on my sign vinyl to arrive so I can stencil the tube stripes. I lined the inside of the helmet with upholstry foam and made a suitable chin strap to keep the helmet in place when I move around. Figured id not bother with a complete liner as I did on my ROTS clone bucket as this helmet will hopefully be trooped in!! Im pretty dark skinned so there wasnt any need to paint the inside of the helmet but I did add some velcroed screen behind the teeth just in case. Stay tuned
-
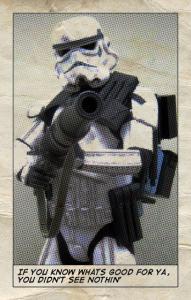
Well she's done. I managed to get the trigger in and all wired up. At the moments no lights or sound but if a blastercore or similar falls in my lap ill be able to wire it in easy I found 2 original enfield webs and the swivel in an antique military shop payed the grand total of £3 for the lot! It finishes the the gun off beautifully. I believe the gun will pass clearance for troopin dont know about deployed yet but ill see closer to time. Gonna leave the gun there at least until the bluray release so I can get some better screen grabs. So ill leave this gun thread with some "Droid Poppin" "Ship Stoppin" "Rebel Bustin" pics......(check out the last pick for the next build Next Build.....
-
Almost finished the barrel section but need some detailing help from a knowledgeable trooper. There are a couple of sections that are causing me some issues. Mostly as I cant seem to find any clear images of the sections in question. One is the wire that wraps around the main barrel section. Some T-21 ive seen have it some dont. Is this required? Anyone have a clearer image of the wire and how its attached? Secondly is the section under the barrel where the stand originally sat. Again as above Can anyone help?
-
I couldnt find 3.5 outer 3 inner diameter ABS core anywhere in the UK. So I've used a packaging tube with 3" and split a piece of 110mm downpipe along its length. Cut to size and wrapped around the packaging tube. I riveted it in place and gelcoated of the rivets. That way the front tube literally slotted into the main barrel. Only downside is its a bit heavy........but hey its a BFG
-
Whilst waiting for my armour I thought id get to work on my T-21. Photos here: BFG Build Gallery If anyone has any comments or suggestions i'd love to here them. Dont want to finish the build and find out I cant get it cleared. Im building the body out of MDF and using a paper roll tube covered in plastic for the larger barrel (due to size constraints). The rest is various bits that are lying around the garage. (dont tell the in-laws...its their garage) Im running some electrics to the trigger in advance just in case I decide to add some sounds and lights. I'll see how well it goes down on a troop and decide then. Enjoying the build and quite pleased with how its turning out. After reading Pandatroopers scratchbuild decided to trying working with styrene for some of the detailing. Finding it hard to get many of the parts and supplies needed due to living on an island in the channel but managing to get things built from scratch. Anyway what do you troopers think so far?