

Christian Dunham
-
Posts
38 -
Joined
-
Last visited
Content Type
Profiles
Forums
Gallery
Articles
Media Demo
Posts posted by Christian Dunham
-
-
That is probably good enough, the cover strips and glue should force them the rest of the way. Mine weren’t perfect either.
Ok thank you!!
Sent from my iPhone using Tapatalk -

I’ve been trying to do hot water baths for the past hour to try to get these to lineup but with no luck, I’m calling it quits right now but will be back at it again tomorrow! Any suggestions on what I may be able to do during the hot water bath to help my situation? Thanks!
Sent from my iPhone using Tapatalk
-
 1
1
-
-
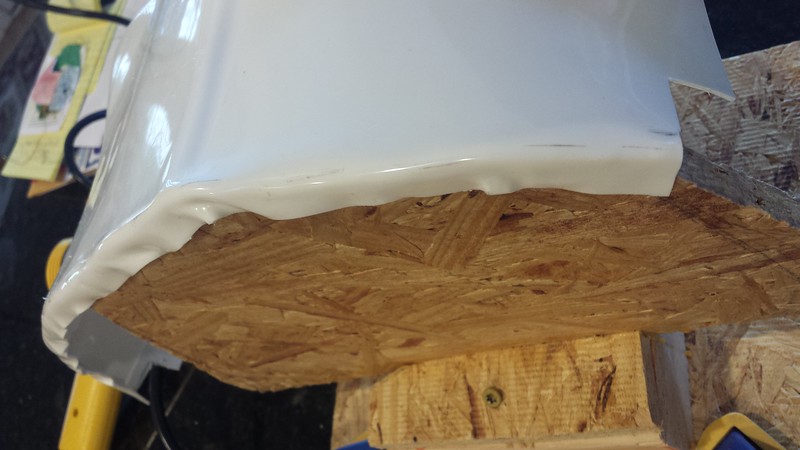
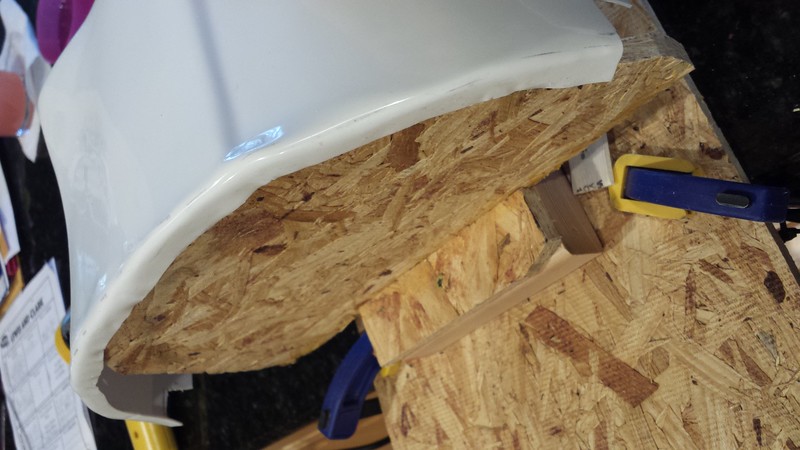
I've seen a few people how have scaled down the chest and needed a new return edge make a plug, a wooden piece cut to the curve of the chest and held it behind then use more heat and mold to it.
The problem with heating ABS is that it can revert to it's natural state the more heat you use, especially when not using a mold.
Using a small block of wood to hold on the other side too is a good idea to help push onto the mold
Here is Christine's build she modified a few pieces so may be worth a look
[/url]
A couple of examples

Thank you!
Sent from my iPhone using Tapatalk-
1
-
-
I had to recently do a hot water bath on my Cod and chest piece because im a pretty skinny guy but in doing so the chest piece warped a tad... any suggestions? Thanks!

Sent from my iPhone using Tapatalk
-
Hello all!! I’m currently in progress of assembling my ESB Vader over on the SLD, but I figured I had better have a back up costume for the 8-9 months of Tennessee heat. Two layers of wool and leather could get pretty warm...
All that to say, I’m here to read up on some WIP threads and get a feel for how to build a TK. I’d really like to do a Rogue One TK when the time comes and from what I’ve seen from lurking, I think I’d like to go with an 850 Armor Works kit, or maybe ANH Kit from RSpropmasters. Thanks for having me!!
Sent from my iPhone using Tapatalk
Hey from Nashville
Sent from my iPhone using Tapatalk-
1
-
-
Hi, may be this can help.
cheers
=== ANH DERIVED ARMOR ===
Type: ATA (Affordable Trooper Armor)
Country: USA
Contact: Supertrooper on FISD / ATAworks@yahoo.com, please email for armor inquiries.
Kit: ABS (HIPS by request), untrimmed, ANH derived
Availability No known problems.
Assembly: Armor needs to be trimmed, parts butt joined with finishing strips, HIPS needs to be painted.
Comments: The quality of HIPS material is such that it is the most durable of all HIPS armor makes. ABS is a custom made ABS for color, gloss, and durability, so you can order it either way and feel confident.
Thank you Spartan!!!
Sent from my iPhone using Tapatalk-
2
-
-
Ok!
Sent from my iPhone using Tapatalk
Also I bought the kit from a friend of mine so I am not quite sure how to contact ATA
Sent from my iPhone using Tapatalk-
1
-
-
You may find the color is off, there can be a color difference between the different makes of armor, I'm not sure how different it is between ATA and WTF
You could also ask ATA for another set I know he will send out spares
Ok!
Sent from my iPhone using Tapatalk -
Looks like you've got the A team on it Christian, You couldn't be in better hands then with these two troopers.
Who's the armor maker? If all else fails I think I have a extra set of WTF ears if you need them.
Hey pally are those ears still up for grabs?
Sent from my iPhone using Tapatalk -
Its ATA Thank you so much my friend! These guys are great! That is very kind of you I will keep you posted;)
Sent from my iPhone using Tapatalk
Hello! Are those ears up for grabs still?
Sent from my iPhone using Tapatalk -
Angling the ears forward from the bottom will reduce the gap, have a play in different positions and see if the gap closes up, some kits just won't give the "ideal screen angle" due to how they were formed.
I found ears to be the most diabolical part of trimming the whole kit.
Some great threads on trimming ears, which may explain the process a little more.
https://www.whitearmor.net/forum/topic/29238-my-helmet-ear-tutorial/
https://www.whitearmor.net/forum/topic/27375-howto-draw-an-approximate-ear-trim-line-with-no-gaps/
https://www.whitearmor.net/forum/topic/41250-ear-trimming-made-easy/
Thank you!!
Sent from my iPhone using Tapatalk-
1
-
-
Hi Christian glad to see you have started a build thread, and Yes, you are in good hands. Keep on doing a great job and hope to see your TK ID soon.

Thanks man good to hear from you!
Sent from my iPhone using Tapatalk-
1
-
-
Looks like you've got the A team on it Christian, You couldn't be in better hands then with these two troopers.
Who's the armor maker? If all else fails I think I have a extra set of WTF ears if you need them.
Its ATA Thank you so much my friend! These guys are great! That is very kind of you I will keep you posted;)
Sent from my iPhone using Tapatalk -
Hey Christian in addition to what Dan is recommending you can also remove the ear and try adding additional screws or pop rivets to secure the two halves that are still overlapping, Since the ear will hide this area you can use as many as needed.
Ok! Thank you!
Sent from my iPhone using Tapatalk -
Hiya,
Thanks for the extra photos.
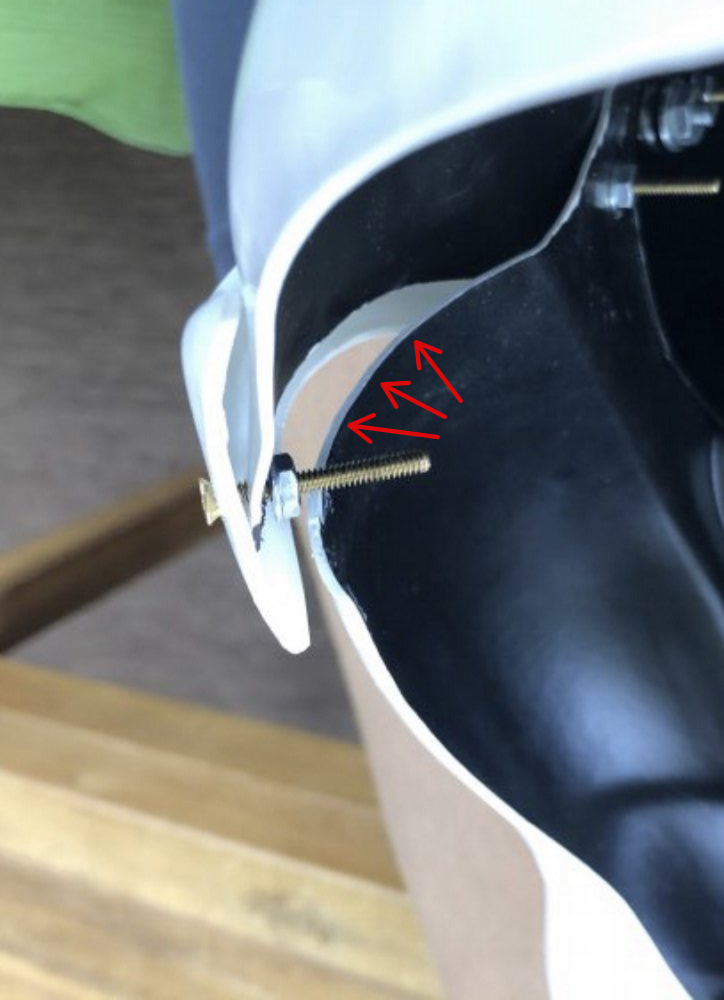
I think the first thing to look at is how the faceplate and back/cap are aligned. I noticed from the below shot that the two parts don’t really meet;

I believe this is because the faceplate is mounted too high into the cap. Notice the green line on the screen used helmet. The eyes are roughly lined up with the rear line on the back/cap.


It looks like your faceplate is mounted very high into the cap.
I’d suggest removing the ears and adjusting the alignment to allow an overlap where the ears attach. Aligning the eyes, as above, will give you a more accurate appearance but also a more solid connection between the faceplate and back/cap.
Once your alignment is sorted, you can then take another look at the ears and see how they match up.
That would be my advice, however, I’m sure others will chip in too. :-)
Thank yo soooo much!
Sent from my iPhone using Tapatalk-
1
-
-
Hiya. Can’t see any additional photos apart from internal shots. :-(


Sent from my iPhone using Tapatalk -
Hiya. Can’t see any additional photos apart from internal shots. :-(

Sent from my iPhone using Tapatalk -
Are you able to post some more pictures? We can then take a look and see what the options are. :-)
Did these photos work? Or do you need any more
Sent from my iPhone using Tapatalk -
Are you able to post some more pictures? We can then take a look and see what the options are. :-)


Sent from my iPhone using Tapatalk -
Hi Christian
Cool. Ideally, I mean from the front, sides, back etc.
A bit like these, for example;
Or do you think I can save it
Sent from my iPhone using Tapatalk -
Hi Christian
Cool. Ideally, I mean from the front, sides, back etc.
A bit like these, for example;
Should I get new ear pieces do you think?
Sent from my iPhone using Tapatalk -
Hey buddy,
Do you have shots from all angles to let us take a look at the alignment and positioning, please? Initially, it looks like too much has been removed but additional angles would help. :-)
Sent from my iPhone using Tapatalk -


Sent from my iPhone using Tapatalk
Sent from my iPhone using Tapatalk -
Hey buddy,
Do you have shots from all angles to let us take a look at the alignment and positioning, please? Initially, it looks like too much has been removed but additional angles would help. :-)
Sent from my iPhone using Tapatalk
501st Trooper Status Requests (Include link to your 501st profile in your request!)
in 501st and Detachment Access Requests
Posted
Tk-81170
https://www.501st.com/members/displaymemberdetails.php?userID=32698