Jump to content

HappyTrooperDotCom

Member
  • Posts

    4
  • Joined

  • Last visited

Posts posted by HappyTrooperDotCom

  1. Greetings fellow Troopers,
     
    A few months ago, I finished a T-21 scratch build using templates from Pandatrooper.  He did an amazing job on both the templates and the instructions.  I was looking for something similar for the DLT-19.  As many of you know, there are some blueprints available.  These schematics do a nice job showing scale and detail, but they didn't provide piece by piece cuts.  I guess I was looking to be spoon fed.  Using these blueprints, I made my own simplified templates that can be applied to wood and PVC pipe/couplings.  My goal was to construct a sturdy DLT-19 using standard hand tools with parts that are readily available.  You will notice that there are some details missing, such as a trigger, sights, T-tracks, and other small greeblies.  I left the trigger and sights off because I plan to troop with this thing and it will get thrown around.  I was afraid those parts would snap off or get caught on something.  If you decide to construct a DLT-19 with these templates, perhaps you can improve on the design.  I've seen a few other scratch builds on here that are MUCH better than mine.  I guess you can consider this a simplified version.  If you find ways to improve the build, please share with the class!
     
    Before we jump in, I'd like to give a shout-out to Astyanax here on whitearmor.net.  I used some of the ideas from his build (found here).  Specifically, the mouthwash cap for the endpiece, and shelving brackets for the bipod.  The trooper that drew up the MG34 blueprints is also a member here.  If you are reading this WizardOfFlight, thank you for the awesome blueprints!  Without them, I wouldn't have known where to start.
     
    Instead of writing up a bunch of steps with photos, I made an instructional video.  It gave me a chance to play dress-up and incorporate some cheezy special effects.  It's a DLT-19, there's a lot going on, so the video weighs in at 30+ minutes :( Here is the video:
     
     
    Here are some pics of the finished product:
     
    DSC_0667-e1486990690776.jpg
     
    DSC_0670-e1486990668802.jpg
     
    DSC_0685-e1486990641724.jpg
     
    DSC_0669-e1486990679612.jpg
     
    DSC_0662-e1486944947790.jpg
     
    Here are the ingredients:
     
    DLT-19 Wood/PVC/Plastic templates http://wp.me/p6OqN2-1se FREE
    1” x 10” x 6’ (actual: ¾” x 9-¾” x 6’ ) premium board http://low.es/2kW8vw5$10
    1-¼” PVC pipe (2 feet) http://thd.co/2lCSM43$4
    4 x 1-¼” PVC couplings (Home Depot couplings were more uniform on outside) http://thd.co/2kz0yMo$3
    1” x ¾” PVC adapter http://low.es/2l3hUnX$1 (Lowe’s has wrong pic on the site...product number in the link is correct)
    ⅞” wood dowel http://low.es/2kksX7O$4
    Plastic sign http://thd.co/2l3qALi$5
    Shelving brackets http://thd.co/2kGRszu$6
    ½” type LB conduit body http://thd.co/2kki7Pc$3
    ¾” corner braces (2 packs) http://low.es/2hID3hB$4
    Mouthwash cap (large) local Grocery/Pharmacy ~3$
    1-½” PVC conduit clamp http://low.es/2l8Uj4Z$2
    ½” #8-32 flathead machine screws and nuts http://low.es/2iIIyOZ$1
    2” #8 wood screws http://low.es/2kksAuj$1
    2” #10-24 round machine screws and nuts http://low.es/2kgC3ra$1
    ¾” #12 oval-head sheet metal screws  http://thd.co/2kH4pJV$1
    ¾” #6 oval-head sheet metal screws http://thd.co/2kktXJa$1
    #6 finishing washers http://thd.co/2lEocYK$1
    ½” mending plates http://low.es/2lCRczh$4
    #10-24 rubber well nut http://low.es/2kWn9Dv$1
    ⅜” #6-32 round machine screws w/ washers & nuts http://low.es/2kgDxl9$1
    ½” #4 pan head sheet metal screws http://thd.co/2h4Ikox$1
    ¾” chicago bolts x 4 http://low.es/2kH3EjY$4
    ½” chicago bolt x 1 http://low.es/2kkq1Z7$1 
    ⅝” or ½” #8 oval head sheet metal screws http://low.es/2l7O8yd$1
    1” #6 oval head sheet metal screws http://low.es/2lD7zfr$1
    ½” #8 machine screws, nuts, and finishing washers used to fill the holes in the shelving brackets $1
    Approximate cost of materials: 66$
     
     
    Finishing Materials
    Bondo 
    E6000 adhesive 
    Elmer’s Wood Glue
    Sandpaper (60, 120, 220, 400 grit)
    Friction tape
    #0000 steel wool
    Graphite powder http://amzn.to/2lFq4R7
    Rustoleum Painter's Touch gray primer spray
    Rustoleum Painter's Touch flat black spray
    Rustoleum Painter's Touch metallic aluminum spray
    Satin clear spray
    Polyurethane in satin finish
     
     
    Tools
    Files & rasps 
    Screwdrivers
    Lexan scissors http://amzn.to/2klB5Fi
    Star Wars pencils! http://amzn.to/2l4wHz0
    Airbrush (optional) http://amzn.to/2l4x7VV
     
    Hope you guys can improve on the design. If I add any additional templates for the build, I'll put them in the zip file in the d/l link. Thanks for looking! This build does take some time and patience. Your hard work will pay off in the end, the DLT-19 is a beautiful weapon!
    • Like 9
  2. Fellow Troopers,


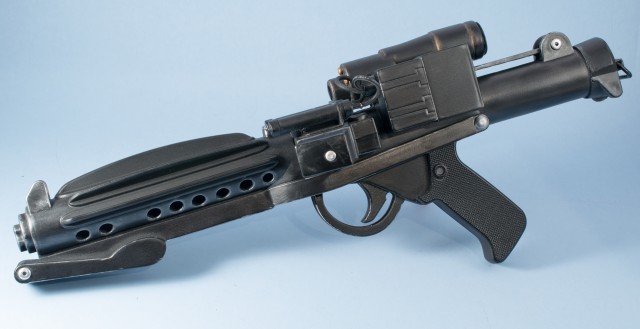
    As you know, us TDs/TKs aren't on the top of the pay scale at the good ol' Empire.  We have to make do with our meager paychecks.  I thought I'd share my cheap and easy E-11 prop build in case there are any other troopers looking for an inexpensive E-11.


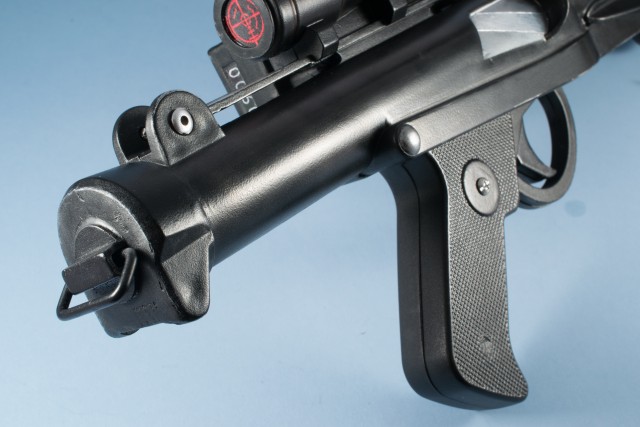
    I used Rubie's Star Wars Rebels Stormtrooper Costume Blaster from Amazon, a drill, some paint, and some greeblies to spice it up.  The blaster isn't 100% screen accurate when it comes to size and shape, but it is pretty close.  With a little TLC, you can turn a toy into a nice prop.
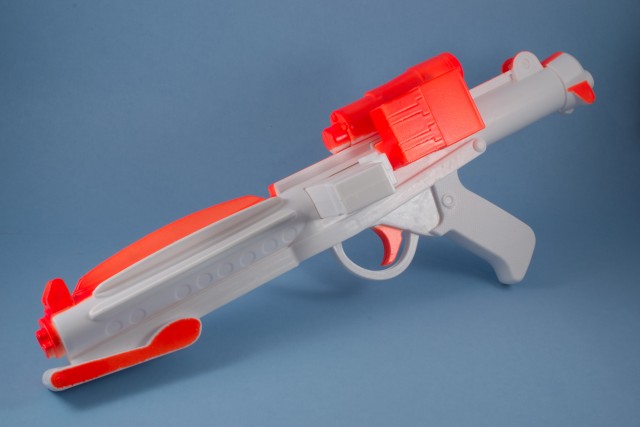
     

    DSC_0211-e1464480378921.jpg


    DSC_0206-e1464479618713.jpg


    DSC_0205-e1464479640566.jpg


    DSC_0201-e1464479629104.jpg


    Greeblies used:

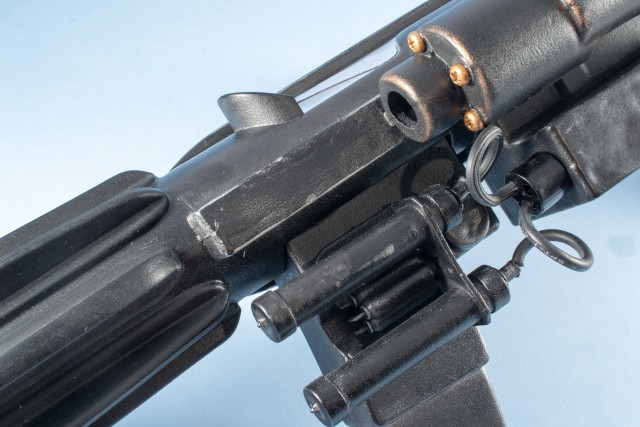
    Electric shaver power cord from Amazon for $5, got the idea from this site...thanks!

    5/32” x ¼” pop rivets from Home Depot for $5

    Hard drive screws from work for free

    3 pin inline mic connector used as the Hengstler counter connector, from eBay, 2 for $5 shipped

    E-11 power cylinders from Shapeways.com for $10 with coupon

    E-11 D-ring from Shapeways.com for $2.50

    E-11 D-ring mount from Shapeways.com for $3.50

    Scope reticles for free from this awesome site!


    If you are interested in the build, you can check out the YouTube video here: 


    Its not the best looking blaster in the galaxy, but it is a fun build and not terribly expensive. 

    • Like 3
  3. I know there has been some issues with Anovos shins being inconstantly numbered, and I can see Troopermaster and Ukswrath are still hashing things out.


    Here's my shins, how they were numbered when I got them, and where they should be according to Anovos construction guide.  Seems like mine have been misnumbered. How do I need to assemble them?


    attachicon.gifmyshins.jpg

    I am also building the Anovos TK kit...it is my first armor build.  My shins are labeled just like your photos.  I originally tried Tony's configuration: 25 with 28 and 24 with 27.  While they fit, one shin I could barely fit on.  Measuring 5 inches from the top, I measured the circumference of the widest point on the tight shin (the Right) and it was about 17 inches, the other side was 19.5 inches.  The left side fit, but was clearly too big, the right side was painful.  I took them apart (love E6000, so easy to fix mistakes, just rubbed it all off with an old dry cloth towel).  I taped together 24/25 and 27/28 and the fit was much better.  Both came out to be about 18.5-19 inches wide.  If I align the tops of the shins, it looks like I need to trim a little off the bottom of the front of the foot.  I'm putting it together this way...it just fits me better, and now the 2 shins look almost the same size.  


    On a side note, Anovos did mislabel in the instructions.  If you look on the shin assembly step in the pdf, the right sides are 24 and 25 (which appear to be correct, and what I am using).  The left side shin stickers say 27 and 28, but the pdf says 38 and 39.  


    Basically, I put tons of painters tape on before glueing to test fit the shins.  24 to 25 ® and 27 to 28 (L) fit me better.  Definitely not knocking Tony here, his tutorial is the bees knees.  Perhaps my labels were correct and many others were mislabeled.  Try taping it as secure as you can to test fit before applying the E6000.  In my specific case, one shin configuration was painful, even my wife could see the difference between the shins just eyeballing it.  24/25 and 27/28 worked for me.  Big +1 for Tony for documenting this every step of the way.  I can't tell you how many hours I've spent looking at his instructions/photos...job well done sir!

    • Like 1
×
×
  • Create New...