


Ksunole
-
Posts
56 -
Joined
-
Last visited
Content Type
Profiles
Forums
Gallery
Articles
Media Demo
Posts posted by Ksunole
-
-
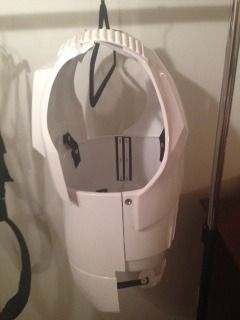
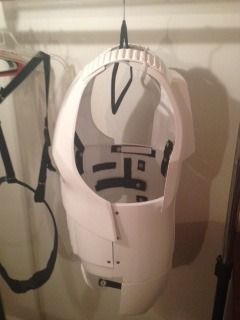
I can take one when I get home that is better and from the side.I'd love to see a pic of the helmet...I can get it close...the issue seems to be no room for the tube stripes. It is a toughy...I feel like I am having to "force" the cap n back in while keeping some gap to have enough room for the tubestripes.
Here is one of my niece wearing it.

And one where I was trying to be artistic...

Now that I look at it, I should probably tighten that ear up some.
Sent from my iPhone using Tapatalk
-
Cool jumping in with both feet starting on the helmet! I want to build the helmet first, but am thinking on starting on something easy like the biceps, forearms, etc. to build up my confidence and skill. So far, I haven't started on anything.

In my opinion, putting together the helmet and the armor are separate beasts. I put together the helmet first, but it didn't really prepare me for the majority of what armor building is (sizing, trimming, sizing, glueing).
I'd definitely start with the forearms when you begin the body armor.
Good luck!
Sent from my iPhone using Tapatalk
-
 1
1
-
-
To be honest I didn't trim any of the helmet on my AM 2.0. Maybe I should have, but it's seems to have fit together without any trimming. Toughest part was getting the screw holes lined up.
Sent from my iPhone using Tapatalk
-
I think UKwrath sells TD clips. Have you checked the continuous sales section?
Good luck on the build

Sent from my DH77 using Tapatalk
It's very easy to build the clips if you have access to a vice.
Sent from my iPhone using Tapatalk
-
I'm 6'5" and also have AM 2.0. I'll follow along to offer up advice if needed. Looks like you're well prepared.
Sent from my iPhone using Tapatalk
-
Welcome! Feel free to check out the GA forum and post in our cadet section. You're welcome to come out to some of our events, we'd love to meet you.
There are plenty of us spread out around GA to help or provide tips. What part of GA are you in?
Sent from my iPhone using Tapatalk
-
There is a sub forum for it on the spec ops board:
http://forum.501stspecopsdet.net
Sent from my iPhone using Tapatalk
-
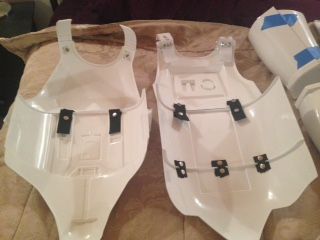
I went with the split rivets and it was surprisingly easy. I reckon I'll have to take an inch off the top of the butt at some point, but that'll wait for now. Other than that I'm fairly happy with the body, though at some point I may also split the cod from the ab and shorten it. I regret not shortening the kidney now.
I also took an inch+ off the top of the thighs all round and I'll probably take more off the insides to shape them around the cod better. I can sort of go upstairs, but I doubt I'll be able to kneel without some serious reshaping.
We only kneel to Lord Vader...
But in all seriousness, I don't know of many TKs that can kneel in their armor (I know I can't), so I wouldn't worry too much about that.
Sent from my iPhone using Tapatalk
-
1
-
-
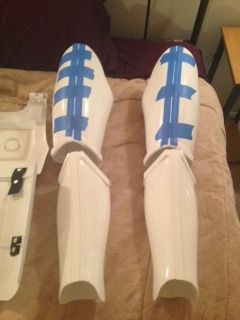
It doesn't really rattle/move if you fit everything correctly. I personally added extra padding inside the shins and forearms to keep them more in place.I might have a few for you soon, but for now I dunno really.
Will definitely use this once my scissors arrive, had no clue my kit was gonna shoe up nearly as early as it did.
Question for completed kit people:
Does the armor rattle / shake when moving? If so, does adding foam padding do anything to change the acoustics? I have quite a bit spare even after making a second whole helmet of foam, and wanna know if that would really change the volume of moving in the stuff.
The armor does make noise when walking just due to all the friction of the parts touching, but I think it sounds cool and gives it character.
Sent from my iPhone using Tapatalk
-
1
-
-
Thanks! Gonna double check to see how much I'd have to trim, going to grab a bunch of supplies at some local hardware stores today. Going to follow your advice and do the biceps next. Hopefully no reshaping needed, as I've kept the armor safe and in a moderately temped environment. Also hate to ask about the acronym, what'd TD stand for in your last line?
Good to know about the painting! Hoping to shoot for at least the level 2 qualification, as I saw on the CRL that ANH Stunt and Hero cannot use AM kits in the Centurion level
TD = thermal detonator, cylinder that mounts on the back of the belt
-
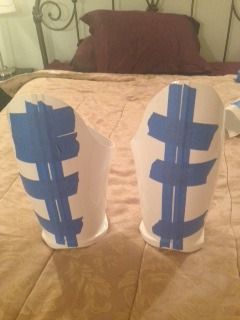
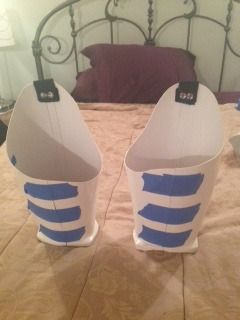
Agree with Artshot on his points. I have to put my gloves on last since they won't fit through the forearm with the hand guards on. What do you mean by "not overlapping"? The forearms are large enough to where you overlap them, tape to the correct size, mark a line down the seem and cut.After reading along with Navajo Bro's guide, I got a few questions for any knowledgeable people out there!
- How do you go about making the forearms large enough to fit your hand through? When I set them to line up (Not overlapping) I have just enough room to squeeze my hand through the little inward lip around the wrist end.
- After the forearms, what should I do next? Been seeing varying builds with people doing the torso or legs next.
- At what point does the painting come in? I think this is towards the end, but I have and IRL friend who wants to know because they're considering the kit as well.
- Is there anyone here who's built this / has a lot of time free to possibly PM more about it or even use Skype? My local garrison doesn't have many members in the city I live in, and I just wanna be double sure before I make any irreversible mistakes.
The only painting that you have to do is on the helmet, an buttons, and rivet/screw heads. Your kit probably came with stickers for the helmet and those are approvable, depending on what level you're going for, so technically the only thing you are forced to paint on the helmet are screw heads, chin (vocoder), and mic tips.
Feel free to PM me and we can chat through there, Facebook messenger or I could potentially Skype depending on how busy I am at the time. I've only built one kit, so I'm not as knowledgeable as some but I could hopefully get you going in the right direction.
-Dustin
-
Made them. Bought some aluminum from Home Depot and bent them to the correct shape with a vice.Good memories I hope! How'd you get the Thermal Detonator clips? Did your kit come with?
-
1
-
-
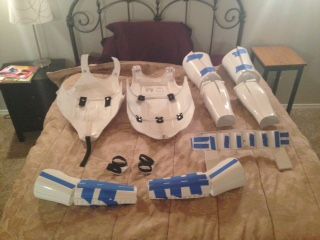
You're telling me! I just laid about the vast majority of the parts (Kept the really small pieces separate to not get lost in the confusion)

Here was my "oh crap" picture...

-
1
-
-
It is a lot of pieces, but it will start going quick once you get the hang of it. Don't let it overwhelm or discourage you.
-
1
-
-
I used these a lot as well, I don't believe it's an AM 2.0 kit but most of them go together the same. Watching someone else do it is very helpful.YouTube has a guy tk1636 his build helped a lot for my am2.0 build. As said above use Navajo bros guide helped a lot as well. I did the TD first just take your time measuring twice cut once.
Sent from my iPhone using Tapatalk
-
1
-
-
Most of the screws are for the bucket. I'd advise starting with the forearms as those are the easiest, just to get your feet wet. Use Navajo bros guide and you can't really go wrong.
-
4
-
-
Excited to say that both my boots and my kit arrive today! Can't wait!
Edit:
Just found out they both originated in the same city and rode the same truck all the way across the country!
Awesome. Have fun man, just remember to measure twice and cut once and you'll be fine.
-
1
-
-
Appreciate the tips, will be looking into Academy very soon... Any tips on where to get the majority of the snaps / misc. supplies? Would a store like Home Depot or Lowes have the majority of them or should I go online to scope stuff out?
I've heard not to buy the Dritz brand snaps that Walmart carries. I bought the line 24 snaps made by Tandy, I believe I got them from Amazon. You can get the scissors from joann's or amazon, the elastic, e6000, Velcro, paint pens at joaann's or walmart. I received enough extra abs plastic from Troopergear with the armor for any extra things. Earth magnets from eBay. Got the neck seal from Darmen here on the boards.
Once you get some build time under you ur belt your belt, you mat want to switch to CA glue (I used Gorilla glue) for things like cover strips since there is no wait time.
-
1
-
-
Thanks! Glad to be a part of it!
Sounds like we're doing the exact same thing then! I'm hoping it does.
While we're at it, anyone have any recommendations for a place to get under shirts / pants? Planning on using TK Boots for the boots, anyone got any ideas? Thanks!
Welcome to the AM 2.0 club! Mine was my first build as well. The first cut is the hardest, but once you get going it gets easier.
I bought the under shirt and pants from Academy sports, because their generic brand has black stitching. I bought my boots from Imperial Boots.
I followed ukwrath and Navajo bros build threads as well as watching videos from the YouTube channel "Armor Building with TK1636".
As everyone else has mentioned, get all of your supplies ahead of time. Buy more clamps and rare earth magnets than you think you need and it will speed up your build.
Have fun!
-
2
-
-

After a bit more research, I think I put the snaps on the wrong part of the butt. Should I trim off the part sticking out and attach the snaps to the curved part of the butt? I was following an AM 2.0 build which shows it the first way, but then found an EIB submission thread where it's commented to remove that part.
I followed Navajo Bro's build thread here: http://www.whitearmor.net/forum/topic/32531-navajo-bros-am-20-stunt-build/
-
Progress so far. Have to do final fits on everything but am trying to get the big stuff done first. The only items I still need are the TD clips and a voice changer/amplifier. I have been toying with the voice changer from the Disney 1st order helmet, but I get a lot of feedback when hooking it up to an amplified speaker. The helmet itself is already done, minus communications.
One question I have for AM 2.0 builders is about the shoulders. They seem huge and I assume I'll have to trim them, I'm just curious about anyone else's experience with them.

The shoulder bells do feel deeper. I'm 6'5, so barely did any trimming on them; however, I've contemplated going back and trimming some off of them.
-
Just paid my deposit for your bucket. I'm 6'5 and can't wait to have armor that matches the character size on screen!
-Dustin
-
I'll definitely be buying some nomex gloves. Would someone please be so kind as to put a link in here that leads to the justjoseph guards?
Sent from my iPhone using Tapatalk
I don't know the link, but I ordered them via PM and I'd do so again, quality product. His username is Justjoseph63.
-
1
-
-
Appreciate the advice, I'll give it a shot.I used E6000 - after several troops they are still holding on just fine.


zv288bot's AP ANH stunt build! Whoop Whoop!
in ANH Build Threads
Posted
Turned out great Jorge. This will be a huge improvement and worth the time.
Sent from my iPhone using Tapatalk