

dldigital
-
Posts
30 -
Joined
-
Last visited
Content Type
Profiles
Forums
Gallery
Articles
Media Demo
Posts posted by dldigital
-
-
Di you thoroughly wash everything before painting? Was there a primer applied? an acrylic primer works very well on resin.
Didn't know I needed to rinse the parts before mounting. Oh well, lesson learned there. The paint I used is a paint & primer mix. It's adhering well just really bringing out the flaws in the resin. I'll sand down the areas tonight and reapply a coat of base paint (hammered gun metal grey) and see how that goes.
-
Hey guys! Got a question...
After painting my blaster with the first coat of paint I noticed that some of the resin pieces have tiny air bubble holes. Is that normal? How can I get rid of them? Do I need to sand the part and then repaint or just try a second coat?


Thanks in advance for the advice.
Dave
-
Well, it's ready to paint. I made a few mistakes here and there but overall I think it'll pass for an Imperial Blaster. One thing I regret is using that JB Weld putty instead of bondo. The JB Weld was ridiculous to work with after it cured!!! Anyways, here it is...

Will probably put the silver coat on tomorrow night, assuming it doesn't rain.
-
Just one side of the barrel. The side with the magazine and counter
Thanks! That keeps is simple!

-
Ok, I got to spend about an hour with my new pet project. Got a few things accomplished but sadly couldn't get the darn thing cracked open. There's glue along the sight rail and I am afraid I am going to break it. Anyways, here's what I managed to accomplish tonight:
- Trimmed off the notch along front bottom of the barrel. Not sure if I was supposed to or not but too late now.
- Trimmed off the front of the scope. Not as easily done when still in one piece.
- Trimmed the trigger a little. Nothing special but I think it looks better than before.
- Trimmed up the sight rail. This was harder than I expected because my Dremel wouldn't get under the scope. So I had to use a hack saw and then a metal file to clean everything up. I think it turned out ok considering.
Here's my latest progress pic...

-
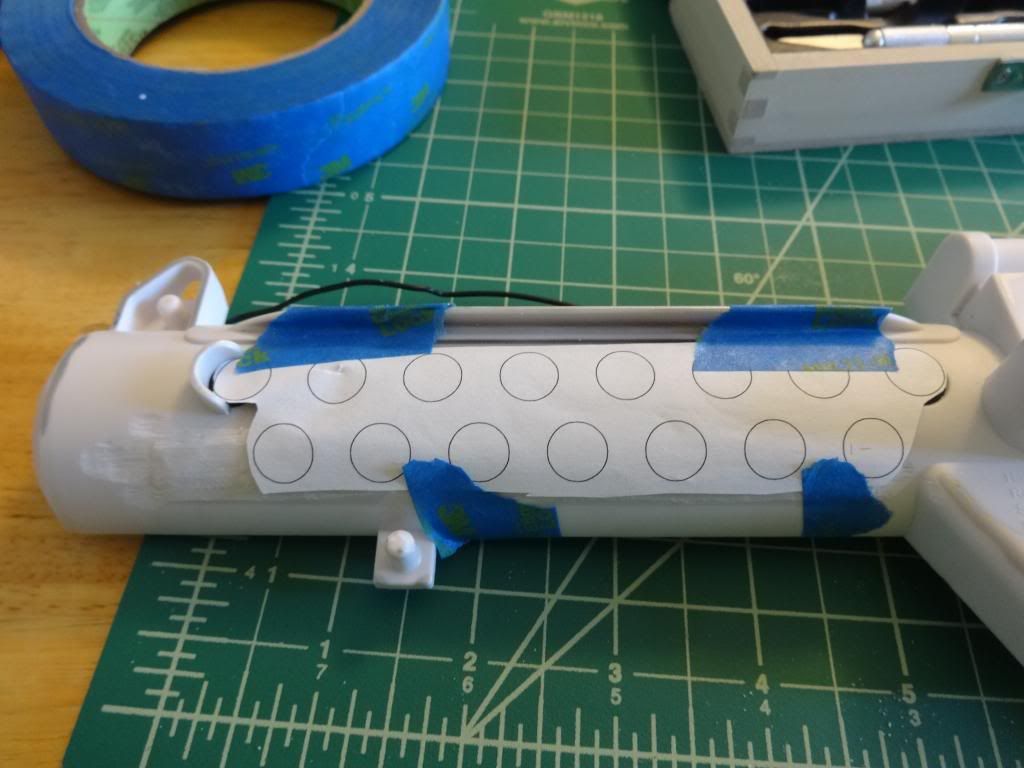
I second that. While its in 2, its easier to drill the new holes on the barrel if you plan to have the correct amount of t tracks
Speaking of T-Tracks...do I need to drill new holes on both sides of the barrel or just one side? I can't tell from your pictures or Zarlon's (shown below).
-
Hey guys! When I crack this thing open what are the things that I need to do inside?
- Modify trigger
- Upgrade LED (if desired)
Anything else?
-
Hey guys!
I've seen a few guys mention that it was a good idea to start my own build thread so I can ask questions along the way. So with that said, here I go...
I got my Hasbro E-11 blaster today and got started with a few small steps this evening.
- Removed the scope caps on both ends
- Removed the orange tip and housing around the LED.
- Sanded down the legal mumbo-jumbo.
I was going to crack it open and get started with the work in there but dinner called and so I had to pause for a bit. I should probably take baby-steps on this anyways and not try to bite off more than I can chew in one day.
BTW...Here's a pic of my little setup/work space in the garage.

To be continued...
-
I received my mod kit from DoopyDoos yesterday. Blaster should be here by tomorrow or Thursday if the USPS tracking is correct. Looking forward to getting started and using your build thread and Fuumantroop's to guide me through it.
-
The Emperor will be pleased
-
Payment sent (Unique Transaction ID # 1B522090RU4140226)
-
I got the ok from the wife to ease my pain and suffering while waiting for my TK kit by allowing me to build an Imperial Line Officer costume. Should be able to get that pulled together by the end of October, give or take a few weeks. That will at least get me in the 501st door and hopefully trooping long before my TK kit gets here.
-
What kind of mods are ya looking to do to the hasbro?
That may be important in fully answering your question. All the above posts are a great starting point though!
There are great recent hasbro builds to choose from as well.
And DEFINITELY get a dremel if you don't own one already. Get one with adjustable speeds as you will need it on different parts of the hasbro. Also, sandpaper is a must! I used 400 grit and 220(i think).
Thanks Andrew!!!
I am planning to do the standard DoopyDoos mod. Not super handy with crafty type of projects so I am not expecting great things from myself.

-
That's some serious awesomesauce! Great job!!!
-
The Dremel will be very important. You will need a couple small sculpting bits to get into tight areas and a larger one for hollowing out the mag well for your new magazine
Oh yea, BTW...I got the mag yesterday in the mail. Totally awesome! Can't wait to mount it. Thanks again Steve!!!
-
Awesome! Thanks Dougal!
Love SWTOR!!!
 I have several toons as well. Can't recall the server I am on but will check tonight.
 -
Hi gang!
I am getting ready to start my DoopyDoos conversion of a Hasbro E-11 blaster. I was wondering if I could get someone to post a list of the tools I'll need to accomplish this. I'd like to make a Home Depot run and get everything I need to hit the ground running when the blaster and kit arrives.
Thanks!
Dave -
Did you ask TK boots about his discounted boots? He didn't have my size for new ones so I took a chance with discounted pair and they are great...they were discounted due to some tiny wrinkling that would've happened through wear anyways.
When I inquired about the boots he did mention that he had some slightly flawed boots but didn't indicate a discount. He quoted me the standard price so I figured I'd wait and get a new pair then pay the same price for a flawed pair.
-
Congrats! Looking forward to joining you in the ranks of TKs someday soon.
-
Awesomesauce!
+1 on the "Awesomesauce"
-
I reached out to the guy that runs the TK Boots website and got my name added to his wait list for the next run of boots he is going to do real soon.
-
one of the fastest ways would be to go the painted boots route... angelus leather paints work really well.
less hassle than other methods.
otherwise you always have the option of getting on the waiting list for Tkboots.com
Thanks for this tip! Do you need to also apply a high-gloss finish after painting the black boots white with this Angelus leather paint?
I found the Zappo boots here on Amazon.com.
-
Looks great Ed! Good luck!!!
-
Thanks guys!
Happy to report my DoopyDoo's mod kit is on the way. This little E-11 blaster mod will give me something to occupy my time while I wait, painfully, for my TK kit.
Old Republic Trooper (Havoc Squad)
in Build Threads Requireing Maintenance
Posted
Totally amazing and awesome! I am playing the trooper in SWTOR and you've nailed the suit perfectly. Fantastic!!!