


Petros
-
Posts
84 -
Joined
-
Last visited
-
Days Won
1
Content Type
Profiles
Forums
Gallery
Articles
Media Demo
Posts posted by Petros
-
-
Hi,
I did read someone had this problem in a build thread, with so many threads i cannot recall which one.
My lid is crooked, how do i rectify and do i do this before trimming the ears to fit?
Thank you

-
Hello, i know there has been comment in threads about the angle of the lid, so many threads to go back and find.
okely dokely, the angle on the helmet is not right:
* how do i fix?
* do i fix before finishing ears?
Peter
-
Okey dokley, normal life stuff out of the way and back onto it, took the day off today to get re-aquainted with the shiny plastic
-
 1
1
-
-
Brilliant than you, going to keep the return edge at the top for effect, and remove from the bottom without loosing the effect.
The return edges on the armor parts were there to give the appearance of thickness. The tops of the thighs should have return edges. The bottoms by the boots, no.
Check out Pandatrooper's AM armor build. It's the best I've seen http://www.whitearmor.net/forum/topic/10434-pandatroopers-am-build-threadam/
Pandatrooper's ANH style thighs (AM armor)
various discussions on return edges
http://www.whitearmor.net/forum/topic/26358-return-edges/?hl=%2Breturn+%2Bedges#entry332473
http://www.whitearmor.net/forum/topic/24538-thigh-greave-questions/?hl=%2Breturn+%2Bedges
http://www.whitearmor.net/forum/topic/18216-return-edges/?hl=return+edges#entry218326
http://www.whitearmor.net/forum/topic/17245-return-edge/?hl=return+edges#entry208902
-
Apologies if this is obvious, I didn't see it in recent posts.
With the AM thighs, what is the suggestions on the return edges, both the top and the bottom.
I haven't cut the back yet so now is the time before i go too far.
thanks
Peter
-
Moriar69, this is a good thread you started and the comments are great for reference.
well done mate

-
The knee is not bad as long as my garter keeps the thighs up. I will need to make some changes to my garter design.
HI DarthDadio,
have you got a picture of your holster and suspenders
-
I have been using a box knife to trim the smaller pieces (legs, arms). Looking at using lexan curved scissors so I can be more precise on my edges.
I love my Lexan scissors, cut everything and very strong
-
If you look at the pic's you and Germain posted, the curved sides are high up. Check ours out:
I think depending on your size, you may not want to cut to much to where it will take away from its roundness.
I just measured it to my my body, I don't have the exact amount removed because I did it a few times. Mine don't have return edges
thanks mate, i am going to cut on the conservative side of things as i love your though on don't loss roundness. i can always cut more when i post for final comments from people before lodging.
-
1
-
-
NIce looking build mate, looks nice and shiny, you can tell you spent some time with the polish.
good luck
-
1
-
-
Going back to your two belts, use the bottom belt. You have three rivet points ( one in the middle and one on each end. ) however, the dimples in the outer most rivet points are far too close to the boxes. They should be closer to the edge of the belt with the final rivet cover sitting slightly off the edge.
Thanks Steve, good timing i hadn't got back to the belt yet, i have been getting my guard cleaned and ready for the Brisbane Supanova coming up.
-
Just be careful with the one we have. The curved sides on the AM armor are longer than the others.
HI Rick, thanks for that, the forums in Australia are not complimentary to AM back plates, opinion but no assistance.
Thanks for your tip. Did you measure a certain distance in, i just don't want to take off too much?
And iss there a return edge put on the plate after the cut, as there isn't one now?
-
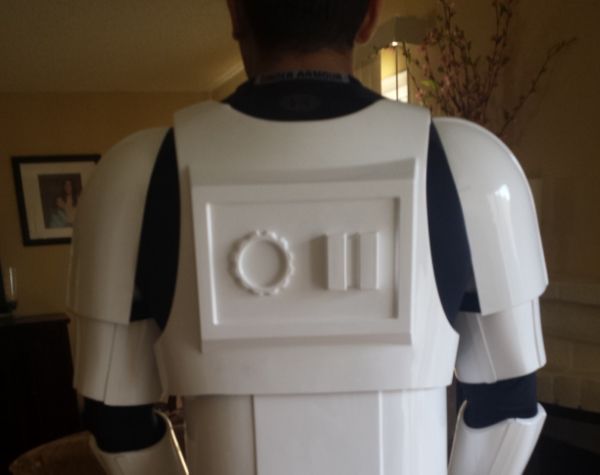
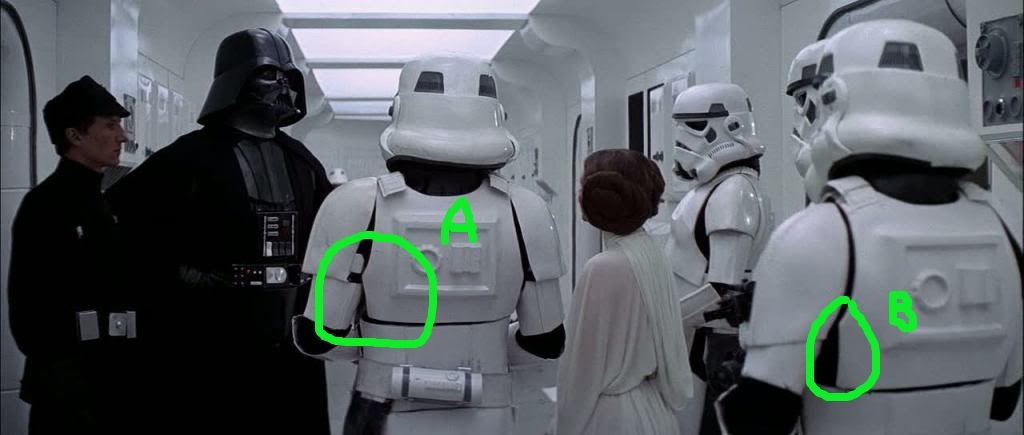
HI everyone,
I have my Dremel humming in my hand and before i cut the back plate, please give me your thoughts and options.
In the reference picture where I labelled "A", the cut is slanted back.
Where i referenced "B" it is straight down.
Is there a wearing preference for fit and comfort?
IS there a deal breaker for approval which one to use?
thanks everyone pin advance.
-
Return edges really have nothing to do with wearability or approval. You are going to have a bit of return edge on almost every part for the exception of the wrist side of the forearms, the foot side of the shins and the chest side of the shoulder bells.
The return edges were designed as a way to make the thin plastic armor parts look really thick. But they also provided a platform (on the torso parts) for the metal brackets that, when connected with loops of elastic, held the torso together. You can see the brackets and screws here:
 image.jpg
Using the metal brackets as the means of joining your torso parts is not a requirement.
Find a happy medium with how much you leave. 1/4-3/8 inch is a good start. You don't want too much or it will start knifing into your body.
Much appreciated Steve, some very clear points.
Going to reduce them from approx 10mm to 5 mm to give the look of thicker armour still.
-
Hey mate it looks great, can i ask a question, reference did you use to know how much to cut off the side of the back plate, i am just about to gut them back.
-
The AM kit comes with very generous return edges, looking at build there looks like this is removed or reduced.
What is the opinions on removing this for ease of wearing or approvals.

-
I use Novus 2 once a year for Comic Con. But I just clean it with Novus 1 between troops.
Sent from my iPhone 6 using Tapatalk
Thanks Eric, that is good to know the frequency you use the Novus
-
You used a razor knife to cut your strips. You will have a little raised edge on your cut lines. Make sure these are removed before gluing anything up as they will prevent a flush, flat fit.
Steve thats a good tip, saves learning by mistakes and fitting flush issues.
-
great work mate...
-
1
-
-
a day of getting the many tasks not finished.
Copying the build thread of a guy here "Bids" replicated his arm system, his looks great and he troops comfortably.. so reinvent the wheel.
Here are my shoulder and biceps, about to attach the arms… perhaps at the end of the Band of Brothers distraction at the moment.
-
I have a gap of something like 1" - 1"1/2 (max) on my shoulders, it seems right for me. Just enough to have the snap for the shoulder bell.
thanks mate for the info, that sounds good to me.
-
-
If you want perfectly symmetrical, Stormtrooper armor is not what you're looking for!

As said above, the return at the bottom needs to be removed. Otherwise, this looks perfectly fine and you are a go to get that finishing strip down on that shin.
Ron, of all the build comments yours rings true the best regarding symmetrical. sometimes it looks like an illusion
-
looking good James.. good to follow the diarised build


AM 2.0 Questions
in Assembly, Mods, and Painting
Posted
Hi mate, good timing i am piercing together the chest and back plate today, did you get a definitive answer to the question?
Peter