

TKFIU
-
Posts
36 -
Joined
-
Last visited
Content Type
Profiles
Forums
Gallery
Articles
Media Demo
Posts posted by TKFIU
-
-
Good luck on your build! I put together the AM kit and was quite intimidated when I first opened the box. I did get the job done and chronicled some of my work at http://www.whitearmor.net/forum/index.php?showtopic=13541&hl=&fromsearch=1. I need to get back to work on finishing my post.
Definitely go with the E6000. That is all you need for the suit. I used the ABS cement in a couple places, but it's not necessary.
You should be able to find all the help you need on this forum. Most of the difficulties you encounter will already have much information about the topic. Feel free to PM me as well if you need some specific help. I completed my suit less than a year ago and am still learning some tricks and am happy to help you if I can.
-
I'm 6'2" 200 lbs and have a 7 5/8 hat size. I picked up the AM kit and am using the helmet that came with it. Some people on the forums will tell you that the helmet is too big, but I think the proportions are right with my size. They should be fine for you as well.
-
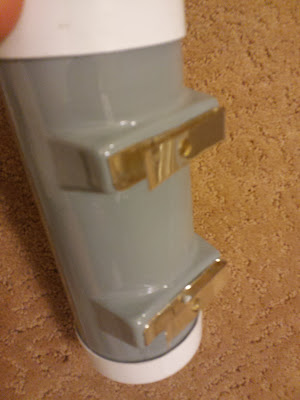
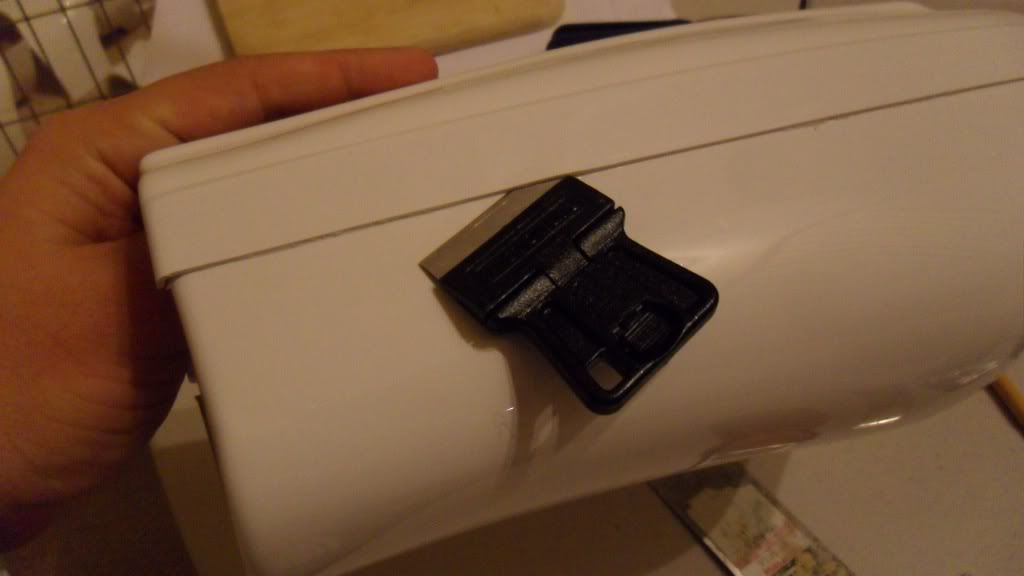
I created my clips by taking an old money clip that I never used and used a hacksaw to cut it in half. I then drilled a hole in each half to rivet to the ABS. It wasn't too hard and stays on very well.
-
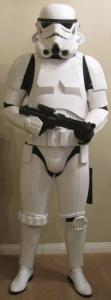
Good luck fellow So Cal troopers! I recently completed my AM build. I'm 6'2" and 200 lbs. I am very happy with the armor. You can pick up the suit from Trooper Supplies in Orange County to get it quickly.
I'm still writing my build post, but please check it out or feel free to PM me with questions. I would post the link but don't know how on my mobile. You can search on TKFIU and you'll find it.
-
Who would have guessed? My new best friend just lives three doors down. He showed up in an incredible Chewbacca costume for trick or treating tonight. I can't wait to talk Star Wars with him.

-
I was hoping to have a place to post this picture.
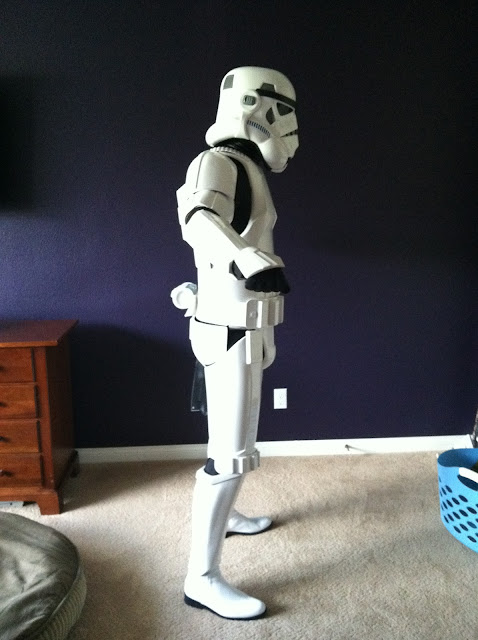
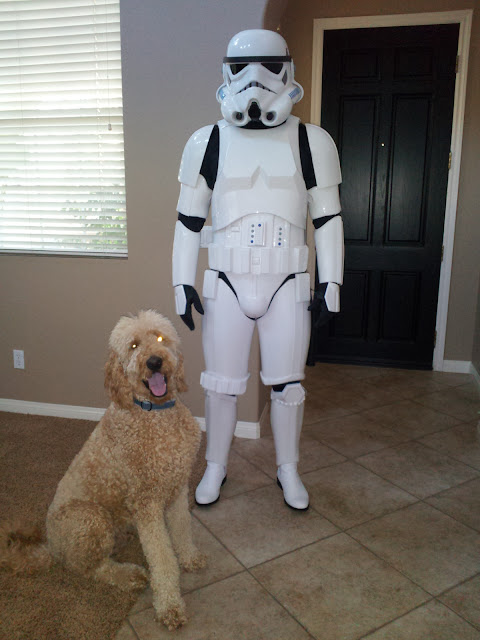
 This was before the Halloween party. Unfortunately, I don't have any of a TK taking jello shots at the party. My wife obliged me and dressed as Leia although she's not a Star Wars fan. I need to work on my dog's Chewbacca costume. If anyone has tips on making or buying an ammo belt, please send them along.
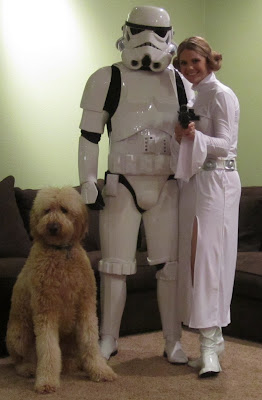
-
I'm putting it on at work tomorrow too, so that's why I wanted to figure this out. I'll still have to ask for help with the O2 tank, but that's much easier than explaining to a coworker how to attach the shoulders and biceps.
I feel like my right knee battery is too low as well. I just don't like that you can see the thigh molding above it. My mind was put at ease while watching Star Wars recently because some of the troopers in the movie had it looking worse than mine. I never noticed the defects in the movie suits until I built my own. Another part I recently noticed is that you can see the black velcro on one of the trooper's thighs in the opening sequence when Leia is captured by Vader. So I guess our little issues make the suits more screen accurate!
-
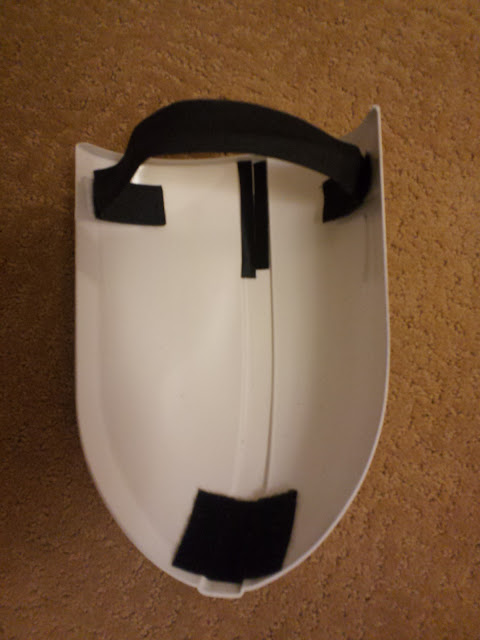
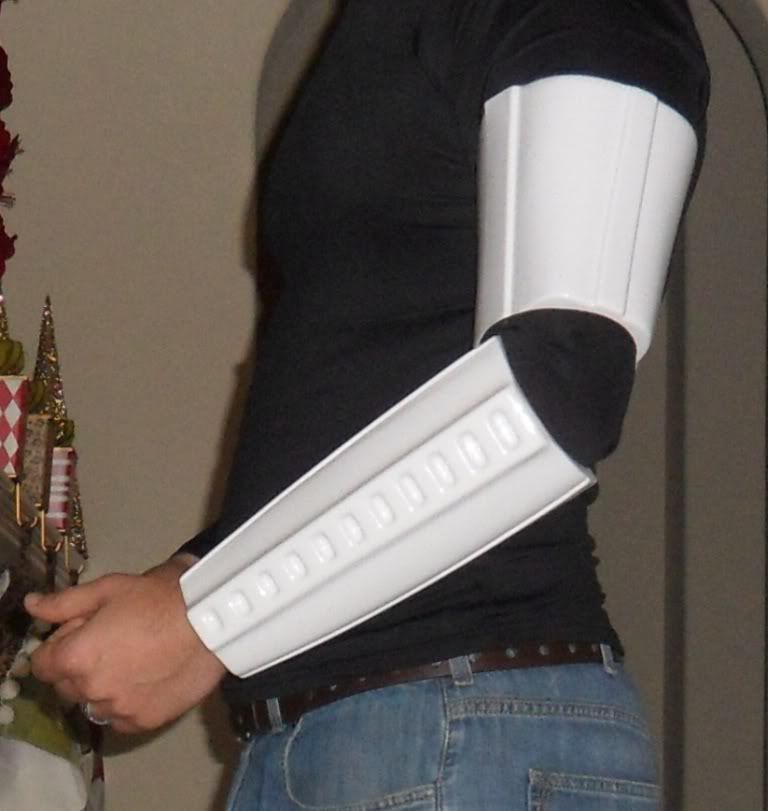
I know I'm jumping around on this, but I wanted to get this tip for suiting up while it was fresh on my mind. After all, we aren't making the armor to look at it, we're making it to wear it! I was unable to suit up my arms without help from my wife. I just figure out how to get the arms on without help and to get them into the correct position.
I pretty much assemble my full upper half before putting it on. I attach the chest and back pieces to my suspenders. (I'll go into more detail about the strapping in this area on a later post.) I also attach the lower back and butt pieces to the back and I attach the code piece to the chest piece. This is my full upper body. Earlier, I was putting this on and then attaching my shoulders and biceps and it was very difficult to get them on and position them.
I have found it much easie to attach my shoulder and bicep pieces to the upper body portion before putting it on. My shoulders attach to the suspenders with a single piece velcro and my biceps attach to the shoulders also with velcro as shown in images above. I removed the strap on the botttom of the shoulder pieces since it is velcroed to my bicep piece and doesn't move around much. I also had difficulty from keeping this strap from showing across the inside of my bicep piece. (I might need to add it back if I find it's needed after a few troops.)
Once I have all these pieces together, I slip it on almost like a jacket. I put my head through first and strap everything up around my body. Then I bend my arms and carefully slide them through the shoulder and bicep pieces. It is a tight fit, but it works. It makes it so much eaiser to assemble the suit myself.
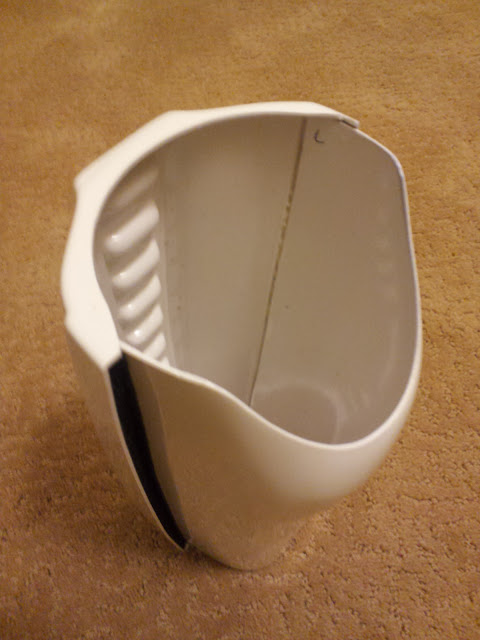
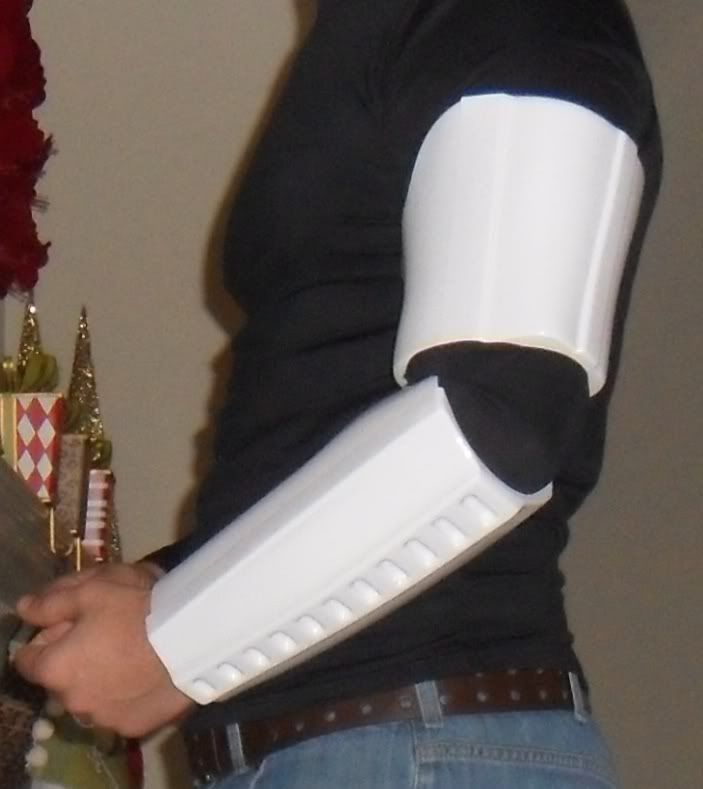
Here's a picture of the upper body before I slip it on.
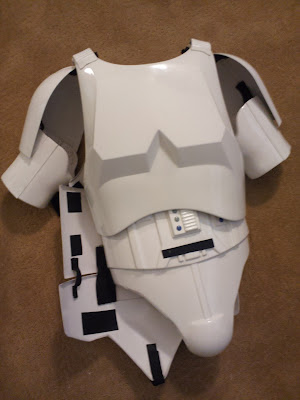
From this picture, you can get a glimpse of my strapping on the upper body. I'll explain it in more detail when I get to posting about this area. It's a very basic (velcro only) strap setup. I might move to snaps later, but this works just fine for right now.
-
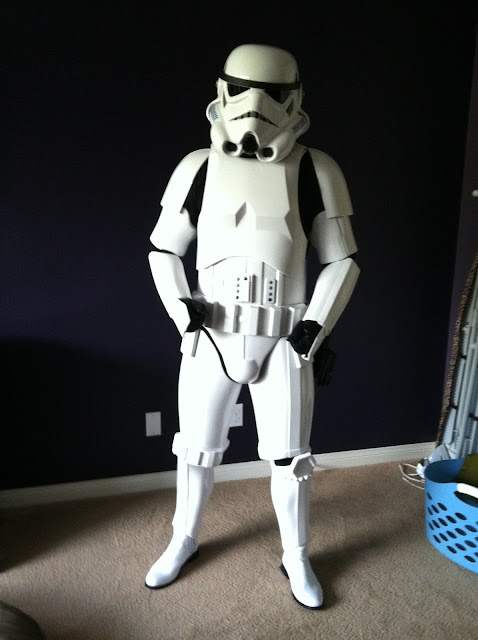
I wore my suit out last night to a Halloween party in my neighborhood. This was the first time that I wore the suit outside of the house and boy did I learn some lessons.
1) I couldn't walk more than a few steps without pain. This is not good for trooping!
2) I can't bend my arms to take off my helmet or bring a glass or food to my lips.
Needless to say that the party was a ton of fun. This did prompt me to make some mods today and I am planning to go out again tonight. Wearing the armor out for a short time is key. Even if it looks good, you can't really tell where the issues are unless you wear it. Don't be too ambitious with your first outing though!
It hurt to walk because my front left thigh piece was digging into the top of my knee with each step. I have read multiple posts about issues of the upper shin or upper thigh, but I didn't find anything on the lower, front thigh. I'll show pictures of the trimming when I write the post on my legs.
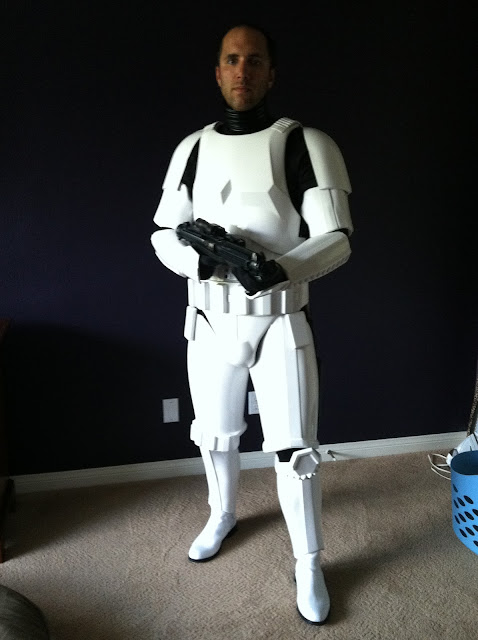
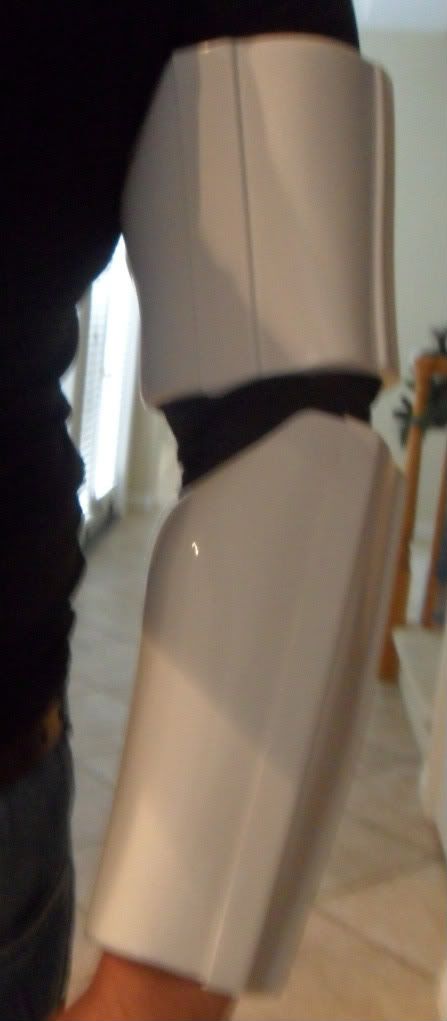
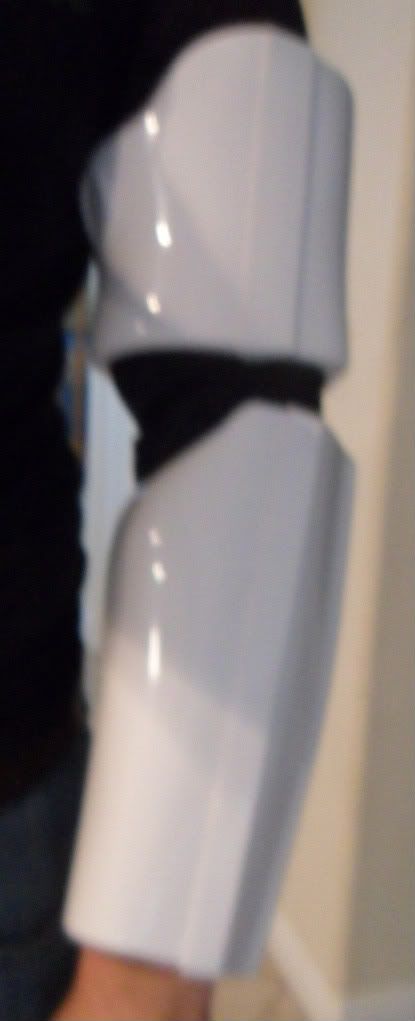
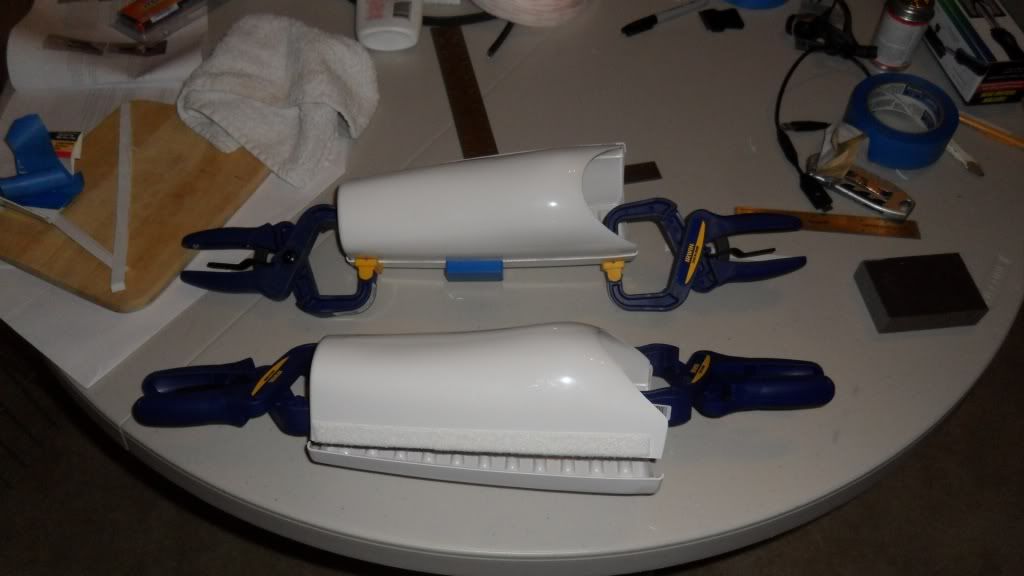
I also trimmed back almost all of the return on both the biceps and forearms. This was really digging into my arms. I was already having trouble with my biceps and I thought I had fixed it with making it more circular, but it still needed more help. As you can see from the two pictures below, I cut away a lot of plastic on the return. I also widened the inside elbow portion of the forearms. I only wore them a little bit so far, but it has helped a bunch. Before writing this post, I put on my armor and had a beer while watching football. I'm happy to report - no pain!
Trimmed up bicep piece
Trimmed forearm piece
Happy Halloween everyone!
-
I'm glad to hear it Turtle. I was overwhelmed when I started. It got better quickly as I gained confidence in the arms and legs. I'll add more soon. Feel free to ask me specific questions on this thread or via PM. Good luck with your kit! You will be happy with the AM.
-
Arms
For me, the easiest part (by far) were the forearms. I only needed basic trimming on the forearms to fit them together properly. The cuts are long, straight cuts so they are very easy. A few tips that would apply to all parts of building the suit. I'll write them down as I think of them.
Use E6000 glue: It is availalbe at Michael's or another craft store. Home Depot does not carry it. The AM kit comes with ABS cement. You really don't need it. I used it in a few places, but I think the E6000 is plenty. The ABS cement will bond permanently and you will damage your suit if you need to remove it as you can see from my post above. You can also tell in my forearm piece if you look closely. I over-clamped the foream piece with ABS cement and it creates dimples in the plastic. I didn't find this with the E6000 regardless of how hard I clamped.
Scissors: Get a great pair of scissors. I bought a nice hardware grade set from Home Depot. Standard household scissors won't cut it! (Yes, pun was intended.) I started using a blade to cut the ABS plastic, but the hardware scissors worked much better. I still used a blade here and there, but I mostly used scissors.
Velcro: Dump the velcro that comes with the kit. Mine came with regular velcro. I kept it to use around the house, but it's worthless for the kit. Pick up some industrial strength at Home Depot. It comes in both black or white. I used up the entire large box.
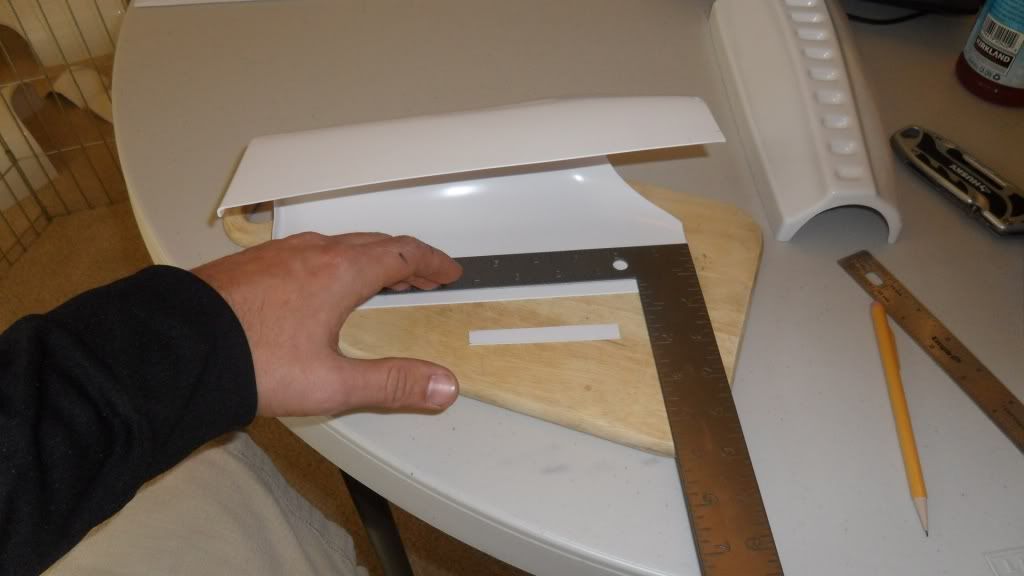
You should have read it throughout the forum, but be careful when cutting. Be sure of measurements. Don't be afraid of cutting, but be careful and deliberate. Use the extra plastic to cut out some guides. I used a 10mm and 20mm strip. I had a small ruler too, but the plastic strips were much more helpful
I don't have a ton of tips to offer on the forearms. They are a really basic piece. The forearms are easy cuts, so this is your place to practice if you want a harder cut than the extra plastic that comes with the kit. You will cut a decent amount of plastic off the forearms, so you can cut it down multiple times.
I did all my joins using the overlap method. The AM kit is perfect for this. I also didn't use any snaps on my kit. I didn't want to get too crazy with the first build. I am leaving snaps open as an option for later, but velcro strapping works fine now. I'll talk more about that later.
Below is a side view of the left forearm. I glued the top side shut and used velcro for the bottom join. The velcro isn't absolutely required, but it does make it easier to put the forearms on, especially with gloves on. If you use velcro, make sure you leave enough plastic so that it hides the velcro when worn. I used black velcro, but you could use the white velcro to make sure it's invisible.

Here is a top view of the same forearm piece. I don't know that there's much to highlight here. You can see the velcro and glued join on this. You can also see my letter "L" on this so I know it's the left forearm. I labeled all of my pieces when I first laid them out to be sure I had it correct before assembling. It's not needed anymore, but it's inside the armor so it doesn't hurt.
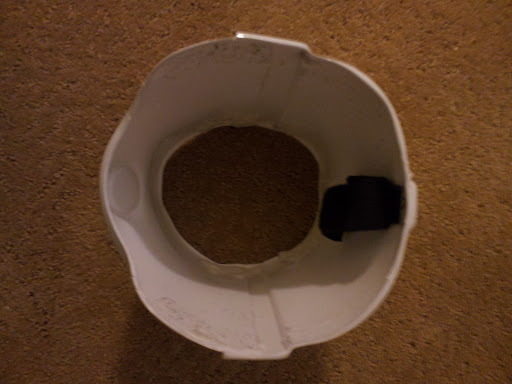
The biceps were harder for me. They were harder than the legs, but hopefully they won't be harder for you. My biceps are large and the proportions didn't work perfectly for me. I posted some info on the biceps in previous posts. You can see how the biceps form an oval instead of a circulary opening. This left the plastic digging into my biceps and was very uncomfortable. I've made some modifications that I'll describe below, but I still have a hard time bending my arms. I can't yet easily remove my helmet. If anyone has tips for me, I'm very happy to listen.
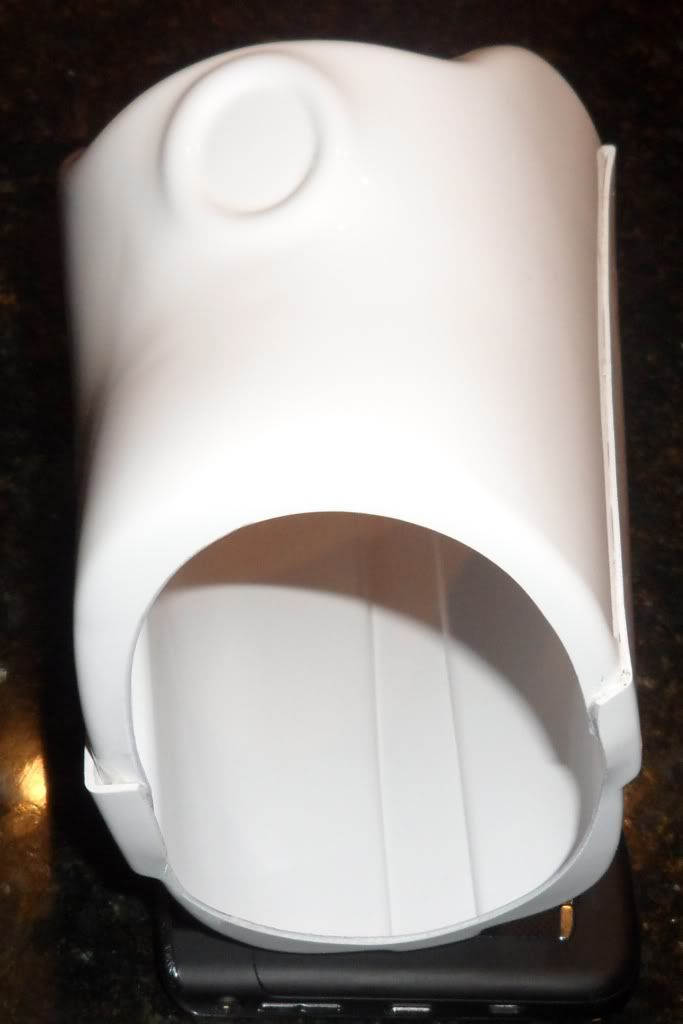
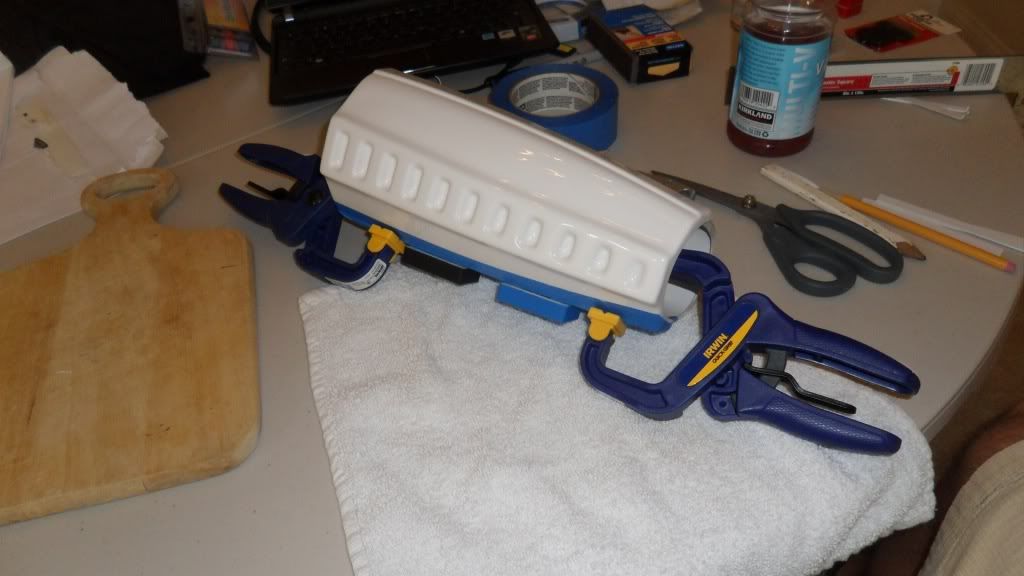
Here's an image of the bicep looking down from the shoulder. You can see a couple things here. The first is that it now looks more circular than like an oval. It didn't turn out perfectly, but it's much more comfortable than before. To make it more circular, I stuffed a few rolls into the bicep piece and heated it up with a heat gun. Do this slowly. I put two rolls in at once because I was worried that the bicep would collaps if heated and not supported. The cold plastic will bend and could crack while inserting the tape rolls. Keep going and get the gun on it soon. You can always fix small cracks later. I had a couple to fix and it worked out just fine. Once you get the rolls into the bicep, just slowly (on low heat first) pass the gun around the bicep piece. I focused mostly on the join area to create the bend there since that it where it really creates the oval shape.
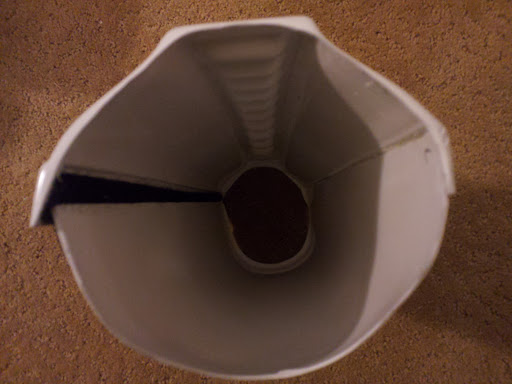
You can also see how much plastic return I removed on this piece. I did this on both open ends. I really took out as much as I could. This was the part that was digging into my biceps, so it was important to remove it. It is still snug so I used some thick weather stripping to soften the pressure. It works just fine. I'll have to replace the weather stripping frequently, but it does the job.
You can also see the velcro on the inside of this piece. I really didn't need any strapping for the bicep, but I used it because most people recommend it. (I have no strapping on the forearms as the combination of gravity and my wrist/hands hold them in place.) The bicep just has one small velcro strap (included in the kit) connecting the bicep to the shoulder. That's the easiest strapping you will do.

Here's a side view of the bicep piece. You can partially see the dimples in the join from the ABS cement and heating. I don't know there if you can see much else in this image though.

One more bicep picture... Here's a side view of the bicep. You can see the joins from both sides, the weather stripping, and the strap from the inside.
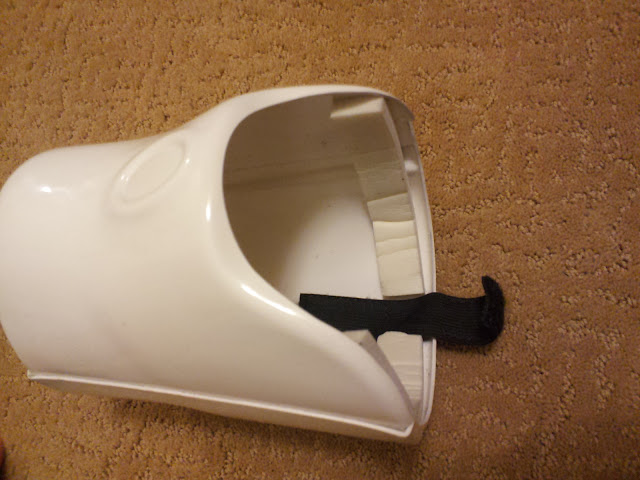
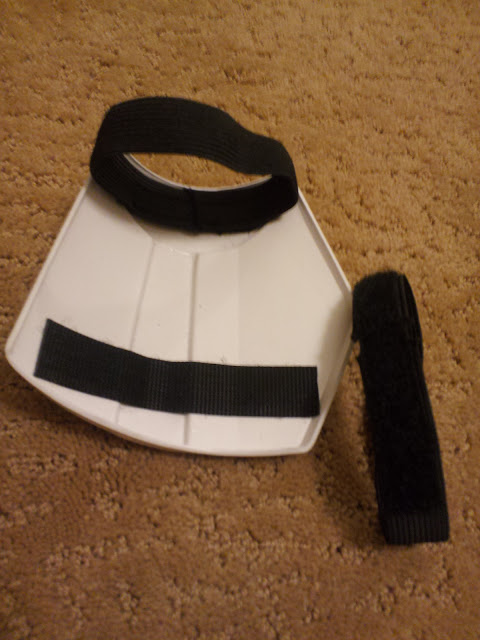
And the last part of the arm is the shoulder. This was the easiest piece. I did no cutting on this piece at all. I only needed to apply strapping for this to work. In this underside image, you can see the strapping, which is pretty basic. Overall an easy piece to cut your teeth on.
Some items to note in the photo below. Starting at the top of the picture (bottom of the shoulder piece), you can see the velcro that attaches to the bicep. This is just a basic strip of velcro to match the piece on the to of the bicep. You can then insert a small elastic with veclro piece to connect them. Be sure the elastic is the right length to have the bicep sit just under the shoulder piece. Your overlap will depend on your arm length. Mine is less than an inch.
You can also see the arm strap in this picture. I used the included elastic strap for this and applied some velcro to the shoulder bell. This will just keep the bell from flopping around when you are wearing the suit. The last item to note is at the bottom of the picture - the top velcro for strapping. This connects to the main strapping system of my suit. I'll go into more detail when I get to the body. From a high level, I have work suspenders that have soft velcro all the way on both sides. My shoulder bell velcros to the underside of these suspenders with a small piece of elastic (provided in the kit).
At the other end of the arms, you have the hand pieces. Similar to the arms, the hand pieces are very easy to complete. I also didn't do any cutting on the hands. The strapping is pretty easy here too. As you can see from the picture below, it's just applying two pieces of velcro on the inside. The kit comes with four circular pieces of elastic which will work for the hands. You want one piece of elastic around your wrist and the other will sit just under your fingers. I tried attaching the velcro directly to the gloves, but it didn't work out too well. Just make sure the elastic is below your fingers so you can hold your blaster.
-
Well, I didn't make certification before Comic Con, but I am ready for Halloween in two weeks. I was considering hitting Vegas to wear the suit, but that's probably too ambitious for the maiden voyage. I'll hit a neighborhood party instead for my first troop outside of the house. I can't wait to get out to some 501st events. I did pick up a Princess Leia (white) dress for my wife and a dog Darth Vader costume from BuyCostumes.com so Halloween will be a family affair.
But, the goal is not to write about Hallowee, it's to help those just starting out on building the suit. I learned a lot while building the suit and I hope to impart some of the knowledge in this blog. I would love any comments on what I've done to help me or others. Of course the suit is never really "done", so I know there are more tweaks I can do to make it better.
Here are some general tips for you to start:
Don't stress: For me this was a lot of work as you can see by the 9 months it took me to build the suit. I never really did many models as a child, so a lot of the work was brand new for me too. I felt overwhelmed at times, but I was able to get through it. I worked primarily on the weekends. Some days, I'd spend 15 minutes on it and not want to do any more. Other days, I'd get into a groove and spend a whole Saturday afternoon working on the suit. It's supposed to be a fun project, so keep it fun and don't look at it as a job.
Read and ask: Read everything you can. There are many ways to build a suit. Some are better than others, but most are not wrong. I tended to take the easy path on many options due to my skill level. Read as much as you can and ask questions if it's not clear. Some of my best resources were Pandatroopers AM build and Dave's Garage (search You Tube). The instructions that are included with the kit are worth reading, but that is merely one source of information. I treated it as a very loose guide at best. It was most helpful for the helmet. It was also helpful for me to see a finished suit. It made it more concrete for me. Thanks Dean!
As you can see with my previous posts, I took the advice of starting with the arms. Great advice! Arms or legs are the right place to start. I did the helmet last. My next post will walk through what is left of my arms.
-
Good luck Pallados! I was very nervous about building my TK as well. I purchased the AM kit. It took me a while, but I'm happy to say it wasn't as bad as I expected. I got a ton of great info from the forum, YouTube, and SD Squad members. If you have any specific questions, feel free to ask.
-
I picked up the AA battery fans at my local Home Depot. The fans are quite large, even for my AM helmet. I recommend sticking with AAA version. Great find on the fans! I've been struggling with CPU fans and 3.7V AA batteries for a while now. Thanks!
Here's a photo of the larger fan next to my AM helmet.
-
-
I just received my TK approval and acceptance into the 501st! I am now known as TK-8075. I'll work on my posts soon to add some more details on what I learned while building my suit.
-
Well I haven't been good about documenting my progress, but I have definitely made some. I have the armor put together and have sent in my 501st membership application. Hopefully I can get approved in time for Comic Con. If that's too ambitious, I'll surely make Halloween. Once I get approval, I'll post all the lessons I learned for anyone newbie interested in reading. Please do send any suggestions/comments on the pictures below.


-
Ok. I've done some work since the last post, but I have been remiss in posting updates. I have the forearms and biceps done except for the strapping. I'm actually not sure that I'll need any straps on either piece. The forearms possibly, but the biceps are super tight and I only trimmed a small bit off to line them up properly.
It feels like the biceps are mis-shapen, but I'm probably just putting them on incorrectly. The bottom opening of the AM bicpe is an oval shape with the skinny part of the oval where the two pieces glue together and the wide side of the oval at the thumb dimple/underarm. I've inserted a picture to better describe what I'm trying to say.
I'm not sure exactly how this should be worn. I think I know based on the pictures I've seen and how it looks, but it feels quite uncomfortable in the way I think it should be worn. If I wear it as I think I should, the bicep muscle is in the skinny part of the oval with the thumb dimple (long part) being under the armpit. This seems correct because it lines up the underarm lip (above the thumb dimple) directly at the armpit.
I'll put some pictures in here, since I might not be making sense.
Here's the way that looks and seems right based on the way the armor looks and the pictures I've seen. However, this way is very tight on my arm. Let's call this method A to make it easier to write about.
The pictures below have the bicep piece rotated slightly so that the thumb dimple is over the bicep muscle. Standing with the back of my palm facing forward, the thumb dimple over my bicep also lines up with my armpit. However, if I rotate my shoulder so that that back of my palm is facing away from my body the bicep muscle and thumb dimple move away from my armpit. It seems less correct, but much more comfortable. Let's call this method B.
This may not matter and I could be over-thinking this. However, if there is anyone on this Earth with whom I could ask the question, it's this group. My wife doesn't want to discuss the finer points of stormtrooper armor.
Thanks for any input. I appreciate it. I'm moving onto the shins and thighs next. I've already taped off one shin (it's a lot easier than the bicep since you can use both hands.)
-
Thanks Defiance! That worked out really well. I could have lived with the space, but I think it looks much better now. It was difficult taking the razor and putty knife to my finished forearm piece. I had actually glued some blue tape under the forearm originally, so I was also able to get that out as well as cut away the scratch I put in on my first pass with this change. I won't need to go over it with high gloss white paint anymore.
BTW, I saw your "back in black" post. The black looks sharp! I might have to follow your lead and pick up a black suit from Trooper Supplies as well.
Starting the cuts with the razor. This was the worst part.
Once I got the razor under it, I was able to finish the separation with a putty knife.
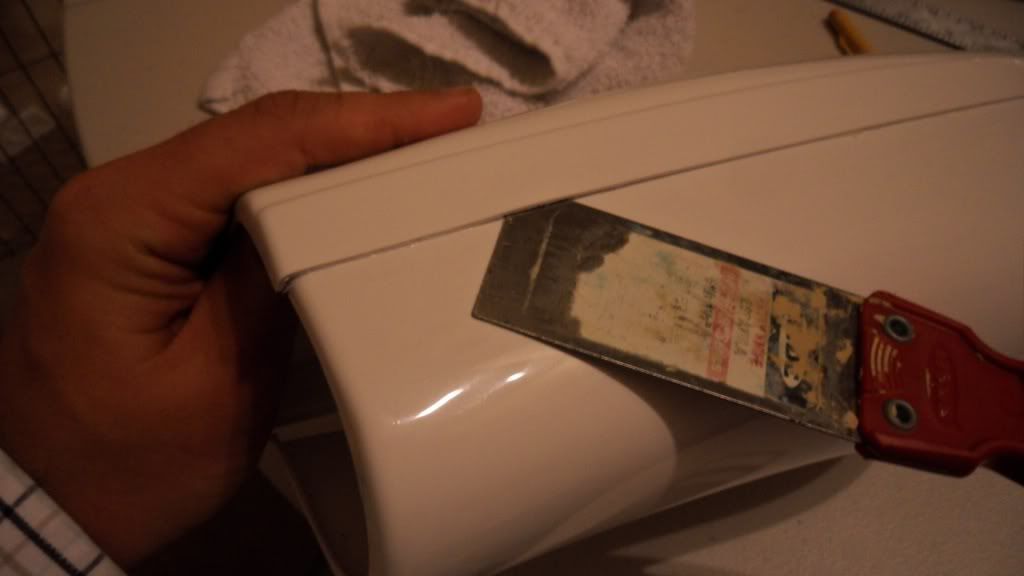
It looked ugly under the glue. It doesn't represent perfectly well in the picture.
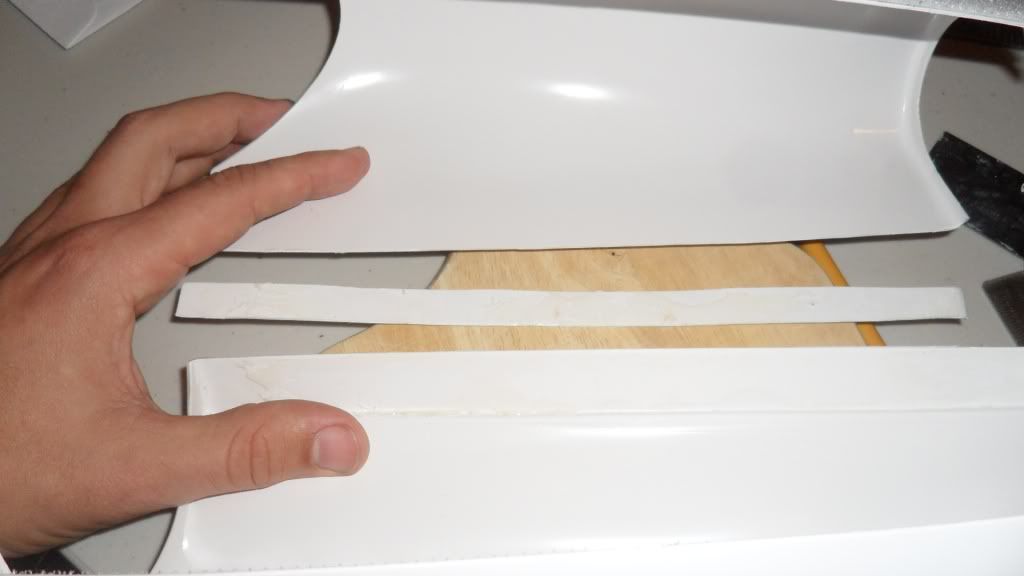
Now both forearm pieces are resting well with their new, tighter fit.
-
Is there any way to remove the abs cement? I'm not stoked on my forearm pieces. They will work, but they could be better. I have velcro on one side, so that is easy to cut and add new velcro. On the other side I have used abs cement. I'm using the overlap method, so I'm wondering if I could loosen the cement and cut away some more length and then re-cement it.
-
Dan - I'm working on an AM build as well and am similarly unhappy with the gap on my forearm pieces. I have a gap on what was to be my right forearm piece, but I've decided to turn it over to use it as the left forearm. This will keep the gap on the bottom and keep it less noticeable. I did pick up an iron though, so I might try to seal it down to eliminate the gap. I'm curios to see your progress.
-
Thanks. I moved the pictures to PhotoBucket and it worked. When I was using Flickr, I kept getting an error when trying to insert an image, so I just put in the links. It must has something to do with the format of the image URL that Flickr uses. PhotoBucket is a nicer program anyway, so this works now.
-
Thanks again for the responses. I moved my images to Flickr and linked on the posts.
I got through the second forearm and it went much faster than the first. I did mess it up slightly, so I'll have to pick up some high gloss white paint. I think that will take care of the few blemishes.
The bicep pieces were the ones that I had trouble getting up my arm. I'll try again, but I think I'll have to do the velcro/glue technique.
I'll post some more pictures as I move through it. Chargers are on now, so I have to take a break from the construction.
-
Thanks for the feedback, Panda and TMC. I'm trying to follow the posts exactly as they show. There is a ton of information on this forum. I'll also definitely take my time. I expect this to be a long term project/post.
I did some more work this morning and got to my first cuts and cementing. The forearm piece was pretty straight forward, so I'm glad I started with it. I did make a couple mistakes, but I can hide them inside the forearm. I picked up a 8" x 12" carpenter square and that has been helpful so far. I'm planning to follow YouTube Dave's method of gluing one side and using velcro for the other side. There's no way that I can fit the bicep piece up my arm without it.
I'm not very happy with the width of the wrist end of the forearm. It seems quite wide. With the glove on, it works, but I just feel like it's wide, even after trimming it. Is anyone using velcro on the inside of the forearm piece to the undersuit to keep it in place or are you just trimming it down enough to get a tight fit?
I've been trying to hook up with the mentor program in the San Diego squad. If anyone in the area is reading and is interested in being a mentor, let me know because I'm happy to learn from you.
Another question - for these long posts, does everyone host their own images and just link via URL? I'm compressing the images, but I'm already at half my "global upload quota".
My 1st Build. Ever. [*AM]
in ANH Build Threads
Posted
Brian is definitely right. It might look bad now, but be thankful you used E6000. You can get that back to square one in no time. If you used ABS cement, you'd be scouring the forum to find somebody selling forearm pieces. I agree that GooGone works wonders. I used that many times on my suit and it removed all E6000 residue. Rare earth magnets are also good for setting the glue. I picked some up at Ace Hardware and used them in addition to standard plastic clamps from Home Depot. You can see images of them in my build thread.
I got to the point you are at with my forearms as well and it all turned out fine. Just keep moving forward slowly and methodically and you'll get there. As far as trimming the return, I would suggest doing that after you glue and try on the pieces. It will make it a little harder to trim it off when the pieces are together, but you may not want to take off the return. I had to do it on my bicep pieces, but I left the return on my forearm pieces. I then added some weather stripping on the inside to keep them from sliding around on my arm.
Another great source of help is Dave's Garage. You can just search for it on YouTube. This video series chronicles an AM build. It's nice to see someone actually performing the tasks that you are reading about in the forums. One piece of advice though - Some of the techniques that Dave has implemented are not the ones that are most recommended. While they may work, others have found better ways to buid the kit since the videos were made. Use the video as a guide coupled with build threads. As others have mentioned, Panda's thread is an excellent source and I read it many times during my build.