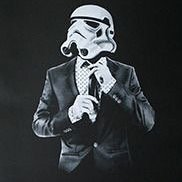
TattooedStormtrooper[TK] Posted August 23, 2022 Report Share Posted August 23, 2022 Mandatory Information Costume = Stormtrooper, A New Hope (Stunt) Costume CRL Link = https://databank.501st.com/databank/Costuming:TK_anh_stunt Name = Scott S. TK ID = 82077 Forum Name = BeardedFett Legion Profile = https://www.501st.com/members/displaymemberdetails.php?userID=31646 Garrison/Squad = Southern California Garrison, Orange County Squad Armor = RS Propmasters (commission) Helmet = RS Propmasters (interior painted, lens and padding upgraded, frown mesh added, cooling from ukswrath) Armorer/Mentor = @TheRascalKing Optional Information Height = 5ft 10in or 177.8cm Weight = 179lbs or 81.19kg Boots = Imperial Boots Canvas Belt = Imperial Issue Holster = RS Propmasters Hand Plates = flexible latex from justjoseph63 Gloves = Double1 rubber chemical gloves Neck Seal = RS Propmasters Undersuit = RS Propmasters Strapping = RascalSnaps Blaster = RS Propmasters E-11 Armor Photos Helmet Off (not adjusted) Full Body Front Full Body Back Full Body Right Full Body Left Action Shot Helmet Detail Photos Front Back Left Right Interior S-trim Detail Vocoder and Hovi Mic Tip Detail Lens Color (Green, backlit - upgraded from RS acetate) Detail Photos (CRL Order) Neckseal (RS Propmasters) Shoulder bridge connection (glued in front, free floating, secured with elastic in back, white elastic strapping) Interior Strapping Detail (RascalSnaps) Forearm Wrist Return Edge (none present) Rubber Gloves & Handguards (flexible latex from justjoseph63, glued) Abdomen Button Panels Right Side "Han" Snap Left Side Rivets: https://i.imgur.com/LGNtvQf.jpg Cod to Posterior Strapping (2 male snaps, split rivet) Ammo Belt (Imperial Issue canvas belt) Thermal Detonator (slotted, pan head style screws) Thigh Ammo Pack (single cap rivets) Sniper Knee Attachment (glue) Holster Attachment (2 Chicago screws) Boots (Imperial Boots) Blaster (RS Propmasters E-11) Thank you for looking, and I appreciate your feedback! Long live the Empire! Quote Link to comment Share on other sites More sharing options...
Chemi[Staff] Posted August 23, 2022 Report Share Posted August 23, 2022 Hi Scott. One of us will be with you as soon as we can Added to the process line. 1 Quote Link to comment Share on other sites More sharing options...
TattooedStormtrooper[TK] Posted August 23, 2022 Author Report Share Posted August 23, 2022 3 hours ago, Chemi said: Hi Scott. One of us will be with you as soon as we can Added to the process line. Cool, thank you!! Quote Link to comment Share on other sites More sharing options...
Crampeat[TK] Posted August 24, 2022 Report Share Posted August 24, 2022 Good luck Scott! Fingers crossed Quote Link to comment Share on other sites More sharing options...
justjoseph63[Staff] Posted August 29, 2022 Report Share Posted August 29, 2022 Hi, Scott, and thank you for your application for ANH Stunt EI! CRL and EIB Application Requirements: All required photos have been submitted, and on behalf of the entire D.O. staff we are pleased to welcome you to the rank of Expert Infantry. Congratulations! Other-Armor Fit/Assembly; In this area we review observations made by your fellow troopers and the DO team. Some observations may lead to suggestions to improve the overall look of your armor, and please keep in mind that we consider both text (CRL) and pictures (screen caps/reference images) when reviewing submissions. Before we begin, we realize that this is a commission build with modifications, and in some areas it's difficult to tell which from which! However we will go over everything and add some advice. Many of the items shown are fairly straightforward/easy fixes, but some will require some elbow grease. You have folks in your corner in the SCG that are on the ready to help. The items in this first area are only suggestions that we hope you will address, so keep that in mind. On that note, let's get started, brother! As seen in the reference image, we are strongly suggesting that you trim down the ends of the brow trim. Easy fix! Reference images Although not a requirement, the screws on the ears should ideally align with the rear angle of the trap above them as shown, and the bottom should angle back more. This can be a challenge, but definitely doable. Reference images The strapping should be adjusted in a few areas for a more uniform look. Note how the right bicep and forearm sit higher than the left, which also leaves a larger gap between the wrist opening and hand guard. The left side is spot-on! Just dropping the right bicep down an inch or so should take care of everything. Notice in the screen used examples below how the rivet is not so close to the corner. I suggest moving them inward. This will require some skill, but the folks in your Squad that may be able to help. Reference images While some troopers have them, note that the coils on E-11s were only seen in promotional photos and not in the film. While it will not affect approval, we recommend that you reduce he number of them that you have. Reference image Centurion Requirements: In this section we prepare you for our highest tier of approval. Because Centurion photos must show more detail than EIB, items pertaining to Level 3 might be seen there and not here and additional photos may be required. We try to point out all that we can from what we are able to see, but the final accuracy is the responsibility of the trooper. Although we allow a bit of leeway in certain instances, unfortunately your tube stripes on on both sides will need to be repositioned. As seen in the reference images they should be about a standard pencil width from the cheek. Replacements are pretty easy to get, and this is easier than you may think. Reference images Easy fix here! For Level 3, ear screws "..shall be... countersunk...". 2 seconds with a small screwdriver and you are golden! (Don't go too tight, though). Reference image As stated in the CRL, there should be minimal gaps between the sides of the bells and the chest/back plate. The tops of the bells should also be VERY close (think touching or almost touching) to the shoulder bridges. If you tighten up the shoulder bell/shoulder bridge connection that should take care of both issues! Reference image As seen below, your ABS belt is sitting a little too far to the right which is throwing off the symmetrical look, causing the left drop box to face forward and the right one to be almost on your side. Another one of those items which is not specifically listed in the CRL but which is seen in the screen caps. Moving it just half an inch to the left will make a huge difference! Reference images In certain cases where a trooper is 6' or taller we allow a gap between the bottom of the back plate and top of the kidney, but since you are 5'10" (like most of the original TKs in the film) that gap should not be nearly that wide. I would tighten up the elastic strapping that connects them, which will close the gap but still give you some maneuverability. Reference images You have the best of both worlds here- screws that mimic the bracket system and straps. (NICE, and I am so totally going to steal that idea)! However, the screw heads need to be painted white.. yet another simple fix! Reference image Another mystery here.. for some reason the builder(s) have placed the upper ab and kidney rivets too far from the top and they (and the ones beneath them) do not line up horizontally. I know this seems like an insanely trivial item, but since Centurion is the highest level of accuracy we must insist that they be moved. As I mentioned, we have the know-how if you have the time and patience! Reference images This is a fairly easy fix... as stated in the CRL, "The corners of the ABS belt shall be trimmed at a 45° angle that meets the outer edge of the cloth belt". It won't be perfect, but short of buying a new cloth belt the easiest way to fix this is by trimming down the ends as shown. Reference images As per the CRL for Level 3, the (outside edges) of the drop boxes are "...vertically aligned with the end of the ammo belt...". Moving the drop boxes into the correct position(s) and then adding a few dabs of glue behind the white elastic straps will do the trick. Reference images Last up is an issue we see often, where the ridge on the sniper knee does not align with the one on the top of the calf. Although this is actually a requirement for Level 2, we tend to relax this item but it is required for Level 3. I know you used CA glue for this piece so it is definitely going to be a challenge to remove, but if you can successfully get it off without damaging it or your calf piece: First you will need start by removing any excess glue. Afterward, it will need to be glued back, with bottom not so close to the front seam of the calf. I have included an image (last pic) of an RS build that shows how it should look. Yes, there is a gap between the bottom of the plate and the seam, but the ridges align perfectly. Reference images RS sniper plate Again, CONGRATS and welcome to the ranks, brother! I know you have some issues to work on, but I have been in touch with Justin and if you are willing he is ready to help you get that Centurion badge under your name. 1 Quote Link to comment Share on other sites More sharing options...
gmrhodes13[Staff] Posted August 29, 2022 Report Share Posted August 29, 2022 Congratulations and welcome to the EI ranks and EI honor gallery Quote Link to comment Share on other sites More sharing options...
TheRascalKing[TK] Posted August 29, 2022 Report Share Posted August 29, 2022 Congratulations, Scott!!! Quote Link to comment Share on other sites More sharing options...
Gh0stxxiv[TK] Posted August 29, 2022 Report Share Posted August 29, 2022 Yeahhhh. Well done lads. Congrats. 1 Quote Link to comment Share on other sites More sharing options...
Sly11[Admin] Posted August 29, 2022 Report Share Posted August 29, 2022 Congratulations! Quote Link to comment Share on other sites More sharing options...
Chemi[Staff] Posted August 29, 2022 Report Share Posted August 29, 2022 Congratulations!!! Quote Link to comment Share on other sites More sharing options...
TKSpartan[Staff] Posted August 29, 2022 Report Share Posted August 29, 2022 Congratulations Scott. Quote Link to comment Share on other sites More sharing options...
TattooedStormtrooper[TK] Posted August 29, 2022 Author Report Share Posted August 29, 2022 Thank you all! I appreciate all the feedback as well. Definitely a big thank you to Justin for his expertise and time. I learned a ton and am much more comfortable in approaching modifications and handling of my armor. 2 Quote Link to comment Share on other sites More sharing options...
justjoseph63[Staff] Posted August 30, 2022 Report Share Posted August 30, 2022 11 hours ago, BeardedFett said: I learned a ton and am much more comfortable in approaching modifications and handling of my armor. That's the spirit, Scott! Looking forward to seeing the mods on your Centurion submission!! Quote Link to comment Share on other sites More sharing options...
Crampeat[TK] Posted August 30, 2022 Report Share Posted August 30, 2022 Congratulations Scott! Feel free to PM me if you need help with that sniper plate. I went through the same issue and it can be a little tricky. 1 Quote Link to comment Share on other sites More sharing options...
giskard8[Staff] Posted August 30, 2022 Report Share Posted August 30, 2022 Congratulations Trooper! Quote Link to comment Share on other sites More sharing options...
Greg Sickmeier[TK] Posted September 5, 2022 Report Share Posted September 5, 2022 (edited) Newbe here working on my Level 1 approval in the Bloodfin Garrison. On your review of the helmet details, you don’t mention the number of bumps on the ear bars. L2 & L3 CRLs both say there should be 3 bumps, not 4. Most helmets & replacement parts I’ve seen are 4 bumps. Do you know a source for the 3 bump ears pieces? Great review that I’m learning a lot about TK armor build! Edited September 5, 2022 by Oldracer Quote Link to comment Share on other sites More sharing options...
TheRascalKing[TK] Posted September 5, 2022 Report Share Posted September 5, 2022 6 minutes ago, Oldracer said: Newbe here working on my Level 1 approval in the Bloodfin Garrison. On your review of the helmet details, you don’t mention the number of bumps on the ear bars. L2 & L3 both say there should be 3 bumps, not 4. Most helmets & replacement parts I’ve seen are 4 bumps. Do you know a source for the 3 bump ears pieces? Great review that I’m learning a lot about TK armor build! Double check your CRLs there - you may be thinking of the ANH Hero CRL, which mandates 3-bump ears. All ANH Stunt TKs should have 4 bumps, and Stunt are by far the more popular option. You should always check with whoever made your helmet and purchase parts from them so the color matches. Off the top of my head, I know TM and AM both make Hero style helmets with 3 bumps but likely others as well. Quote Link to comment Share on other sites More sharing options...
gmrhodes13[Staff] Posted September 5, 2022 Report Share Posted September 5, 2022 Stunt Basic The “ear” bars have three or four bumps and are gray or painted gray, with a black outline. Painting the bumps with rank stripes (highlighted) in black is optional. L2 Ear bars have four bumps only. Not three. Hero Basic The “ear” bars may have three or four bumps and are grey or painted grey, with a black outline L2 Ear bars have three bumps only, not four. Quote Link to comment Share on other sites More sharing options...
Greg Sickmeier[TK] Posted September 5, 2022 Report Share Posted September 5, 2022 4 hours ago, TheRascalKing said: Double check your CRLs there - you may be thinking of the ANH Hero CRL, which mandates 3-bump ears. All ANH Stunt TKs should have 4 bumps, and Stunt are by far the more popular option. You should always check with whoever made your helmet and purchase parts from them so the color matches. Off the top of my head, I know TM and AM both make Hero style helmets with 3 bumps but likely others as well. I’m working off of the Hero CRL. The kit I purchased was for a Hero configuration from Shepperton Design Studios in the UK, Andrew Ainsworth’s company. He proclaims he completed the final Stormtrooper design and produced the first 50 suits for Lucas back in 1976. He claims what he sells today are made from the original molds that he still owns today. He has the whole story on his web site Original Stormtrooper dot com. The Hero helmet he sells has 4 bumps on the ear bars. Quote Link to comment Share on other sites More sharing options...
gmrhodes13[Staff] Posted September 6, 2022 Report Share Posted September 6, 2022 23 minutes ago, Oldracer said: I’m working off of the Hero CRL. The kit I purchased was for a Hero configuration from Shepperton Design Studios in the UK, Andrew Ainsworth’s company. He proclaims he completed the final Stormtrooper design and produced the first 50 suits for Lucas back in 1976. He claims what he sells today are made from the original molds that he still owns today. He has the whole story on his web site Original Stormtrooper dot com. The Hero helmet he sells has 4 bumps on the ear bars. Not many purchase from SDS these days, unfortunately his kits do need a little work, I may have passed on this info before but in case I haven't here are a couple of thread may be worth a read Great website about the history of Stormtroopers (and other costumes) Hero page here Hero's had different ear section casting with 3 centre ridges - rebuilt due to damage caused pulling all the Stunt ears from their vac-form moulds. Quote Link to comment Share on other sites More sharing options...

Recommended Posts
Join the conversation
You can post now and register later. If you have an account, sign in now to post with your account.