KaiserintheHood[TK] Posted November 2, 2021 Report Share Posted November 2, 2021 Name: Dan Quinn ID: TK-80419 Username: KaiserintheHood Garrison: Midwest Garrison Armor Maker: Walt’s Trooper Factory Helmet Maker: Walt’s Trooper Factory Blaster Maker: Hellhounds Height/Weight: 5 foot 11” 145 pounds Boot Maker: Crow Props Canvas Belt Supplier: Self made Neck Seal: Self made Hand Guard: Trooperbay Holster Maker: Darman props Quote Link to comment Share on other sites More sharing options...
KaiserintheHood[TK] Posted November 2, 2021 Author Report Share Posted November 2, 2021 1 Quote Link to comment Share on other sites More sharing options...
KaiserintheHood[TK] Posted November 2, 2021 Author Report Share Posted November 2, 2021 Sent from my iPhone using Tapatalk Quote Link to comment Share on other sites More sharing options...
KaiserintheHood[TK] Posted November 2, 2021 Author Report Share Posted November 2, 2021 Sent from my iPhone using Tapatalk Quote Link to comment Share on other sites More sharing options...
KaiserintheHood[TK] Posted November 2, 2021 Author Report Share Posted November 2, 2021 Sent from my iPhone using Tapatalk Quote Link to comment Share on other sites More sharing options...
KaiserintheHood[TK] Posted November 2, 2021 Author Report Share Posted November 2, 2021 Sent from my iPhone using Tapatalk Quote Link to comment Share on other sites More sharing options...
KaiserintheHood[TK] Posted November 2, 2021 Author Report Share Posted November 2, 2021 Sent from my iPhone using Tapatalk Quote Link to comment Share on other sites More sharing options...
KaiserintheHood[TK] Posted November 2, 2021 Author Report Share Posted November 2, 2021 Sent from my iPhone using Tapatalk Quote Link to comment Share on other sites More sharing options...
Lionel Noronha Gallardo[TK] Posted November 2, 2021 Report Share Posted November 2, 2021 Brilliant armor. Good luck brotherPipertrooper TK-27056 1 Quote Link to comment Share on other sites More sharing options...
justjoseph63[Staff] Posted November 2, 2021 Report Share Posted November 2, 2021 SUPER nice job on this WTF armor, Dan! One of us will be with ya' shortly, so hang in there! 1 Quote Link to comment Share on other sites More sharing options...
TKSpartan[Staff] Posted November 2, 2021 Report Share Posted November 2, 2021 Looking nice Trooper ! 1 Quote Link to comment Share on other sites More sharing options...
KaiserintheHood[TK] Posted November 2, 2021 Author Report Share Posted November 2, 2021 Thanks everybody! Looking forward to your comments. Quote Link to comment Share on other sites More sharing options...
justjoseph63[Staff] Posted November 3, 2021 Report Share Posted November 3, 2021 Hi again, Dan! Can you do us a favor and post up a clear, close up pic of your large ab-button panel? The sun is shining directly on it and the details on the sides can't be clearly seen THANKS!! Quote Link to comment Share on other sites More sharing options...
KaiserintheHood[TK] Posted November 3, 2021 Author Report Share Posted November 3, 2021 3 hours ago, justjoseph63 said: Hi again, Dan! Can you do us a favor and post up a clear, close up pic of your large ab-button panel? The sun is shining directly on it and the details on the sides can't be clearly seen THANKS!! I will do that as soon as I can for you guys. But I can already tell you I do not have the border around the panel which I know will be required for Centurion 2 Quote Link to comment Share on other sites More sharing options...
gmrhodes13[Staff] Posted November 3, 2021 Report Share Posted November 3, 2021 10 hours ago, KaiserintheHood said: I will do that as soon as I can for you guys. But I can already tell you I do not have the border around the panel which I know will be required for Centurion You have a couple of options there, contact the armor maker for a new ab plate, or glue a piece of abs plate behind, then add abs paste to the join, sand and polish. Going through the armor maker could be the easiest option Quote Link to comment Share on other sites More sharing options...
KaiserintheHood[TK] Posted November 4, 2021 Author Report Share Posted November 4, 2021 Photo requested Sent from my iPhone using Tapatalk Quote Link to comment Share on other sites More sharing options...
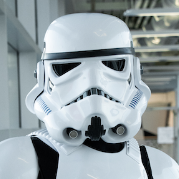
justjoseph63[Staff] Posted November 5, 2021 Report Share Posted November 5, 2021 Hi, Dan, and thank you for your application for ANH Stunt EI! CRL and EIB Application Requirements: All required photos have been submitted, and on behalf of the entire D.O. staff we are pleased to welcome you to the rank of Expert Infantry. Congratulations! Other-Armor Fit/Assembly; In this area we review observations made by your fellow troopers and the DO team. Some observations may lead to suggestions to improve the overall look of your armour. Note that we consider both text (CRL) and pictures (screen caps/reference images) when reviewing submissions. Super nice job on this WTF armor, brother! Just a few items to go over in this area to give you a better overall look. Your bucket is riding pretty high, and I suspect it's a padding issue. You may have more than you need in the top and it's not allowing it to sit lower. Reference images In the first pic below I noticed that you seem to be looking down. When the helmet is sitting too high it forces you to tilt it forward just to be able to see in front of you clearly. I had the same exact issue, and after I removed the padding in the top I had MUCH better vision. Reference images The ear angle on your left is almost perfect, but the one on the right is at a skewed angle. Ideally, the screws should line up with the angle at the rear of the trap above them. We know there were wonky aspects to many of the original buckets, but to make them more symmetrical/screen accurate we are suggesting that you shift the bottom of the right ear back at least a bit. Reference images 2 quick items on your tube stripes.. The first being is that you have accidentally put them on backward. Not the biggest deal in the world, and we see this often, but as per the CRL and seen in the reference images the tops in the front section should lean forward. Also, the last stripe nearest the vocoder on each side (red arrow) overlap the crease in front of them and should be removed. Reference images (Note the gaps) We always want you to look your best, so when suiting up just ask the person who puts your TD on to make sure the clips are securely all the way down on the belt. Reference images Centurion Requirements; In this section we prepare you for Centurion. Because Centurion photos show more detail than EIB, items pertaining to Centurion might be seen there and not here and additional photos may be required. We try to point out all that we can from what we see, but the final accuracy is the responsibility of the trooper As it says in the CRL for Level 2 "Ideally the tube stripes are positioned a pencil width from the side of the cheek" so no problem for EI. But, for Level 3 we have to ask you to move the ones on the right closer to match the left side. Due to the fact that you have the issues from the first section, we are suggesting that you replace them. Being decals, they are easy to remove, and I'm sure Walt can supply you with a new set. Once you get them, the whole process should take less than 5 minutes! Reference images Awesome paint job on that vocoder, brother.. nice crisp lines, but we need you to grab your brush and extend the paint on the two ribs (shown below) just a bit. Another quick and easy fix! As stated in the CRL, ear screws need to be countersunk/flush. The left one is textbook, but the right one needs to come in a bit. This should be a fairly easy and fast fix! Reference images As you are aware, the large ab-button panel must have at least a small flat edge around it. We see this a lot, and it's honestly not to difficult to remedy in your case. Walt is a great guy, and I'm sure he would be happy to hook you up with a new plate. As Glen mentioned, you can also add an ABS plate behind it, touch up the edges with some ABS paste and sand/polish it. If you want to go that route I will send you a flat ABS plate for free, just PM me. Reference images The 45° angle on the ends of the ABS belt must meet up with the outside edges of the cloth belt. You have a big advantage over some with this issue, as you just need to take a little off the ends. Should take you less than 5 minutes! Reference images And that's it! You have a few items to deal with to get that Centurion badge under your name, but we honestly hope you give it a go. In looking at the suggestions/requirements above, once you have the large button plate and tube stripes in hand taking care of all of those issues should take you less than an hour in total. We are here to help in any way we can, so always feel free to hit us up if you need assistance. After seeing what an fantastic job you did on your build I have every confidence that you can do this, sir, and I look forward to seeing that L3 submission soon! 1 Quote Link to comment Share on other sites More sharing options...
gmrhodes13[Staff] Posted November 5, 2021 Report Share Posted November 5, 2021 (edited) Congratulations and welcome to the EI ranks trooper Edited November 5, 2021 by gmrhodes13 photo updated 1 Quote Link to comment Share on other sites More sharing options...
KaiserintheHood[TK] Posted November 5, 2021 Author Report Share Posted November 5, 2021 2 hours ago, justjoseph63 said: Hi, Dan, and thank you for your application for ANH Stunt EI! CRL and EIB Application Requirements: All required photos have been submitted, and on behalf of the entire D.O. staff we are pleased to welcome you to the rank of Expert Infantry. Congratulations! Other-Armor Fit/Assembly; In this area we review observations made by your fellow troopers and the DO team. Some observations may lead to suggestions to improve the overall look of your armour. Note that we consider both text (CRL) and pictures (screen caps/reference images) when reviewing submissions. Super nice job on this WTF armor, brother! Just a few items to go over in this area to give you a better overall look. Your bucket is riding pretty high, and I suspect it's a padding issue. You may have more than you need in the top and it's not allowing it to sit lower. Reference images In the first pic below I noticed that you seem to be looking down. When the helmet is sitting too high it forces you to tilt it forward just to be able to see in front of you clearly. I had the same exact issue, and after I removed the padding in the top I had MUCH better vision. Reference images The ear angle on your left is almost perfect, but the one on the right is at a skewed angle. Ideally, the screws should line up with the angle at the rear of the trap above them. We know there were wonky aspects to many of the original buckets, but to make them more symmetrical/screen accurate we are suggesting that you shift the bottom of the right ear back at least a bit. Reference images 2 quick items on your tube stripes.. The first being is that you have accidentally put them on backward. Not the biggest deal in the world, and we see this often, but as per the CRL and seen in the reference images the tops in the front section should lean forward. Also, the last stripe nearest the vocoder on each side (red arrow) overlap the crease in front of them and should be removed. Reference images (Note the gaps) We always want you to look your best, so when suiting up just ask the person who puts your TD on to make sure the clips are securely all the way down on the belt. Reference images Centurion Requirements; In this section we prepare you for Centurion. Because Centurion photos show more detail than EIB, items pertaining to Centurion might be seen there and not here and additional photos may be required. We try to point out all that we can from what we see, but the final accuracy is the responsibility of the trooper As it says in the CRL for Level 2 "Ideally the tube stripes are positioned a pencil width from the side of the cheek" so no problem for EI. But, for Level 3 we have to ask you to move the ones on the right closer to match the left side. Due to the fact that you have the issues from the first section, we are suggesting that you replace them. Being decals, they are easy to remove, and I'm sure Walt can supply you with a new set. Once you get them, the whole process should take less than 5 minutes! Reference images Awesome paint job on that vocoder, brother.. nice crisp lines, but we need you to grab your brush and extend the paint on the two ribs (shown below) just a bit. Another quick and easy fix! As stated in the CRL, ear screws need to be countersunk/flush. The left one is textbook, but the right one needs to come in a bit. This should be a fairly easy and fast fix! Reference images As you are aware, the large ab-button panel must have at least a small flat edge around it. We see this a lot, and it's honestly not to difficult to remedy in your case. Walt is a great guy, and I'm sure he would be happy to hook you up with a new plate. As Glen mentioned, you can also add an ABS plate behind it, touch up the edges with some ABS paste and sand/polish it. If you want to go that route I will send you a flat ABS plate for free, just PM me. Reference images The 45° angle on the ends of the ABS belt must meet up with the outside edges of the cloth belt. You have a big advantage over some with this issue, as you just need to take a little off the ends. Should take you less than 5 minutes! Reference images And that's it! You have a few items to deal with to get that Centurion badge under your name, but we honestly hope you give it a go. In looking at the suggestions/requirements above, once you have the large button plate and tube stripes in hand taking care of all of those issues should take you less than an hour in total. We are here to help in any way we can, so always feel free to hit us up if you need assistance. After seeing what an fantastic job you did on your build I have every confidence that you can do this, sir, and I look forward to seeing that L3 submission soon! Thank you! Thank you! All good suggestions to help get me to Centurion thank you so much. I'll take a look at what's making my helmet ride higher. I don't think I have too much padding in there but I'll double check that. I'll see how much play I have with my right ear and adjust it as much as I can, but I'm not sure how much plastic will be left underneath the ear. Tubes stripes are no problem to fix. I thought I had the fall correct but now that I see your reference pictures that helps a lot! A couple questions about the stripes though, If I put them on backwards but the left side has more room because of the ear's angle, how do more stripes fit on the shorter right side? Because the stripes are not the same quantity on each side correct? Also, are you saying decals are accepted for Centurion now or still painted? Vocoder is an easy fix. So is ab buttons and det. Belt question, There are specific dimensions for where the holster is mounted in relation to the plastic belt, If I cut a little more off the plastic to line up better with the canvas then these dims will change. Is this an issue for Centurion or no because it's only 2-3mm difference? Those are all my questions for fixes for now. I expect you'll see my Centurion application soon! Thank you for your approval and feedback! 1 Quote Link to comment Share on other sites More sharing options...
justjoseph63[Staff] Posted November 5, 2021 Report Share Posted November 5, 2021 9 minutes ago, KaiserintheHood said: Thank you! Thank you! All good suggestions to help get me to Centurion thank you so much. My pleasure, sir! I'll take a look at what's making my helmet ride higher. I don't think I have too much padding in there but I'll double check that. I'll see how much play I have with my right ear and adjust it as much as I can, but I'm not sure how much plastic will be left underneath the ear. I have zero padding in the top.. it's all on the sides. I just got really tired of constantly tilting my bucket forward to be able to see! Tubes stripes are no problem to fix. I thought I had the fall correct but now that I see your reference pictures that helps a lot! A couple questions about the stripes though, If I put them on backwards but the left side has more room because of the ear's angle, how do more stripes fit on the shorter right side? Because the stripes are not the same quantity on each side correct? Also, are you saying decals are accepted for Centurion now or still painted? Because of the right ear position you have less room to put all 16 stripes. Moving the ear back would give you that room. Decals for tube stripes/tears and traps are approvable at all levels! Vocoder is an easy fix. So is ab buttons and det. Belt question, There are specific dimensions for where the holster is mounted in relation to the plastic belt, If I cut a little more off the plastic to line up better with the canvas then these dims will change. Is this an issue for Centurion or no because it's only 2-3mm difference? All you have to do is just trim off the end(s) a bit with a razor knife and you are golden on all counts! Those are all my questions for fixes for now. I expect you'll see my Centurion application soon! Thank you for your approval and feedback! AWESOME! 1 Quote Link to comment Share on other sites More sharing options...
Chemi[Staff] Posted November 5, 2021 Report Share Posted November 5, 2021 Congratulations Dan!!! 1 Quote Link to comment Share on other sites More sharing options...
KaiserintheHood[TK] Posted November 5, 2021 Author Report Share Posted November 5, 2021 2 hours ago, gmrhodes13 said: Congratulations and welcome to the EI ranks trooper Thank you! Quote Link to comment Share on other sites More sharing options...
KaiserintheHood[TK] Posted November 5, 2021 Author Report Share Posted November 5, 2021 11 minutes ago, Chemi said: Congratulations Dan!!! Thank you! Quote Link to comment Share on other sites More sharing options...
giskard8[Staff] Posted November 5, 2021 Report Share Posted November 5, 2021 Congratulations and welcome to EIB. 1 Quote Link to comment Share on other sites More sharing options...
KaiserintheHood[TK] Posted November 5, 2021 Author Report Share Posted November 5, 2021 4 minutes ago, giskard8 said: Congratulations and welcome to EIB. Thank you! Quote Link to comment Share on other sites More sharing options...

Recommended Posts
Join the conversation
You can post now and register later. If you have an account, sign in now to post with your account.