GilesWoodward[TK] Posted February 18, 2018 Report Share Posted February 18, 2018 (edited) The adventure has started. My BBB arrived just before Christmas 2017. I printed out a copy of ukswrath’s Anovos build guide that I’m using for reference (Thanks UKSWRATH). My TK Boots were purchased months ago while waiting for Anovos to ship to me. Everything is unboxed... My goal is to build directly to L3 Centurian. I'm looking forward to any advice from Expert troopers out there - Thank you in advance. Struggled to get my first post uploaded with images, until I found that useful thread that said open up an Imgur.com account and link your images. Thanks : ) I thought I'd start with a low stress piece of armour - the hand guards as I'll be replacing those with flexible ones for Centurion. Ordered two sets of flexible guards from justjoseph63. Can't wait to get those in the snail mail. Thanks for sending them up into the Great White North Joseph! A good confidence builder - Now onto the forearms Left forearms seems to fit-like-a-glove. A nice amount of room inside but not too much! I now have rough cut all the armour and taped it all together to start the final measuring for fitting. I went a little over-the-top with the tape. Just excited to actually see a stormtrooper in my basement after all the waiting. As you can see I also bought a cheap black belt from value village to test out a potential garter system for supporting the thigh armour. Did I get the correct leg pieces together? I just had to try on the main body pieces of armour - to see if it even fit me. Held together only with blue tape and the supplied Anovos belt. Which yes I will be replacing with a Kittle belt once I know my waist measurement wearing armour! The Anovos supplied belt was very big on me, I was at the end of the vecro! For the most part it was an ok fit. I struggled with getting the chest & backplate into the correct place on my shoulders. Very uncomfortable on the shoulders as the plastic was digging into my bodysuit and neck. Maybe a little trimming needed here. Edited February 19, 2018 by GilesWoodward Mistakes made learning how to post images Quote Link to comment Share on other sites More sharing options...
Frank75139[501st] Posted February 18, 2018 Report Share Posted February 18, 2018 Let’s get started!Sent from my iPhone using Tapatalk 1 Quote Link to comment Share on other sites More sharing options...
gmrhodes13[Staff] Posted February 19, 2018 Report Share Posted February 19, 2018 Great to see, good luck with the build, remember measure twice and cut once, good luck 1 Quote Link to comment Share on other sites More sharing options...
imperialbrewer[TK] Posted February 19, 2018 Report Share Posted February 19, 2018 Welcome and glad to see another new builder out there! Take your time and don't rush into anything and cut slowly and with intent. As far as your back pieces, you want minimal gap between pieces — so while you're getting that all fit out, make sure that your strapping in the back is set so that you have minimal gaps and then the shoulder strapping will be dictated by how your front and back are strapped together. 1 Quote Link to comment Share on other sites More sharing options...
wook1138[TK] Posted February 19, 2018 Report Share Posted February 19, 2018 5 hours ago, GilesWoodward said: For the most part it was an ok fit. I struggled with getting the chest & backplate into the correct place on my shoulders. Very uncomfortable on the shoulders as the plastic was digging into my bodysuit and neck. Maybe a little trimming needed here. Great start Giles! For me, this was something that really didn't sort itself out until the other torso pieces were together. After everything was pretty much strapped together, I put in temporary elastic pieces to help fit (I used snaps for all the strapping on the shoulder to chest connection) and it wasn't until then that I could really see how the chest and back would fit together. Your back piece should be a lot closer to your body. Mine was like yours the first time I fitted the armor - I just had to pull the pieces up higher (pull the cod and butt pieces upwards). Of course, I'm only 5'10", so if you are a taller person my advice is pretty much moot. 1 Quote Link to comment Share on other sites More sharing options...
TheSwede[TK] Posted February 19, 2018 Report Share Posted February 19, 2018 (edited) Hey Giles Looks like you came prepared but how on earth could you resist opening the boxes?! Great to hear you aim for Centurion - be all you can be Trooper So...like Greg mentioned, looks like the torso (back/front) can come up more and that would help with the gap you have now and also pushing the back closer to your body and for the plastic digging into the shoulders they might need som shaping/bending (see Tony`s thread) and...hard to tell for sure but it looks like you have your shins reversed, the shorter swoop goes on the inside (to conform to the muscle) easy fix in the tape-stage just swapping the sniper knee Also...how wide are the ridges on the thighs? Would a 20-22mm cover strip hide them? And finally, wrist end of forearms there can be no return edge for Centurion and as a bonus it`s much more comfortable Overall great progress - keep it up Trooper Edited February 19, 2018 by TheSwede 1 Quote Link to comment Share on other sites More sharing options...
Harbinger[IPM] Posted February 19, 2018 Report Share Posted February 19, 2018 Looks like you are well on your way and have done your homework. Love that pic of everything rough taped up. If you want/need a stiffer belt there is a guy on here who sells them... but the Anovos belts look a lot better than they used to. 1 Quote Link to comment Share on other sites More sharing options...
hollowbodies[TK] Posted February 19, 2018 Report Share Posted February 19, 2018 Welcome aboard and have fun with your build! 1 Quote Link to comment Share on other sites More sharing options...
CableGuy[Admin] Posted February 19, 2018 Report Share Posted February 19, 2018 Looks like some great research and preparation prior to your build - that's wonderful to see. With bookshelf-Yoda and the FISD gang here to help, you'll do great. Best wishes, Dan 1 Quote Link to comment Share on other sites More sharing options...
TheSwede[TK] Posted February 19, 2018 Report Share Posted February 19, 2018 22 minutes ago, CableGuy said: bookshelf-Yoda You should change name to "Eagle-Eye" 2 Quote Link to comment Share on other sites More sharing options...
GilesWoodward[TK] Posted February 19, 2018 Author Report Share Posted February 19, 2018 OMG! I was inspecting my rough cutting today prior to starting the fitting process. AND I FOUND THIS.... cut on the return edge of my left shoulder bell. HELP! Any advice Troopers on how I can fix this please? Do I need to start mixing up a batch of abs paste? Thanks Quote Link to comment Share on other sites More sharing options...
Frank75139[501st] Posted February 19, 2018 Report Share Posted February 19, 2018 You could probably glue it from behind and clamp it. That’s not a bad cut. Sent from my iPhone using Tapatalk 1 Quote Link to comment Share on other sites More sharing options...
TheSwede[TK] Posted February 19, 2018 Report Share Posted February 19, 2018 28 minutes ago, GilesWoodward said: cut on the return edge of my left shoulder bell. Not to worry, like Frank said it’s not a bad cut but I would leave it for know as you probably will trim the return some more in order to get the bells close to the sides of the chest and backplate, in other words to get the biceps to sit further in the bells 1 Quote Link to comment Share on other sites More sharing options...
TheSwede[TK] Posted February 19, 2018 Report Share Posted February 19, 2018 36 minutes ago, GilesWoodward said: start mixing up a batch of abs paste? Although that’s good to have on stand-by so I would 1 Quote Link to comment Share on other sites More sharing options...
gmrhodes13[Staff] Posted February 19, 2018 Report Share Posted February 19, 2018 I would glue a small scrap piece of ABS behind just to give it some strength and prevent it from cracking further. At least it's once of those areas where it will be hardly noticeable, only by you and of course all of us 1 Quote Link to comment Share on other sites More sharing options...
Harbinger[IPM] Posted February 19, 2018 Report Share Posted February 19, 2018 So true, I see all my mistakes in my TK. 1 Quote Link to comment Share on other sites More sharing options...
GilesWoodward[TK] Posted February 20, 2018 Author Report Share Posted February 20, 2018 Hello Troopers, Thank you very much, to all of you, for your advice and motivation so far! I'm trying the rough cut armour on with my compression gear underneath to check the final fitment before starting the glueing process. I have magnets, clamps, tape and E6000 at the ready. Fitment first and maybe some cutting to fine tune? Starting with the Left Forearm: How does this look? Initially I thought it looked and felt ok but... The photo is the top return edge of the forearm nearest the elbow looking down inside to the wrist. I have my arm squeezed against the inside piece of armour. Is there too much room inside? Here's another photo of the top return edge with my arm flat against the outside armour piece looking down inside to the wrist. Here a photo of the lower return edge (which I know needs to be removed for Centurion) with my arm pressed against the inside to show the clearance I have inside. It might be tricky to see from the photos, so here are some measurements. Left Forearm circumference: Upper = 14.25", Middle = 13.5", Lower = 11.5" Do I need to trim the butt edges to make the armour smaller on my arm? Thanks : ) Quote Link to comment Share on other sites More sharing options...
imperialbrewer[TK] Posted February 20, 2018 Report Share Posted February 20, 2018 For starters, no return edge on the front of the forearms — aside from it being required for Expert level, it’s a huge comfort thing. The last thing you need is the armor digging in your wrists.Sent from my iPhone using Tapatalk 1 Quote Link to comment Share on other sites More sharing options...
lucnak[TK] Posted February 21, 2018 Report Share Posted February 21, 2018 My forearms are a little big on me...can't recall how Anovos arms tend to sit. You should be fine, assuming that you are going to be strapping the forearm to the bicep. If you find that they are really too loose, you can just add some foam in there. You need enough room to get your hand through and you can only size down to a certain point before you'd start removing the ridge, which you want to keep. 1 Quote Link to comment Share on other sites More sharing options...
wook1138[TK] Posted February 21, 2018 Report Share Posted February 21, 2018 Hey Giles. If you are planning on higher level approval (and you should be ) you are going to want to remove the return edge at the wrist now, before deciding on final sizing. For the wrist opening, I sized mine down to the point where my hand just fit through without too much trouble. I have skinny wrists so the forearm piece fits much like your picture above, but once I get my gloves on it is not nearly as noticeable (try fitting with your gloves on and cotton liners - you'll want liners eventually so you can remove your rubber gloves and they will thicken your wrist area a bit) . As for the butt return edge - aim for 15mm total width but you can adjust a bit to whatever works for you - just keep in mind that all your coverstrips need to be proportional (i.e. if your biceps and forearms are a little less than 15mm then your legs should be a little less than 20mm). You can cheat a little on the back coverstrips compared to the front ones (they don't have to be exactly the same if you need to squeeze a few mm here or there). I hope that all made sense. Keep up the good work! 1 Quote Link to comment Share on other sites More sharing options...
68Brick[TK] Posted February 22, 2018 Report Share Posted February 22, 2018 Wook's got it right. Loose the return edge now and leave enough room to squeeze your hand through. The more form fitting the better. Less padding needed, and no popeye arms. 2 Quote Link to comment Share on other sites More sharing options...
GilesWoodward[TK] Posted November 2, 2018 Author Report Share Posted November 2, 2018 Since my last post on February 2018 much has happened — I was just approved at L3 Centurion. My apologies for not completing this build thread while I was building. However I thought that I should go back and complete my build thread in case it can help be of help to another Anovos builder out there somewhere in the galaxy! Forearm: The first cover strip being glued in place! A very satisfying feeling—I can do this. Use a lot of glue and make sure it comes out a little at the edges. It's super easy to clean up once its dry. I left all my freshly glued armour for at least 24 hours before even touching it. Excess glue almost peels off with the addition of a little rub of the fingers. Biceps: Cover strips cut to length, edges sanded and ends rounded. Each one marked to stop any mix ups! as little of the protective plastic covering was left on to stop any unwanted scratches. Biceps—Front: Magnets and clamps used to secure one cover strip at a time. Notice the glue squeezing out a little. These puppies are not coming undone! Biceps—Back: Inside shot of the second set of bicep cover strips. Notice doubled up magnets & tape to hold in pace! Thigh—Right Front Outside: Inside View I will glue the cover strip on one side at a time. The curvature on this thigh armour was crazy. I finished the cover strip but left it long at the top to trim down afterwards. Notice a print out of Tony's Anovos build thread! My bible! Thigh—Right Front Outside: Outside View Notice the magnets at at the outside edge of the cover strip to ensure firm glueing. Notice also excess glue squeezed out! Thigh—Right Front Complete: Outside View Time to glue the cover strip onto the other half of the right front thigh. The arrow were drawn as I tested the fit and alignment before glueing. I then used the marked locations for the magnets. Painters tape to ensure good attachment. Left Thigh Outside— Outside View: I used more clamps than magnets on the left thigh. But notice I am only glueing the cover strip to the outside half of the thigh one side at a time to ensure a firm connection and strong bonding. Again the cover strip is left a little long on the top. I will trim this back once the other side is glued in place. Left Thigh Inside—Outside View: More magnets than clamps this time. magnets at the outside edge of the cover strip to ensure a good glue connection! Left Thigh complete—Outside Top View: The blue tape was critical ensure the cover strip was firmly secured to two thigh pieces. Left Lower Leg - Connecting the Sniper knee: Glueing the centre of the sniper knee in place first! Notice the small clamp at the bottom, that's to keep the knee in place as well. No images of the front cover strips being glued in place I'm afraid! Remember the backs are left open! A little look at the position of the sniper plate on the inside of the lower leg. No trimming required! Outside of the sniper plate: I trimmed off this much to ensure a better fit onto the left lower leg. Outside of the sniper plate: This is how it looks when trimmed and glued in place Split Rivet Painting: I pushed the rivets through the lid of an old cardboard box and painted them with these tiny cotton bud looking sticks I found at a model store. Much better than messing around with a brush! Inside View of the left thigh: I found a crack - time to cut a scrap piece of abs to fit. Glued in place - no clamp though! Inside view of the cod: Time to figure out where to drill my first holes I couldn't wait to try on all the pieces of armour once most of the glueing was finished! The armour looks a little big right now! Maybe i should loose the tape! What a good looking guy thanks to a lot of duct tape!!! I received these flexible hand guards in the mail thanks to Joseph!!! Now time to glue them on the rubber gloves! Flexible Hand Guards on rubber Gloves: Stuffed some winter socks inside the gloves to mimic my hands. Cleaned both the glove backs and the hand guards with rubbing alcohol. Trusty e6000 at the ready and ... Finish holding them in place with strips of duct tape. These baby's are never coming off!!! Hopefully The Finished Product: Finished! I wasn't sure that e6000 would hold but it did! Much easier than I had anticipated. Making Snap Plates: 1 Inch belting (nylon strapping) was cut into 2" ish lengths. I made a template from a piece of cardboard. Then I used a soldering iron to burn (punch) a hole in the centre. The template was then along with a soldering iron to make the plates. The snaps themselves: I had read that some people were experiencing some unusual effects from glueing their snap plates onto the inside of their armour. So as a consequence I decided to wrap the bases of the plates with painters tape. Glue would then not come into contact with any of the metal/plastic. A similar process was used to make the strapping. The finishes snap plates and strapping. No double snaps were used!! After 4 troops some over 4 hours - I have not had a single snap fail - Yet! Sewing the elastic for the shoulder/chest connections - thanks wifey! Sewing the thigh elastic around a garter belt - thanks wifey! Garter belt for the thigh minus the snaps! Time to test snaps, strapping and shoulder elastic - looking good! I just need some legs and a belt please : ) Trying to determine the length of the thigh elastic that connects to snaps on the inside of he upper thighs. Getting all the holes in the right places was tricky - patience ! I did't like how the bottom of the left thigh was finished so I made an extra piece of moulding out of scrap abs! The abs moulding patch glued in place. It now needs sanding to blend into the existing armour. Time to paint a Rubies blaster. I hung it from the garage door mechanism with a wire coat hanger I made into a hook. Black primer & spray paint from Home Depot and we're looking in ok shape! The finished forearms showing the position of the elastics in place. Quote Link to comment Share on other sites More sharing options...
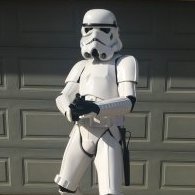
GilesWoodward[TK] Posted November 2, 2018 Author Report Share Posted November 2, 2018 My first time wearing all the completed armour! Well... the right thigh wasn't finished but I couldn't wait any longer! Not too bad of the first fitting! Now it's time for a walk outside... 1 Quote Link to comment Share on other sites More sharing options...
lucnak[TK] Posted November 5, 2018 Report Share Posted November 5, 2018 Looks good! 1 Quote Link to comment Share on other sites More sharing options...
TheSwede[TK] Posted November 5, 2018 Report Share Posted November 5, 2018 A Centurion in the making 1 Quote Link to comment Share on other sites More sharing options...

Recommended Posts
Join the conversation
You can post now and register later. If you have an account, sign in now to post with your account.