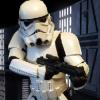
Java 555[TK] Posted June 8, 2017 Report Share Posted June 8, 2017 Mandatory Information Name: Bryan Coffey TKID: 70813 Forum Name: Java 555 Garrison: Diamond Garrison Armor: ANOVOS Helmet: ANOVOS Blaster: Hyperfirm 501st Profile: http://www.501st.com/members/displaymemberdetails.php?userID=24921 Optional Information Height: 6'1" Weight: 225 lbs Boots: TK Boots Canvas belt: Homemade to replace ANOVOS Hand Plates: JustJoseph63 Electronics: Stormtrooper Hearing Assist (SHA) by Ukswrath Fan - self wired Neck Seal: ANOVOS with new zipper Holster: ANOVOS Note: I am normally the most patient person in the world, but I would very much like to place an order for the hockey jersey, closing 6/14. So IF you are able and IF my armor is approvable, I would very much appreciate it if I could make that deadline. If not, I still appreciate you taking the time to review my submission. Thank you! Armor Body Full Front Full Back Full Right Full Left Right Detail Left Detail Ab Details Helmet Front Back Right Left Lens Color S Trim Hovi Mic Tips Interior Strapping Ab & Chest I know that the strapping could look much better and I originally tried the bracket system, but I have a long torso and found that the extra support of more elastic kept everything where it needed to be while looking very nice from the outside (and not bending the armor). I plan to rivet the sides when I shed a few pounds and get down to Centurion weight. I know a specific strapping system is not listed in the guide, but I understand if this disqualifies me for EIB. Interior Strapping Back, Kidney, Butt Cod Butt Interior Butt Exterior Legs Knee Right Exterior Knee Left Exterior Knee Right Interior Knee Left Interior Sniper Knee Right Sniper Knee Left Accessories Belt Front w/ Holster Belt Rear w/ Inner Dropboxes Thermal Detonator Outward Facing Thermal Detonator Inward Facing Neck Seal Gloves Rubber & Silicone Hand Guards Boots Side Boots Top Blaster Right Blaster Left Blaster Bottom ACTION SHOT!!!! Thank you very much for your time and consideration. I am already proud to be a part of an amazing brother/sisterhood and hopefully can walk in the footsteps of EIBs who have led the way. Thank you, Bryan 1 Quote Link to comment Share on other sites More sharing options...
Shanester[TK] Posted June 8, 2017 Report Share Posted June 8, 2017 Hey Brian! Your armor is looking good. I don't see any glaring issues. You might want to show your screws on the Thermal Detonator. Good luck! Quote Link to comment Share on other sites More sharing options...
Java 555[TK] Posted June 8, 2017 Author Report Share Posted June 8, 2017 Thank you Shane!! And thank you for the call out. Thermal Detonator Screws Quote Link to comment Share on other sites More sharing options...
Java 555[TK] Posted June 9, 2017 Author Report Share Posted June 9, 2017 Didn't have time at lunch to do research and had just snapped a pic. TD corrected with black painted screws! Thanks again Shane! Quote Link to comment Share on other sites More sharing options...
ukswrath[Staff] Posted June 9, 2017 Report Share Posted June 9, 2017 Hey Brian welcome, Sly or myself will be with your shortly. We're assuming you're applying for ANH Stunt, just to confirm this is correct? Quote Link to comment Share on other sites More sharing options...
Java 555[TK] Posted June 9, 2017 Author Report Share Posted June 9, 2017 Thanks Tony! And that is correct, ANH Stunt. Sent from my SM-G920V using Tapatalk Quote Link to comment Share on other sites More sharing options...
ukswrath[Staff] Posted June 9, 2017 Report Share Posted June 9, 2017 Thank you, title corrected Quote Link to comment Share on other sites More sharing options...
ukswrath[Staff] Posted June 14, 2017 Report Share Posted June 14, 2017 Hey Brian, we're almost ready brother. Can we get a couple more photos. Left side of the helmet and a close up of the hovi tips and Vcoder. Thank you Quote Link to comment Share on other sites More sharing options...
Java 555[TK] Posted June 14, 2017 Author Report Share Posted June 14, 2017 Hey Brian, we're almost ready brother. Can we get a couple more photos. Left side of the helmet and a close up of the hovi tips and Vcoder. Thank you Hi Tony, Thank you so much, please see below for the Left Side, Hovi Mic Tips closeup, and VCoder. Sorry about not including those in the original post - it seems photobucket got the best of me. VCoder Mic Tips Helmet Left Side Quote Link to comment Share on other sites More sharing options...
ukswrath[Staff] Posted June 14, 2017 Report Share Posted June 14, 2017 Excellent thank you Quote Link to comment Share on other sites More sharing options...
ukswrath[Staff] Posted June 21, 2017 Report Share Posted June 21, 2017 Hi Bryan, welcome and thank you for applying for EIB. Let's have a look your armor. CRL and EIB Application Requirements: All the required submission photos have been posted. Without further delay, your armor displays all the necessary elements to qualify for Expert Infantry. Sly and myself would like to welcome you to Expert Infantry. Congratulations trooper . Other-Armor Fit/Assembly: In this section we review observations made by your fellow troopers and ourselves. Some observations may lead to suggestions to improve the overall look of your armor. If any suggestions may affect the application process, it will be listed separately in either the above EIB or below Centurion requirement sections. In our ongoing strive for accuracy we have a few areas to cover, all to help you look your best. Though the following suggestions will not effect your EIB application they are highly recommended, especially if you choose to shoot for Centurion. Starting from the top. 1) The Anovos provided ear mounting screws are incorrect. No fault of yours however, the screw type should be "V" head not the provided "Pan" head. If you haven't changed out the original ear screws we're recommending you do so. Don't discard these however, as they can be used to replace the Thermal Detonator screws we'll talk about shortly. Here's a screen used helmet armor reference photo 2) Stunt frown paint should extend to the edge of the last tooth. Yours will need to be longer. Reference photo 3) Frown paint over spray. Anovos is notorious for leaving over spray around the teeth. Basic 501st requirement as noted below is the paint is not to leave the teeth Area. Though most GMLs fail to check this during basic approval, at the higher levels we look at just about everything. Most applicants use mineral spirits and a Qtip to clean it off. In the even you remove too much paint if may be necessary to repaint the teeth effected or entire frown. Helmet For 501st approval: Frown is painted gray and does not leave the teeth area. Reference photo 4) Hovi screen mesh is too fine. The mesh Anovos uses is incorrect, it should be a bit more coarse. Some folks are using tightly woven flower sifter screens, but your best bet is to contact Hovi sellers here or elsewhere roe replacement screens. Reference photo 5) Vcoder edge lines are too soft. The screen used helmets have very definitive Vcoder paint lines. We're suggesting applicants touch up the area as needed. Reference photo 6) Shoulder bell to chest and back plate gap. There should be little gap here. The bells should almost touching the shoulder covers. Beside readjusting the shoulder to bell strapping. You also might want to try removing more lower shoulder bell return edge. This should draw the bell closer to the chest and back at the bottom. Reference photo 7) There should be minimal back plate to kidney gap. We're suggesting you tighten the strapping between the two. Reference photo 8) No a big issue but worth mentioning is the right forearm cover strips should be aligned with the biceps cover strips. Reference photo 9) It appears there is return edge on the Ab button plates where there should be none. If there is, it is highly recommended you remove it. Reference photo 10) The Thermal Detonator Philips head mounting clip screws Anovos provided in your kit are incorrect. Conveniently enough the screws Anovos used to secure the ears to the helmet are very close to screen accurate and would be a good choice . Reference photo 11) Your thigh are sitting around 1" too low. We're suggesting you maybe remove the upper return edge so they can be pulled up. Reference photo 12) Gap between Ab and kidney, right side. Though yours is very close these is to be minimal gap here. A simple strap adjustment should do the trick. Reference photo Centurion Suggestions or Requirements: In this section we prepare you for Centurion. If there were any areas of concern they would be discussed here. The following areas will need to be fixed prior to applying for Centurion if that is in your sights. 1) As mentioned in the EIB section the gap on the right side will need to be closed. CRL states: For level three certification (if applicable): Ideally there no gap between the abdomen and kidney armor. 2) Six rivets are required on the right side armor, 3 on the ab, 3 on the kidney. For level three certification (if applicable): Three rivets, approximately 5/16"(8mm) diameter, are present on the left side of the abdomen armor. Note: The original rivets used for the TK armor were bifurcated rivets or split rivets. Rivets are equally spaced along the depth of the armor and about 10mm from the edge. The heads are rounded or domed. Rivets are painted white. You will need to install the six rivets on the left side of the Ab and Kidney. There are literately 100s of build threads ot tutorials illustrating how to do this. Reference photo 3) A single male snap is required for the upper right side ab plate. For level three certification (if applicable): A single male snap on the top right corner of the ab plate is present. Reference photo 4) Drop boxes should be aligned with the outermost edge of the ammo belt. The easiest fix for this is to simply glue the drop box straps to the cloth waist belt itself. For level three certification (if applicable): Drop boxes are vertically aligned with the end of the ammo belt with minimal gap between belt and box. Reference photo 5) And lastly, you'll need to remove the return edge on your forearms near your wrist. For level three certification (if applicable): No return edge on the inside of the front of the forearm is allowed. Reference photo That's it Bryan, just a few items to correct and you'll be rockin the Empire. Congratulations again and hope to see you at Centurion Quote Link to comment Share on other sites More sharing options...
Java 555[TK] Posted June 21, 2017 Author Report Share Posted June 21, 2017 Thank you Tony!! That is such great news to hear! Also, thank you very very much for being so clear on the next steps. It's enough to keep me busy for a while, but I'm not scared of a little work and taking baby steps to the finish line. Sent from my SM-G920V using Tapatalk Quote Link to comment Share on other sites More sharing options...
ukswrath[Staff] Posted June 22, 2017 Report Share Posted June 22, 2017 You're very welcome Bryan, and thank you for your CAN DO! attitude. Can't wait to see you at Centurion Quote Link to comment Share on other sites More sharing options...
rwbowri[TK] Posted June 22, 2017 Report Share Posted June 22, 2017 Looking awesome there Bryan. Quote Link to comment Share on other sites More sharing options...
Java 555[TK] Posted June 22, 2017 Author Report Share Posted June 22, 2017 Looking awesome there Bryan. Thank you Robert!! Quote Link to comment Share on other sites More sharing options...

Recommended Posts
Join the conversation
You can post now and register later. If you have an account, sign in now to post with your account.