MrSnrub[501st] Posted April 26, 2017 Report Share Posted April 26, 2017 (edited) Got my 40th anniversary helmet kit from RS today and started on the eyes, going after mr no striped replica i notice he has a clean right eye and a bit of a sleepy left, mine is over exaggerated at the moment as i didnt want to remove too much ill definately remove a little more, i also think i cut the right eye a bit too much and a bit too round sorry for giant images, but hey more detail lol Edited May 16, 2017 by MrSnrub Quote Link to comment Share on other sites More sharing options...
Bulldog44[TK] Posted April 26, 2017 Report Share Posted April 26, 2017 Good start. Wish Mr. no stripes was allowed to be official in the CRL. Oh well, glad you are making one! Quote Link to comment Share on other sites More sharing options...
Shanester[TK] Posted April 26, 2017 Report Share Posted April 26, 2017 Nice helmet. Good luck! Quote Link to comment Share on other sites More sharing options...
MrSnrub[501st] Posted April 27, 2017 Author Report Share Posted April 27, 2017 got the teeth cut out yesterday and the eyes a little more shaped, taking my time with this and goin real slow, also what is the best color match to the khaki of the origional helmets? i would like to add some chipped paint effects heres where im at so far with the faceplate, how do the teeth look? Quote Link to comment Share on other sites More sharing options...
Nagedzi[TK] Posted April 28, 2017 Report Share Posted April 28, 2017 I'd personally open up the teeth some more as Mr No Stripes actually had pretty open teeth where a lot of the "return edge" of the teeth was removed.Here's my MNS as I was cutting the teeth out compared with a screen shot:Here's mine trying to compare paint chips to a screenshot:The end result turned out pretty good: While this MNS was a CAP-W, I'm currently using an RS to recreate the squad leader that entered the gantry and released the droids.... Anyways, best of luck! Mr No Stripes is awesome...I love trooping in him! 2 Quote Link to comment Share on other sites More sharing options...
MrSnrub[501st] Posted April 28, 2017 Author Report Share Posted April 28, 2017 Hey thanks for the helpful info ill definatly cut those teeth out more also what kind of paint for the khaki paint chips? Quote Link to comment Share on other sites More sharing options...
Nagedzi[TK] Posted April 28, 2017 Report Share Posted April 28, 2017 This is the colour you want to strive for:Without custom ordering some paint, I found it hard to source out here in Canada so I went this readily available can of camouflage paint (centre). It is not exact (a little too brown), but looks good enough as chips on the bucket:This was my ESB chipper helmet before painting white:This is what I used to mask the chips out. Others have had good success with plain latex paint though: Quote Link to comment Share on other sites More sharing options...
MrSnrub[501st] Posted April 28, 2017 Author Report Share Posted April 28, 2017 (edited) Thanks for the helpful info again! Im trying to put the faceplate and back togeather but whenever i allign one side the otherside Is unalligned and off by quite a bit :s<br><br><br> Edit: i think i manged to get it lined up ive jusy been playing with it for hours but im gettin real close, should have it built up tomorrow hipefully with some pics Edited April 28, 2017 by MrSnrub Quote Link to comment Share on other sites More sharing options...
MrSnrub[501st] Posted April 29, 2017 Author Report Share Posted April 29, 2017 (edited) . Edited May 11, 2017 by MrSnrub Quote Link to comment Share on other sites More sharing options...
MrSnrub[501st] Posted May 5, 2017 Author Report Share Posted May 5, 2017 (edited) heres a pic it just needs paint, Edited May 11, 2017 by MrSnrub Quote Link to comment Share on other sites More sharing options...
MrSnrub[501st] Posted May 5, 2017 Author Report Share Posted May 5, 2017 is the paint for the vocoder humbrol coal black satin? and the same for the black outlines and lines on tears traps? Quote Link to comment Share on other sites More sharing options...
MrSnrub[501st] Posted May 6, 2017 Author Report Share Posted May 6, 2017 (edited) trying to recreate the mr no stripes brow, the brow is easily adjusted to the way i want some adjusted brow photos Edited May 11, 2017 by MrSnrub 1 Quote Link to comment Share on other sites More sharing options...
MrSnrub[501st] Posted May 7, 2017 Author Report Share Posted May 7, 2017 (edited) rocking the mr no paint, ordered humbrols, #5 admiral grey and coal satin black #85 and some stencils from trooperbay, also not looking forward to inserting the mic tip mesh edit:i think i finally figured out how to get pictures to stay now Edited May 17, 2017 by MrSnrub Quote Link to comment Share on other sites More sharing options...
GandalfTheImperial Posted May 10, 2017 Report Share Posted May 10, 2017 Hey, can i see some pics of the ears? I think you set them too low Quote Link to comment Share on other sites More sharing options...
MrSnrub[501st] Posted May 10, 2017 Author Report Share Posted May 10, 2017 (edited) . Edited May 17, 2017 by MrSnrub Quote Link to comment Share on other sites More sharing options...
MrSnrub[501st] Posted May 11, 2017 Author Report Share Posted May 11, 2017 (edited) moved the ears up a millimetre or two, and i got rid of all the squeaking when handling the helmet i think i may tweak the left ear (viewers pov) but for now I'm happy, also the brow is able to be moulded to where i want it as its quite tight, i can get a lot of varied out of it lol. still waiting on paints and stencils from trooper bay Edited May 17, 2017 by MrSnrub Quote Link to comment Share on other sites More sharing options...
MrSnrub[501st] Posted May 11, 2017 Author Report Share Posted May 11, 2017 (edited) . Edited May 17, 2017 by MrSnrub Quote Link to comment Share on other sites More sharing options...
MrSnrub[501st] Posted May 15, 2017 Author Report Share Posted May 15, 2017 (edited) was playing with the left ear yesterday as i noticed it was on way to much of an angle i bought it back and tried to recut it to fit, and ended up with this, urgh, guess ill have to get another left ear and have another go at it :/ looks ok from the side but not the frontMy paint should arrive tomorrow also Edited May 15, 2017 by MrSnrub Quote Link to comment Share on other sites More sharing options...
MrSnrub[501st] Posted May 17, 2017 Author Report Share Posted May 17, 2017 (edited) i took my helmet screws apart and riveted it together to seal the look of my helmet as the left side from the views had this weird thing with the tube goin on and had to settle for a crooked brow like these guys to sort it, i got my paints and got a light coat of grey so its easy for me to clean up, ill get a second nice coat and follow my lines, next post will be finished bucket i need to replace the ears and cut them flat, i followed the the lines drawn on the helmet at the beginning,i have asked for a new right ear i might get a new one so i can fix the gap a bit and cut it flat, i might adjust the brow a bit too Edited May 20, 2017 by MrSnrub Quote Link to comment Share on other sites More sharing options...
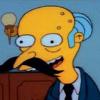
MrSnrub[501st] Posted May 23, 2017 Author Report Share Posted May 23, 2017 well unfortunately i wasn't happy with how my mr no stripes looked so i opted for mr crooked brow instead lol really happy with how my painting came out as i thought i sucked at it! few little touch ups here and there but this lid is done!(waiting on some new ears) sorry for the false advertisement in the title haha! 1 Quote Link to comment Share on other sites More sharing options...

Recommended Posts
Join the conversation
You can post now and register later. If you have an account, sign in now to post with your account.