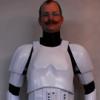
Stampeder17[TK] Posted April 10, 2017 Report Share Posted April 10, 2017 (edited) Jeff SchultzBadlands Garrison, Alberta, Canada Armor Maker: Authentic Props Helmet: Authentic Props Blaster: TrooperBayHt: 5'10 Wt: 165 lbsBoots: Imperial BootsBelt: canvas self madeHand Plates: AP (I have Trooperbay for Centurion application)Electronics: 3 fan cooling system self made Neck seal:Geeky Pinks Phantastic GasketsHolster: Authentic Props Edited April 11, 2017 by Stampeder17 1 Quote Link to comment Share on other sites More sharing options...
ukswrath[Staff] Posted April 10, 2017 Report Share Posted April 10, 2017 Thanks Jeff Quote Link to comment Share on other sites More sharing options...
Stampeder17[TK] Posted April 10, 2017 Author Report Share Posted April 10, 2017 Just trying to get the photo size right. I will shrink them down and try again. Quote Link to comment Share on other sites More sharing options...
Stampeder17[TK] Posted April 10, 2017 Author Report Share Posted April 10, 2017 All photos uploaded. Quote Link to comment Share on other sites More sharing options...
humperdingle Posted April 10, 2017 Report Share Posted April 10, 2017 (edited) Hi, nice build Hope you don't mind but I like to practice my eagle eye on builds Here's what i've noticed:Drop boxes look a little low-slungRivets on the side of kidney/ab need painted whiteAre those rivets on TD? They should be small, domed black slot head screwsInside of the hovi mic tips should be white. Edited April 10, 2017 by humperdingle Quote Link to comment Share on other sites More sharing options...
PBTrooper Posted April 10, 2017 Report Share Posted April 10, 2017 Awesome Jeff .... Good to see another badlands member going for glory cheers Dave Quote Link to comment Share on other sites More sharing options...
ukswrath[Staff] Posted April 10, 2017 Report Share Posted April 10, 2017 Hey Jeff we need the following photos please: Full length, left and right arms down Waist belt attachments, Ab side Thank you Quote Link to comment Share on other sites More sharing options...
Stampeder17[TK] Posted April 11, 2017 Author Report Share Posted April 11, 2017 Updated pics added. I had to shrink a few pics down to be able to add the new 3. Off to bed now so I can catch my 9 am flight to Celebration!!!! Quote Link to comment Share on other sites More sharing options...
ukswrath[Staff] Posted April 11, 2017 Report Share Posted April 11, 2017 Awesome thank you Quote Link to comment Share on other sites More sharing options...
Shanester[TK] Posted April 12, 2017 Report Share Posted April 12, 2017 Good looking armor. Good luck! 1 Quote Link to comment Share on other sites More sharing options...
ukswrath[Staff] Posted April 19, 2017 Report Share Posted April 19, 2017 Thanks for your patience. We'll be with your shortly Jeff Quote Link to comment Share on other sites More sharing options...
Stampeder17[TK] Posted April 21, 2017 Author Report Share Posted April 21, 2017 No worries, I know everyone was busy with Celebration. Quote Link to comment Share on other sites More sharing options...
Sly11[Admin] Posted April 25, 2017 Report Share Posted April 25, 2017 Hi Jeff Can we please have a photo of the other side of your thermal det please. Thanks for your patience, I'm just getting back into the swing of things Quote Link to comment Share on other sites More sharing options...
Sly11[Admin] Posted April 29, 2017 Report Share Posted April 29, 2017 Hey Jeff, great to see you at Celebration, thank you for your application, lets take a look. CRL and EIB Application Requirements: All submission photos are present, your armor displays all the necessary elements to qualify for Expert Infantry. Congratulations Trooper well done! Other-Armor Fit/Assembly: In this section we review observations made by us and your fellow troopers. If there are any suggested corrections they will be made here, if any will effect a future application, they will be made in the Centurion section below. Overall, you have a nice set of armour, but with a few little adjustments and fixes, we are going to have you in Centurion form in no time. We shall start from the top and work our way down. I have huge respect for anyone that hand paints their helmet, I took the easy way out on my build, but have hand painted a few commission builds over the years. I think you can tidy up the edges on the ears and tears to make them a little straighter. I use a toothpick dipped in turpentine and scratch the paint away at the edge to straighten lines or remove any paint runs. Give it a try, it works a treat and is easy to clean up. Secondly, your Tube stripes need to be re applied. They should run evenly along side the cheek and positioned approximately a pencil thickness away from the cheek. Reference image It is difficult to check how your armour is sitting when having your photos taken for approvals, so the highlighted areas on the below image all seem to be simple dressing issues. This will be a good guide so you know the ballance we are looking for in Centurion app shots. Keep an eye on the shoulder bells and how they sit. Rotate them forward so as to close up the uneven gao between them and your chest plate, and make sure the sholder connecting white elastic isnt pulling out from under the bridge. Also even up the gaps between the bicep and fore arms, and the thigh height. Reference Image As we move down to your Ab and kidney plates, there are only minor adjustments needed. 1. The side gaps, we will cover off in the centurion section. 2. Main Ab button plate. It appears you have trimmed too much off around the edges of the button plate. I have added a reference image below to show how the originals were trimmed.It;s not something we will request you change but more just to point out to others how they usually should look. On the smaller button plate, you could still trimm some off so it is smaller than the part it mounts too. That is an easy fix. While at the mid section, we think your back to kidney straps can be shortened up so the plates stay nicely aligned, and maybe the shoulder bridges can be more centralised in their alignment. Thermal Det screws: These should be a flat blade pan head type screw and also painted black for that finishing touch. It is a little difficult to determine exactly what you have used due to the image size, but they look like rivets or Philips head screws Reference image Centurion Suggestions: In this section Uk or myself may suggest recommended or required repairs prior to applying for the Centurion level, however the accuracy it is ultimately up to the trooper. We do our best to cover everything, but the more detailed photos that come with a level 3 application may reveal other items that could require change. These are the few items that will require change to meet the level 3 requirements for your future Centurion application, so lets cover off on those. As per the CRL for level 3 Side gaps For level three certification (if applicable): Ideally there no gap between the abdomen and kidney armor. This gap looks too small to require a shim, so tighten up that belt Jeff Side rivets will require a lick of white paint to fit the requirement as below. Rivets are painted white. Ammo belt For level three certification (if applicable): Drop boxes must have full inner drop boxes to close the back. Flat covers are not allowed. Drop boxes are vertically aligned with the end of the ammo belt with minimal gap between belt and box. So shorten the straps from which the drop boxes hang, make sure they align at the ends of the plastic ammo belt, and get yourself some inner boxes. I believe Mark from AP can supply those for you. Well that's it Jeff, thank you for your patience, make your corrections and get that Centurion application in. Congratulations trooper Quote Link to comment Share on other sites More sharing options...
PBTrooper Posted April 29, 2017 Report Share Posted April 29, 2017 Awesome Jeff, congrats!!! Quote Link to comment Share on other sites More sharing options...
Pyrates[TK] Posted May 3, 2017 Report Share Posted May 3, 2017 Beautiful work Jeff, it was an honour to be there to help you! Next stop Centurion !!! Sent from my iPhone using Tapatalk Quote Link to comment Share on other sites More sharing options...

Recommended Posts
Join the conversation
You can post now and register later. If you have an account, sign in now to post with your account.