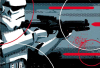
LuckySox[TK] Posted March 29, 2017 Report Share Posted March 29, 2017 (edited) Name: Jess Wedlock FISD Name: LuckySox 501st ID: 42129 Garrison: Old Line Garrison http://501st.com/members/displaymemberdetails.php?userID=23490 Mandatory Information Armor = Anovos Helmet= Anovos Blaster= Hyperfirm Optional Height = 5'6" Weight = 125lbs Boots = TK Boots Canvas belt = TKittell Hand Plates = Anovos Electronics= Ukswrath hovi tip mic/amp and fans, ICOMM Neck Seal = Anovos Holster = Anovos Armor Photos front back left left arms up right right arms up ab detail left detail right detail left shoulder strap right shoulder strap rivet detail (I noticed they were a bit scuffed, so I did a quick touch-up paint job) thermal detonator cod to butt attachment interior strapping sniper plate left sniper plate right ammo pack left ammo pack right Helmet Photos front back left right hovi tip detail lens color S-trim Accessory Photos blaster left blaster right D ring belt front belt back neck seal boots Action Shot Thank you for your consideration! This was my first build, and I never could've made it this far without all the excellent advice found here on FISD! And now I play the waiting game...... Edited March 29, 2017 by LuckySox 1 Quote Link to comment Share on other sites More sharing options...
Shanester[TK] Posted March 29, 2017 Report Share Posted March 29, 2017 Great looking armor trooper. Good luck to you! 1 Quote Link to comment Share on other sites More sharing options...
pattrooper Posted March 29, 2017 Report Share Posted March 29, 2017 very nice 1 Quote Link to comment Share on other sites More sharing options...
illusionz_09[TK] Posted March 29, 2017 Report Share Posted March 29, 2017 everything looks perfect. Looks like an easy approval. My only critique (and i know it may not be the easiest thing) is that you make modifications to either your abdominal piece or your chest to try to show your front mid-section a bit more. I know right now it is just the way it fits on your body, but there are some things you can do to make it even better. Good luck on your submission! 1 Quote Link to comment Share on other sites More sharing options...
LuckySox[TK] Posted March 29, 2017 Author Report Share Posted March 29, 2017 everything looks perfect. Looks like an easy approval. My only critique (and i know it may not be the easiest thing) is that you make modifications to either your abdominal piece or your chest to try to show your front mid-section a bit more. I know right now it is just the way it fits on your body, but there are some things you can do to make it even better. Good luck on your submission! Thanks, David. Yeah, I definitely fall into the "a little short..." category, hence the diminished abdomen presence lol. I have seen some mods done by other short troopers to help combat this--something I probably will look into down the line now that I'm slightly more confident in my build skills (as opposed to a year ago!) Quote Link to comment Share on other sites More sharing options...
illusionz_09[TK] Posted March 30, 2017 Report Share Posted March 30, 2017 I completely understand you. Let me know if you need a good reference for "short trooper" builds 1 Quote Link to comment Share on other sites More sharing options...
themaninthesuitcase[Admin] Posted March 30, 2017 Report Share Posted March 30, 2017 Not an EIB thing but you might want to reduce down the shoulder returns on the back plate. You can already see the stress cracks forming. IF you reduce the return down there's far less stress on the outside edge so it will be less prone to crack. Quote Link to comment Share on other sites More sharing options...
LuckySox[TK] Posted March 30, 2017 Author Report Share Posted March 30, 2017 Not an EIB thing but you might want to reduce down the shoulder returns on the back plate. You can already see the stress cracks forming. IF you reduce the return down there's far less stress on the outside edge so it will be less prone to crack. I just took another look thru the photos and I see what you mean--on the close ups of the shoulder strap, you're talking about the stress cracks on the sides of the back plate, right? I don't know if I even noticed that before, but I see it now. Thanks for the tip, will definitely address that. 1 Quote Link to comment Share on other sites More sharing options...
Artshot Posted March 30, 2017 Report Share Posted March 30, 2017 Great build, very clean, EIB should be a breeze 1 Quote Link to comment Share on other sites More sharing options...
justjoseph63[Staff] Posted March 30, 2017 Report Share Posted March 30, 2017 Really nice job on this build, Jess! The only thing you may have to address is the overlap of the back plate over the kidney. If so, this is a really easy fix. Stellar job, Trooper! 1 Quote Link to comment Share on other sites More sharing options...
ukswrath[Staff] Posted March 31, 2017 Report Share Posted March 31, 2017 Hey Jess Andrew or myself will be with you shortly 1 Quote Link to comment Share on other sites More sharing options...
vettereddie[TK] Posted April 3, 2017 Report Share Posted April 3, 2017 Good luck Jess, looking good. May want a lighter background for the E-11 pics, hovi tip mod looks good, will need to check out how it sounds at the next troop. Quote Link to comment Share on other sites More sharing options...
LuckySox[TK] Posted April 4, 2017 Author Report Share Posted April 4, 2017 Good luck Jess, looking good. May want a lighter background for the E-11 pics, hovi tip mod looks good, will need to check out how it sounds at the next troop. Thanks, Brian! I snapped a few indoors, hopefully these are a little easier to see: And the hovi tips work great, very happy with the whole setup once I worked out placement in my bucket. I like having everything all in one place. Quote Link to comment Share on other sites More sharing options...
ukswrath[Staff] Posted April 6, 2017 Report Share Posted April 6, 2017 Hey Jess, thank you for your EI application, let's get started. CRL and EIB Application Requirements: All the required submission photos have been posted. Your armor displays all the necessary elements to qualify for Expert Infantry. Welcome and congratulations! . Beautiful work on your build Other-Armor Fit/Assembly: In this section we review observations made by your fellow troopers and ourselves. Some observations may lead to suggestions to improve the overall look of your armor. If any suggestion affects any application, it will be listed separately in the above or below sections. Since this section is used to enhance to overall look of your armor we have a few requests. Anovos is notorious for paint over spray, specifically at the teeth. Were requesting troopers to remove the over spray where the teeth meet the gun line. A little bit of mineral spirits and a Q-tip should do the trick. In some cases in the process too much of the original tooth color can get removed. If that happens you may need to repaint the entire frown. Here's a reference photo While on the subject of the helmet. The Vcoder paint outline should be a bit more defined. A little Testers glossy black usually does the job. Reference photo And finally with the helmet the tube strips should be a #2 pencil width away from the face. This involves a bit more work as you'll most likely have to remove the old stripes first. There are stencils that your can buy and plenty of tutorials and build threads illustrating how to do this. Reference photo Your left forearm is considerably larger than the right which will require you to resize it so they match. Next up, the posterior connections need to be tightened up a smidgen. The plate is sticking out a bit too far and should be more aligned with the kidney.. Reference photo Closing off the visual enhancements is a few cover strips appear to be extending past the return edge of the armor. This could be a photo issue only but they are indeed too long we're suggesting you trim them back to avoid being snagged on other areas. Centurion Suggestions: In this section we prepare you for Centurion. If there were any areas of concern they would be discussed here. The only are of concern is the CRL states there should be little to no overlap of the back plate to kidney armor. For level three certification (if applicable): Back plate shall have no, or minimal overlap of the kidney plate. Reference photo Your's isn't too bad but worth mentioning none the less. As simple strap adjustment, or pulling the lower armor sections down should remedy the issue. That's it. Again, excellent job on your build, hope to see you at Centurion. Quote Link to comment Share on other sites More sharing options...
LuckySox[TK] Posted April 6, 2017 Author Report Share Posted April 6, 2017 Thanks Tony! I appreciate all your advice. After working on the armor for a while , It gets hard to see the detail corrections that need to be made, so this helps tremendously. Not looking forward to redoing those tube stripes though--I'm a terrible painter! Time to brush up on my skills Quote Link to comment Share on other sites More sharing options...
ukswrath[Staff] Posted April 6, 2017 Report Share Posted April 6, 2017 Thanks Tony! I appreciate all your advice. After working on the armor for a while , It gets hard to see the detail corrections that need to be made, so this helps tremendously. Not looking forward to redoing those tube stripes though--I'm a terrible painter! Time to brush up on my skills Glad to be of help. YOOOU CAAAN DO IT! 1 Quote Link to comment Share on other sites More sharing options...

Recommended Posts
Join the conversation
You can post now and register later. If you have an account, sign in now to post with your account.