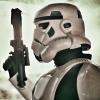
Bloodwalker[TK] Posted December 24, 2016 Report Share Posted December 24, 2016 (edited) Name : Óscar González Legion ID : TK61138 Forum Name : Bloodwalker Garrison: Spanish Garrison URL EIB STATUS: http://www.whitearmor.net/forum/topic/39623-tk-61138-requesting-anh-stunt-eib-status-ata-660/ Armor = ATA Helmet= ATA Blaster= Painted Doopydoo's Kit Height = 182 cm Weight = 82 Kg Boots = Zaldi Canvas belt = Hand made Hand Plates = Hand Plate Type Neck Seal = Extreme Racing. Holster = Hand made Full Body 1. Front – Arms at side 2. Back – Arms at side 3. Left – Arm raised 4. Right – Arm raised Armor Details 1. Ab/Kidney Attachment – Button Orientation 2. Butt/Kidney – Fixed: No 3. Hand Plates 4. Shoulder Bridge Back 5. Shoulder Bridge Front 6. Back/Chest Connection 7. Thigh Pack Attachment 8. Knee Plate 9. Drop Box Back 10. Cod and Butt Plate Attachment Helmet Details 1. Front 2. Side 3. Back 4. Hovi Tip Detail 5. Lens Color (Backlit if required) 6. S-Trim Blaster Details 1. Blaster – Left 2. Blaster – Right Accessory Details 1. Neck Seal 2. Thermal Detonator – Back 3. Holster Attachment Action Shot New Interior Edited December 24, 2016 by Bloodwalker Quote Link to comment Share on other sites More sharing options...
illusionz_09[TK] Posted December 24, 2016 Report Share Posted December 24, 2016 Nice work on your ATA. You are still missing an action shot pic. <br><br> Good luck on your submission. Quote Link to comment Share on other sites More sharing options...
Bloodwalker[TK] Posted December 24, 2016 Author Report Share Posted December 24, 2016 Thanks for your words and for the AS advice (post edited). Merry Xmas. Quote Link to comment Share on other sites More sharing options...
justjoseph63[Staff] Posted December 25, 2016 Report Share Posted December 25, 2016 Looking great, Oscar! If I could make a few suggestions, it would be to trim down the cover stips on the tops of the thighs in the back, and maybe a bit off the top of the backs on the forearms. Really nice job on the alignment of your ab/kidney and back/kidney connections... see you at Centurion soon! Quote Link to comment Share on other sites More sharing options...
Bloodwalker[TK] Posted December 25, 2016 Author Report Share Posted December 25, 2016 (edited) Thank you very much for your nice commentaries. Do you mean these parts? I think it's a great idea and It makes the missions more comfortable. Edited December 25, 2016 by Bloodwalker Quote Link to comment Share on other sites More sharing options...
justjoseph63[Staff] Posted December 25, 2016 Report Share Posted December 25, 2016 Those are the ones, sir. It will not only make it more comfortable, it will keep then from snagging on your undersuit. Quote Link to comment Share on other sites More sharing options...
illusionz_09[TK] Posted December 25, 2016 Report Share Posted December 25, 2016 Yes I was going to mention it. But I know sly and Andrew are definitely going to highlight the strips Quote Link to comment Share on other sites More sharing options...
Bloodwalker[TK] Posted December 26, 2016 Author Report Share Posted December 26, 2016 (edited) Done! Thanks. I think it looks much better. Edited December 26, 2016 by Bloodwalker Quote Link to comment Share on other sites More sharing options...
Sly11[Admin] Posted December 28, 2016 Report Share Posted December 28, 2016 Great work Oscar, we will be with you shortly. Quote Link to comment Share on other sites More sharing options...
Sly11[Admin] Posted December 28, 2016 Report Share Posted December 28, 2016 Hey Oscar thank you for your Centurion application, lets go through it CRL and Centurion Application Requirements: Thank you for making the suggested modifications as mentioned in your EI review, those shoulder bells are looking much better, but they could still be rotated forward some, so as to close down the gap between them and the sides of the chest plate. The tops are now good. If you could make this one adjustment and post up a new front on photo, we will get this review completed. See you soon. Quote Link to comment Share on other sites More sharing options...
Bloodwalker[TK] Posted December 28, 2016 Author Report Share Posted December 28, 2016 (edited) Thanks Andrew for your comments. Could you suggest me how can I do it? Maybe I could connect the biceps to the chest plate with snaps... would it be correct? Thanks again. Edited December 29, 2016 by Bloodwalker Quote Link to comment Share on other sites More sharing options...
Sly11[Admin] Posted December 29, 2016 Report Share Posted December 29, 2016 Thanks Andrew for your comments. Could you suggest me how can I do it? Maybe I could connect the biceps to the chest plate with snaps... would it be correct? Thanks again. There are a couple of ways to get them sitting forward a little more. Move the top strap attachment location forward on the white elastic that runs under the plastic bridge. This forces the bells to sit closer in at the front. The second way is to remove more of, if not virtually all of the return edge at the base of the shoulder bell. This allows the bells to sit closer to the bicep and in-turn closer to the chest plate. it can also sometimes just be a dressing issue, so simply rotating them forward for the photo can also work. Quote Link to comment Share on other sites More sharing options...
Sly11[Admin] Posted December 29, 2016 Report Share Posted December 29, 2016 Quote Link to comment Share on other sites More sharing options...
Bloodwalker[TK] Posted December 31, 2016 Author Report Share Posted December 31, 2016 (edited) Done. I have removed some of the return edges at the base. I think it works. This is a parcial frontal picture (I am redying my boots for the next mission and I can’t do a full frontal picture)… If it was necessary I’ll post it next year. Thanks a lot for your advices... and happy new year. Edited December 31, 2016 by Bloodwalker Quote Link to comment Share on other sites More sharing options...
Sly11[Admin] Posted January 2, 2017 Report Share Posted January 2, 2017 Thank you Oscar, so with no further delay, lets bring in 2017 with our first Centurion for the year. All submission photos are present. Your armor displays all the Centurion required components, with that we would like to congratulate and welcome you to the Centurion level. Excellent work Oscar 1 Quote Link to comment Share on other sites More sharing options...
Chapaaz[501st] Posted January 2, 2017 Report Share Posted January 2, 2017 Congrats mate Sent from my iPhone using Tapatalk Quote Link to comment Share on other sites More sharing options...
Bloodwalker[TK] Posted January 2, 2017 Author Report Share Posted January 2, 2017 (edited) I am truly happy. A thousand thanks to all of you for your incredible help. It's a honor to be a 501s member . Thanks again and very best imperial wishes. B. Edited January 2, 2017 by Bloodwalker Quote Link to comment Share on other sites More sharing options...
russellr2d2[TK] Posted January 4, 2017 Report Share Posted January 4, 2017 (edited) That last photo looks like a perfect stormtrooper to me.<br><br>Congrats and welcome to the ranks. Edited January 4, 2017 by russellr2d2 Quote Link to comment Share on other sites More sharing options...
thatsnotamoon Posted January 4, 2017 Report Share Posted January 4, 2017 Well done Sent from my SM-J100H using Tapatalk Quote Link to comment Share on other sites More sharing options...
silverdollar22[TK] Posted January 4, 2017 Report Share Posted January 4, 2017 Congratulations! Great job. Quote Link to comment Share on other sites More sharing options...
Captain_Wordo[TK] Posted January 4, 2017 Report Share Posted January 4, 2017 Congrats Óscar and welcome to the centurion rank! Quote Link to comment Share on other sites More sharing options...
Bloodwalker[TK] Posted January 13, 2017 Author Report Share Posted January 13, 2017 Thankssssssssssssssss!!!!!!! Quote Link to comment Share on other sites More sharing options...

Recommended Posts
Join the conversation
You can post now and register later. If you have an account, sign in now to post with your account.