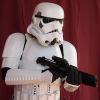
Coloursergeant Posted October 18, 2016 Report Share Posted October 18, 2016 (edited) Please consider my application for ANH Stunt EIB Status Name: Jon Thielmann 501st ID: TK-12513 FISD Forum Name: Coloursergeant Garrison: Florida Garrison (Everglades Squad) Height: 5' 11" Weight: 200 lbs Armor: RS Prop Masters Bucket: RS Prop Masters Neck Seal: RS Prop Masters Belt/Holster: RS Prop Masters Boots: RS Prop Masters Electronics: iComm w/ Aker Amp Cooling: ukswrath Echo-Type Fan System Blaster: Sterling E-11 Self-Built Front – Arms at side Back – Arms at side Left – Arm raised Right – Arm raised Right Side Detail – Arm raised Left Side Detail – Arm raised Abdomen Details Action Shot Cod and Butt Plate Attachment Interior Strapping Helmet Front Helmet Right Side Helmet Left Side Helmet Back Hovi Tip Detail Lens Color (Is it just me or does this pic look like one of those Fyrnock creatures from the abandoned base in season 1 of Star Wars Rebels???) Blaster – Left Blaster – Right Blaster – D Ring Neck Seal Thermal Detonator – Back Holster Attachment - Front Holster Attachment - Rear Edited October 23, 2016 by Coloursergeant 1 Quote Link to comment Share on other sites More sharing options...
Coloursergeant Posted October 18, 2016 Author Report Share Posted October 18, 2016 (edited) Application photos updated 10/22! Edited October 22, 2016 by Coloursergeant Quote Link to comment Share on other sites More sharing options...
CrookKnight[TK] Posted October 18, 2016 Report Share Posted October 18, 2016 Great job and very nice looking armor. Good Luck. 1 Quote Link to comment Share on other sites More sharing options...
TrooperKen(TK)[TK] Posted October 18, 2016 Report Share Posted October 18, 2016 Looking good Trooper! Don't forget to paint the screws black on your T.D. 1 Quote Link to comment Share on other sites More sharing options...
Coloursergeant Posted October 20, 2016 Author Report Share Posted October 20, 2016 Looking good Trooper! Don't forget to paint the screws black on your T.D. Done and pics updated! Thank you! 1 Quote Link to comment Share on other sites More sharing options...
TrooperKen(TK)[TK] Posted October 20, 2016 Report Share Posted October 20, 2016 Done and pics updated! Thank you! Good Job! Your Armor looks awesome! Good Luck Brother!! 1 Quote Link to comment Share on other sites More sharing options...
Coloursergeant Posted October 22, 2016 Author Report Share Posted October 22, 2016 Had another photo session today and was able to improve my photos a great deal. Hopefully everything is clear now! Quote Link to comment Share on other sites More sharing options...
Sly11[Admin] Posted October 25, 2016 Report Share Posted October 25, 2016 Hi Jon, thank you for your application, lets see what we got!! CRL and EIB Application Requirements: All submission photos are present. and your armor represents all elements as required for Level 2 CRL,, with that said, Congratulations and welcome to Expert Infantry!! Other-Armor Fit/Assembly: In this section we review observations made by us and your fellow troopers. Suggestions made here are to improve the overall look of your armor . If these suggestions would effect an application they will be mentioned in the above or below sections. Another very nice set of RS armour and another great build, never get tired of reviewing these, and I'm glad to say there is not much to suggest in this section. You can probably close the gap between the chest and shoulder bells a touchby simply rotating them forward. Moving the top straps to the bells forward can also help make them sit closer. The other fine tune point would be to drop your left thigh and balance the gap between the tops and the cod. Reference image Centurion Suggestions: In this area we try to prepare you for Centurion. Any needed corrections will be posted here. Only two areas to address and place you in the best possible position for a successful Centurion application so here they are.. As per the CRL For level three certification (if applicable): Drop boxes are vertically aligned with the end of the ammo belt with minimal gap between belt and box.We think you just need to secure these from behind the belt with Velcro or a dab of glue so they cant slip on the canvas belt Reference image The second point is the side shims. This will take a bit more work, but the end results we have seen by others in the past, make the effort well worth it. In the below image rthey look to be mounted behind the kidney plate, where they will need to be flush with it, the same way a but joint is made with a cover strip on the inside. The seam then needs to be filled with ABS paste, sanded and polished so as to make the entire part look as one piece. The CRL states For level three certification (if applicable): Ideally there no gap between the abdomen and kidney armor.A single visible seam line is present.The seam line refered to is the line between the Ab and Kidney, and of coarse needs to be replicated on the opposite side as well. There are loads of build threads and a few tutorials on FISD that go through the process of ABS paste There you go Jon, congratulations on a great EI review and award, see you again soon in centurion 1 Quote Link to comment Share on other sites More sharing options...
Coloursergeant Posted October 25, 2016 Author Report Share Posted October 25, 2016 (edited) Thank you so much Andrew! And thank you for the centurion tips. I will get to work on those right away, hopefully you will see my application before too long! Edited October 25, 2016 by Coloursergeant Quote Link to comment Share on other sites More sharing options...
Novak Dimon[TK] Posted October 25, 2016 Report Share Posted October 25, 2016 Congratulations to your EIB award Jon! 1 Quote Link to comment Share on other sites More sharing options...
TrooperKen(TK)[TK] Posted October 26, 2016 Report Share Posted October 26, 2016 Congratulations on your EIB!! Wish you the best on your centurion next! 1 Quote Link to comment Share on other sites More sharing options...
Coloursergeant Posted October 26, 2016 Author Report Share Posted October 26, 2016 Congratulations on your EIB!! Wish you the best on your centurion next! Congratulations to your EIB award Jon! Thank you brothers for the kind words! 1 Quote Link to comment Share on other sites More sharing options...
Sam Crow[TK] Posted October 27, 2016 Report Share Posted October 27, 2016 well done, centurian shouldn't be a problem 1 Quote Link to comment Share on other sites More sharing options...

Recommended Posts
Join the conversation
You can post now and register later. If you have an account, sign in now to post with your account.