y2gabe2 Posted May 9, 2016 Report Share Posted May 9, 2016 Gabriel Arroyo TK-83186 y2gabe2 So Cal Garrison Height: 5' 5" Weight: 160lbs. Armor: Anovos Helmet: Anovos Blaster: Hyperfirm Boots: TKBoots Canvas belt: Trooperbay Hand Plates: Trooperbay Neck Seal: Anovos supplied Thank you for your time and consideration Quote Link to comment Share on other sites More sharing options...
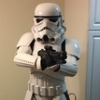
y2gabe2 Posted May 9, 2016 Author Report Share Posted May 9, 2016 (edited) Attached are my images for submission. Edited May 9, 2016 by y2gabe2 Quote Link to comment Share on other sites More sharing options...
y2gabe2 Posted May 10, 2016 Author Report Share Posted May 10, 2016 Here are some additional pictures. Quote Link to comment Share on other sites More sharing options...
ukswrath[Staff] Posted May 16, 2016 Report Share Posted May 16, 2016 Hey Gabriel, Sly of myself will be with you shortly, sorry for the delay 1 Quote Link to comment Share on other sites More sharing options...
y2gabe2 Posted May 16, 2016 Author Report Share Posted May 16, 2016 Hey Gabriel, Sly of myself will be with you shortly, sorry for the delay Awesome! I can't wait. Quote Link to comment Share on other sites More sharing options...
allan1313[TK] Posted May 16, 2016 Report Share Posted May 16, 2016 Nice clean build! Only suggestion is to clean up the eyes a little. Sent from my Nexus 6P using Tapatalk 1 Quote Link to comment Share on other sites More sharing options...
y2gabe2 Posted May 16, 2016 Author Report Share Posted May 16, 2016 Copy that. Thank you. Quote Link to comment Share on other sites More sharing options...
Sly11[Admin] Posted May 19, 2016 Report Share Posted May 19, 2016 Hey Gabriel, thank you for your EIB application, let's get to it. CRL and Expert Infantry Application Requirements: All required photos have been submitted. Great looking build trooper . Your armor meets all the requirements for Expert Infantry. Sly and myself would like to congratulate you on a job well done. Other-Armor Fit/Assembly: You have put together a very nice set of armor, with only a few minor details that need some attention, so we will start with the one that stands out to us the most. Drop Box positioning: The drop boxes need to be aligned with the ends of the plastic ammo belt and they should hang just below it, if not touching the base as in the image below yours. Reference photo Back Plate to Kidney plate connection: In this image, it appears to overlap. In this one, a large gap opens up So we see here that the problem stems from the Anovos Velcro strapping system. Its definitely not my choice in strapping as there are better systems available, but to rectify the current gaps and overlaps, you need to bring the two pieces of armor together so the bottom of the back plate is touching the top of the back plate as there is two much slack between the parts. Shorten up those straps. Cover Strips: Some of your cover strips are just a little long and could be trimmed back to finish at the edge of the armor. Centurion Suggestions: Ab and Kidney rivet positioning: This one is a must fix. Unfortunately you have placed the bottom rivet down on the cod section. It needs to remain on the Ab area as in the image below. Fear not, this isn't a hard fix. You will need to make up some ABS paste using small scraps of ABS mixed in a jar with acetone. This melts the ABS into a tooth past like consistency, which you then fill the holes with, and when it sets sand it with fine sand paper, then wet & dry, and finally some Novus polish. Many FISD members have made and used ABS paste so i am more than positive you will get help and more advise on how to proceed. Thermal Det screws: This is just a nice upgrade for accuracy, but they can be changed to Flat blade as opposed to the Philips head screws currently being used. Also for screen accuracy they should be painted black Aside from the above mentioned corrections, you have done a brilliant job with this build. The repairs are well within your capabilities so get to it and hope to see you in Centurion review soon. Again Congratulations. Quote Link to comment Share on other sites More sharing options...
y2gabe2 Posted May 19, 2016 Author Report Share Posted May 19, 2016 Hey Gabriel, thank you for your EIB application, let's get to it. CRL and Expert Infantry Application Requirements: All required photos have been submitted. Great looking build trooper . Your armor meets all the requirements for Expert Infantry. Sly and myself would like to congratulate you on a job well done. Other-Armor Fit/Assembly: You have put together a very nice set of armor, with only a few minor details that need some attention, so we will start with the one that stands out to us the most. Drop Box positioning: The drop boxes need to be aligned with the ends of the plastic ammo belt and they should hang just below it, if not touching the base as in the image below yours. Reference photo Back Plate to Kidney plate connection: In this image, it appears to overlap. In this one, a large gap opens up So we see here that the problem stems from the Anovos Velcro strapping system. Its definitely not my choice in strapping as there are better systems available, but to rectify the current gaps and overlaps, you need to bring the two pieces of armor together so the bottom of the back plate is touching the top of the back plate as there is two much slack between the parts. Shorten up those straps. Cover Strips: Some of your cover strips are just a little long and could be trimmed back to finish at the edge of the armor. Centurion Suggestions: Ab and Kidney rivet positioning: This one is a must fix. Unfortunately you have placed the bottom rivet down on the cod section. It needs to remain on the Ab area as in the image below. Fear not, this isn't a hard fix. You will need to make up some ABS paste using small scraps of ABS mixed in a jar with acetone. This melts the ABS into a tooth past like consistency, which you then fill the holes with, and when it sets sand it with fine sand paper, then wet & dry, and finally some Novus polish. Many FISD members have made and used ABS paste so i am more than positive you will get help and more advise on how to proceed. Thermal Det screws: This is just a nice upgrade for accuracy, but they can be changed to Flat blade as opposed to the Philips head screws currently being used. Also for screen accuracy they should be painted black Aside from the above mentioned corrections, you have done a brilliant job with this build. The repairs are well within your capabilities so get to it and hope to see you in Centurion review soon. Again Congratulations. I appreciate all the feedback and will be getting on this very quickly. I already started with the strapping system. Just upgraded to Mr. No Stripes. Thanks for all the feedback. Look forward to seeing you in Centurion Level. 1 Quote Link to comment Share on other sites More sharing options...
ukswrath[Staff] Posted May 19, 2016 Report Share Posted May 19, 2016 Congrats Gabriel Quote Link to comment Share on other sites More sharing options...
y2gabe2 Posted May 19, 2016 Author Report Share Posted May 19, 2016 Congrats Gabriel Thank you. Now on to some Centurion work. Quote Link to comment Share on other sites More sharing options...
magni[TK] Posted May 19, 2016 Report Share Posted May 19, 2016 Congratulations Gabriel! 1 Quote Link to comment Share on other sites More sharing options...
y2gabe2 Posted May 20, 2016 Author Report Share Posted May 20, 2016 Congratulations Gabriel! Thank you. Quote Link to comment Share on other sites More sharing options...

Recommended Posts
Join the conversation
You can post now and register later. If you have an account, sign in now to post with your account.