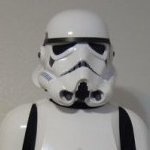
SeanTX Posted October 7, 2015 Report Share Posted October 7, 2015 Name = Sean Thomas TK ID = 73268 FISD Forum Name = SeanTX Garrison = Star Garrison Armor= AM 2.0 Helmet= AM 2.0 Blaster= Rubies (PP pipe build in work) Height = 6'2" Weight = 160 lbs Boots = Painted Roamers Canvas Belt = TKittell Hand Plates/Gloves = Sonnenschein Inner Drop Boxes = AM 2.0 Holster = Darman Neck Seal = Darman Front-Arms at side Back - Arms at side (This one makes it pretty clear I need to raise my shins somehow.) Left - Arm raised Right - Arm raised Right Side Detail - Arm raised Left Side Detail - Arm raised Abdomen Details Cod and Butt Plate Attachment Interior Strapping Front Left Right Back Hovi Mic Tip Detail Lens Color Blaster Details (This is just my $15 drop weapon. I have much better blasters in work) Blaster - Right Blaster - Left Accessories Details Neck Seal Thermal Detonator - Back Holster Attachment Quote Link to comment Share on other sites More sharing options...
SeanTX Posted October 7, 2015 Author Report Share Posted October 7, 2015 I know my lack of adequate blaster disqualifies me. I would just like to receive armor critiques so I can fix them while I wait on more parts. Quote Link to comment Share on other sites More sharing options...
Teekay YYC Posted October 7, 2015 Report Share Posted October 7, 2015 Armour and helmet look great. Your ammo belt on the right thigh might be a bit low.....but I'm not sure what's exactly allowed. You may have already addressed it during your build, so I'll just let the experts chime in! Good luck!! Quote Link to comment Share on other sites More sharing options...
SeanTX Posted October 7, 2015 Author Report Share Posted October 7, 2015 Ah shoot. That is cause it fell off the snap on my side shots. Quote Link to comment Share on other sites More sharing options...
ukswrath[Staff] Posted October 8, 2015 Report Share Posted October 8, 2015 Hey Sean, well besides your blaster needing power cylinders, D-ring, paint the tip and making sure you have 6 T-tracks and a row of holes left (I cant clearly see these) you should be good to go. Your brow appears a bit low also but its not a deal breaker IMO. Looking good brother, good luck. Quote Link to comment Share on other sites More sharing options...
TyWebb1075[501st] Posted October 9, 2015 Report Share Posted October 9, 2015 Regarding the gap between the thighs and shins in the back that you mentioned, I don't think you'll be able to raise the shins any higher without it looking weird around your ankles. You could possibly lower your thighs a bit to close your gap. You can have a bit more black showing between your cod and thighs and still be okay. Another option is to pick up a set of extra long shins from TM which are a few inches longer than what you have now. That's what I did. I'm 6'3" and my AM shins were too short. The TM and AM whites match very well too. Sent from my SM-N910V using Tapatalk Quote Link to comment Share on other sites More sharing options...
SeanTX Posted October 11, 2015 Author Report Share Posted October 11, 2015 I do think i should lower my thighs. Whoch should be easy enough. I'll just loosen my belt. Taller shins are interesting. I really don't want to make them again lol. Sent from my SAMSUNG-SGH-I257 using Tapatalk Quote Link to comment Share on other sites More sharing options...
ukswrath[Staff] Posted October 21, 2015 Report Share Posted October 21, 2015 Hey Sean, Sly and myself are aware of your application and we're currently reviewing it. Thanks for your patience. 1 Quote Link to comment Share on other sites More sharing options...
The5thHorseman[TK] Posted October 21, 2015 Report Share Posted October 21, 2015 (edited) Hey Sean, Sly and myself are aware of your application and we're currently reviewing it. Thanks for your patience. Out of curiosity, are you actually reviewing both each application, comparing your results, choosing the points to keep, and then making the official post? If it's the case, it feels to me like having two DOs will actually slow down the approval process, and that the DO workload won't be split at all. Edited October 21, 2015 by The5thHorseman Quote Link to comment Share on other sites More sharing options...
ukswrath[Staff] Posted October 21, 2015 Report Share Posted October 21, 2015 We'll ignore that comment but thanks for your thoughts. Quote Link to comment Share on other sites More sharing options...
Darth Aloha[Admin] Posted October 21, 2015 Report Share Posted October 21, 2015 Out of curiosity, are you actually reviewing both each application, comparing your results, choosing the points to keep, and then making the official post? If it's the case, it feels to me like having two DOs will actually slow down the approval process, and that the DO workload won't be split at all. For the now, yes, they intend to work on them together. To ensure consistent reviews between the two of them this seems smart to start out this way. This is going to be a process of finding what works and doesn't with two DOs. Who knows what those two knuckleheads will come up with to make things easier/faster? -Eric Sent from my iPhone using Tapatalk 2 Quote Link to comment Share on other sites More sharing options...
The5thHorseman[TK] Posted October 21, 2015 Report Share Posted October 21, 2015 (edited) Okay, thanks for your diplomatic answer Eric. I think this way of working kinda counteracts the advantage of having two DOs, but as you say, this is the first time we have two guys in charge so it might take time to figure out how to make it work. And sorry for derailing your thread Sean. Good luck with the approval. Edited October 21, 2015 by The5thHorseman Quote Link to comment Share on other sites More sharing options...
Darth Aloha[Admin] Posted October 21, 2015 Report Share Posted October 21, 2015 Okay, thanks for your diplomatic answer Eric. I think this way of working kinda counteracts the advantage of having two DOs, but as you say, this is the first time we have two guys in charge so it might take time to figure out how to make it work. And sorry for derailing your thread Sean. Good luck with the approval. You're not wrong Germain. And if nothing else I am indeed a politician -Eric Sent from my iPhone using Tapatalk Quote Link to comment Share on other sites More sharing options...
SeanTX Posted October 22, 2015 Author Report Share Posted October 22, 2015 Cool. I'm not in any rush. Quote Link to comment Share on other sites More sharing options...
AnakinS Posted October 22, 2015 Report Share Posted October 22, 2015 Looking good mate! I know my lack of adequate blaster disqualifies me. I would just like to receive armor critiques so I can fix them while I wait on more parts. As Tony says, although the CRL's don't mention Rubies yet, there's probably no reason why it can't be approved. Theoretically it should be easier to mid than a Hasbro is. - Drill out lower holes, add cylinders and D-ring. Done! Oh, and paint Good luck. Quote Link to comment Share on other sites More sharing options...
ukswrath[Staff] Posted October 23, 2015 Report Share Posted October 23, 2015 Hey Sean, sorry for the delay, let's get started shall we. Thank you for your application for Expert Infantry. Let's take a look at your armor!! CRL and EIB Application Requirements: Excellent job on your build, very clean . As you already know a approved blaster is required for EIB and we're sorry to say the Rubies version is not, even with some serious modifications as I'd mentioned in a previous post, I now have to eat my own words. Sorry brother. Before proceeding, in addition to the blaster we also need a action shot picture. If you could post those when you have time that would be awesome. Thank you On a positive note your armor contains all the necessary elements to qualify for EIB . When you have your approved blaster please post the pictures so we can get you approved. Other-Armor Fit/Assembly: In this section we'll discuss observations made by your fellow troopers as well as myself and Sly. Sometimes changes and or adjustments are suggested for the overall fitment of your armor. With that said tightening the belt would probably resolve the drooping issue as it will hold it against the armor tighter essentially assist in keeping it snapped. As for the gaps in between sections, your height alone may naturally create some excessive space in between sections however, we believe yours are acceptable as you've been able to balance your height and armor sections to give it a well balanced look over all. Great job again. Centurion Suggestions: A this moment the only thing we see that may need correction for Centurion is the drop box to belt alignment. From the angle of the pictures the drop boxes are to be aligned with the outer most edge of the ammo belt as see here in this reference picture. We have suggestion, we noticed that the ammo belt outer rivet covers aren't centered due to extra plastic at the edge. If you were to trim ammo belt edge removing enough to align with your drop box it would essentially centering the rivet covers accomplishing two things at once. Just a thought. Quote Link to comment Share on other sites More sharing options...
SeanTX Posted October 23, 2015 Author Report Share Posted October 23, 2015 Thanks. I had no misunderstanding about the blaster. I wouldn't wamt the crl to include them anyways. I'll take an action shot when i get a chance but i may aswell wait on the blaster. Here is the side rivets. http://i236.photobucket.com/albums/ff263/seantheawesome/stormtrooper/8a1413aa-88f8-4597-b81f-783950d00d03_zpshkysckin.jpg Interesting about the drop box alignment. When i riveted them they are flush with the outter edge when the belt is off. But i didn't notice they slide forward like that when worn. I'll try adjusting them. This is the only picture i haveof that right now. http://i236.photobucket.com/albums/ff263/seantheawesome/stormtrooper/tapatalk_1443896523949_zpsjttvsm2n.jpeg That stinks about the buttons. I wonder why the kits guide hole is off. I e6000ed the covers i might be able to just adjust them. Or do as you recommended. Sent from my SAMSUNG-SGH-I257 using Tapatalk Quote Link to comment Share on other sites More sharing options...
ukswrath[Staff] Posted October 23, 2015 Report Share Posted October 23, 2015 Hey Sean thanks for the ab picture but I need the other right side . No rush there's time. Thanks for the clarification on the drop boxes, a picture with them in the correct position would be awesome and no worries about the ab belt rivet covers it's only a suggestion. All we need now is a action shot picture and blaster and your set brother. Quote Link to comment Share on other sites More sharing options...
I'm Batman[501st] Posted October 24, 2015 Report Share Posted October 24, 2015 Sorry brother. Before proceeding, in addition to the blaster we also need a action shot picture and a picture of the right side ab rivet. You do realise the ab rivet is not required until Centurion? Quote Link to comment Share on other sites More sharing options...
sylverbard[TK] Posted October 24, 2015 Report Share Posted October 24, 2015 (edited) I think he means the fake snap on the right hand side not the crotxh rivet? But yes the snap is a centurion thing. I just had it put on from day one to hold the armour closed. Edited October 24, 2015 by sylverbard Quote Link to comment Share on other sites More sharing options...
ukswrath[Staff] Posted October 24, 2015 Report Share Posted October 24, 2015 You do realise the ab rivet is not required until Centurion? Yes, we just want to see it for future reference but you're correct. Quote Link to comment Share on other sites More sharing options...
I'm Batman[501st] Posted October 24, 2015 Report Share Posted October 24, 2015 Odd that you would say you "need" the photo. Hopefully you won't hold up his application for something that's not required? Quote Link to comment Share on other sites More sharing options...
SeanTX Posted October 24, 2015 Author Report Share Posted October 24, 2015 Oh the side snap. Hmm i actually don't have a picture of that. I'll have to take one when I'm by my armor again. But the inside just incase. http://i236.photobucket.com/albums/ff263/seantheawesome/stormtrooper/a4ba1d3d-1deb-4b1b-b9df-25598d6955f5_zpshpof7e0e.jpg Sent from my SAMSUNG-SGH-I257 using Tapatalk Quote Link to comment Share on other sites More sharing options...
ukswrath[Staff] Posted October 24, 2015 Report Share Posted October 24, 2015 No worries Sean you're only required to produce the blaster and a action shot picture. Quote Link to comment Share on other sites More sharing options...

Recommended Posts
Join the conversation
You can post now and register later. If you have an account, sign in now to post with your account.