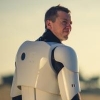
Shrapnel[TK] Posted November 12, 2014 Report Share Posted November 12, 2014 TK-77177 requesting ANH Stunt EIB Status Name: Simon Marquis501st ID: TK-77177FISD forum name: simDutch GarrisonMandatory InformationArmor = SDSHelmet = SDSBlaster = Doopydoos kit buildOptionalHeight = 182cm / 6 ftWeight = 70 kg / 154 lbBoots = painted Chelsea bootsCanvas belt = Home-madeHand Plates = SDS (hard plastic)Electronics = Aker ampNeck Seal = DarmanHolster = Darman Yep it's an SDS - young & dumb and didn't read the boards first. Here goes... Front - arms at side Back - arms at side Left - arm raised Right - arm raised Right side detail - Arm raised Left side detail - Arm raised Armor Details Abdomen details Action shot Cod & butt plate attachment Interior strapping Other armour details: Elastic on shoulders (I forgot to take a photo of this so I used an older photo) Right thigh ammo belt Sniper plate Gloves and hand plates Helmet Details Front Side Side detail Back Hovi tip detail Lens colour Blaster details Blaster left Blaster right Accessory Details Neck seal Thermal detonator - back Holster attachment I know there's some work to be done to make this look better. I'm compiling a list of Centurion upgrades & plan to upgrade the strapping system over winter. Any tips and advice gratefully received. Thanks in advance for your time :-) Simon 2 Quote Link to comment Share on other sites More sharing options...
Redforce[TK] Posted November 12, 2014 Report Share Posted November 12, 2014 Looking good. Good luck! Quote Link to comment Share on other sites More sharing options...
The5thHorseman[TK] Posted November 12, 2014 Report Share Posted November 12, 2014 Well, among other tweaks your main problem if you want to go for Centurion is the fact your armor is assembled with the overlap technic instead of the butt-joint (use of cover stripes). I can see few cover stripes, like in front of the thighs and the shins, but otherwise it seems to be overlapping everywhere else. Also your right shin closes the wrong way. The outer half should overlap the inner half, like on your left shin. And, i'm not sure but i wouldn't be surprise if you were wearing the right forearm on your left arm, and vice versa. And, one thing that should have been done before your basic approval, you should have a black elastic glued at the bottom of the shoulder bells and wrapping around the top of the biceps: Quote Link to comment Share on other sites More sharing options...
Shrapnel[TK] Posted November 12, 2014 Author Report Share Posted November 12, 2014 (edited) Germain, good stuff, thanks for the information on the butt joints. I'll add that to my to do list for further research. Also thanks for pointing out the wrong closing on the right shin. I'll get that fixed. I'll also double check the biceps. Yes, I can confirm that my shoulder bells do indeed have black elastic straps at the bottom. I've got stupid long arms so I had to play around a bit with the bicep position - maybe I placed them a bit too low (to cover my arms better), meaning you can't see the elastic. But it is there. Thanks, Simon Edited November 12, 2014 by sim Quote Link to comment Share on other sites More sharing options...
The5thHorseman[TK] Posted November 12, 2014 Report Share Posted November 12, 2014 Your biceps aren't too low. On the contrary, they are where they should be regarding your height. It's just that on your pics, especially the ones with the right arm lifted, i would have bet you had no black strap at the bottom of the shoulder bells. Quote Link to comment Share on other sites More sharing options...
gazmosis[501st] Posted November 14, 2014 Report Share Posted November 14, 2014 Hey Simon! Thank you for your application for EIB! We don't get a chance to see too many sets of SDS armor, so let's look at yours!! There is a lot to cover here. In no way are we trying to beat you up. We are just making suggestions to provide you with the information should you decide that you want to take this armor to the next level. That said, let's get to it!! CRL and EIB Application Requirements: You have all required photos properly posted. Nicely done!!! You are one adjustment away from EIB. I am surprised that your GML missed this because it is really construction 101, but as Germain pointed out, your right calf closure has the inside overlapping the outside. The outer halves always overlap the inner halves. Make this adjustment and we can move forward with your badge! Other-Armor Fit/Assembly: These are suggestions that go toward improving the overall look of your armor. These suggestions will NOT affect any application unless otherwise stated. Putting all the stories behind regarding this armor maker, you have a very good base set of armor. You have a very good and balanced fit. May I say also that your E-11 is splendid!!! What I would recommend is that you swap out the velcro on your strapping system to straps and snaps. There are far less "wardrobe malfunctions" and no ripping and crackling noises. I would also recommend building a garter system to hold up your thighs rather than the snaps on the inside of your ab. This will free up your movements and leave no possibility of your thighs coming undone from your armor. I have only one comment on the general construction and that is your plastic waist belt is a little wide. However, your canvas belt seems to be sized to this so fixing it at this point would be useless. Carry on!! Centurion Suggestions: ​This is the section that is really the separation between most armors available here and SDS. Most troopers who have Centurion in mind, build it following those guidelines right out of the box. Making adjustments, ad ons, and repairs after the fact is always most difficult. But if you intend on shooting for this accuracy badge, there is some work that will need to be done first. First and foremost is the overlap construction of your parts. This method was only used in the ROTJ armor which yours is not. It seems that the fronts of your thighs and shins have the correct butt joint/cover strip construction that should be followed on ALL your parts. The good news here is that looking at your parts, the overlap is excessive. this means it is very possible to trim this down to a single seam butt joint and top that seam with a cover strip. This is only possible based on whether or not you can get the halves apart. The last time I heard SDS was using a plastic melt/weld that fuses the parts together. You can probably contact them and ask their opinion of what you should do to get the halves apart. Should you have any questions regarding the correct construction procedures, look up the build threads and there should be around a million examples of this. You already have the correct gloves, now you need the flexible/latex hand guards You will need the hardware for along your side seams. The 6 split rivets on your left side: and the inward facing male snap on your right side: Note their positions and distances from the seam line. You will need the two, inward facing snaps on the crotch portion of the butt plate as well as the split rivet on the cod portion of the ab. The blue buttons on your ab button plates look added on. All the buttons here need to be originally molded into the plate then painted directly onto the raised buttons If you plan on tackling the cover strip challenge, keep in mind that the cover strips on your shin backs and thighs(fronts and backs) should only go UP TO and not exceed the ridges. You will need to trim the one cover strip on the front of your left thigh. This is an example of a thigh back with the proper strip placement: Your chest plate will need to altered slightly. Right now, the distinct upside down "U" shape of the bottom is just too similar to the old FX plate that needed upgrading. Here is what I am suggesting as a change here: It merely takes the end and curves it slightly to level it off and take away that "U" shape. IF you really wanted to be sneaky and put in a new return edge here you would be a rockstar!!! While we are on the subject of trimming things, a bit can be taken off both sides of your back: This will mess with your connecting strap here, but replacing the velcro with snaps is always a plus. You will need to change out the black straps that connect your chest and back with white elastic or webbing. The details on your helmet will either need to be hand painted or the "hand painted look" decals can be purchased from Trooperbay Laslty but not super high priority are the belt clips on your Thermal detonator. These should be 25-28 MM thin aluminum strips. Your screws are great. The clips need to be wider. Like I said, this can be last on your list. I know this sounds like a lot but we are here to support you should you decide to take on this challenge. If not and you are satisfied with EIB, make that calf closure change and we will celebrate that!!! Quote Link to comment Share on other sites More sharing options...
Shrapnel[TK] Posted November 16, 2014 Author Report Share Posted November 16, 2014 Hi Steve,First - many thanks for all the detailed information in your post. It's very much appreciated to get feedback like this from you experienced guys. Also thanks for the E-11 compliment - I had a lot of fun building it, but couldn't have done it without all the great builds listed on whitearmor.Second - any errors in the construction are mine and shouldn't reflect on others in my garrison, who have been very helpful over the last year. Both before and after my TK approval, I've pulled much of the armor apart to play with positioning so any errors in the build are my fault.Ok, moving on!I re-did the right calf closure - this now closes with the outside over the inside. Thanks for the heads-up on this! Photo attached below.Yes, the strapping does need swapping out - I plan to do that over winter. Watch this space!I already have a garter system for my thighs - I made this after talking with some of the other TKs in my garrison at my first troop. A great tip. Photo below... Also, thanks for your cutting tips on the chest and back plate. You know, I had noticed a difference in shape but was still scratching my head about how to change this so your photo edits are going to be a great help.Germain was also right about my biceps - I pulled them out yesterday to check and the elastic is sitting too high. See photo below. For the rest, I hope to work on the Centurion upgrades over winter. Like you mentioned, it could be that the cover strip challenge might be a task too great, but it's something I'll have to analyse and plan for over the coming weeks. Even if I can't fix the cover strips, there's still a lot of other minor Centurion upgrades you listed which will improve the look of my armour, such as the snaps, split rivets, hand guards, TD belt clips, etc. Good stuff. Thanks again for your help. Quote Link to comment Share on other sites More sharing options...
gazmosis[501st] Posted November 16, 2014 Report Share Posted November 16, 2014 Hey Simon: Great follow-up! Sorry about the assumption of the thigh straps being attached to the inside of your ab. I see those snaps and they are only usually used for that purpose in that location. My bad. Anyway, With your correction of the calf closure, I put through your EIB badge. Congratulations and welcome to EIB!!! Regarding your upgrades, you never stated which adhesive you used in your assembly. If in fact is was something that you can get the halves apart with damage, the process of upgrading your seams ma seem daunting until you get done with the first one. After that, you will have the hang of it. If it is something that you just won't get to right now, I would at least, cut the overlap on your calf closure so the halves butt up to each other and install a cover strip of around 25 mm in width to your calves. This will at least get one upgrade chalked off the list. You can use Velcro or the metal hooks attached to elastic to keep them closed. We hope that you can make this happen! In the meantime, enjoy your EIB quality armor and get out there and make people smile!!!! Quote Link to comment Share on other sites More sharing options...
Artstar[TK] Posted November 17, 2014 Report Share Posted November 17, 2014 Congrats simon! Gefeliciteerd! Quote Link to comment Share on other sites More sharing options...
The5thHorseman[TK] Posted November 17, 2014 Report Share Posted November 17, 2014 Congratulations! Welcome to EIB. Quote Link to comment Share on other sites More sharing options...
Sly11[Admin] Posted November 17, 2014 Report Share Posted November 17, 2014 Congrats and welcome to the ranks. Sent from my iPad using Tapatalk Quote Link to comment Share on other sites More sharing options...
Tusken RTT Posted November 17, 2014 Report Share Posted November 17, 2014 Congrats!! Quote Link to comment Share on other sites More sharing options...
Shrapnel[TK] Posted November 17, 2014 Author Report Share Posted November 17, 2014 Thanks guys And thanks Steve and Germain for all the useful tips (and for tripling my 'To do' list ) Quote Link to comment Share on other sites More sharing options...
gmrhodes13[Staff] Posted November 17, 2014 Report Share Posted November 17, 2014 Congrats and welcome to the ranks Quote Link to comment Share on other sites More sharing options...
roguewedge[501st] Posted November 19, 2014 Report Share Posted November 19, 2014 Congrats brother! Quote Link to comment Share on other sites More sharing options...

Recommended Posts
Join the conversation
You can post now and register later. If you have an account, sign in now to post with your account.