TurboPunk Posted April 30, 2013 Report Share Posted April 30, 2013 Please add me to the list. This is an incredible set-up. Quote Link to comment Share on other sites More sharing options...
calvincarter Posted May 3, 2013 Report Share Posted May 3, 2013 Any update? Quote Link to comment Share on other sites More sharing options...
Coryleeper[TK] Posted May 4, 2013 Report Share Posted May 4, 2013 He's gone MIA.... No answer here or on his website. Quote Link to comment Share on other sites More sharing options...
Vheissu Posted May 5, 2013 Report Share Posted May 5, 2013 Take my money! Quote Link to comment Share on other sites More sharing options...
E-Vader Posted May 17, 2013 Report Share Posted May 17, 2013 Any News? Still MIA? If not, would be interested... Quote Link to comment Share on other sites More sharing options...
SuperficialBurn Posted May 19, 2013 Report Share Posted May 19, 2013 Add me to the list too. Or perhaps I can take DDay's spot. Quote Link to comment Share on other sites More sharing options...
Ruck[TK] Posted June 14, 2013 Report Share Posted June 14, 2013 Does anyone know if this guy is still selling his kits? I haven't heard back from him either I also left him an email on his web page. Quote Link to comment Share on other sites More sharing options...
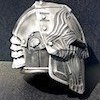
Mynock Posted June 15, 2013 Author Report Share Posted June 15, 2013 (edited) Still here, though my apologies for the comm silence over the last little while. Work has been a nightmare, with little time for play. I've replied to many of you via PM and/or on my website, but still have a few messages to answer, so my apologies if I haven't yet done so. The project has been slow going, and unfortunately I am not ready to offer the Environmental AMP System (EAS) as a kit. In fact, if I don't find a way to minimize the workload involved in putting these together, the best I may be able to do is a parts list and a detailed set of instructions. :huh:The main issue is that as it stands, I have to cannibalize components from existing products and adapt them for use in the EAS, which is extremely time consuming. With my schedule and other commitments, it's proving to be a crawl. I'm not giving up hope just yet, and I may still be able to do a few at a time while I look for simpler solutions. On a brighter note, I just successfully outfitted an AP lid with the EAS, custom padding and fan (no voice/transmitter mods yet). It's put together in such a way as to leave a ton of room (in the dome and most of the tube) for whatever else you want to put into the helmet. I am in the process of putting together a video of the whats and the hows, but in the meantime here are some pics. Once again, the inside of the lid is painted black because I'm a huge fan of the look. The AP lid is signifficantly smaller than the eFX, so the amps are now housed in the dome as opposed to in the tube. Initially I had them in the tube, but since i literally have to put the helmet on sideways and then rotate it into place due to the much tighter fit, I decided to get them out of the way altogether. The amps are held in place with velcro (velcro for president on all my mods!) and are covered by a circular piece of 1"-thick open celled foam, which acts both as padding for your skull and protection for the circuitboards. The ear pads are also made out of 1" open cell foam cut into 5x5" squares; the middle of each pad is cut out and fitted with a headphone driver. The pads are enclosed in grey fabric with a velcro strip sewn into them (courtesy of my wife), to attach to the inside of the helmet. The 9v batteries (one for EAS and one for the fan) are on the sides below the ears and are covered by plastic ribbing cut from sump pump line (though the ribbing is not really necessary). I will post a video with a better description soon, and compile a comprehensive DYI guide showing all the steps; i purchased another eFX lid to use in the demonstration. Edited June 15, 2013 by Mynock Quote Link to comment Share on other sites More sharing options...
LeMaxim[TK] Posted June 15, 2013 Report Share Posted June 15, 2013 Good to see you back. Great work on the lid. Very inspirational. Keep up the good work! Quote Link to comment Share on other sites More sharing options...
Deadpool[TK] Posted June 15, 2013 Report Share Posted June 15, 2013 So with the change in design for the AP do you have ATA worked out? Quote Link to comment Share on other sites More sharing options...
gac Posted June 16, 2013 Report Share Posted June 16, 2013 It seems from the postings you have a good product that people are willing to purchase. I may be able to help you with your design of the electrical components I will send you a PM. Quote Link to comment Share on other sites More sharing options...
Mynock Posted June 16, 2013 Author Report Share Posted June 16, 2013 (edited) So with the change in design for the AP do you have ATA worked out? I do not own an ATA helmet, though my goal is to acquire all major makes of the TK lid if not for this purpose then to collect them (which is going to take some $ saving). I would hazard a semi-educated guess that given that all dome depths are very similar, that the fit would be the same for all helmets, if the electonics are housed in the dome and covered with some sort of soft padding. These boards do not generate heat, so they require no breathing room; they can be installed, covered with foam to protect them, and left alone. Wearing the AP lid, you would never know there's something behind the dome padding. The AP lid is tight to get on, but even so the ear pads press against your ears without any oppressive pressure. Since I did not use heavy duty helmet liner this time, there is lots of space left to put in additional fans, batteries, or to just leave alone as breathing room. I'm in the process of doing a detailed "how to" writeup complete with a parts list, photos, and wiring diagrams for those that want to replicate these results themselves. This is a fairly inexpensive seteup; just takes some time putting it all together. It seems from the postings you have a good product that people are willing to purchase. I may be able to help you with your design of the electrical components I will send you a PM. PM replied. Edited June 16, 2013 by Mynock Quote Link to comment Share on other sites More sharing options...
TB27886[501st] Posted July 14, 2013 Report Share Posted July 14, 2013 (edited) so I've read through this whole thread and learned that... A. You've got a really awesome idea on your hands, and B. you're sitting on thousands of dollars worth of customers! is the problem the work load? could you perhaps wire up mic-->board-->speakers and a seperate external mics-->board-->headphones simple versions for us to install in our own lids where we want? I'm really interested in one myself, and as I see it, you could maybe provide an "install it yourself" version to recoup some costs relatively quickly while you hone your goldmine of a project! Sorry if what I have said was super naive...haha I'm not any kind of electronics expert at all (stoked that I can set my xbox up myself! JK) but I would love to see this come to fruition without you being too overwhelmed to get it going! Thanks for being awesome and sharing this project Let us make you rich! haha Edited July 14, 2013 by jaxinhall Quote Link to comment Share on other sites More sharing options...
Kaden Posted July 22, 2013 Report Share Posted July 22, 2013 A "How To" would be outstanding! I'll be watching this thread closely. Quote Link to comment Share on other sites More sharing options...
pretense Posted July 23, 2013 Report Share Posted July 23, 2013 Very inspiring work! You changed the way I imagine the inside of a real Stormtrooper helmet. Keep it up! Quote Link to comment Share on other sites More sharing options...
BlackSun51[TK] Posted July 30, 2013 Report Share Posted July 30, 2013 Can't wait to see the write up for the DIYS! I want to take on this challenge for my bucket! Quote Link to comment Share on other sites More sharing options...
Mynock Posted August 1, 2013 Author Report Share Posted August 1, 2013 Finished the DIY tutorial! I will most likely create a thread for it here when I get a minute so people have easy access to it from within the forums, with the ability to ask questions etc, but for now here it is on my website. http://mynocksden.com/projects/stormtrooper-helmet-upgrade/environment-amplification.html Quote Link to comment Share on other sites More sharing options...
LeMaxim[TK] Posted August 1, 2013 Report Share Posted August 1, 2013 Very nice! It's on my "sometime in the future list" now Quote Link to comment Share on other sites More sharing options...
BlackSun51[TK] Posted August 1, 2013 Report Share Posted August 1, 2013 Sweet! Thanks! Printed out and getting ready to go shopping! Thanks! Quote Link to comment Share on other sites More sharing options...
Logon Posted August 5, 2013 Report Share Posted August 5, 2013 (edited) Finished the DIY tutorial! I will most likely create a thread for it here when I get a minute so people have easy access to it from within the forums, with the ability to ask questions etc, but for now here it is on my website. http://mynocksden.com/projects/stormtrooper-helmet-upgrade/environment-amplification.html One thing i wondered is why you don't just use 1 amp? connect left and right mics into the L + R Inputs in the amp and then just connect speakers to the amp? Rather than using 2 microphone amps, or is it because you need the very high amplification of the microphones? Edit: Because there are 2.1 cm x 1.8 cm x 0.3 cm big amps that you could use been thinking about doing a kit myself and giving out plans + orderplaces Edited August 5, 2013 by Logon Quote Link to comment Share on other sites More sharing options...
Mynock Posted August 5, 2013 Author Report Share Posted August 5, 2013 (edited) One thing i wondered is why you don't just use 1 amp? connect left and right mics into the L + R Inputs in the amp and then just connect speakers to the amp? Rather than using 2 microphone amps, or is it because you need the very high amplification of the microphones? Edit: Because there are 2.1 cm x 1.8 cm x 0.3 cm big amps that you could use been thinking about doing a kit myself and giving out plans + orderplaces It's not enough to just plug an electret microphone into the L or R input on a regular amp. It won't work. High sensitivity mics need pre-amp (phantom) power to output signal strong enough to be amplified by your LR amp. You can get mic-pre amp DIY boards to do this (like this http://www.canakit.com/electret-microphone-pre-amp-kit-ck495-uk495.html), but now you're adding more hardware (two extra boards, at least one more battery, and/or resistors if wiring to the LR amp's internal power supply, etc), which takes up even more space, and in my opinion defeats the purpose of trying to simplify the design with a single LR amp. And you have to be careful not to use dynamic microphones for this setup, because they have totally different preamp requirements, and are not sensitive enough to pick up anything other than directional sound (meaning that unless you talk directly into the microphone, you will not hear anything). If you can find or make a condenser microphone amplifier WITH preamp for two built-in microphones to give you stereo sound, then by all means go that route because that's essentially the ideal setup! There are existing products that implement this already (electronic earmuffs for shooters for example), but I have not been able to find anything like that in a simple circuit board DIY kit setup, because there are too few practical applications for such a thing to be produced en masse. Edited August 5, 2013 by Mynock Quote Link to comment Share on other sites More sharing options...
Logon Posted August 5, 2013 Report Share Posted August 5, 2013 If you use something like this http://www.ebay.com/itm/370528555200?ssPageName=STRK:MEWNX:IT&_trksid=p3984.m1497.l2649 Which itself needs a powersource of a 9v battery you could add 2 extra batteries to get the simpler circuit or simply power both with a phone charger USB 5v 1A Quote Link to comment Share on other sites More sharing options...
Mynock Posted August 5, 2013 Author Report Share Posted August 5, 2013 What kind of amplifier did you have in mind? Quote Link to comment Share on other sites More sharing options...
Logon Posted August 5, 2013 Report Share Posted August 5, 2013 (edited) What kind of amplifier did you have in mind? Small digital one 5v to drive 2x 40mm 3w 4ohm speakers. I have ordered all the parts needed so i will test it and try. Theoretically you should be able to connect the mic to the speaker themselves and get a result because of the input in the mic Edited August 5, 2013 by Logon Quote Link to comment Share on other sites More sharing options...
Mynock Posted August 5, 2013 Author Report Share Posted August 5, 2013 (edited) Small digital one 5v to drive 2x 40mm 3w 4ohm speakers. I have ordered all the parts needed so i will test it and try. Theoretically you should be able to connect the mic to the speaker themselves and get a result because of the input in the mic I got a few of these on order but they haven't arrived yet: http://bit.ly/15IfYRV Also, got two of these to try, but again haven't had time to play with them due to other projects. Look at the size comparison! If it works, both the cost and the footprint of the system can be reduced drastically, which will be awesome! Edited August 5, 2013 by Mynock Quote Link to comment Share on other sites More sharing options...

Recommended Posts
Join the conversation
You can post now and register later. If you have an account, sign in now to post with your account.