darksideemt Posted January 23, 2012 Report Share Posted January 23, 2012 (edited) I remember having to trim more off of one side than the other for the same reason. You want the middle box centered most of all. Edited January 23, 2012 by darksideemt Quote Link to comment Share on other sites More sharing options...
TD-4395[501st] Posted January 23, 2012 Author Report Share Posted January 23, 2012 Just fixed the thigh ammo strip it aint perfect but alot better Quote Link to comment Share on other sites More sharing options...
Quartermaster[501st] Posted January 23, 2012 Report Share Posted January 23, 2012 Looking good Tyler! Quote Link to comment Share on other sites More sharing options...
TD-4395[501st] Posted January 27, 2012 Author Report Share Posted January 27, 2012 Allright just finished the thermal det., and the belt. Quote Link to comment Share on other sites More sharing options...
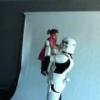
TD-4395[501st] Posted January 31, 2012 Author Report Share Posted January 31, 2012 heres updated pic of everything but holster which is on its way, and helmet which is on its way: Ill make sure to adjust the shoulder bells for submission pics Quote Link to comment Share on other sites More sharing options...
BananoPower22[TK] Posted January 31, 2012 Report Share Posted January 31, 2012 Looking nice! But my neck kinda hurts now Quote Link to comment Share on other sites More sharing options...
TD-4395[501st] Posted January 31, 2012 Author Report Share Posted January 31, 2012 Ya srry bout thesideways pic even if i fix them in photobucket they still post sideways for some reason. lol Quote Link to comment Share on other sites More sharing options...
Trooperman Posted January 31, 2012 Report Share Posted January 31, 2012 looks good, but i think your drop boxes might have to be moved slighly Quote Link to comment Share on other sites More sharing options...
tkrestonva[TK] Posted February 1, 2012 Report Share Posted February 1, 2012 looks good, but i think your drop boxes might have to be moved slighly Agreed. Move the drop boxes out so that the outer edges are lined up with the outer edges of the belt. Quote Link to comment Share on other sites More sharing options...
TD-4395[501st] Posted February 1, 2012 Author Report Share Posted February 1, 2012 will do, i hope they slide over enough. I decided to not rivet them on and place them inside of the two outer rivets on the belt. Thanks Quote Link to comment Share on other sites More sharing options...
darksideemt Posted February 1, 2012 Report Share Posted February 1, 2012 will do, i hope they slide over enough. I decided to not rivet them on and place them inside of the two outer rivets on the belt. Thanks they actually should have been mounted with the outside rivets, so get it as close as you can. Quote Link to comment Share on other sites More sharing options...
TD-4395[501st] Posted February 2, 2012 Author Report Share Posted February 2, 2012 (edited) I figured i wouldnt rivet them on, so that they could be removable if needed. Oops. Edited February 2, 2012 by dante12721 Quote Link to comment Share on other sites More sharing options...
Quartermaster[501st] Posted February 2, 2012 Report Share Posted February 2, 2012 Looks great Tyler! Quote Link to comment Share on other sites More sharing options...
gazmosis[501st] Posted February 3, 2012 Report Share Posted February 3, 2012 Nice armor, Brother!!! I have my ATA kit on its way. Your armor is getting me STOKED!!! In regards to those drop boxes, they should not be moveable at all. They should be fixed in position lining up with the outside edge of the ammo belt. Quote Link to comment Share on other sites More sharing options...
TD-4395[501st] Posted February 4, 2012 Author Report Share Posted February 4, 2012 Well it is what it is, a little too late to change it. Quote Link to comment Share on other sites More sharing options...
TD-4395[501st] Posted February 5, 2012 Author Report Share Posted February 5, 2012 about 6 hrs later helmet is almost done, just some painting and installing the s neck trim left heres some pics (srry bout pic quality) the only problem i ran into is the bottom not quite linning up, should i trim it even, and glue it together to attach the s-trim? heres the pic it hard to see but the area under the ear doesnt line up, and since everythingelse pretty much lines up right expect theres a slight gap on one ear, im not looking to take it apart and re-esemmble it. Quote Link to comment Share on other sites More sharing options...
TD-4395[501st] Posted February 6, 2012 Author Report Share Posted February 6, 2012 all right helmet is done, so there shall be some full gear pics coming soon... Quote Link to comment Share on other sites More sharing options...
TD-4395[501st] Posted February 8, 2012 Author Report Share Posted February 8, 2012 heres some finished pics: Quote Link to comment Share on other sites More sharing options...
Quartermaster[501st] Posted February 8, 2012 Report Share Posted February 8, 2012 Looks great Tyler! You really did a great job for your 1st build. Now get tose submission pics in to Lou!!!! Quote Link to comment Share on other sites More sharing options...
TD-4395[501st] Posted February 8, 2012 Author Report Share Posted February 8, 2012 Thanks allready in should be approved by tommorrow or the next day!! Im also gonna be getting a radio shack amp and ptt cable on friday Quote Link to comment Share on other sites More sharing options...
darksideemt Posted February 8, 2012 Report Share Posted February 8, 2012 Looks great, Congrats! Just a suggestion, you need to clean up the cover strips on the back of the thighs. Quote Link to comment Share on other sites More sharing options...
TD-4395[501st] Posted February 8, 2012 Author Report Share Posted February 8, 2012 What happened was that they are velcroed on, and i didnt notice till afterwards that they were a little off in their placement Quote Link to comment Share on other sites More sharing options...
BananoPower22[TK] Posted February 8, 2012 Report Share Posted February 8, 2012 Looking fantastic! Armor look perfect on you. One quick tip though, you can pull the belt up a wee bit more so it aligns with the bottom of the ab button square "control panel" or however it's called. But everything else looks superb. Well done! Quote Link to comment Share on other sites More sharing options...

Recommended Posts
Join the conversation
You can post now and register later. If you have an account, sign in now to post with your account.