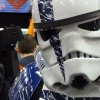
Angevine[TK] Posted December 7, 2011 Report Share Posted December 7, 2011 (edited) Thought it was about time I put some pictures up of my first ever TK build and where I am so far. Firstly, I managed to obtain the kit in a part built state. Arms built Chest and Back plate trimmed and painted Helmet - AP helmet previously used and EIB approved, painted up as TK Commander (Thanks Terry Cooper) I have been working none stop for the past month or so to get my kit built and so far I am enjoying the process, the errors and the build in general. I have attached some progress pics so far of not only the kit build but also a test fit for your comments. As I got the kit :0) I added my resin blaster and boots to this awsome kit and started to build in ernist: Terry Cooper, who I brought the kit off, had done an awsome job with the paint job so I have been scrutinising every page of the forum to ensure that I do all his hard work justice. This is where I am so far: Bells, Biceps and arms complete but not strapped Chest and back plate completed and connected via snaps and webbing, shoulder straps attached to front. Kidney plate and butt plate complete and attached to each other via straps Cod piece trimmed awaiting buttons and painting Thighs trimmed and fronts glued and strips attached (backs to measure and glue) Legs trimmed and fronts glued and strips attached (backs to measeure and velcro) Hand plates trimmed and attachment method to be sourced The pictures below are of a test fit of the upper armour but I still have the following to do: Shoulder Bells to be attached to straps to brevent bells sitting to far back Biceps and arms to be painted and correct positions to be measured and strapping system installed Right shoulder strap has a horrible twist which needs to be sorted. Can this be velcro'd in place at the rear or should I heat and bend? I think the back plate needs to drop down a bit more, easily done by adjusting the strapping Belt to be finished, and worn properly next time! Leather holster to be purchased. Anyone recommend a good supplier? Rest of strapping to be completed and lots of painting and weathering to do! Comments and advice as always appreciated. Edited December 8, 2011 by Angevine Quote Link to comment Share on other sites More sharing options...
tkrestonva[TK] Posted December 7, 2011 Report Share Posted December 7, 2011 What kind of kit is that? Quote Link to comment Share on other sites More sharing options...
Angevine[TK] Posted December 7, 2011 Author Report Share Posted December 7, 2011 The Armour is from loadingarea and the helmet is AP Quote Link to comment Share on other sites More sharing options...
darksideemt Posted December 7, 2011 Report Share Posted December 7, 2011 I hope he sent you the paint as well, so you don't have to try and match it. Good luck, it looks good so far. Quote Link to comment Share on other sites More sharing options...
Angevine[TK] Posted December 8, 2011 Author Report Share Posted December 8, 2011 Yep, got the paint so no worries there :0) Quote Link to comment Share on other sites More sharing options...
Angevine[TK] Posted December 16, 2011 Author Report Share Posted December 16, 2011 (edited) Been a busy boy and got a load more work done. Still got some tweeking, strapping to do but as you can see, we are moving on! The following pics are as I stand tonight Comments as always welcome Edited December 16, 2011 by Angevine Quote Link to comment Share on other sites More sharing options...
Angevine[TK] Posted December 18, 2011 Author Report Share Posted December 18, 2011 Two quick questions, Should there be any strapping between the chest plate and back plate? Also should the back plate be strapped to the kidney plate? I'm currently painting and weathering the thighs and ab plate as we speak, more photo's soon Any advice on the strapping is appreciated. Quote Link to comment Share on other sites More sharing options...
dashrazor Posted December 18, 2011 Report Share Posted December 18, 2011 looking good for the strapping are you going with a suspender style or clamshell? Quote Link to comment Share on other sites More sharing options...
Angevine[TK] Posted December 19, 2011 Author Report Share Posted December 19, 2011 Clam Shell Quote Link to comment Share on other sites More sharing options...
dashrazor Posted December 19, 2011 Report Share Posted December 19, 2011 Should there be any strapping between the chest plate and back plate? Also should the back plate be strapped to the kidney plate? then no, there doesn't need to be a strap between the chest plate and back plate and yes, you should have straps from the back to kidney Quote Link to comment Share on other sites More sharing options...
Angevine[TK] Posted December 22, 2011 Author Report Share Posted December 22, 2011 Thanks for the advice given so far, its been a great help. I have few more questions for you. 1. What size should the buttons be painted on the abs? I have used the centre of an old cd but it looks a bit large to me. 2. Anyone advise me of a good supplier of Thermal Detonator Clips? 3. My Thermal Detinator tube came as a piece of black pipe, I have three cans of Humbrol #5 Gloss Grey. Is this the correct colour for the pipe to be painted? Thanks for you comments and I look forward to getting some more pictures up soon. Quote Link to comment Share on other sites More sharing options...
sharptrooper Posted December 23, 2011 Report Share Posted December 23, 2011 hey mate can answer questions 1 an 2 for you and he will answer ur 3 for you :-) throw Paul TROOPERMASTER a pm on here he will b able to sort u out ab button plates and also the 1 inch width aluminium strips for the td clips, plus if u didnt want to paint up ur td he aslo supplies fantastic ones check my build thread on the ukg public section for pics mate Quote Link to comment Share on other sites More sharing options...
captsafe66[Admin] Posted December 23, 2011 Report Share Posted December 23, 2011 Looks nice! Quote Link to comment Share on other sites More sharing options...
Angevine[TK] Posted December 23, 2011 Author Report Share Posted December 23, 2011 hey mate can answer questions 1 an 2 for you and he will answer ur 3 for you :-) throw Paul TROOPERMASTER a pm on here he will b able to sort u out ab button plates and also the 1 inch width aluminium strips for the td clips, plus if u didnt want to paint up ur td he aslo supplies fantastic ones check my build thread on the ukg public section for pics mate Thanks for the above but my ab button plates are already glued to my ab piece so I am looking for the correct size to paint them. I did find these to paint and glue onto the ab plates but unsure if they are the correct size etc. http://www.amazon.co.uk/Half-Ball-Cover-Buttons-Size-18-Pkg/dp/B004BPCLKM/ref=sr_1_1?ie=UTF8&qid=1324651489&sr=8-1 Will contact Paul with regards to Clips and Tube Quote Link to comment Share on other sites More sharing options...
seantrooper[TK] Posted December 26, 2011 Report Share Posted December 26, 2011 Looking good mate, just one thing I can;t make out.... Do you have the ab button plates and are yet to glue them on? Your ab plate should look like this not without the plate (like a TD) as your looks from your photos. If you don't have the ab button plates, try sending one of the makers a PM, or ask one of your garrison's Sandys. They may have a spare set you can buy Also, it might be worth considering toning down the paint scratching too. It's just a little too much for my personal taste, but it's up to you. Maybe try painting over a majority of the white marks, and by adding in scratches going in diferent dirrections, just makes it look more natural "battle damage" rather than having the same direction which looks like you've been dragged along the ground behind a landspeeder As for your questions, 1. Not really sure what you mean here, sorry. 2. Jesse TK4702 makes awesome thermal det clips and kits. Just look for them in the For sale section. 3. Yep, humbrol #5 is the right colour for the thermal det tube. Any more questions just ask Quote Link to comment Share on other sites More sharing options...
Angevine[TK] Posted December 26, 2011 Author Report Share Posted December 26, 2011 Sean, Ab plates are now attached to the armour and the correct way up Going to re-look at the scratches again and tone them down a tad! the main question I was asking was what size I should paint the Ab buttons. I had been advised that the whole in the centre of a CD/DVD was about the right size to use as a template for painting, but when I painted the buttons to that size they looked a bit large. The centre of a CD/DVD is about 15mm in Diameter, but I think the buttons should be about 11mm in Diameter at the most! Quote Link to comment Share on other sites More sharing options...
seantrooper[TK] Posted December 26, 2011 Report Share Posted December 26, 2011 (edited) I would say just paint the raised part of the button... have a look at the centurion threads and also any screen caps or original armour reference... you should be able to get the size close from looking at that. When you are doing the scratches, use sandpaper to make them, or if you plan to use making fluid, at least scuff up the edges with sandpaper to make it look more natural and blend in better. Edited December 26, 2011 by seantrooper Quote Link to comment Share on other sites More sharing options...
SolderMaster Posted December 26, 2011 Report Share Posted December 26, 2011 Does the TKC need to have finishing strips like in the ANH fashion, or is the armor over-lapped while assembling? Quote Link to comment Share on other sites More sharing options...
dashrazor Posted December 26, 2011 Report Share Posted December 26, 2011 i just answered that in your other post here http://forum.whitearmor.net/index.php?showtopic=18123 IMO they look ANH in the pics but its impossible to say 100% as it is an artist rendition.. Quote Link to comment Share on other sites More sharing options...
TK-4935 Posted December 27, 2011 Report Share Posted December 27, 2011 Just my tuppence worth but what makes your scratches look odd is that there are no signs of scratching and scarring anywhere else on the armour. Rather than toning them down on the painted areas you might like to blend in some topical scarring and damage on the white parts as well. See below my old 501st clone. Different armour but similar paint scheme. There is actually more weathering on the white parts than the blue and I tried to match the scratches on the blue to carbon scoring on the white. It definitely helps to keep the direction of the scratches as random as possible. Give each scratch a reason. For example, bottom of the chest piece had paint rubbed off due to contact with something so the non painted part got a contact mark along the raised edge as well. The shoulder bell took and deflected a laser blast so there is a main contact point and a spray effect. There is some black carbon scorching at the point of contact. You get the idea. Quote Link to comment Share on other sites More sharing options...
seantrooper[TK] Posted December 27, 2011 Report Share Posted December 27, 2011 Just my tuppence worth but what makes your scratches look odd is that there are no signs of scratching and scarring anywhere else on the armour. Rather than toning them down on the painted areas you might like to blend in some topical scarring and damage on the white parts as well. See below my old 501st clone. Different armour but similar paint scheme. There is actually more weathering on the white parts than the blue and I tried to match the scratches on the blue to carbon scoring on the white. It definitely helps to keep the direction of the scratches as random as possible. Give each scratch a reason. For example, bottom of the chest piece had paint rubbed off due to contact with something so the non painted part got a contact mark along the raised edge as well. The shoulder bell took and deflected a laser blast so there is a main contact point and a spray effect. There is some black carbon scorching at the point of contact. You get the idea. Couldn't have put it better myself Quote Link to comment Share on other sites More sharing options...
Angevine[TK] Posted December 27, 2011 Author Report Share Posted December 27, 2011 Thanks for the advice, i've still got all the weathering to do on the white parts as you've pointed out. The clone armour looks awsome, careful, I might be contacting you for a weathering armour party Will definately be working hard to get it right otherwise it does completely stuff the whole look of the armour. Will post more pics when I have done some more, having a break for christmas! Quote Link to comment Share on other sites More sharing options...
Angevine[TK] Posted December 30, 2011 Author Report Share Posted December 30, 2011 Over the past few days I have been attempting to finish the Blue weathering on my TK Commander. I've still got all the white work to weather yet but I am pleased with the way that the Blue areas all came out. Still a little bit more work to do, but I can see an end in sight. To Do: Smoke charing on all white areas Holster to attach Boots to paint and weather Vox Kit to purchase Final adjustments to strapping As usual, all comments, advice and guidance appreciated. Quote Link to comment Share on other sites More sharing options...
Angevine[TK] Posted January 1, 2012 Author Report Share Posted January 1, 2012 Started the smoke and battle effects on the white areas. I just got dirty Quote Link to comment Share on other sites More sharing options...
Angevine[TK] Posted January 2, 2012 Author Report Share Posted January 2, 2012 Boots now sprayed up and all armour weathered. Will post pics soon Quote Link to comment Share on other sites More sharing options...

Recommended Posts
Join the conversation
You can post now and register later. If you have an account, sign in now to post with your account.