Smitty Posted March 25, 2010 Report Share Posted March 25, 2010 Cool pics! Thanks for sharing those. I havent seen a good 360 of an RT mod in a while. Quote Link to comment Share on other sites More sharing options...
SolderMaster Posted March 27, 2010 Author Report Share Posted March 27, 2010 (edited) Your welcome! I have been busy tonight..err last night and this morning...lol Since I have never built a TK before, I thought it was best to get a rough idea on how exactly this thing is "supposed" to go together. So, by reading for about three hours and looking at many pics from film clips, stills, and other trooper methods of connecting this stuff, I remember reading and seeing a couple pics of a trooper using Velcro, snaps and elasic for their webbing/strapping. I have my back, kidney, and butt joined with 2" black Velcro (loop), then a snap tab with hook Velvro, and finally snaps with 2" elastic. I felt since I'm a rookie, building it this way will allow for easy adjusting. I'll have to wear the armor a few times, I figure, before I learn what needs what. The snap tabs were made from a for sale sign I chopped up. Worked nice! So, here's what that looks like... Here's one of the Ab/cod and butt, kidney, and back. and of how it was... I also got the bicepts and bells connected. As you can see, I have a long strip of white Velcro on the bell to allow for adjustments. Once I'm happy with how it feels and looks, I may glue the tabs for permanent placement...then again...? We'll see. I'm done for tonight...err this morning. When I wake up, it's off to Tandy Leather for my TD clips!....And more snaps...man you use a bunch of those...lol Edited March 27, 2010 by SolderMaster Quote Link to comment Share on other sites More sharing options...
darthfoster[501st] Posted March 27, 2010 Report Share Posted March 27, 2010 Actually, after looking at them, I could trim each side and butt them together...then tape them from behind...then add finishing strip and glue. I just need to match up the finishing strip with the butt and make sure they are both the same width...15mm for the arms and 20mm for the legs...now...How to remove super glue. Cyanoacrylate....will Acetone hurt ABS? You didn't use E6000? Ouch You shouldn't need a finishing strip with RT if it fits when overlapping. The pieces you have glued already look fine after the painters tape is taken off. If there are some remnants that can't be picked out maybe a small bead of good white silicone can be used? Nice job on the blaster. Looks like your build is moving along pretty well too. Quote Link to comment Share on other sites More sharing options...
SolderMaster Posted March 27, 2010 Author Report Share Posted March 27, 2010 Actually, after looking at them, I could trim each side and butt them together...then tape them from behind...then add finishing strip and glue. I just need to match up the finishing strip with the butt and make sure they are both the same width...15mm for the arms and 20mm for the legs...now...How to remove super glue. Cyanoacrylate....will Acetone hurt ABS? You didn't use E6000? Ouch You shouldn't need a finishing strip with RT if it fits when overlapping. The pieces you have glued already look fine after the painters tape is taken off. If there are some remnants that can't be picked out maybe a small bead of good white silicone can be used? Nice job on the blaster. Looks like your build is moving along pretty well too. Well, I was going to, bought 4 tubes of it...but when I went to he home of one of my local garrison member's home, they swore by the stuff they get from the local hobby shop. It holds great and I can still flex the shins to get my legs in and out... They both are building clones right now, so I figured they knew their stuff. Maybe on my next build I'll use the E6000...OMG...did I say on my NEXT build?...Wife is gonna kill me! I changed the butt and kidney webbing. Removed the velcro from the sides and only put two 2" squares in the butt and kidney indented area. Over on the WG (Wisconsin Garrison), a member suggested I move it because it wont hinge correctly...Made sense so I listened. Can anyone post pics or a thread of what the suspenders should look like with a snap setup? I've seen a few, but want to get some more ideas before I go buy 2000 more snaps..lol Love those things but they should sell a TK amount...like 100. Quote Link to comment Share on other sites More sharing options...
EOTK Posted March 27, 2010 Report Share Posted March 27, 2010 Tandy has 100-count packs of snaps. Quote Link to comment Share on other sites More sharing options...
SolderMaster Posted March 27, 2010 Author Report Share Posted March 27, 2010 Tandy has 100-count packs of snaps. Ya know, I was just there today and when I brought them up to the counter, I asked her if this was the standard size...She asked what they were being used for...I said they will be going through elastic and plastic. She said these are made for leather, they wont work for elastic and plastic....SHEESH! So, I put them back. I'm going back tomorrow to grab some. Once I get my TK finished, I should go back there and arrest her for obstruction and disorderly conduct toward an Imperial Trooper! lol Quote Link to comment Share on other sites More sharing options...
EOTK Posted March 27, 2010 Report Share Posted March 27, 2010 Lol! A lot of people recommended Tandy snaps over the Dritz and other brands. The owner of the local Tandy shop knew that I was getting them for TK armor--he didn't discourage me from getting them. Quote Link to comment Share on other sites More sharing options...
SolderMaster Posted March 27, 2010 Author Report Share Posted March 27, 2010 Lol! A lot of people recommended Tandy snaps over the Dritz and other brands. The owner of the local Tandy shop knew that I was getting them for TK armor--he didn't discourage me from getting them. Sweet, thanks, Eric! I'll be grabbing a few 10 packs...that should be enough for extras. Quote Link to comment Share on other sites More sharing options...
Topgun[TK] Posted March 29, 2010 Report Share Posted March 29, 2010 Wow!!! That blaster mod is awsome. how did you make the scope with the crosshairs? Quote Link to comment Share on other sites More sharing options...
SolderMaster Posted March 29, 2010 Author Report Share Posted March 29, 2010 Wow!!! That blaster mod is awsome. how did you make the scope with the crosshairs? Heh, I will be posting a "HOWTO" for that shortly. First, I must finish my TK! Quote Link to comment Share on other sites More sharing options...
SolderMaster Posted March 30, 2010 Author Report Share Posted March 30, 2010 (edited) I see most belts have pre-drilled holes or indents to rivet the belt to a canvas belt. My RT kit doesn't have these pre marked areas. I just have molded covers... If you look at the pic, where should I place the rivets? I was thinking just inside the cover moldings...if you know what I mean. Edited March 30, 2010 by SolderMaster Quote Link to comment Share on other sites More sharing options...
Terry19D Posted March 30, 2010 Report Share Posted March 30, 2010 I placed the holes for the tiny screws that hold my armor belt to the canvas belt just on the outside of the moldings, if you're referring to the squares with the circle details within them on the belt's outer edges. This setup is then fastened to the ab armor and is quite sturdy. I just can't take the belt off independently of the armor without a little work, but it speeds up putting on/taking off the belt as all I have to do is pull and fasten and its done. A lot of folks install snaps on the back of the armor belt and snap it onto the canvas belt. This keeps the armor belt completely devoid of any telltale fasteners, leaving it clean-looking. Quote Link to comment Share on other sites More sharing options...
SolderMaster Posted March 30, 2010 Author Report Share Posted March 30, 2010 Ok, Thanks Terry19D! That was the other route I was going to go. Either that, or glueing the ABS belt to the canvas one. I think I'll go the snap route for the cleanliness. Quote Link to comment Share on other sites More sharing options...
SolderMaster Posted April 11, 2010 Author Report Share Posted April 11, 2010 Ok... I decided to use some velcro along with the snaps to hold the ABS belt to my canvas one. Seems to work ok. I tried on everything today and walked outside for a test run. I think I'll have to add some snaps to my cod and ab for better connection. I had it pop off twice just walking around. I also need to atach my holster. But as I walked around I got a few cars to honk at me! It was funny! Of course, having my glasses off, walking around was a little interesting. My specs wont fit in my bucket so I made an appointment for contacts. When I get some other little things done, I'll take some more pics and post em. Quote Link to comment Share on other sites More sharing options...
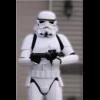
SolderMaster Posted April 13, 2010 Author Report Share Posted April 13, 2010 (edited) UPDATE TIME! Ok, here's my first real test fit. Things I know I need: * Find another way to keep my thighs up. I have an elastic garter...I think I'll make a new one that is NOT elastic. They both slip down as you will see in the pics. * Add drop boxes to belt...easy one. * Add holster to left side using 2 rivets, snaps, or Chicago screws...more than likely rivets. * Helmet needs the bottom screw on both ears for ANH....the RT lid comes with 2 screws and a rivet under the seal. I will have to drill a hole in the lower part of each ear and use one of those screws for a light switch cover and paint white if needed. * Helmet needs the frown painted. RT lid comes with all decals. I also want to paint the chin, but may get some help with that... * Trim the thighs on the top for a smoothe look. * I MAY end up using a double snap system. Most of my parts are single snapped...meaning one snap per end of strapping...so 4 snap straps hold the cod and ab together 2 front 2 back...but you knew what I meant...lol * Left thigh bottom needs a little trim. * Sew the gloves so NO skin shows. * Sharpe the logos on the diveskin undersuit. * Add padding to forearms and shins so they dont moved around. * Paint rivets on ab white. What else would you folks suggest? Edited April 13, 2010 by SolderMaster Quote Link to comment Share on other sites More sharing options...
EOTK Posted April 16, 2010 Report Share Posted April 16, 2010 I can't believe I missed your test fit post pics--looking good, man. I think you posted the stuff I would point out. Add paint ab buttons to the list maybe. Looks like the frown on my bucket is painted, but I hear you on the chin decal. There's a pretty cool tip for making a template for painting, if you haven't seen it: http://forum.whitearmor.net/index.php?showtopic=1941 Anyways, I wish I could help you more. I started sanding some edges on my pieces, but my kit has sat mostly untouched due to work and taxes over the last week.... I did make some test snaps in the .040" ABS I found--do you have secrets for getting clean holes in ABS? I found that poking an awl through and then slowly drilling the other side made the cleanest holes, but maybe you have a better way? On the legs, maybe shorten the elastic straps so they pull the thighs up more? Are you attaching them to a belt around waist, or to the armor? Quote Link to comment Share on other sites More sharing options...
bluehickey Posted April 16, 2010 Report Share Posted April 16, 2010 It's really coming along very well! I can see that you are having problems with your elastic garter: I went to the thrift store and bought a black belt for a couple of dollars and put snaps in it to hook my thigh straps into. The armor covers the black belt completely. You might want to try that. Quote Link to comment Share on other sites More sharing options...
SolderMaster Posted April 16, 2010 Author Report Share Posted April 16, 2010 From Eric: I found that poking an awl through and then slowly drilling the other side made the cleanest holes, but maybe you have a better way? I used a soldering iron to poke the hole in my ABS tabs then a drill to drill them to size. Worked well for me. I was going to use a garter but I have added snaps to my cod and thighs. I just need to make the straps to fit. I'm a little worried about the thighs being too heavy for the snaps. I'll have to experiment a little and see what works best for me. Thanks for that template for the chin. I will look at that when I'm ready to paint. And painting the ab buttons is next on my list to do. Thanks for your advice and thoughts guys!!!! Quote Link to comment Share on other sites More sharing options...
Terry19D Posted April 17, 2010 Report Share Posted April 17, 2010 The suit's looking very nice, Brian! I also attach my thighs directly to the cod with straps and have never had an issue of them coming loose. Looking forward to seeing your TK with all of these additions done. Quote Link to comment Share on other sites More sharing options...
EOTK Posted April 17, 2010 Report Share Posted April 17, 2010 Thanks for the soldering iron tip--great idea, thanks. Can't wait to see your finished build--you are close, man. Quote Link to comment Share on other sites More sharing options...
SolderMaster Posted April 24, 2010 Author Report Share Posted April 24, 2010 Thanks for the soldering iron tip--great idea, thanks. Can't wait to see your finished build--you are close, man. Just got back from visiting grandparents in Inverness, Florida... Back to finishing that armor! Quote Link to comment Share on other sites More sharing options...
SolderMaster Posted May 5, 2010 Author Report Share Posted May 5, 2010 Things I know I need: * Find another way to keep my thighs up. I have an elastic garter...I think I'll make a new one that is NOT elastic. They both slip down as you will see in the pics. DONE * Add drop boxes to belt...easy one. DONE * Add holster to left side using 2 rivets, snaps, or Chicago screws...more than likely rivets. DONE * Helmet needs the bottom screw on both ears for ANH....the RT lid comes with 2 screws and a rivet under the seal. I will have to drill a hole in the lower part of each ear and use one of those screws for a light switch cover and paint white if needed. * Helmet needs the frown painted. RT lid comes with all decals. I also want to paint the chin, but may get some help with that... * Trim the thighs on the top for a smoothe look. * I MAY end up using a double snap system. Most of my parts are single snapped...meaning one snap per end of strapping...so 4 snap straps hold the cod and ab together 2 front 2 back...but you knew what I meant...lol * Left thigh bottom needs a little trim. * Sew the gloves so NO skin shows. * Sharpe the logos on the diveskin undersuit. * Add padding to forearms and shins so they dont moved around. DONE * Paint rivets on ab white * Paint ab buttons....DONE I hear there's an armor party Saturday. I'll try getting the rest squared away and take some pics. Quote Link to comment Share on other sites More sharing options...
SolderMaster Posted May 5, 2010 Author Report Share Posted May 5, 2010 Here's a few shots from last night. My cousin is home from Iraq and wanted to take a few pics to take back with her. She's a Chinook Crew Chief for the US Army. I gave her an Imperial Cog decal which she says she's gonna put it on the nose of one of her choppers. Quote Link to comment Share on other sites More sharing options...
SolderMaster Posted May 11, 2010 Author Report Share Posted May 11, 2010 BUMP.... What do you think of the pics in the last post? Quote Link to comment Share on other sites More sharing options...
tkrestonva[TK] Posted May 11, 2010 Report Share Posted May 11, 2010 Nothing problematic stand out. Looks like you're good to go. Quote Link to comment Share on other sites More sharing options...

Recommended Posts
Join the conversation
You can post now and register later. If you have an account, sign in now to post with your account.