

naatsirhc
-
Posts
543 -
Joined
-
Last visited
Content Type
Profiles
Forums
Gallery
Articles
Everything posted by naatsirhc
-

ATA full armor pics, almost done
naatsirhc replied to Sgt JB's topic in Hard Armor (General Discussion)
Great job Eric! Congratulations on your build, hope to be there next week with mine. Thanks for all your help with my build! Christaan -
Well, I am getting closer to completing my build. I did a lot more trimming and brought all the ridged areas to their correct spacing. This was very time consuming, but well worth the effort. I decided to glue support strips on the inside, I started with the arms. I then glued strips to the inside of the front of the calves. My wife took a shot of me working on the thighs. My thigh pieces are gluing up right now. I am using a devcon 5 min epoxy for insides and will use plastic weld on the face strips. After a 24 hour cure on the forearms I filed and sanded the ridge lines flat, to cleanly accept the strips. I will spend much of tommorrow gluing on the strips. Here is what my arms look like assembled and prepped for strips. I met with my wifes cousin( who does body work and paint) to talk about having my armor shot with professional paint and clear coat. I gave him my bucket, he will paint on Monday and meet with me Tuesday. If the color looks good then I can finish my lid and have him shoot the rest of the armor. I am totally excited to see how this turns out! I should have pics up tommorrow evening of assembled armor
-
Doug's ATA Build[*ATA]
naatsirhc replied to dougefresh's topic in Build Threads Requireing Maintenance
Doug, Nice job on the bucket! I am envious of your TM armor, very nice purchase. -
I know it sounds like a broken record, but i would like to thank you guys again for your help. After getting my ridge question answered by Terrell( Thank you ) I have trimmed everything except my thighs to the correct size. So, I will be gluing up some pieces today. Here are a couple of pics showing what I did to make the strips. I used a cheap little ruler guide to set my measurements and transfer to the flat styrene provided in the kit. I then cut all the strips: 7/8 inch for legs, 1 inch for calf backs and 5/8 inch for the arms. I am getting close now, I am looking into having a relative do a professional auto body finish. I think this will look better and hold up longer.
-
Terrell, Thank you for the pic, this is most helpful. So, the strip goes the whole length on the back. I will trim the fronts to the strip width. Is it ok for a 1/16 inch and or some slight variation? Thanks Christaan
-
I used Krylon fusion early on in my build but did not like it. I ended up using Rustoleum auto primer and Rustoleum multi surface satin black. I did both wet and dry sanding with 200, 400 grit on problem areas between coats. It has a shine to it, but not glossy. I was happy with the end result. You can check my build thread for reference. Hope this helps, when it comes to paint there are many ways to achieve the same outcome.
-
Thanks Terrell, that will be most helpful! Here is a pic of the left forearm trimmed down more, I would like to know if this spacing is ok. I am affraid to trim all the way to 5/8. This pic has the 5/8 strip clamped to forearm, I have seen finished armor with similar spacing. Please let me know what you think is best.
-
Thanks again for the help Eric. These pics are a big help! Hey, Terrell have you found any of your old pics yet? I am prepping today to start the assembly process. Thanks again guys, Christaan
-
Thank you so much terrell, any pics would be awsome. I hope to start gluing things up tommorrow! Thanks again, and thanks for the beautiful armor! Christaan
-
Thanks Eric, Terrell has been kind enough to help out with this issue.
-
Thanks again for the help kevin. I am off to the store again for pvc, paint and snaps!
-
Paul and /or Terrell, I need some advice about this ridge area. For EIB does the ridge area have to meet the strip covering the butt joints or can there be some gapping on either side. I am getting ready to glue my armor and want to do it right. I can cut the thighs down to were there is a 1 inch ridge in front but not in back or the armor won't fit my leg, right now I have a 2 inch space front and back on thighs and this feels like a good fit. The forearms, biceps and calves in front have a 1inch wide space. I have looked at a lot of picks and I see a lot of variation of spacing on the armors that have this ridge. My legs are not huge but a little muscular. I am 6' and a bit over 220, I realize a lot of the guys out there are a bit on the skinny side so the can do more trimming. This is much needed advice and I will be most grateful if you can help me solve this dilema, so I can get everything gued up and ready for paint. Thank you, Christaan PS- picks are in my build thread!
-
Gos's ATA Armor Build![*ATA]
naatsirhc replied to GosHawk's topic in Build Threads Requireing Maintenance
Eric, Nice job on the bucket! For the neck trim I bend it to where the flaps open up, then the strip is somewhat flat. Put the inside seem against the helmet and run it around keeping the flaps open. As you go along the rubber will then grip the helmet and you will get a nice snug fit. I hope this helps, if not i will post a pick of what I am describing. -
looks really good there Kevin! Where did you find the tube for your thermal? Is that 2inch pvc painted grey? Anyway, great job! wish I was that far. Thanks again for the help.
-
Wow, I am really sorry to hear that. I am glad the Lord kept you and your family safe. I pray that things will recover soon! Christaan
-
Doug's ATA Build[*ATA]
naatsirhc replied to dougefresh's topic in Build Threads Requireing Maintenance
Thank you doug for posting those pics after talking with ATA. I had guessed right, but was not sure until now. Great job so far! -
My ATA build[*ATA]
naatsirhc replied to NoGoodSkills's topic in Build Threads Requireing Maintenance
Nice job on your build! I am really lagging on mine. Looks like your almost there, congrats. -
Thanks Eric for the much needed advice! I have another question for you guys, regarding the thighs. I have trimmed them down to were I have a 2 inch ridge front and back. They seem to fit my leg build very well like this. My question, am I allowed to have this much space. I will be adding the required 7/8 inch strips. Or, does the front need to be about anch wide w/ 7/8 inch strip. I am assuming they are not supposed to be real tight, to allow for movement. I am getting ready to glue things up and not sure about this ridging on the ATA. I have look at alot of pics of other builds and there is variation in the ridge spaceing. Here is a pic of the front view of my thighs Please let me know!
-
Thanks for the advice doug, much appreciated! I hope to get my trimming done tommorrow and prep for assembly this coming week. Christaan
-
I began working on the lower legs, I could use some advice here. Do I have the pieces assembled correctly? It looks right but i am not sure. Also, are you supposed to taper the trim toward the ankles? Please take a look and let me know! Test fit left leg both legs taped Your help will be most appreciated! Wow! My 100th post.
-
Gos's ATA Armor Build![*ATA]
naatsirhc replied to GosHawk's topic in Build Threads Requireing Maintenance
Nice work! I hope I can get caught up with my build this weekend. So, are you going to polish and them weather for TD? look forward to seeing the finished result. -
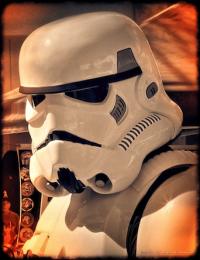
Thanks for the encouragement. It makes me feel really good to have you guys that know your stuff give me a little boost here and there. I have completed my bucket, it by no means was easy to assemble. I definately struggled with this, the ears drove me crazy. I wanted some gaps for screen accuracy, I hope I did not do to bad a job. I will have a much easier time on the next one. I painted the inside of face plate and part of the back cap with plastidip black paint. After letting it dry all night I began my assembly, attaching both sides. I then went for the ears, spent a lot of time trying to get them right. Let me know if I need to change anything. TK-4510 makes this look easy in his tutorial. I had the most trouble with the bottom screw. Look close and you can see where I had issues with the holes, I need fill in my boo-boos Front view and neck trim I had to do some trimming to get my head in, I have to do the screw on/off method You don't realize how assymetrical the helmet is until you assemble. My first bucket, I hope it looks ok Now it is back to trimming the legs!
-
When I have paint issues I usually wet sand that area with 200,400 and 600. Sometimes just 400,600. Make sure it is clean before you spray again. I had to do this with my blaster. Hope this helps!
-
I have decided to put my bucket together and get it ready for paint. I trimmed the cap back area and the sides a little. I have been reviewing tk-4510's tutorial and I think I have it ready to assemble. I reinforced the hovi areas with superglue gel and old sock. It is common for these areas to be softer, the right inside was my main problem, but I did both to help support hovis and be uniform. I have not decided about a black interior, I hope to assemble tonight. We will see how that goes! I like the lower brow Superglued sock
-
I used superglue gel and it is nice and solid now! E-6000 should work, it will probably flex a little. Here is what superglue and old sock look like Hope this helps