
WodiQuix
-
Posts
91 -
Joined
-
Last visited
Content Type
Profiles
Forums
Gallery
Articles
Media Demo
Everything posted by WodiQuix
-
One thing I noticed right off the bat was that my belt was positioned too low to my abdomen buttons. Not to worry! I set a new set of snaps directly below the old pair on the back of the belt, which worked out just fine! http:// Oh, and I almost forgot, I finished up the outside of the bucket. I used decals from Trooperbay. Here is the before picture of the back traps. http:// And here is the final result, with all traps painted and pinstriped. http:// http:// http:// http:// http:// http:// http:// Last things to do are to install helmet fans, finish up the blaster, and put the finishing touches on the thighs and belt, and then I'll be ready for pre-approval!
-
As promised, here are the pictures! I last left off with my shins. I'm happy to report that after three hot water soaks, my shins formed right up. http:// Then I added the cover strips and bra hooks. I installed three washers, one on each hole, to help prevent plastic tears. http:// Next, I moved on to the sniper knee plate. I cut along these lines, sanded it down, and clamped the crap out of it. I dented the plastic slightly due to my clamps not having rubber ends, but I managed to mostly fix this by letting the leg sit in the sun, with plastic clamps on the outer contours to flatten out the dents. http:// http:// After this, I moved on to the thighs, cutting and gluing front cover strips, as well as securing the ammo knee with split rivets, painted white. The backs of the thighs I'll have to cut, as they don't line up, but I'll save that for last. In addition to this, I worked on the belt, securing the plastic part to the canvas. I installed new snaps into my abdomen armor, as my belt from Trooperbay didn't have pre-installed snaps. http:// However, as I did this, one of the elastic pieces for my split rivet side closure decided to come out. http:// To fix this, I put metal eyelets I purchased from my local fabric store into the holes of all three elastic pieces (taking split rivets out and then putting them back in is a pain!) to prevent the split rivets from worming their way out again. I also added in a reinforcing strip. http:// Once this was accomplished, I snapped my belt on and did a test fit. My cousins were in from Utah that week, and my youngest one was thrilled to help me suit up and take some photos! I'm holding my thighs in all the pictures, as I don't have the backs or the connector straps done. http:// http:// http:// http://
-
Hey everyone, it's been another long while! I'm just about finished with my kit, which is a relief, but also a sort-of sadness. I liked working on it very much. Pictures will follow tomorrow. I finished up the helmet, save for the helmet fans on the insides, and my last things to do are the backs of the thighs , belt drop boxes, and blaster, plus the Aker amp system inside my chest armor.
-

Freduster's ANH Stunt TK build (RS Props, aiming for Centurion)
WodiQuix replied to Freduster's topic in ANH Build Threads
Good progress so far, @Freduster ! I'm also building an RS kit. I'm jealous that you got your ab buttons pre-painted. Mine came blank! Keep up the good work. I'm going to have to shape my shins in a hot water bath as well. -
Thanks, CableGuy! I had fiddled with the brow before, trying to find a good place for it. I think the crookedness gives it a certain charm, but I will definitely try moving it up to see how that looks. I've always liked the lower brow look.
-
My shins are nearly done, I just have to do the back closure and add the sniper knee plate to the left side. Here's what they look like. http:// The fronts look pretty good, but the backs are another story. Looks like I need to do use the hot water bath method! Dun dun dunnnnnn! Any tips on how to do this would be greatly appreciated. I'm fearful of melting the plastic or deforming the shinsbeyond repair. Or of burning myself on accident. http:// http:// After the shins, I'll move on to the thighs, which are already trimmed along the return edges. Then it's on to the belt. For the belt, being 56" long, I'll have to cut it in the middle and adjust it to my waist, then install the snaps. Not looking forward to that either. Other than that, I can see the light at the end of the Star Destroyer corridor! I can't believe I'm so close! Oh, and I also need to complete my DoopyDoos blaster kit. But there are a ton of threads that I can use for that!
-
Hey troops, I'm back from my vacation and ready to get serious again. I returned a little while ago, and have been finishing up certain parts. I figured it was time to update this thread again with my progress. Before I left, I worked on the bicep/forearm connection. I am now happy to report that my arms are completely finished! Here are the completed arms (sorry for the bad lighting quality). http:// I had encountered a slight problem when finishing these up. I had left too little of a gap between my bicep and forearm, meaning that I could hardly bend my arm! Oops. A fellow Garrison mate said that if I have trouble saluting, then my arms are too close together. I was having a lot of difficulty bending my arm all the way! http:// http:// http:// So, after removing the elastic strap and taking off the excess E6000 glue on the strap with a cotton ball and rubbing alcohol, I tried again. Hurrah! It worked! With the arms done, I went to try everything on, but then I noticed another problem, this one on my abdomen armor. http:// Gah! One of my bracket screws had cracked the plastic on my chest armor! I hastily posted a question on the Facebook group and got some replies on reinforcing the plastic where the bracket holes were, something I had thought I would not need to do. Oh well. I took apart the chest and used some of the thick cover strip material to reinforce the holes. I then decided I'd better reinforce all the brackets then, just to be absolutely sure that they wouldn't crack under stress. So I took apart my whole chest and worked for about an hour with my dad, laying down and gluing the cover strip reinforcers. http:// http:// http:// Here's a pic of my nearly completed bucket. All I need to do is add the pinstriping and vertical striping in some of the traps. I also removed most of the padding on the inside and made it much more efficient. Before, I had placed several FMA pads I had gotten off of Amazon inside, but with all the extra cushioning, the helmet eye lenses sat slightly above my eyes, making it difficult to see. The new interior doesn't gain any style points, but it's much better in terms of fit. http:// Here's the old padding. http:// And, here's the new version. http:// Last up with the bucket, besides the paint touch ups, are the electronics. I'm not too sure how to do it, but I have two battery operated fans that I purchased, also off of Amazon. Anyways, with all that sorted out, I got to work on the shins. Here is a test fit with everything I have completed so far. Does this look okay? (Please note that this was taken before I had completed the shoulder snaps on the shoulder bells.) http:// http:// http:// http:// http:// http:// This is getting quite long, so I'll continue in the next post below.
-
Hey everyone, Did some more work on my kit recently. I'm just about done with the forearm/bicep connections. http:// I thought this would be hard, since I'm not that good with measurements, but it turned out to be pretty darn easy! All I have to do now is to glue the bicep/forearm connection to the insides of both forearms and attach the snap that will connect the whole arm to the shoulder strap. In addition, I measured and cut the plastic section of the belt, as well as the belt rivet covers. http:// http:// http:// Next, I glued the last cover strip on my right arm. While that was drying, I decided to do another test fit of everything. Man, RS does it good! I can't believe that the suit has turned out this nicely considering my novice level of costume building. http:// http:// http:// http:// http:// http:// Next, I'll be painting the finer details of the helmet tears and traps, as well as assembling the belt and drop boxes, thighs, and shins. I won't be making any progress for a while until the 4th. I'll be on vacation in Europe starting tomorrow!
-
I have a few questions again. 1) My kidney and ab plate don't sit flush on either side, as you can probably see in the last photos. I asked a fellow Garrison member about this and all he said I had to do was tighten my belt. Is this really all I need to do? 2) I am planning on wetsanding the paint on my helmet to smooth things out and get rid of the bumps and pits. Has anyone done this before? What grit do you recommend if you have? 2000, 800? I'm planning on heading down to Home Depot to pick some up soon.
-
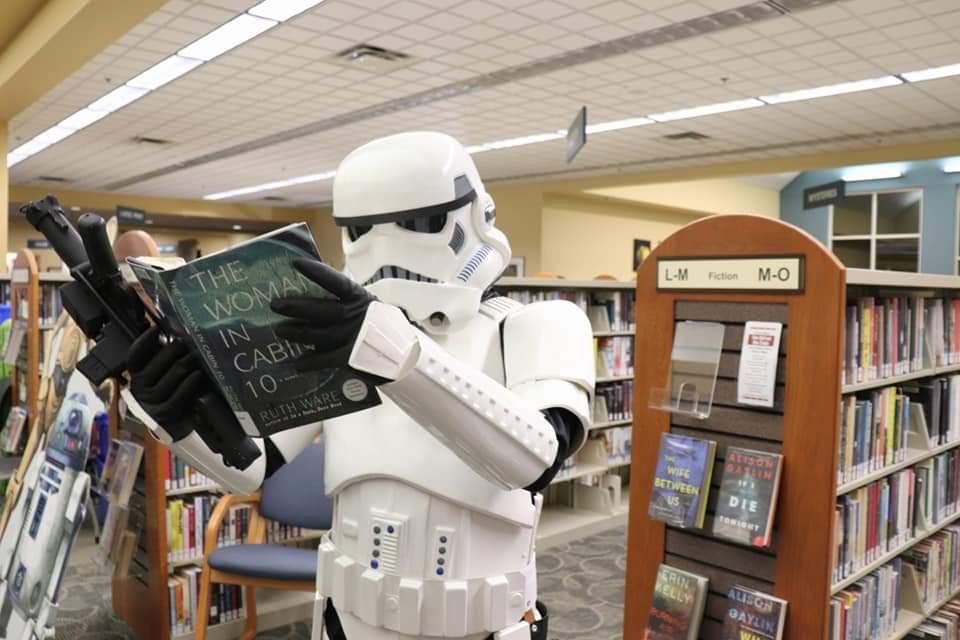
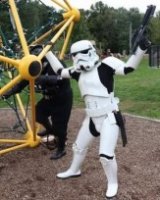
Hey all, last Friday I had the privilege of meeting representatives from my future Garrison, the Ohio Garrison, at the premiere of Solo. http:// Here's me with my friend David, TK-31131. I could barely contain my excitement posing (well, not really posing) next to a real stormtrooper! http:// Prior to going to Solo, I decided to do a test fit of everything on. The arms still need completing, but I couldn't putting everything I had done on. Man, it was hot, but so worth it! http:// http:// http:// A few days ago, I completed my torso. I accidentally riveted on the cod strap too short, so I painstakingly pried the split rivet off and made the strap a little longer, then inserted the rivet again. Speaking of split rivets, man are they tough! I was terrified of cracking my armor when hammering down the rivets, so I resorted to using a pair of needle-nose pliers and a small flowery hammer. http:// It took me about an hour and a half, but I did it! I eventually got over my fear and used the big boy hammer on a hard metal clamp/anvil thing (very technical) to get the rivet arms down. Here's the result. http:// http:// http:// http:// Yesterday, I got two surprises. One of them was from TrooperBay, and contained the satin paint, Chicago screws, and helmet masking templates I ordered. The other package came all the way from Hong Kong! My boots had arrived! I feverishly ripped them open (actually, I was quite careful) and extracted them. http:// http:// Man, they look great! And fit great, too! My cat Smoky was thrilled to be in the picture. I got everything together again and put it on with some help. http:// http://
-
I had also worked on the shoulder bells. 12" up from the return edge of the spine and 5" horizontally from the bottom. I used a cloth measuring tape and then traced my lines. I was a bit nervous about how much I was trimming off, but after looking at other build threads, I steeled myself and made the cuts. I noticed that one shoulder bell was way larger than the other one, but I heard that is just how RS makes them. Here they are, minus the straps on the insides. http://
-
Bicep strips and gluing. Yesterday, I cut 15 mm cover strips and glued them to the outer biceps. http:// http:// http:// In addition, I glued and clamped the shoulder straps. After poking around, I decided to put them about 5 ridges down. I used some spare ABS to fill the holes on the underside of the strap of where I'd be gluing. Then, I sanded the areas down to give the glue more "grip." http:// http:// Here is the finished product (taken today)! http:// http:// Today I peeled off the tape and clamps and did the insides. Very happy with the results! Now waiting for everything to set. http:// http:// The biceps are definitely the easiest part to do.
-
Thanks! I haven't trimmed the shins yet since I'm waiting on my boots from IB!
-
Also, I didn't stir it for very long. So maybe that could also be part of the issue.
-
Thanks for the answers! I just recently got the Humbrol paint from TrooperBay about a month ago. I think the issue was that I accidentally stuck the painted surface on my pants (I was holding the bucket and painting it). Oops! I applied some more paint to try and cover the roughness up, but it has yet to work.
-
Doh, I nearly forgot something! I received this from another fellow Garrison member. Pew pew! DoopyDoos resin kit. Now I have to assemble it. Should be fun! http:// In addition, I also purchased an Anovos neck seal from a guy who was selling his TK kit. It fits pretty well! http://
-
I have a couple of questions: 1) For my biceps, the edges where the cover strips will go don't line up perfectly. Is this OK? Also, should top and bottom return edges meet up, or should I leave them the way they are? 2) Do my legs as I taped them look good? I know there's a specific right and left shin piece, but I'm not sure if I taped together the correct pieces. I watched some videos by TK-1636 on YouTube and he said something about the bottom shin piece being longer than the other on one side, as well as a swoop. 3) As I mentioned earlier, my paint in certain places on my bucket is very grainy and textured. I would like it to be smooth. Should I apply more paint, or wet sand and then paint again?
-
Hey everyone, it's been a while. Last time, I had just completed torso strapping. I figured out that cap rivets are not a great substitute for split rivets, so I'll be ordering split rivets, along with Chicago screws from TrooperBay. After doing some thinking, I decided I was going to take the plunge and hand paint my helmet details. So, I peeled off the sticker decals and drew pencil lines to mark the outline of the tears and traps. Here it is, minus the details. http:// http:// http:// My Humbrol paint is still heavily textured in some places, particularly the side traps. I would like it to be silky smooth. Any suggestions on how to achieve this? Wet sanding? Another application of paint? Next, I worked on the biceps and forearms. First, I trimmed and sanded everything down. For the arms, I cut out all of the return edge on the wrist opening and left 1/8" return edge on the elbow. http:// http:// http:// http:// (For the last picture here, I actually didn't trim anything. I'll need to make the scoop a bit bigger. I'll have to make a scoop for the other arm as well.) For the biceps, I also left 1/8" return on the top and bottom, and trimmed and fit them. I watched very helpful tutorial videos put out by pandatrooper for this bit. http:// http:// http:// Next I cut cover strips and will be gluing them on shortly. I also taped up the legs, too, but haven't trimmed or cut anything. Here are the thighs: http:// http:// http:// http:// And here are the shins: http:// http:// http:// http://
-
Here are the pictures of the completed torso. Now I just need to figure out the Han snap elastic size and the split rivets for ab and kidney closure. I purchased 8mm head by 6mm cap rivets to substitute split rivets, which I think will do nicely! http:// http:// http://
-
Thank you for the kind offer, @TheSwede , but I already figured out a solution. I put the five phillips screws on the butt brackets and closed them, and the closure is so thin that you can't even see the difference between the screws!
-
That's what I did, and I couldn't find anything like it. I went to Home Depot. The closest match there were the Philip's ones in the picture.
-
Nice! I have a TrooperBay belt in the picture. I just need to install the poppers, which I picked up from Jo-Ann's fabric store.
-
I had to make do with some Philip's ones, since the kit didn't come with enough of the normal screws. Do you know the exact kind of screw?
-
Hey Troopers, it's been a while since I last updated this build thread, since I've been a bit busy with college. Anyways, I last left off with my mic tips painted and installed. I next painted the vocoder, the frown, and ears using Humbrol Gloss Black (#21) and Amiral Grey (#5), respectively. It took a few coats (and a lot of reshaping with a toothpick) to get the effect that I wanted, but I am pretty proud with the results. I didn't use the lens that RS provided, but rather ordered a green welder's replacement screen, which I cut to size and installed. Here are the ears, minus the black outline and rank bar. http:// Here is the completed helmet. http:// http:// http:// Stormtrooper selfie! http:// http:// Here's the completed interior of my bucket, minus the helmet fans. I finished this part yesterday night. http:// While working on the bucket, I also started working on the torso. A few weeks prior, I had cut and sized the torso pieces. This time I cut out and sized the button panels, then painted them with Humbrol Ad Grey and Humbrol French Blue (#14). Then I glued both in place with my E6000. http:// Next, I drilled holes and put in the metal brackets. I marked with a pencil where to drill holes using a nifty piece of scrap metal that I had measured out the bracket posts. http:// http:// Next I painted the screws using two coats of Humbrol Gloss White (#22). http:// http:// http:// Last night, I also worked on and completed the torso strapping. I used 2.5" pieces of nylon folded into a loop and sewed them together using a sewing machine (I have to give my mom credit for this one, I can't sew for my life!). It was a bit tricky screwing back together the brackets after I had slipped on the strapping, but I somehow managed. I don't have pictures of this yet, I'll get some later. Now it's onto the split rivets and shoulder straps. Going to go up to Home Depot today and see what they have. 8mm with 6mm shanks, right? Also, I'm a bit confused on the elastic portion of the shoulder strapping. I know that if you're taller that you make the strap longer, but by how much? I am 5'9" tall. What is the normal length of the elastic straps?
-
Looks good! I'm working on my torso as well. Good idea for the shoulder straps. I heard that they're prone to breaking. I was going to order my boots from IB, too. Where did you order your neck seal from?
