

fragarock
-
Posts
231 -
Joined
-
Last visited
-
Days Won
3
Content Type
Profiles
Forums
Gallery
Articles
Media Demo
Posts posted by fragarock
-
-
I'd order the belt from RS if they are willing to supply it at a reasonable cost. Get it and then evaluate if its close enough in color.
Seems like it should be passable. If not, you could get away with painting that one piece rather than the original kit.
Sent from my SM-G960U using Tapatalk -
Wait, is this your original RS kit?
Sent from my SM-G960U using Tapatalk -
21 hours ago, FanboyNightmare said:
Hello,TKs! Finally getting closer...only thing stopping me is fitment. 1st time using imgur, so hopefully the photos are there: http://imgur.com/gallery/Yhw9Yx4
As of now, I'm wanting to start with the lower half. Most notably the thighs and bate plate...
But plate sticks out, and I feel that the thighs are too high on me and wide. What do you think? How can I fix this, so I can not only look accurate, but also be quite mobile in armor, too, without armor pinches and rubs.
Height: 5'6ish / 7
Weight: 145/50
Assuming I need to make trims on top of the thighs, reposition straps (kidney, back plate, and thighs), and perhaps thin the thighs, so they are more fitted and to prevent the butt plate and thighs interfering. My guess. Anyway, let me know what I should do. I would eventually like to submit for level 3. Keep that in mind. Thanks all in advance (:
Hi JC,
I had the same problem. Ended up trimming off the top of the thighs and reducing all around the bottom and sides of the butt piece. Check out my thread, I have a whole section dedicated to this issue. Also, if you can, I suggest slightly reducing the diameter of your thighs, they look a little big, not huge, just a little. I'm 5'-5" about 140 lbs. so a similar size.
-
 1
1
-
-
I thought that was a beer in your TD belt. That would have been bold.
Looks great as expected. Hope you're doing well and GL on that troop.
Sent from my SM-G960U using Tapatalk-
1
-
-
Here are my photos for reference. How tall are you? Would be helpful to know when it comes to trimming pieces.
The top of the kidney and top of the ab sides are to align. Looks like you need to reduce the height of the kidney. Since you'll have to cut it off from the butt piece, do the trimming on the bottom along that cut line. That cut line will be covered by the belt anyways an that way you maintain the return edge along the top of the kidney.
This may force you to trim the sides of the ab so they align with the trimmed kidney. The key is to get the bottom of the butt and the cord aligned so that its comfortable when you walk and doesn't collide with your thigh pieces. Then look at how that placement looks in relation to the chest/ab interface. Meaning, are the buttons on the ab still visible? Is the ab too high or low? If too high, you may have to trim some more off. A lot depends on your height.
I'm short so had to trim a lot. I trimmed off the top and bottom of the kidney to get it the right size. Also trimmed and repositioned the cod to move it up. And trimmed off the top of and sides of the ab. Sometimes you just gotta cut.
The butt piece is pushed out in the photos due to my mannequin. Obviously not supposed to look like that.
Are you local to the Detroit area? There are lots of us in the Great Lakes Garrison to help. I'm in Royal Oak.


Sent from my SM-G960U using Tapatalk
-
1 hour ago, Jeklynhyde said:
Not yet, but i may need to get one!
That is definitely on my list. Thanks for the suggestion!
After reading your post I went back and looked at mine. I had to cut quite a bit off the bottom of my kidney piece. You may find you have to do the same. It's hard to tell until you get all brackets in and see the pieces hanging together. Keep up the good work, it can be scary at times but also very rewarding.
-
1
-
-
Give it another bath and try to straighten the edge that's curled. Do you have a heat iron? I suggest getting one, they're invaluable especially for us shorter troopers who need to cut and reform edges.
I suggest reinforcing your bracket attachment areas as well with an extra strip of ABS. It will be worth the extra work.
Sent from my SM-G960U using Tapatalk-
1
-
-
I couldn't get my belt to snap either. The snaps from RS were misaligned and I didn't feel like messing with it. I just use some velcro to help hold it in place.
Sent from my SM-G960U using Tapatalk-
1
-
-
I like the organization and prep work to get all the tools in order before the build. Looks like you've done your research.
I have an RS kit and it went together pretty easily.
Good luck.
Sent from my SM-G960U using Tapatalk -
1 hour ago, Echostatic said:
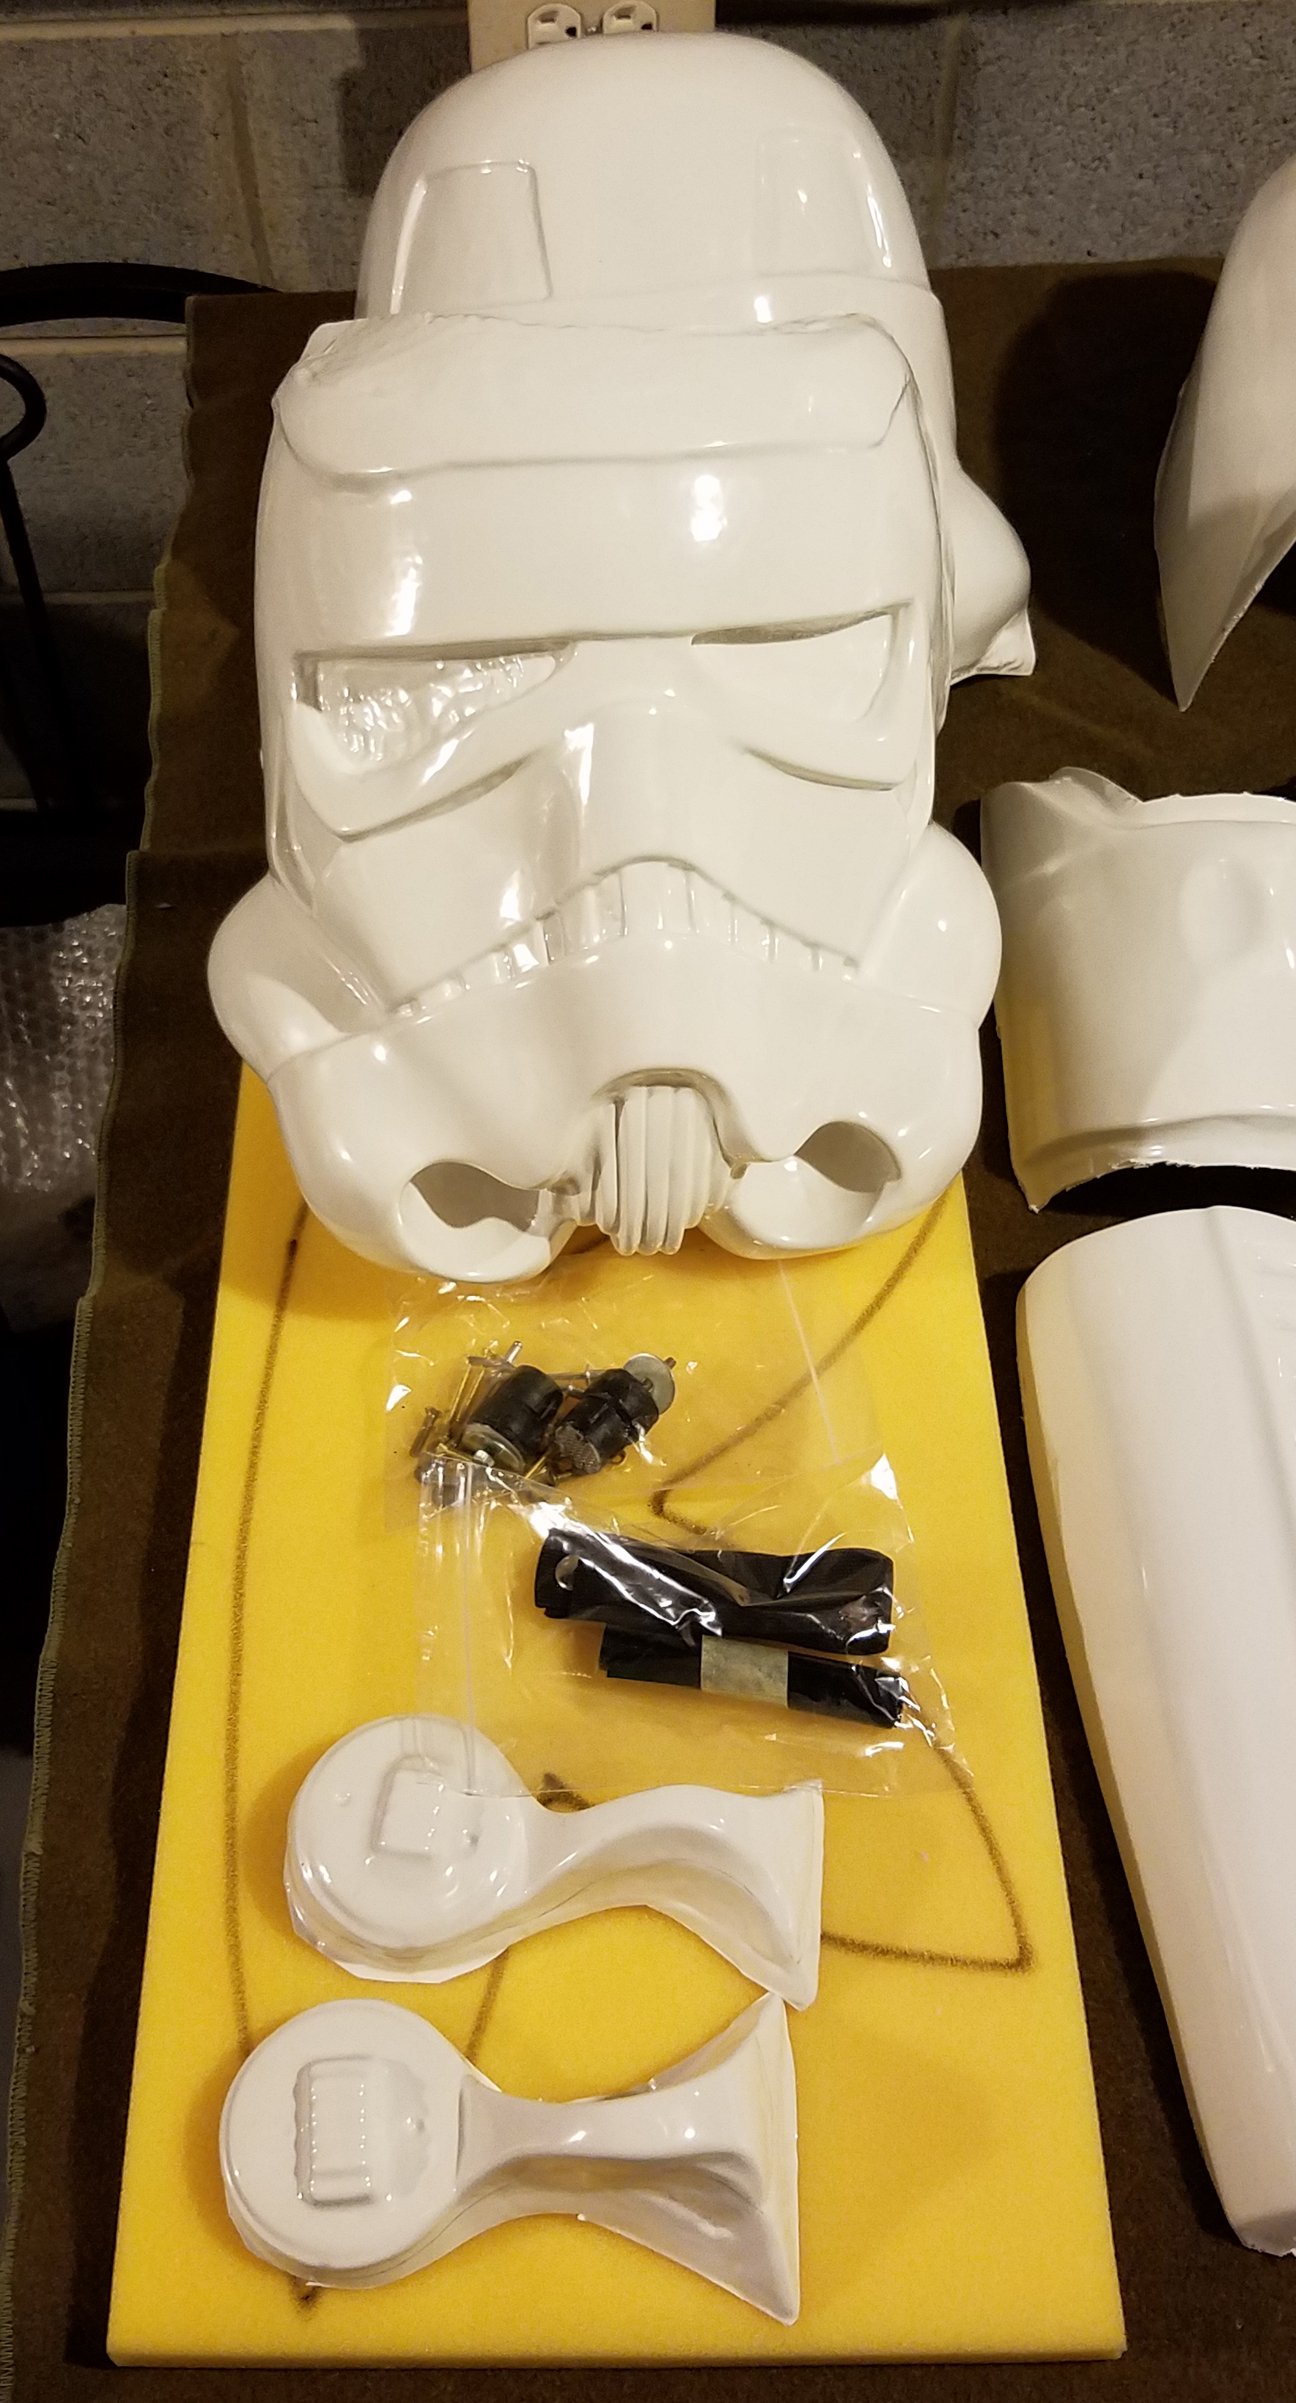
My armor kit showed up today, I laid it all out on a pool table and, unsurprisingly, felt quite overwhelmed with it. There's so many pieces!
https://i.imgur.com/Uvon9t5.jpg
I'm excited to get started on it, though. It looks good. Unfortunately I appear to be missing quite a bit from the helmet kit. I've got the face mask, and helmet part, as well as the two ears, but that was all I got. I reached out to RS Prop Masters to inquire about all the missing bits, hopefully they won't take too long to reply.
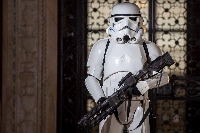
Sorry to hear about the missing parts. You should have received a bag with the hovi-mic tips and a bunch of screws and rivets as shown in this pic from my kit. Don't sweat it, you've got plenty to work on while RS send you the parts. Good luck and reach out to us with questions. We're all happy to help.

-
If you are really bothered by it, I have several ways to polish the scratches out.
Sent from my SM-G960U using Tapatalk -
My snaps never held well either. I attached white velcro strips to help hold the belt in place. One in the front middle and one on each side of the ab piece. Once its wrapped around and tightened at the back, it's not coming off.
Sent from my SM-G960U using Tapatalk -
On 9/5/2018 at 7:14 AM, rzill said:Frank, you are awesome, man! I've hit another snag - issues with the shins. Mine are kind of oval shaped, and even hot water bathing the crap out of them, I don't think they look good. I'm not looking forward to doing it again for two reasons - one, it's been so dang hot without leaning over hot water! And two, it will probably make me have to re-glue the cover strips yet again and again. I am thinking of buying this guy's armor though, and maybe just trying to re-sell it with switching out the helmet if the whites match up. Anyway, does this look like as much crap as I think it does? The velcro just isn't holding the cover strip down flush.
I think we can fix that. Let me know when you're around and I'll come over. Maybe this weekend.
Sent from my SM-G960U using Tapatalk
-
I know the helmet can be daunting. I'm available to help even if you want me to build it for you. Let me know, I'm around the corner .....sort of.
Just want you to get this kit done and get out there trooping.
Sent from my SM-G960U using Tapatalk -
Welcome aboard. I always love to see another RS kit come to life. Reading build threads is the key so you know what you're doing before you cut you plastic.
Of course you'll still have questions as you go or even just before you start and were happy to help.
I Also have an RS kit that I built 2 years ago and it is holding up great and looks awesome.
If you need help, just ask.
Sent from my SM-G960U using Tapatalk -
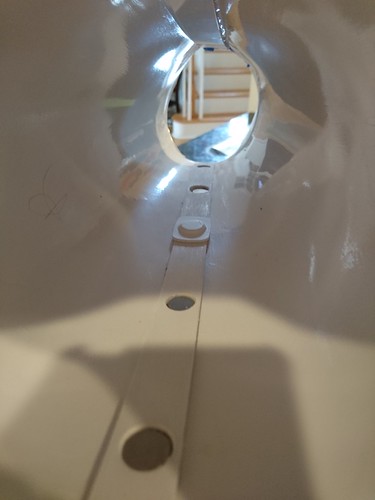
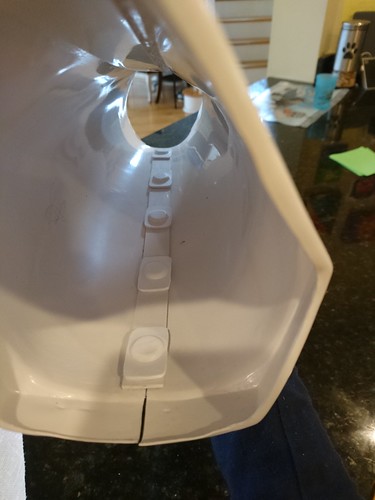
Hot water bath on that but piece. I had to do that too, also had to trim it some.Whoops, update shouldn't have ended here:
As you can see in this picture, the butt plate is spread out quite far - I've tried to tackle this issue by using two extra strapping strips, but apparently this wasn't enough any ideas?
Also, when I walk around in the armor there's a lot of plastic clicking sounds which is quite annoying. Did anyone have the same issues, or does that just go away eventually by itself?
Third, as you can see in the front dress run pic some of the colour on the boots has already worn off because the shins keep going up and down when I walk. Would strapping the shins to the boot loops solve that?
As always, when you notice something, hit me up, and despite all these minor problems, I'm getting more and more hyped up for the day when I can finally submit my application in a good conscience!
Cheers,
Freddy
Sent from my SM-G960U using Tapatalk
-
Hey Mark,
Come on by The Maker Faire at Henry Ford Museum in Dearborn on the 28th and 29th. The Great Lakes Garrison will have a table set up and there will be lots of troopers you can talk to and check out some armor.
Sent from my SM-G960U using Tapatalk -
The sniper plate is a bit flexible so you can bend it a bit to get it to align. Probably won't be able to make it align exactly but it should be close.Hey guys, I've got a problem concerning my sniper knee.. the ridge that it has does not align with the ridge on the upper shins at all. How did you guys (especially the ones with an RS kit) solve that issue?
See my RS kit in the photos. The trick is to make it look aligned without trying to fit it directly against the shin. Ome of it will touch, some will not. The bottom part of the sniper plate will likely not sit flat against the shin, okay.
I think I glued and clamped one side at a time.


Sent from my SM-G960U using Tapatalk
-
1
-
-
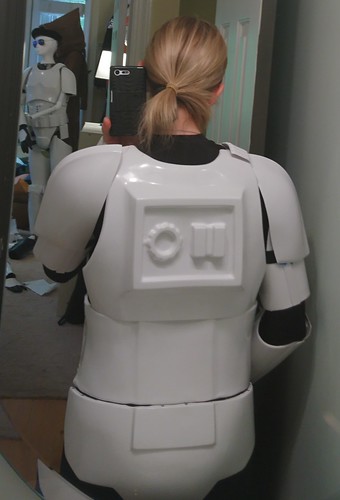
Hey Christine,Discovered today that gaffer's tape holds much better than blue tape for temporary strapping when fitting! Yeah, it's more expensive than blue tape, but you don't use nearly as much gaffer's tape, and it can be re-used much of the time. I was able to use it to secure my shoulder elastics and shoulder bell elastics in these test fitting shots today. I'm still building and adjusting things- please disregard the missing items on the armor!
Left side rivets all lined up. Ab/kidney meets level at the top.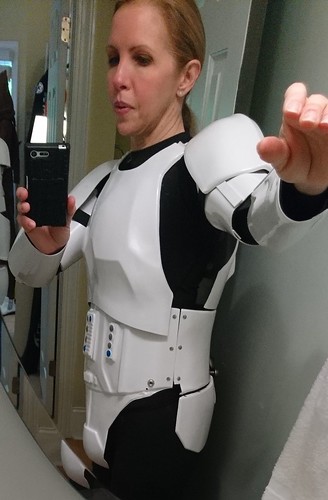
Right side kidney/ab connection is only secured with the Han snap elastic here. I'm working on the belt, so I don't have it on in these shots. Remember, the belt isn't necessarily there to pull things together; the armor should come together pretty well without it! I'll need my belt to snug up how the kidney/ab open up a little bit near the bottom of the connection when I move my arm like in the photo, but it's no biggie.
It is ridiculously difficult to get a rear selfie shot in a mirror! My back plate looks like it's overlapping the kidney, but it's not. It's sitting right on top of the kidney due to a bit of foam that I have inside the back plate. Maybe I'll take a little off of the foam to keep it a bit closer to me.
I still have to adjust the chest. I don't like how it's sitting a little lower on the left hand side, so I'll need to fix that. Shoulders seem like they're tight to the chest (minimal gaps) when my arms are relaxed, but I can still easily move them around. I'm happy with this.
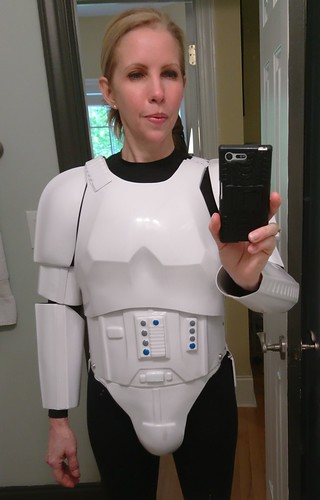
If anyone sees anything glaring about how things look, please let me know. The interesting thing about this kit is that I have not trimmed any of the length on the arms yet, and they seem to fit pretty well.
I took about 1.25" off the bottom of the chest, and removed about 1.25" off the cod/ab connection. I trimmed about 5mm off of the sides of the chest where it meets the ab, but I've not removed anything on the chest around the arms. I don't think I'll need to remove much off of the thighs at all. (I'll be getting to the thighs next.)
Overall, there has been much, much less to size down on this kit compared to the RS Props kit.
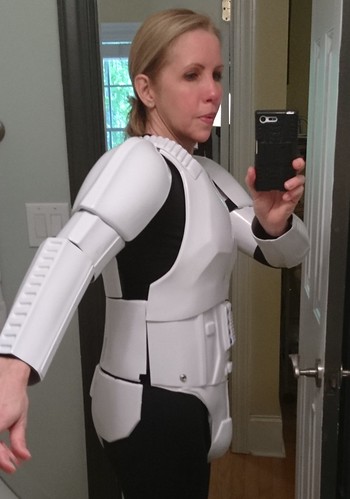
I agree about the chest hanging, looks a little tilted but that could just be the way you're standing.
Hows your arm movement at the elbow? Even if it functions well I personally prefer to see a bit of black at the elbow rather than the pieces fitting tight. Seeing the black helps with the visual balance.
Otherwise looking good...as expected.
Here's mine for reference. I think we're close to the same size.
Sent from my SM-G935V using Tapatalk
-
There are a lot of us who have built the RS kit and we are happy to help. Any kit is daunting when you first start out but it is totally worth the effort. Baby steps is how you get thru it.This thread is exactly what I was looking for! Thank you sir! I'm compiling a list of what I will need, material-wise, since I'm planning on ordering my RS build-it-yourself kit this spring or summer. The process seems pretty daunting, but rewarding!
Sent from my SM-G935V using Tapatalk
-
3
-
-
Looking good. Glad to see you're back to work on this kit. Must be feeling better?Magnetic shins continued. (Almost there!)
Now that the e6000 has had lots and lots of time to cure, it's time to attach the other halves of the magnets. Make sure that the halves are super clean and free of extra dried glue. It will prevent the shins from closing well. You can do this by touch. Rub all of it off where you feel it.
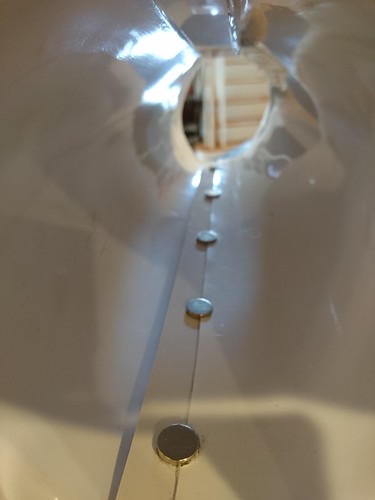
Once everything is cleaned off, close the "hole" half over the "magnet" half. Your shin should be closing correctly at this point. The "holes" should lock around the magnets and prevent the shin from opening at all, even without the additional magnets at this point. If the "hole" strip is not fully engaged over the magnets, you won't have a very strong bond between the magnets to keep the shin locked.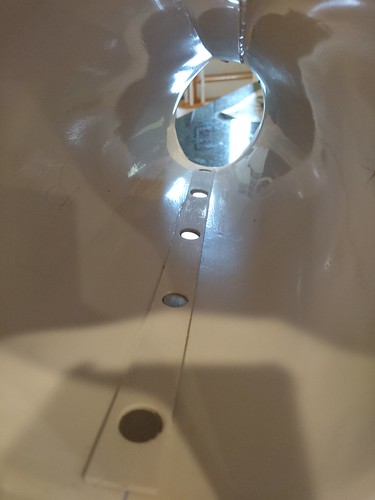
Easy part next! Apply e6000 around the prepared ABS button. No need to go crazy with the stuff. You don't want it oozing all around in there.
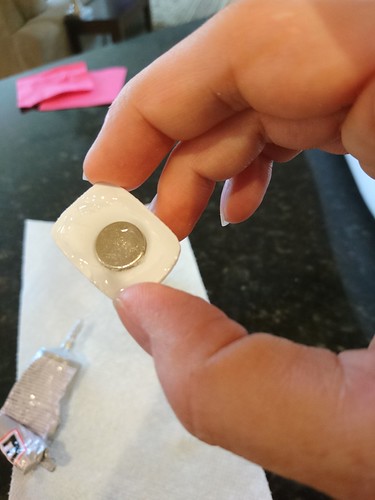
And stick it on!
This part goes really quickly.
For additional strength, I add some extra magnets on top.

Check those clean closures! Left shin.
Right shin.
I will open these up in a few hours just to make sure that there isn't any extra e6000 that has spilled out and might lock those shins closed where I don't want them locked.
Now to allow several days to dry, and these shins will be good to go!
Do you find yourself more comfortable taking your time with this one? I feel like my build and yours which was several months ahead of mine were going at 100 mph. Now Im taking my time, a glacial pace compared to the TK build.
Sent from my SM-G935V using Tapatalk
-
1
-
-
My belt snaps didnt work out, they werent aligned quite right. Didnt bother swapping them out, just added some velcro and its still holding up after a year of trooping.Thanks Stephen.
I didn’t get any strapping or snaps or anything from RS, just the hard harmour, so I’ve been sourcing it all myself. I got the Tandy snaps which seem extremely strong (as everyone says) but I did cheap out a little with the poppers for the belt. They aren’t too strong at all so I might have to redo them at some point.
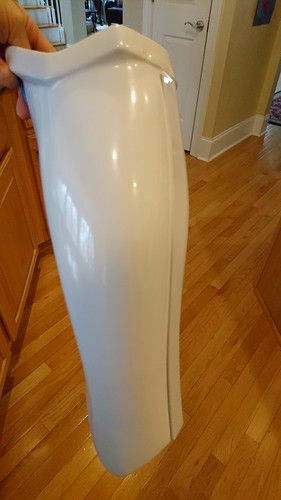
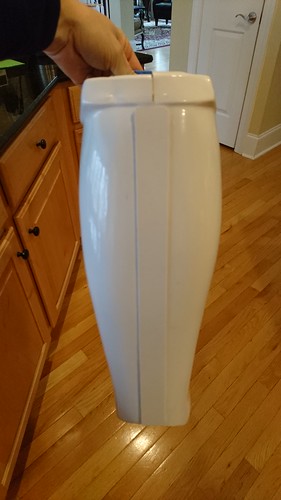
Oh yes the two identical shins. When the kit first arrived I feared I’d been sent the wrong parts. But it didn’t take much searching to find that it was normal. I haven’t trimmed my shins yet but I assume people try to reshape the ankle curves to be symmetrical? Or do they leave it as is? To me it looks as though it would be easiest to make both sides of each shin the same rather than try and replicate the two different curves.
Sent from my SM-G935V using Tapatalk
-
4
-
-
Not much cooler than a TK on a motorcycle.
Thanks Christine, it was your build thread that made me think, perhaps I can do this, and I’m so glad I tried.... mine you both you and Frank and the guys on the UKG gave me so many tips on how to do things, and encouragement when I hit the inevitable brick walls, I really couldn’t have done it without you all.... thanks
Haha... riding without a crash helmet on is illegal over here, might try it in the garden when it’s warmer
In the mean time.... my impression of a biker scout..... I don’t think it will get clearance 

Have applied for EIB... so fingers crossed
Sent from my iPhone using Tapatalk
Sent from my SM-G935V using Tapatalk
-
1
-
-
Awesome. Your kit looks great.My costume has been cleared, I’m now a really chuffed TK14655
I can not thank you all enough for your help, advice, support and encouragement throughout my build thread and particular thanks to Christine aka Cricket, Frank aka Fragarock and the armourers on the UKG..... you have all enabled a dream to come true
A big thanks to all of you
Sent from my iPhone using Tapatalk
Sent from my SM-G935V using Tapatalk
-
1
-
Toran's RS ANH Stunt build
in ANH Build Threads
Posted
It can be daunting but you just have to dive in and go. Slowly you'll gain the confidence needed and after you've built a few pieces you'll be just fine.
Hand guards are a good place to start. Simple trimming and gluing. After that I'd work on the forearms then biceps.
I have a very detailed build thread from several years ago. It was tailored to shorter folks and thr trimming needed to make a kit fit us better but the techniques are universal for anyone. Mine was also a RS stunt kit.
Post questions and you'll get lots of good advice.
Sent from my SM-G960U using Tapatalk