

TKZombie
-
Posts
389 -
Joined
-
Last visited
Content Type
Profiles
Forums
Gallery
Articles
Media Demo
Posts posted by TKZombie
-
-
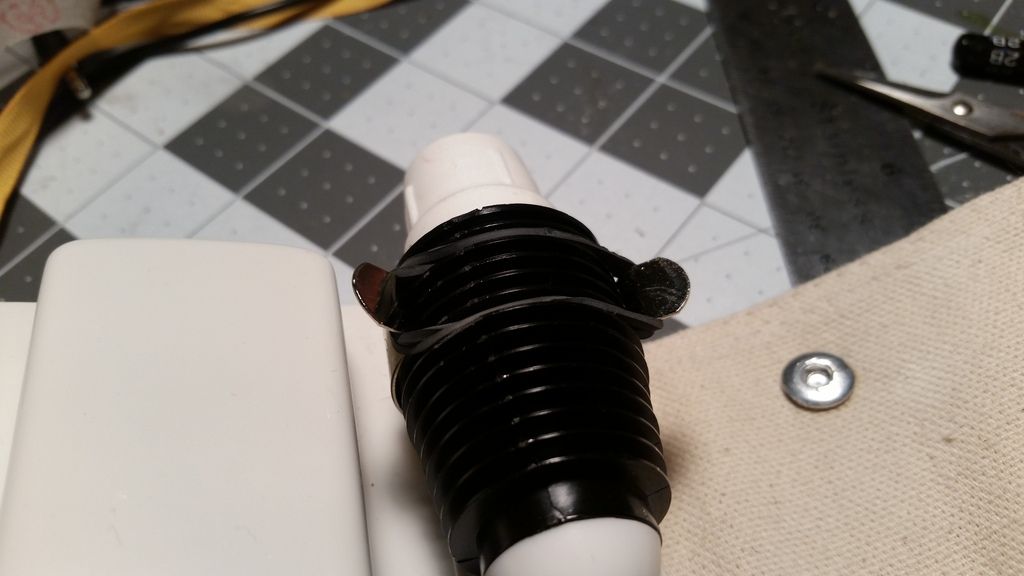
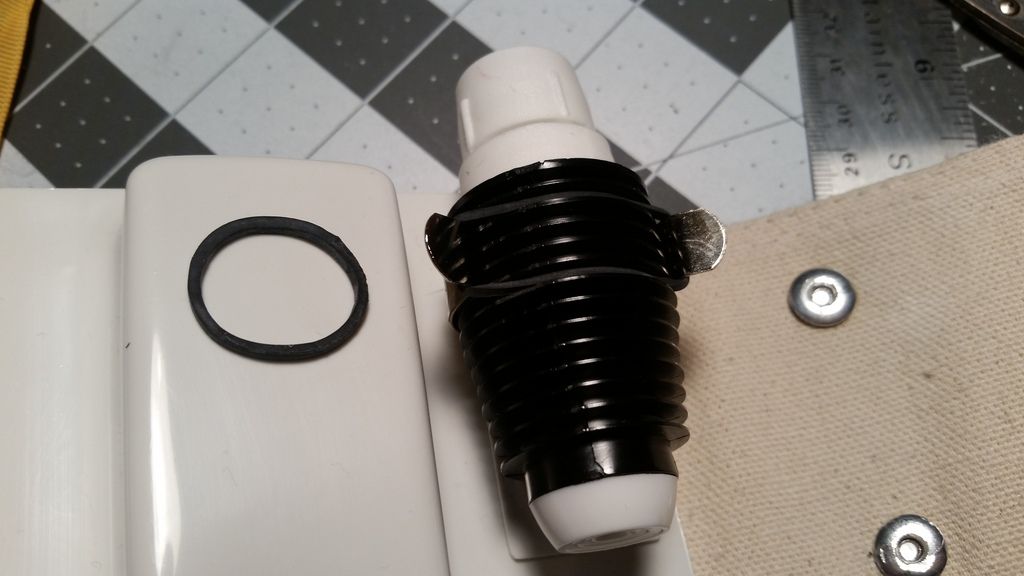
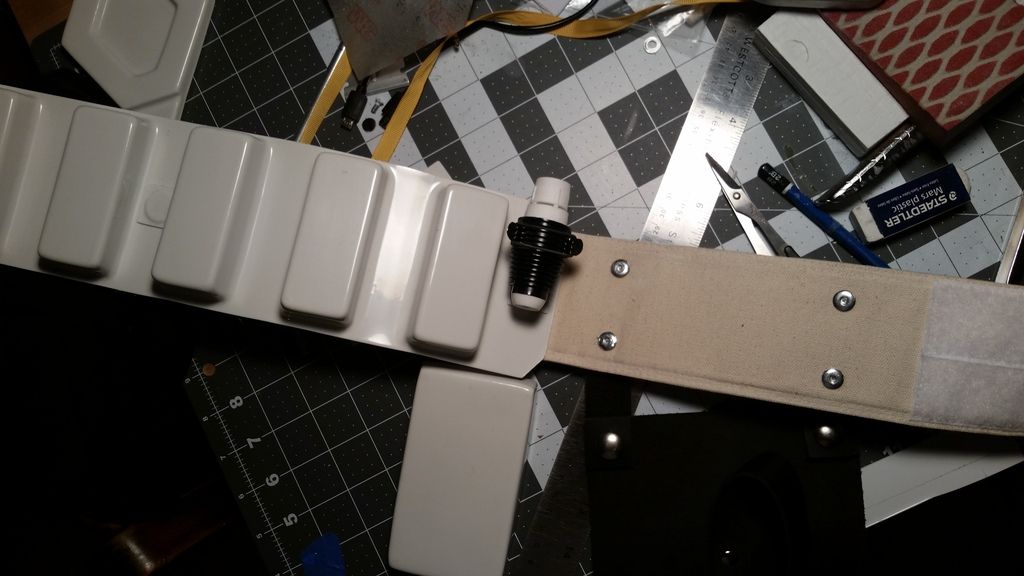
Thought I'd share my hyperfirm DLT-19, I've modified it adding wire wraps to the barrel and repainted the majority of it. Transporting the weapon is always a challenge so I had a custom carrying bag made as all rifles bags were not designed to accommodate the extra width of the DLT-19's charging handle on the side. You can find him on the 501st site he primary makes custom helmet bags but does other bags as well.
http://www.501st.com/forum/viewtopic.php?f=28&t=85460
Here is the bag, complete with custom TK ID on the handle and a embroidered imperial cog and my DLT19. I've since added additional patches as well to the bag.

The wires added on the barrel.


Stock repainted for a bakelit look.

Out trooping in action with it.

-
 2
2
-
-
Yeah I noticed, I picked up gortex gloves from my local racing apparel shop.
If you want the white cotton glove liners let me know there is a supply store beside where I work in Toronto that sells the for around $3 per dozen, I'm picking up for Danny and Clamps gloves let me know if you want some and I'll bring them to Fanexpo.
-
1
-
-
Back in June I commissioned a custom Gaffi Stick from a custom prop builder. Sadly there was a few issues with the order so I won't be recommending them.
Here are the finished pictures, the shaft and war club head are all wood, the head is turned on a lathe, the spike is a wood base with a epoxy resin over top. The other end has plastic fins in the wooden shaft with a wooden spike.


-
Boots completed, weathering next...


Forearm wraps finished, weathering them next.

Mask details inside finished, snout fans added, counter weights added in (approx 2.5 lbs) at the back of the helmet to offset the weight and foam padding placed in for comfort, similar to what I use in my TK, real comfy and holds the helmet in place perfectly. Nose pad added as well to take the pressure off the mask pressing directly on the nose ridge.


Neck seal time, using my TK neck seal as the base I made one out of my spare wraps material.

It closes in the back with Velcro


Neck Seal wrappings sewn on, testing fitting on my dog Sam.

Waist belt distressed the leather, needs a weathering paint pass still.


Test fitting, pre-weathering. Outer robe needs to be cut shorter, its folded up under my shoulders for the shot, needs about 6" trimmed, also going to add a 2nd skirt on the bottom of the inner robe as seen on screen.
Weathering up next!!!


-
2
-
-
Looking great.
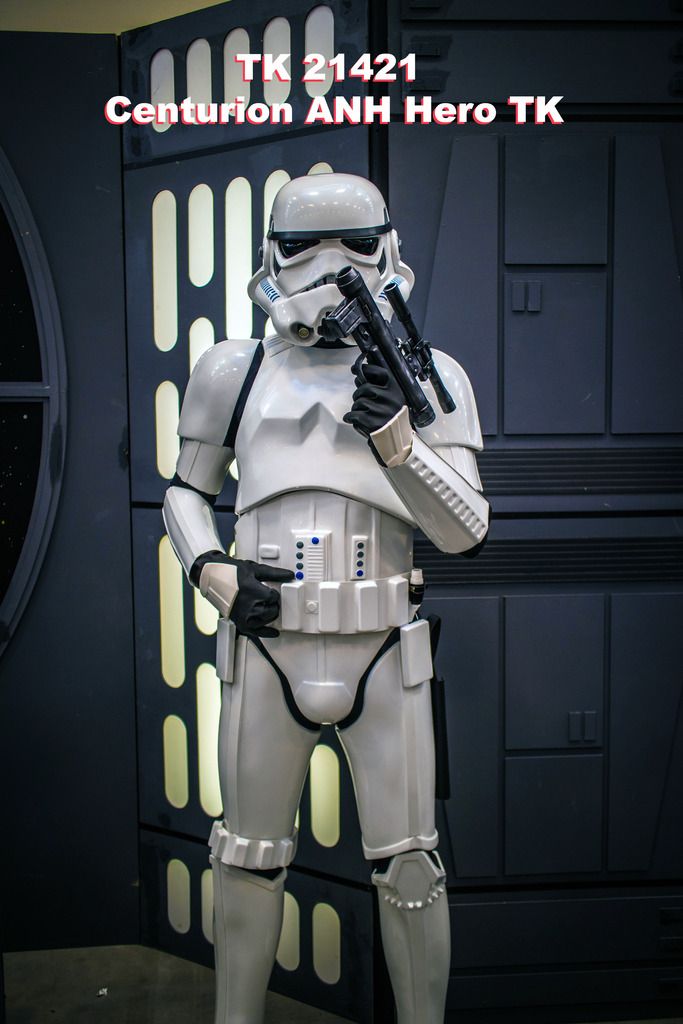
Your ANH Hero - is that a mannequin?
Nope that is on me.
-
Awesome glad you got your RS kit! Time to get building!!
-
1
-
-
You should start a fresh build tread!
-
1
-
-
Glad to finally see your TK is in transit to you. It's been forever. I certainly would not have been as patient as you were. <br><br>
I've had delays from builders when I ordered my parts as well and lack of communication is the number 1 issue with each and every one of the seller. <br><br>
To all SELLERS If you have a personal problem inform the people who paid you money upfront. Leaving people dangling in the wind is totally unprofessional and will lead to a bad reputation about your work. <br><br>
Anyway good luck on your TK build getting done for Fanexpo.
-
Thanks for all the congratulations! I love the TM armor. I'm off building a Tusken Raider and Sandtrooper now.
-
The boot wrapping saga continues...
Prepping the torn strips with a wire brush to fray the edges. Clamp and grate the edges to ruff up the edges and get some exposed threads hanging loose, far easier to do now than after its applied.

Wrapping strips edges all wire brushed and ready for boot wrapping.

The boots and e6000 ready for wrapping!

First boot wrapped, I'll take progress pics on the 2nd boot.

The other side. I can't wait to weather these up.

The right boot, really happy with how this turned out. Took about 1 & 1/2 tubes of e6000 to attach the straps on one boot and about 2 1/2 hours. I'll add some additional distressing on the fabric with a rasp and file.

The sole of the boot, I'll be adding Shoe Goo for traction and wear durability once I weather these.

The left is up next tonight...
-
Wow. I'm not sure which aspect of this is the most impressive... TK1, TK2, the Tusken or the fact that you did all three in a year! Good stuff!
Well technically its been 7 months for all 3 but who's counting. After pretty much working every month when i finish up I won't know what to do with my free time. The next month will be hell getting the Tusken finished and trying to get the Sandtrooper completed.
-
The leather bandoleer was weathered in a few stages, first sanded all the edges where natural wear would occur, then took a rasp & file to add deep wear and scratches. Once the distressing was completed I soak the whole bandoleer in the sink full of warm-to hot water for about 15 minutes this softens the leather. Once you take it out you twist wring all the water out and then begin shaping the leather, hitting spots with a hammer, rolling edges and flaps. As the leather dries it will deform to shaped you forced on it. The leather also hardens and is more rough once dry, so good to add a leather conditioner to it at that point. <br><br>
Fabric is distressed with sand paper, a serrated knife, a rasp and wire brush. best to practice on a old piece of clothing or scrap material before you try it out, less is more and once you start cutting and tearing it can get out of control fast!
-
The boots! I decided on using a old pair of leather boots over rubber boots, as these are comfortable, pre-broken in and won't heat up my feet lie rubber ones. I test fitted them zipped up and they still slide on & off so these will work!
They have a raised heel and a gap so I cut out 2 wedges out of dense foam and will glue them in the gap.

Wedges glued in...

The finished wedges in place.

Adding a fabric base to the bottom, the straps will wrap around the whole boot including the bottom I wanted a good base for them to adhere to. I'll shoe goo coat the bottom of the boot once its weathered for traction and to extend the life of the bottom.

Bottom course of wraps is applied around the whole of the boot. Ready for wrapping next! I've stuffed the boots with towels to expand the size of the boot to as wide as possible so when they get wrapped they don't get tighter.

-
1
-
-
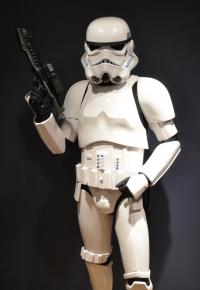
Well after building 2 Stormtroopers this year I decided I wanted a 3rd costume, my 1st build was a AM ANH Stunt TK, after making that one I decided I wanted a more screen accurate TK and ordered a TM ANH Hero TK. With the Hero TK finished and centurion approved I begun converting the AM TK in a Sandtrooper.
ANH AM Stunt TK
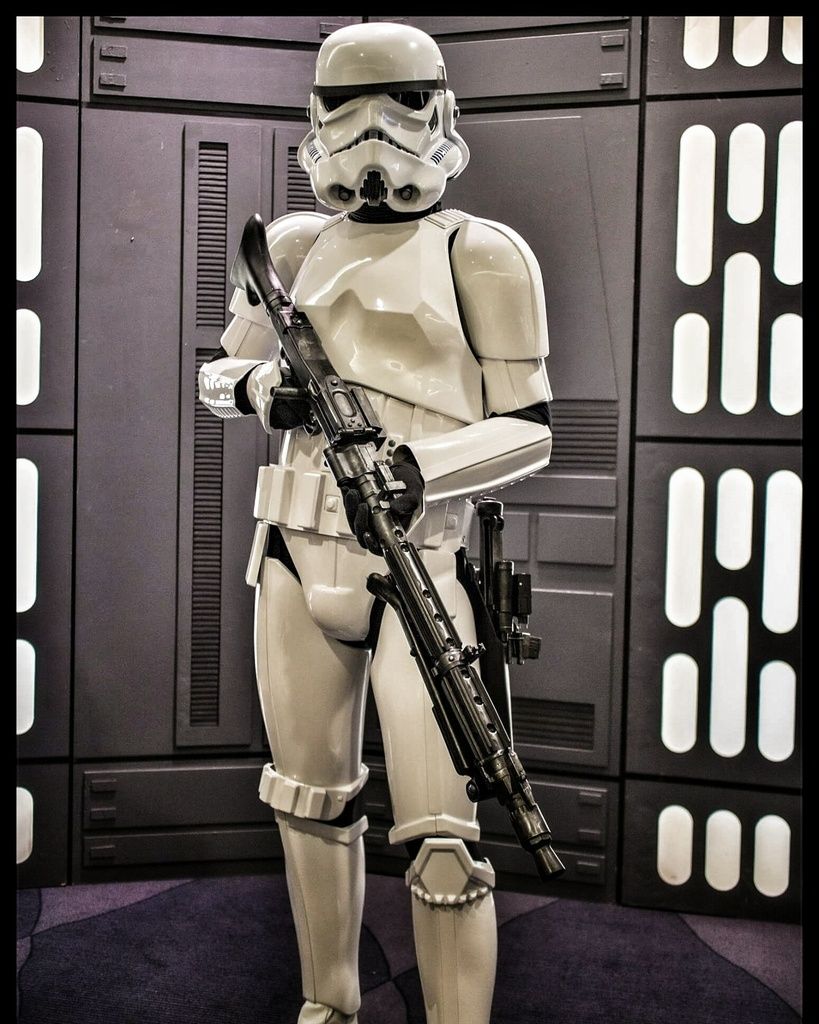
ANH TM Hero TK
So back to a third costume option. At first I considered Captain Phasma but after seeing another garrison members build of Phasma I am hesitant based on the complexity and cost involved on that build, maybe I'll revisit it in the future but for now its too much to take on that build. So what next then? I've always loved the Tusken Raider and at the last few troops kept being drawn to them. So making a Tusken Raider it is! So now what?
After a little research and talking with a few other garrison members with Tuskens I decided to go with the Godzilla mask for my build. Its highly recommend for its screen accuracy and has machined metal parts. I'm a detail freak and if i'm making it, its going to be the best it can be. So step 1, reach out to the Godzilla Mask maker and ordered a finished mask. When he responded to me he also told me he makes the majority of the rest of the costume as well which I didn't know and after seeing his photos of finished builds I knew this was the one for me! I place my order in June.
While waiting for my Tusken to be made and shipped I started gathering up the other extras I'll need. First up was the Bandoleers and a Waist belt with pouches. There is several different options to choose from. I decided on the ones I wanted as per the photo below so now to find them.

There are replica makers and vintage ones but the replicas didn't look screen accurate as I wanted and the vintage ones were not to be found. Then I stumbled on a UK site called Cosmic Creations and they make screen accurate replicas of the waist belt with pouches and 1 of the bandoleers I wanted. The 3rd Bandoleer I ended up getting a replica off Amazon for the British Martini-Henry Bandoleer.
The 3 of them.


Cosmic Creations Waist belt pouches details

Cosmic Creations Bandoleer

Amazon British Martini-Henry Bandoleer weathered and distressed by me.

With those located and ordered I moved onto a Gaffi Stick. I decided on getting one made by a prop builder called Carp's Creations. Its currently in progress and due to ship to me by Aug 10th at the latest, more to come when it arrives.
July 22nd the big white box arrived! The other is my Sandtrooper parts from TM...

The unboxing...Finished mask, Inner robe, Outer Robe, Neck Canister, Gloves, Waist belt, and 2 sheets of material for making forearm, neck and boots wraps.

The mask after some additional weathering, a bit more to come but getting there.


Up next making the forearm wraps. 1 sheet ripped up, 1 more to go. Once torn up I took a wire brush to one edge to rough up the torn edge and fray it to a degree.

I took an old sweater and cut off the sleeves. I stuffed the sleeve with a piece of foam slightly larger than my arm so these would fit a little loose when i slide them up as the wraps have no give once sewn on. Then I hand sewed on the wraps.

1 done, 1 to go

The completed forearm wraps, weathering them is up next.

Test fitting with the inner robe and glove.

Boots are up next...
-
5
-
-
Pan head screws are available at Lowe's in the miscellaneous drawers.
-
I'd ask on the Krayt Clan forum for mesh options. All the Jawa's there will surely be able to help you out. <br><br>
Any update on your AP armour arrival date?
-
1
-
-
I have the TM armor and another member in our Garrison has RS the RS won't match your armour. Its close but clearly different enough. The RS has a pitted finish. TM does not.
-
A chin strap definitely helps. I have a hero bucket, with bubble lenses so my field of view is even less that a regular stunt TK as you can only look directly out the front otherwise you see distortion and your eyes will get strained really fast. The chin strap holds the helmet firm and I've learned to turn my head to look not my eyes.
-
4
-
-
Great helmet job!
No you always fell a little sad when you finish a build, the full TM will keep you busy for quite a while so enjoy the downtime while you have it! Then plan for what's next!
-
Fan expo is Sept 1-4 plan for 1 or more days there you don't want to miss it. It's our biggest event of the year!
-
4
-
-
Awesome, now you need to play your first official troop! There is bunch on the 25th. Get signed up on the 501st.ca page ASAP then you can see the upcoming events. Get your 501st approval here too then you can get on the 501st member only section and don't forget to get on the 501st.com page that's where all the good merch is.
-
2
-
-
The number of screws on the helmet is less, the number of teeth is less, bubble lenses, bumps on the ears are less. Belt rivets are 4 not 2. And you can wear the Grappling hook commlink set instead of the TD. The neck seal should be the full bib to the waist and the hand plates can be different too. As well you can use the SE14R blaster pistol that was used in the promo photos for ANH. <br><br><br>
Not very many armour makers do the hero helmet. <br><br><br>
I have a TM Hero TK. I prefer it over my stunt TK.
-
I found a simple way to keep the commlink on by belt in the metal bracket as it easily pops off with impact from your forearm or blaster. I added these black hair elastics and they hold the piece firmly in place.
I use 2 of them for safety.
1 on and 1 off to see what they look like
Very hard to see unless you are a foot or so close to it.
-
1
-
-
Looking good so far. I just finished my Troopmaster Hero build and just had it 501st approved as well as Expert Infantryman and Centurion approved. My build thread is on here if you want to reference it. <br><br>
Take you time and refer to Pauls build thread too and you'll do great!
-
1
-
Hyperfirm DLT-19 and Carry bag
in BlasTech DLT-19
Posted
Yes Hyperfirm still makes the DLT19 but I hear there is a longer wait to increased demand.