

eqdizzle
-
Posts
342 -
Joined
-
Last visited
Content Type
Profiles
Forums
Gallery
Articles
Media Demo
Everything posted by eqdizzle
-
I have a Grand Zillo that I got second hand and am in the process of refurbishing. TZA (Talon) is also creating the full kit, including a helmet.
-
Start coarse, approx. 60 grit, then switch to a grade or two finer, like 320 or even up to 1000 grit.
-
Keep your eyes moving constantly...take slow deliberate movements especially when raising or lowering your weapon!
-
Looks like I'll be doing the full armor set as well... Stay tuned for BBB TV!
-
Mic tips added, and weathering scrubbed a bit more. I also hit the black areas with steel wool to knock a bit of the shine out. Now I'm just waiting to hear back on tube stripe stencils...! Then we're looking at sealant, visor, padding, and fans!
-
Agreed...! This has the Semi-Gloss (i.e. Satin) as well, but I'll be hitting it with a bit of 0000 Steel Wool to knock just a bit of the shine off.
-
Weathering added. I misted some of the Smoke Grey in split second bursts from about 2-3 feet away. I let this dry, and then dry and wet-sanded with 1000 grit sandpaper to give it this look. I think this matches the on-screen weathering pretty darn well. You can tell it's there when viewed up close, and it fades away a bit when viewed further back. Really nice and subtle. I'll likely do some more sanding to take even a bit more off, though.
-
Mic tips. These are 2 piece, so the main body is painted in Semi-Gloss black, and the center is Rustoleum Metallic Aluminum
-
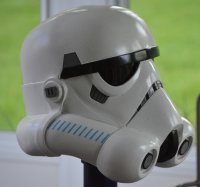
Rebels TK item list: Bucket: Originally GZ, may move to the TZA TZA Armor: TZA / Talon With Walt's upgraded shins Boots: not official. Working with Imperialboots to develop Imperialboots Underarmor: Plain old black underarmor. May use the Anovos, but it's a little on the hot side Gloves: These look to be the same fabric as the compression suit, not the rubber/latex of the Movie TKs. Black wrist length Opera gloves Neckseal: Very different than the Movie TKs. Looks to be the same material as the compression suit, with horizontal stripes without adding dimension. Balaclava may be required. E-11: Rubies with LED upgrade. D-Ring added The Rebels TK does NOT have a holster..! ___________________________________________________________________________________________________________________________________________________________ ___________________________________________________________________________________________________________________________________________________________ I picked up a 2nd hand bucket GZ bucket off the main board a month or two ago, and I'm now in process of finishing it: This bucket didn't come with decals or mic tips, so I've had to paint the details and source a 3d printed set of mic tips. As you can see, I had a bit of the white paint come off when I removed the painter's tape, so I'll have to repair this before I weather. Paints used : Rustoleum "Works on Plastic" White Primer Rustoleum "Works on Plastic" Gloss White Rustoleum "Works on Plastic" Semi-Gloss Black Rustoleum Smoke Grey Hand-painted Testor's Semi-Gloss Black Edge-lighting on teeth with Testor's Flat White coming soon...weathering, mic tips, and tube stripes!
-

New armour build Star Wars Rebels TK
eqdizzle replied to Fem Kat Rebel TK's topic in Build Threads Requireing Maintenance
I grabbed this pic from shockmatic on the CTD site, but you'd essentially create a butt joint on the interior (i.e. the left side of the right leg and the right side of the left leg) of each leg, leaving the exterior (i.e. the right side of the right leg and the left side of the left leg) fully seamless and permanently fused. The cover strip would only be attached to a single side on the *inside* of the leg, and Velcro attached to fully enclose and mimic the seamless look. You could, in theory, do the split in the rear, but that will be much more obvious than this method. -
New armour build Star Wars Rebels TK
eqdizzle replied to Fem Kat Rebel TK's topic in Build Threads Requireing Maintenance
I would consider doing a closure like the animated Clones do. The KW kit is designed to have the seam on the inside of each leg, Velcro closed to mimic the seamless look. You certainly could split the rear calf, but I'm thinking you'll see more popping open on the rear with these being more form fitted than the ANH TK. -
New armour build Star Wars Rebels TK
eqdizzle replied to Fem Kat Rebel TK's topic in Build Threads Requireing Maintenance
and I think TZA uses HIPS plastic, as this doesn't look to be resin. If that's the case, I'd recommend using sludge for the filler in lieu of Bondo. The Bondo will eventually crack and require much more maintenance to keep it looking right! -
New armour build Star Wars Rebels TK
eqdizzle replied to Fem Kat Rebel TK's topic in Build Threads Requireing Maintenance
Having done a few of the animated characters, I can tell you that this is not the typical grey wash using acrylics like you see on Clones. I've 99.9% decided to use the "mist on - rub off" method to most accurately match the on screen look. I've got about 6 total coats of the gloss white on the bucket, with wet sanding with 1000 grit between coats. This will give you a thick and smooth base to build off of. Once the white has fully cured, mask off the black areas and lightly mist with the grey from .5 m or so, concentrated in certain areas with a quick, split-second burst. Let this dry for a few hours, and rub with the 1000 grit until much of it disappears. This should leave you with something that matches the look of the weathering on screen..! -
Rebels Stormtrooper Helmet
eqdizzle replied to gmrhodes13's topic in Build Threads Requireing Maintenance
That was my thought as well...it looks to almost have a turquoise hue to it. I'm going to try to reproduce this to be as screen accurate as I can get it...with the light grey weathering and edge lighting on the teeth. It will be the third Filoni-animated bucket I've done...! I may be picking your brain from time to time, so thanks for all your help!! -
Rebels Stormtrooper Helmet
eqdizzle replied to gmrhodes13's topic in Build Threads Requireing Maintenance
Ah...my 2nd hand one had just the bucket...no mic tips, decals, etc. -
Rebels Stormtrooper Helmet
eqdizzle replied to gmrhodes13's topic in Build Threads Requireing Maintenance
Nice work! I'd love to know what blue you used for the stripes...still the French Blue? -
Rebels Stormtrooper Helmet
eqdizzle replied to gmrhodes13's topic in Build Threads Requireing Maintenance
Did you get this completed? I have one 2nd hand that I'm refurbishing at the moment. -
You'll be fine with either. You're more likely to warp your plastic in extreme heat than anything..!!
-
My Walt's Trooper Factory TK Build (WIP)
eqdizzle replied to EmlanThane's topic in ANH (Stunt and Hero)
make sure you talk to Aicire, who I think is one of the admins on Walt's FB page. She's about the same height and should be able to provide some good insights! -
drill out the end of the crack first to prevent any further cracking. You can use a very small drill bit, but this is an important step. backfill with a piece of scrap ABS with CA glue or similar and put a *tiny* dab of ABS sludge in to fill. The less you can use, the better..!!
-
ABS sludge isn't the greatest at retaining structure, since its thinner than HIPS sludge. Make sure you have a backing material to which you can apply the sludge, i.e. thin cardboard, scrap abs, etc. Think of the sludge as the window-dressing top coat, and don't rely on it for strength; It will not be as strong as the original ABS. And as far as the tiny pieces, don't spend too much time cutting yours into the tiny pieces as it will all melt just fine in not too long a time. Just make your scraps small enough to fit in your jar. Small Salsa jars work great since they're wide and shallow. Add too much acetone? Let it breathe a bit. Too thick? add a bit more and stir. Hope this helps!
-
He is active on the Clone boards. He does not cast any helmets, but purchases them and paints them. He works with Marcelo from C6, but has purchased KW, EVO3, and Grand Zillo buckets among others.
-
Doopy's Hengstler Counter Box question
eqdizzle replied to Cricket's topic in Build Threads Requireing Maintenance
I was shorted the D ring on my kit from DD's. Probably easier to see if you can find a replacement on Trooperbay. I ended up buying from them on Ebay because the shipping ended up being less expensive...! -
Doopy's Hengstler Counter Box question
eqdizzle replied to Cricket's topic in Build Threads Requireing Maintenance
It fits right over the box on your Hasbro. The hollows allow the sound to come through, so it's a purposeful design! I hope this helps! -
StlTommy is getting RS Armor
eqdizzle replied to StLTommy's topic in Hard Armor (General Discussion)
We have an armor party this weekend, fyi. I know a few members will be working on their TK armors...!
