
.jpeg.ff3078cf696d324fa576c149490ede78.jpeg)

themaninthesuitcase
-
Posts
4,126 -
Joined
-
Last visited
-
Days Won
31
Content Type
Profiles
Forums
Gallery
Articles
Media Demo
Posts posted by themaninthesuitcase
-
-
25 for the top, 16 at the bottom?Yes, M3.5 brass machine screws. I believe the original RS helmet had 25mm and 16mm long screws.
-
So if I wanted metric (as they are easier to source in the UK) I'd want to use M3.5? And they'd want to be about 20mm long?My inch fractions are not very good but I believe 6/32 is the same as 3/16 which is roughly 4.7mm. The actual size of the brass screws are 3.5mm which is approximately 9/64.
-
The included ones are nasty little self tappers. I'm ordering some pan head machine screws, washers and nylocs this evening. I'm not 100% sure on the head size though ukswrath used #6 which looks to be a 6.9mm head. M3 is 6, M4 is 8 so I'll probably go for M4.I'll do that another day, though. But say, that reminds me: Does anyone know offhand what size nuts and bolts I should use for this? My kit did not seem to come with the screws, but I know there are more accurate options than the Anovos screws anyways, so I'll just buy the right ones. I want to use nuts and bolts, as well, not the sharp screws that were to have been provided.
-
 1
1
-
-
I'll use Chicago screws I think, if I need to remove them I'll be able too. Then I'll glue on the covers with E6000 which is also removable.Not sure I follow?
-
1
-
-
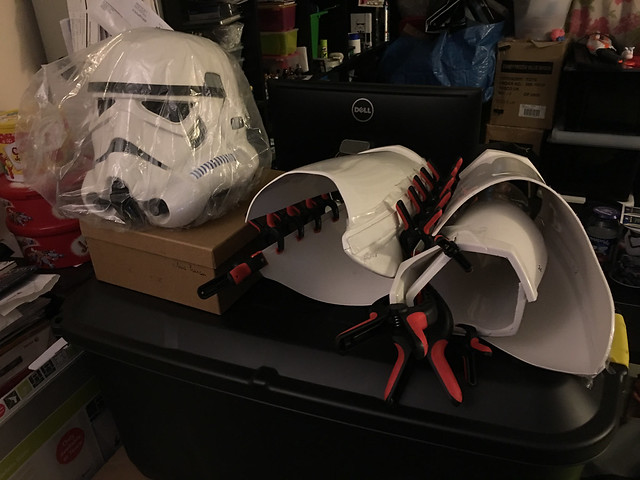
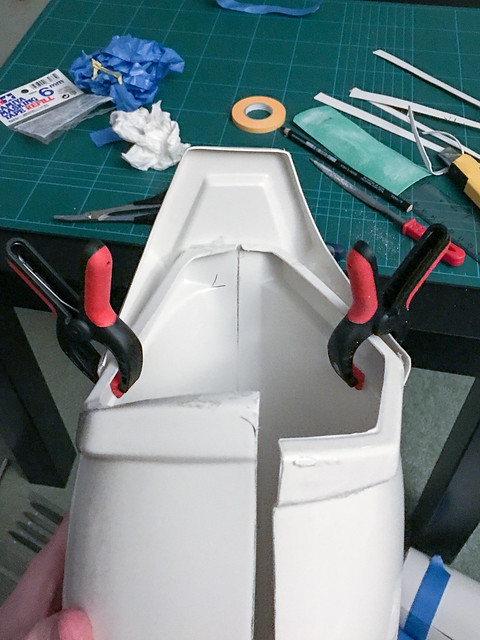
I took the clamps off the plate today:

You can see the plate has a healthy slant, but I'm not worried as this more or less matches the reference, maybe a tiny bit worse.

I've now started gluing the corners, but it's really held in place already.
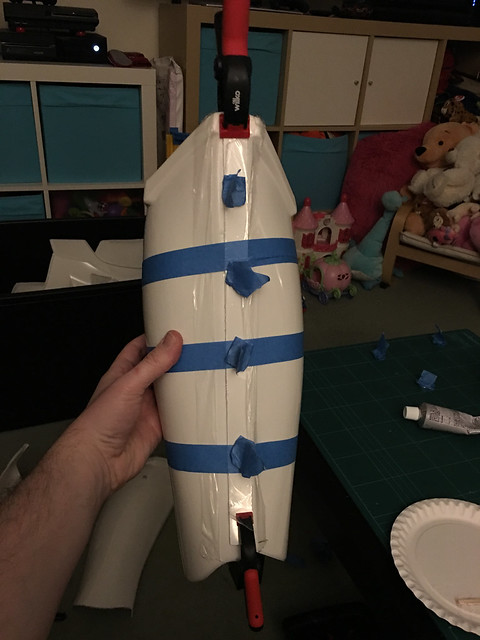
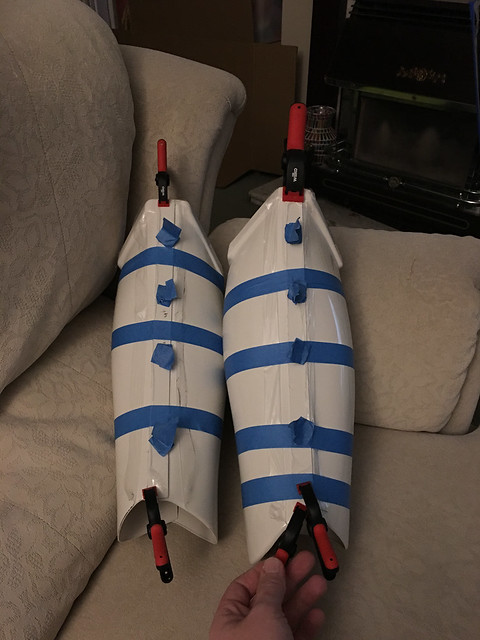
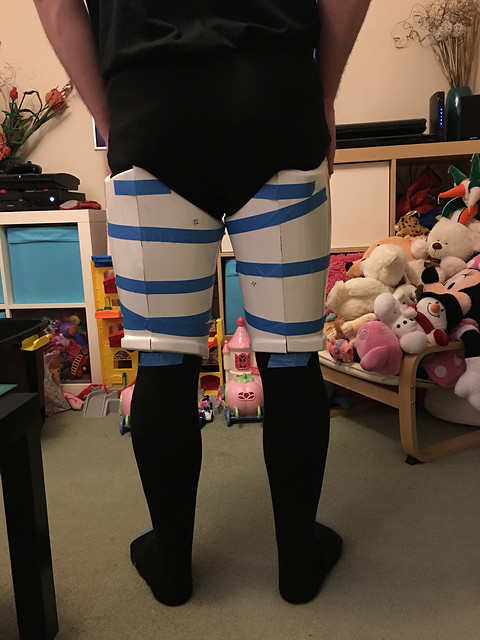
I also added the cover strips to the rear of the shins. These are added to the outers and I'll leave the inners un-glued for the hook holes.
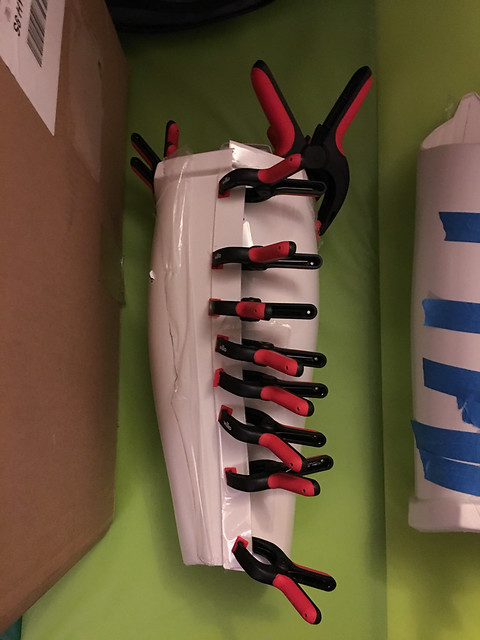

As you can see I'm glad I bought so many clamps! I also used almost all the magnets I bought on the rear of the thighs (not pictured).
This nearly brings me to the end of the main build work on the limbs. I just need to add the elbow elastics, thigh belt elastics, bicep hooks and shin hooks. Oh I also need to add the ammo box to the thigh.
Any input on the size and distances for the shin holes would be appreciated.
Starting to get exciting now.
I have about 10m of 1" webbing I got for the snaps so I'm thinking of getting a cam buckle for this to make the belt for the thighs. This will be nice and low profile, I'm just worried if this will be up to the job. Tomorrow I'll be ordering the snaps so will be able to get on with the body too.
-
What size are the brass helmet screws? I need to get those too.
-
I'll probably go for something easier to remove then rivets too, then E-6000 on the covers.
-
in some ways melting out the rivet would give a nice neat hole rather than a huge tear. I just hope I'm one of the small amount of glue people.Wow. I got really lucky with my belt. Sorry you guys didn't.
As for using a dremel, be very careful. Those rivets will heat up fast and melt the belt plastic. I tried this on one of mine and got some melting on the belt. I stopped before it got too bad.
-
I am petrified of removing the belt now. I've seen 1 or 2 success storied and 4-5+ where there's been issues.
I think I'll use a dremel to grind of the rivets a small amount at at time and use a damp cloth to keep the heat down. In theory I could apply this to the caps too once I get that far. What do you think?
-
1
-
-
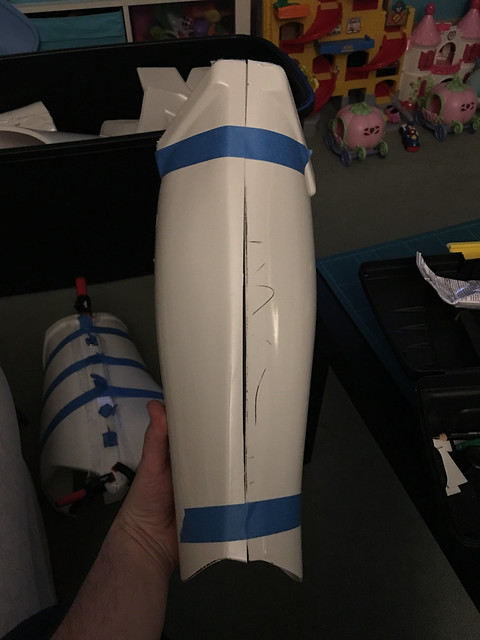
Did a little bit more this evening. Not too much as I A: Needed the glue to dry and B: My mask needs replacing and I can't wear it long at all now before I struggle for breath. I have a 3M 4251 which is great but mine is super old and clogged. Trying to work out if I should get another the same or if I should swap to the units with replaceable filter units.
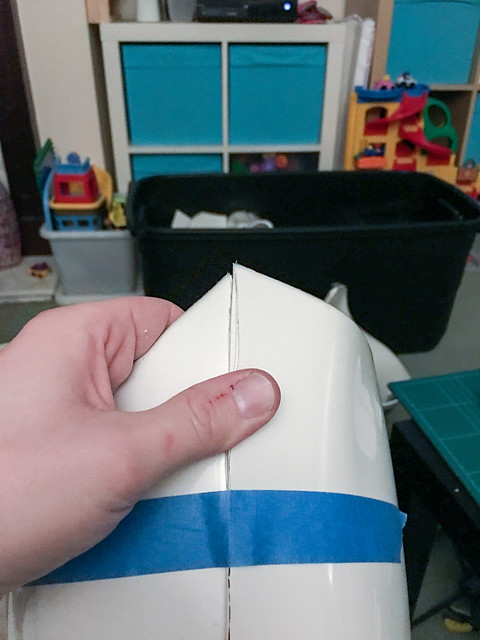
This evening I got the joins on the back of the thighs straight, one side on each leg was bowed out slightly. I then attached a cover strip as before gluing to one side. Once that's dry I'll do the other side. I didn't trim the sharp point just yet, though I did just soften it a shade. I can always go further later if needed.
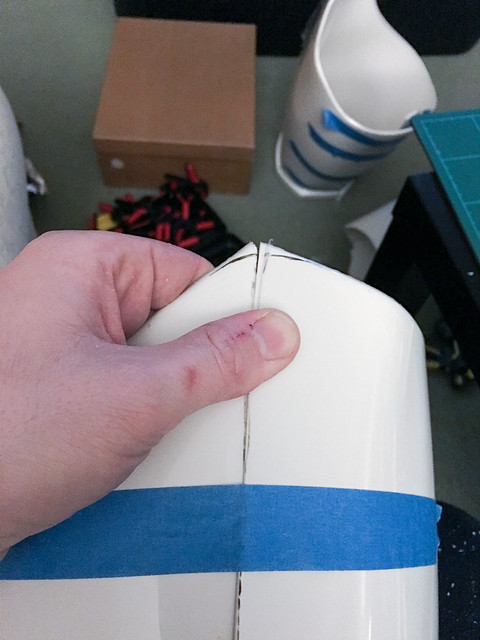
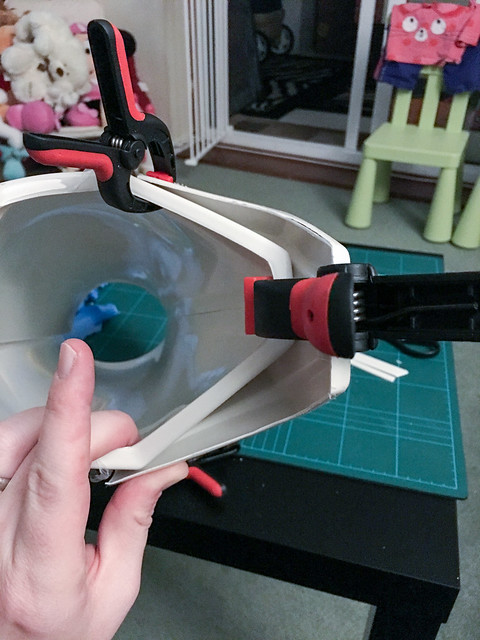
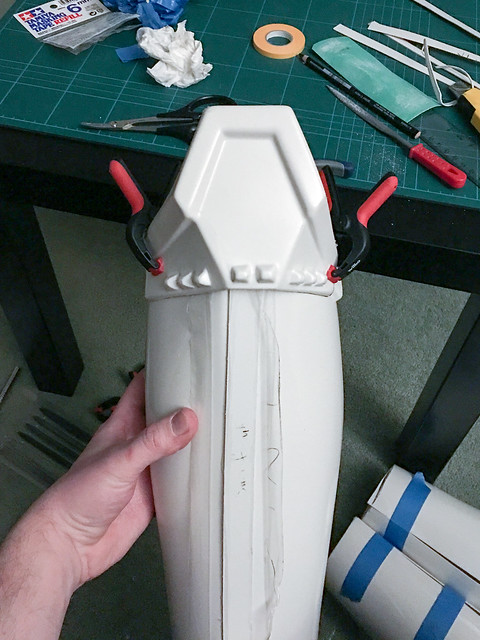
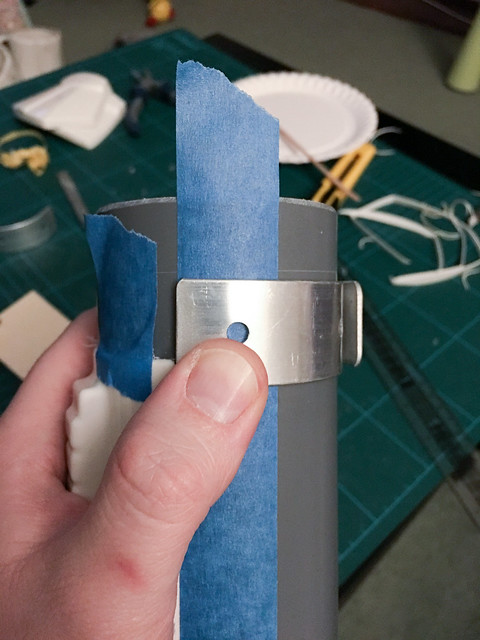
I also started gluing the sniper plate in place. I first trimmed the side i mentioned which was too long. This done I made a light pencil mark to help get the glue right and removed the protective coating to stop it getting glued in by accident. To try minimise damage during glue up I applied a layer of blue tape to the face of the plate.
So far I only glued the main face of the plate, the side clamps are purely to keep the alignment.
Tomorrow I'll glue the sides, though I'll possibly do one side at a time depending on how well the glue holds.
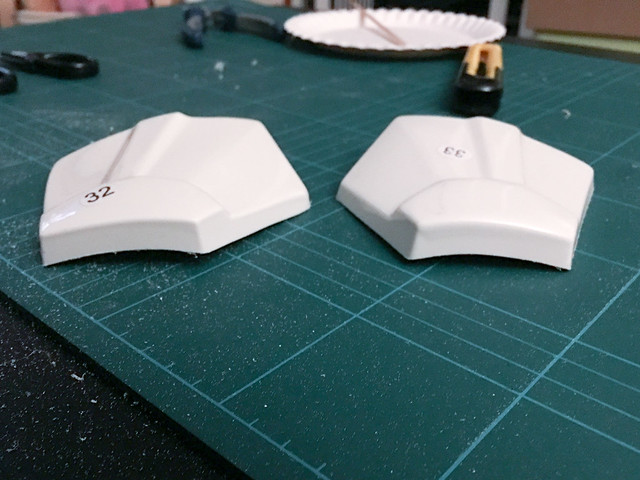
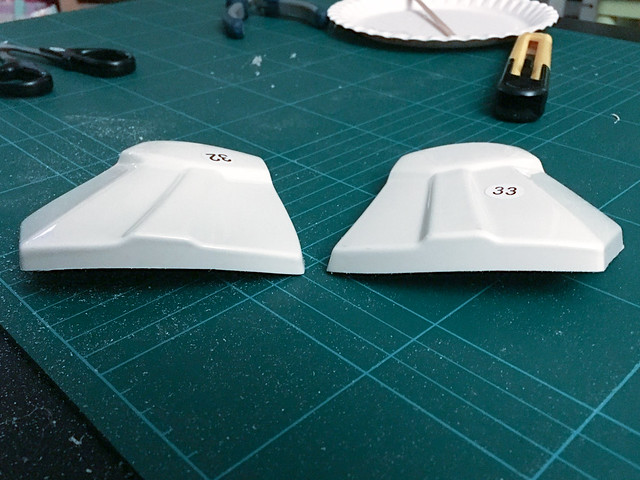
For the record i've followed TMs advice on the sides. Longer edge goes on the inside, so for me the left is parts 24 and 27. Other people have this as the right for the exact same parts. Seems the labelling on the shins is a mess.
I will probably also punch the holes for the #4 hooks too. I need to look up exact measurements, I've seen 5mm (edge to hole centre) in ukswraths post but looking at the reference below I think it might be a bit more. Maybe 6mm from the edge to the edge of the hole.

The same post suggested a 1/8" hole which is about 3mm, is this a good size?
This is how I left things for the night.
-
Also I have about a 5mm return on both ends f the bicep and also on the outside edge of the forearms. Should I reduce this at all or leave as is. Fit seems good as is (if anything I need to make the bicep smaller), more the reference i've been looking at has little to no returns on these edges and it may also be a comfort thing.

This image shows what I mean, you can just about see the forearm is also pretty return free as well through the gap. But again I want to say that I think fit is currently good it's just something I noticed fishing through my reference.
-
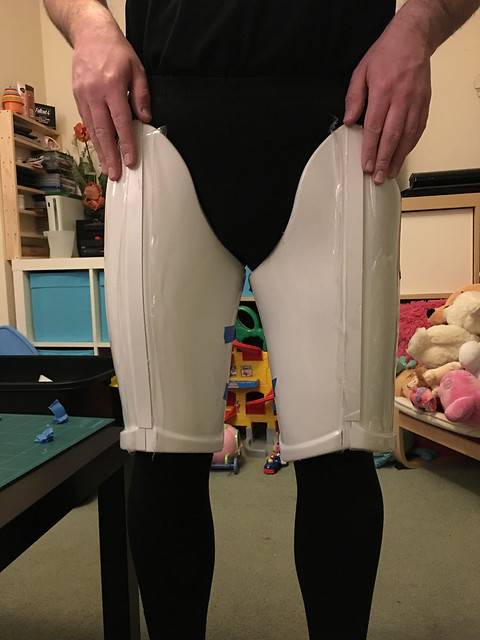
Based on the reference image I posted previously I trimmed the top of the thigh returns.

This gave me a lot better fit at the top and generally allowed for better movement, I could actually walk. To further improve this I used the same method with the 6mm tape to trim the back down removing approx half the return. This again gave me far more movement. I still can't bend my knee much, and having hitched up the thing so far can't lift that high there either. I will probably need to remove more at the base of the thigh to allow me to get more movement and lower the thigh a tiny bit. Though this will happen later once I've got a troop or two in I think.
I do have this digging in now though
This clearly isn't all that comfortable. Would this be okay to round off a bit? If so would this line be acceptable?
At the suggestion of TM I have swapped the L and R shins. This puts the slightly longer bottom edge on the inside. I had a 2nd go at getting the plate aligned and I think I can just about do it. On the other knee (what is now the R) it lines up pretty easily. On the correct L it's going to need some force.
I can get the centre lined up okay:
And the outside edge lines up easily enough.
The inside one is where the force is needed.
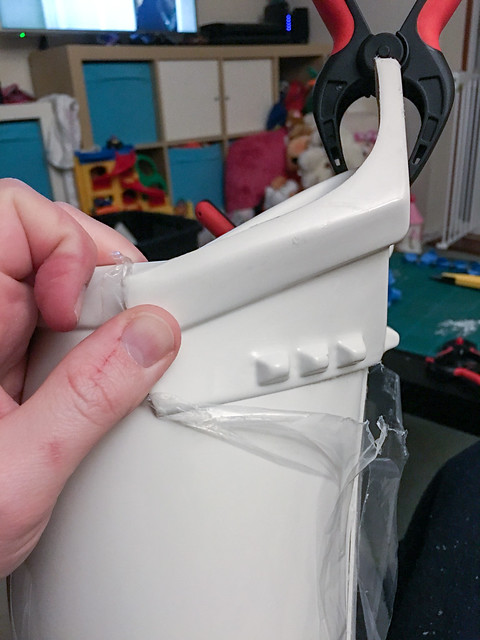
First it's a bit long but this can be trimmed down. 2nd it need a fair amount of force to hold down, will E-6000 be able to hold it?
Finally once all lined up are the lines okay for Level 3 approval? It does also introduce a general lean to the side s you can more easily see from above.
This reference seems to suggest this is perfectly acceptable:
Other than that I spent the evening cleaning up the excess glue on the arm parts which are now all full glued up. I can probably add the elbow elastic, I just need to double check where it goes.
-
If I want to swap out the horrid screws for pan heads on the TD do I need an 6 or 8mm heads? I am pretty sure it's 8 but I can't find where I saw that.
-
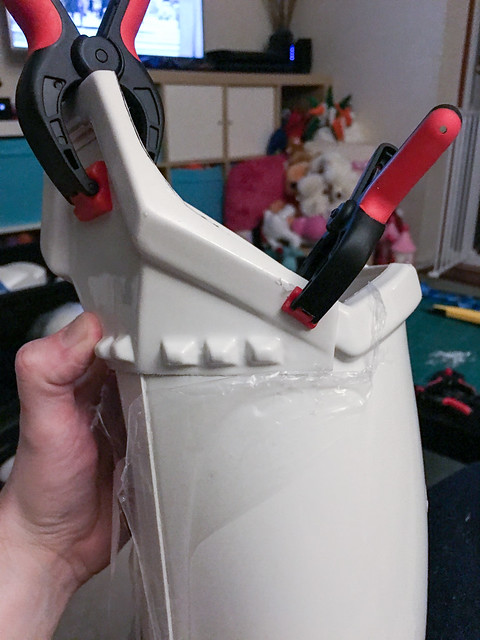
Must have missed he did the sniper will go find that.There should be NO return at the bottom of the sniper knee. Take it all off so it fits flat. Ukswrath did this as well.
I believe the TD straps are supposed to be flush to the caps. Did you shorten the pipe at all? I believe I've read in a couple of places that it's about 1/2" too long.
CRL said 7.5" off the top of my head. What ever it was it was either fine or 1/8th under, it wasn't cut all that straight.
-
I'll swap them.Shins are on the wrong legs.
-
I started last night by trying to get a proper fitting of the leg parts with my boots on.
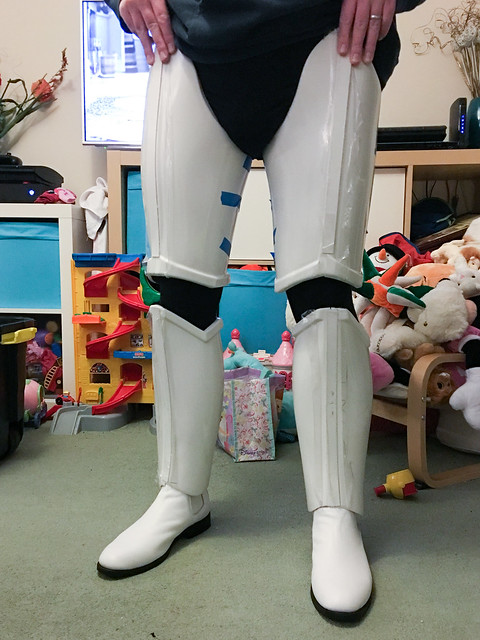
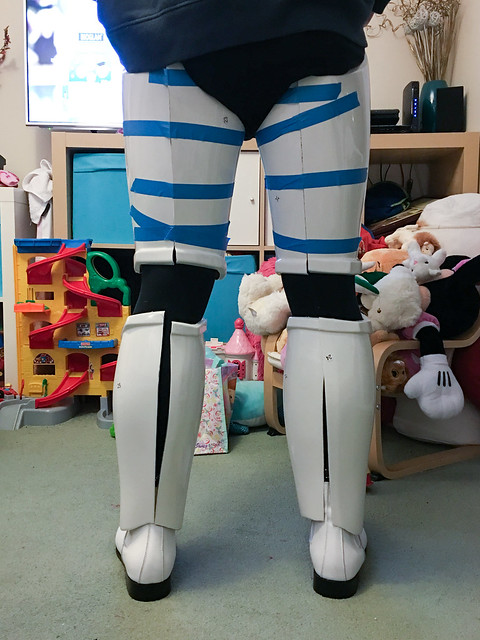
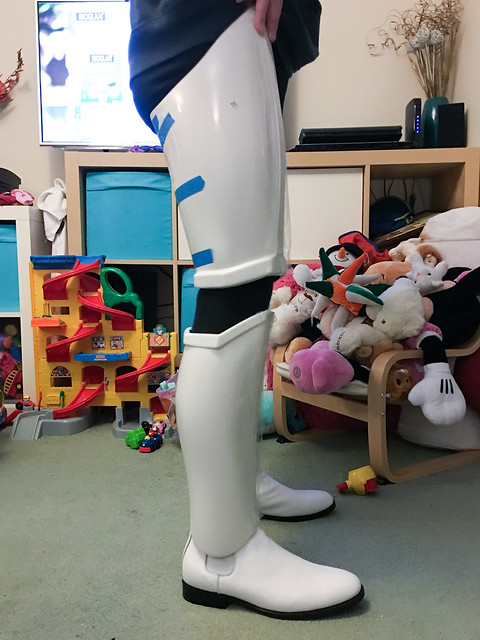
Looking at the fit I think I'm pretty good for general fit on both the thighs and the shins. The shins just need the holes for the #4 hooks and the rear cover strips adding. Once that's done I can neaten up the trim on the curved sections and call the, done.
For the thighs I am struggling to bend the knee. If I force them up a bit I am fine so probably only need 10-15mm or so but with them forced I am not comfortable at all. Looking at other builds and some reference I will start by trimming the top return.
This is an image of a genuine thigh and you can see how it has very little return. I'll start by going this far and see if I can get the thigh up further.

If more is needed it looks like I'll have to either trim off the return entirely or add a 'notch' behind the knee. I'd rather not do the notch as I think it's ugly but I already have a large gap between the thigh and skin so moving the thigh up even further would make this huge. Though hopefully the return trim I suggested will do the job.
Whilst fitting the shins I found that the left pinched a bit on the outside. Looking at the return it was far larger than the rest. To address this I added a strip of 6mm Tamiya masking tape as a cutting guide and cut along the edge. This gave a much nicer edge and hopefully will stop the pinching.
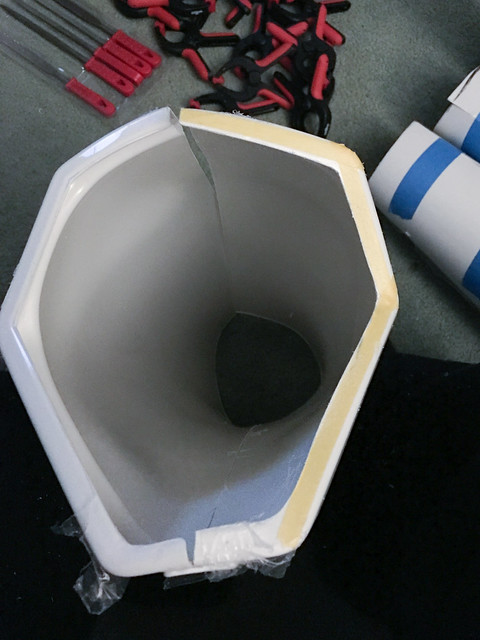
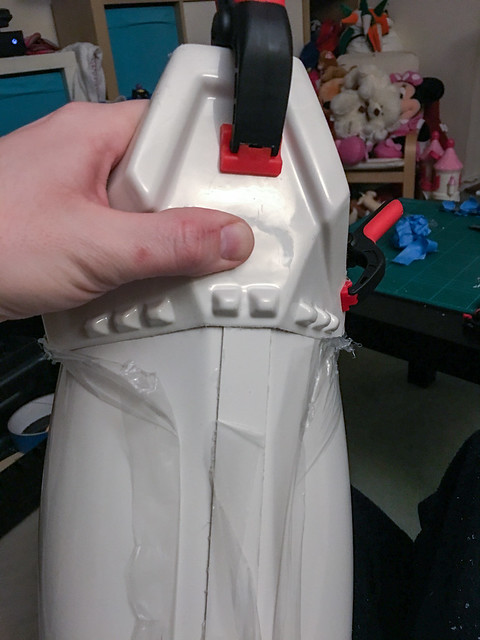
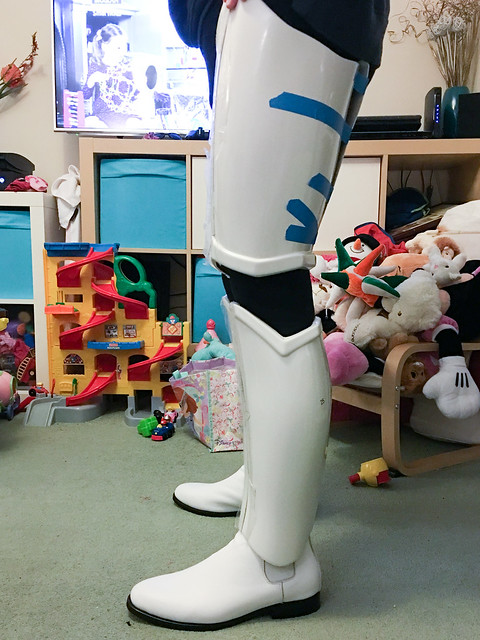
With the shins sized and sorted I tested the fit of the sniper plate.
Whilst this fits it needs a fair amount of force to get into place. Looking at other builds and reference it looks like I can remove the return on the bottom of the plate. This would make the plate easier to flex and so glue into place. Would this be acceptable?
I also used the tape trick to thin down the moulded hand guards, I don't plan on using these but figured I may as well do it.
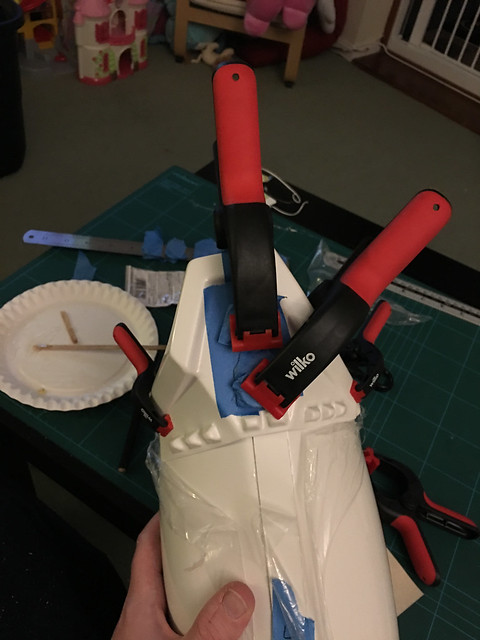
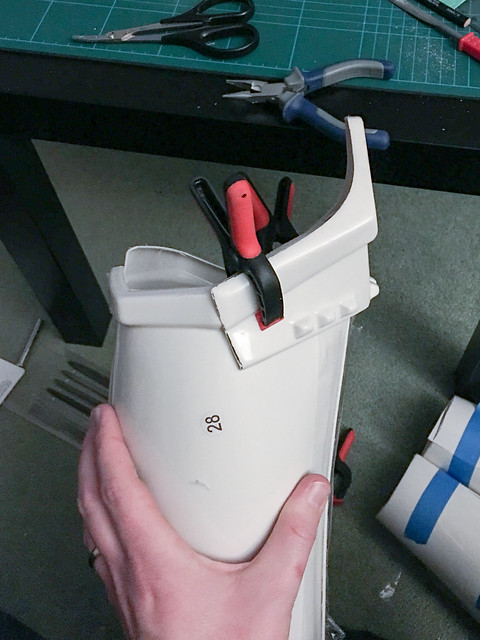
I finished off the evening by starting on the TD.
First job was to add a light chamfer to the edge to help fit the end caps.
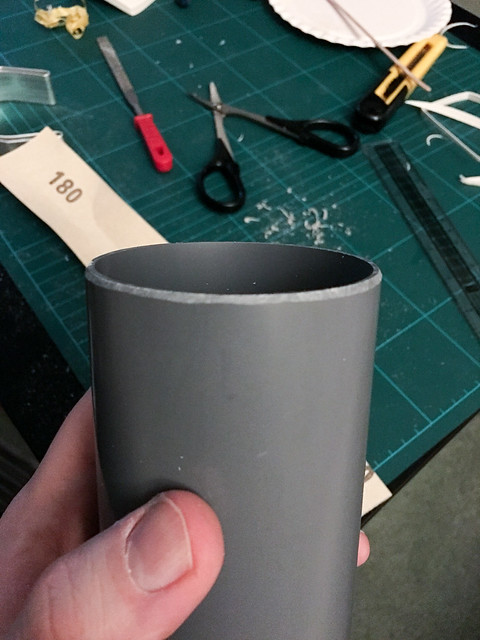
With this done I measured the depth of the caps and scored a line this far from the end to help me mark out where the clips will go. I want to use nuts and bolts as I don't trust screws to not strip out. This means I need to fit the clips before the end caps, hence the marking out.
How big should the gap be? Ive seen anything from 0 to loads. The image in the CRL seems to be right up against the end caps, is this the best bet? If so I'll attach right up against the marks and push the end caps on until they butt up.
The more astute of you will notice the screw up in the above. The score lines are at the actual internal depth of the end caps. If they don't fit 100% full down you'd see the score mark. Doh. To fix this I used some 180 grit to lap around 1-1.5mm off each end to give some clearance. This should mean you can't see the mark any more but did make a HUGE mess. I then re did the chamfer again, and did a much better job this time.
I'm about as far as I can go on the TD until I can get the M4 pan head screws, nuts and some washers. Pay day at the end of the week which lifts the parts ordering embargo. I'll also be ordering the Prym snaps which means I can get on with the body.
-
Tier 2, but I was also one of the first in the pay it forward chain of vouchers so I didn't pay the full $450.Chris - was yours a tier 1 or 2 order.?
I can't grumble at the VAT and duty though I do feel the £12 handling fee a bit of a joke seeing as the whole point of Fedex is to handle packages, often across borders, and should be factored into the base international shipping cost.
-
With all the pollava over the shins it must be nice to get one with the snaps! I'm ordering my snaps soon and am really looking forward to it. The shins have sat for a day or so now as I can't face them at the moment!
-
Thank you guys! Glad to see the work and time spent into this build has at least not been wasted

Chris, I really like the clip as it was and would not say that any measurement was “wrong”. The aluminum channel can also get squeezed a bit to reduce the gaps.
No silver available anymore? Thought this to be the best choice for parts in stressed areas, in case the paint comes off.
If people want it its not hard to add back, about 4 clicks! I just wasn't happy with the finish due to the extra work required.
-
I seem to be winning the UK VAT bill game so far at £106 but if people ordered at the $650 tier then it will be more. Though on the plus side it's pretty much what I calculated when I ordered so not un-expected.
-
2
-
-
So should I loosen up the wrist a little? I can get my bare hand through but at a slight squeeze.
I'll trim the returns on the thighs and see how that changes things.
I clearly need to re check the sides I've marked on the biceps then. Would explain why they didn't seem to line up too.
-
Started this evening removing one of the strips I'd glued to the front of a shin to allow me to swap the shells round as suggested by Troopermaster.
As I mentioned I'd added a trim to get the shins to get them to sit right when I had them paired wrongly (though following the numbering from Anovos). Here you can see the small gap this has caused. Once this was glued up it ended up being slightly wider but there's still plenty of meat to hold though glue. The trim was taken from the side with the scribble marks on, the cover film is still on and it's chinagraph so just rubs off.
I also added the 2nd shell to the other shin.
Once the glue had set enough I added the 2nd side to the shin I had added the cover strip back onto earlier and compared the 2. The result was 2 very similar looking shins rather than the 2 very distinct ones. The rears also are much closer to alignment and don't overlap horribly as before.
I'd like to thank Troopermaster for pointing this out as it's giving me far better results.
Next I taped up the thighs for fitting. I've not done any measuring or trimming yet. I simply butted the edges up and taped them. I don't haven any compression leggings yet so I pinched some of the wives cotton ones :shock: These are very tight fitting and I would say are very representative of what I'll be wearing under my final armour.
Test fitting thighs - front by Christopher Pearson, on Flickr
Test fitting thighs - rear by Christopher Pearson, on Flickr
I've left those as links to the larger versions on Flickr.
I feel the fit is generally good and the gaps are about right at the bottom though am close to maxed out at the top. They are also about 1/2-1" too long. I think if I remove the return at the top I'll be able to bring them up a bit higher as well as having more room. I don't believe that these returns are needed and removing them will improve the fit. What's the thoughts on this?
I finished up the evening by sizing up the arms.
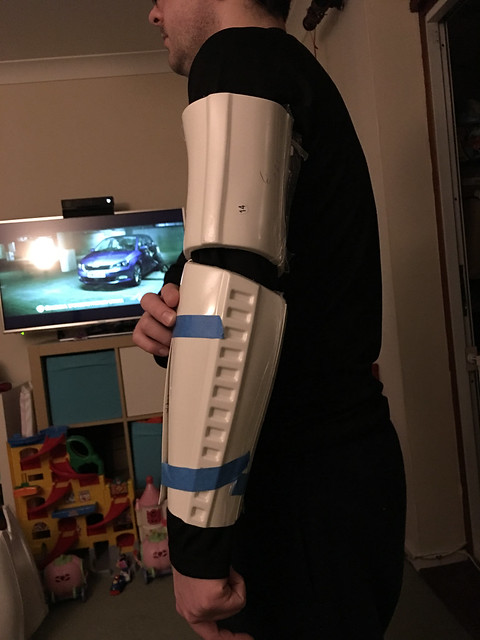
I think I'll need to bring in the biceps a bit but I'll wait until I can get some better images of this. I think I'll probably need to remove ~5mm from each side of the back shell of each bicep. However this can wait for now.
For the forearms the tops up at the elbow is a pretty decent fit. Not much room but enough. The wrists will need to be pinched down a bit I think.
Right:

Left:
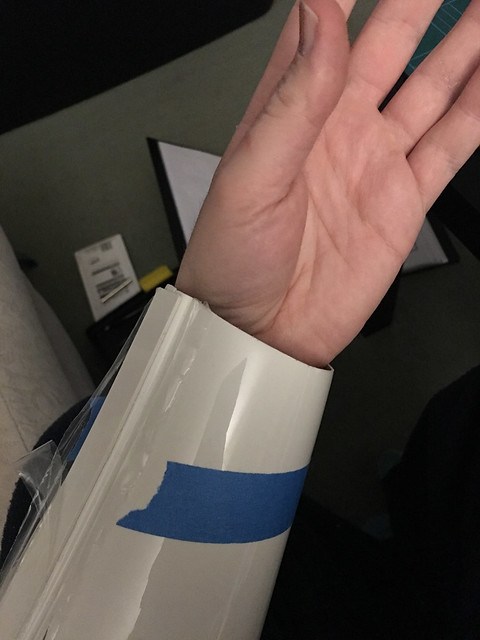
This is as tight as I can go and still be able to get my hand through without forcing things. It rubs a bit putting my hand through but leaves a bit of a gap afterwards.
Whats the opinion on the sizing?
-
Thanks l, that's what I thought looking at the pictures. Will move stuff about this evening.Looking at your photos I would say the left shin has the two outer halves and the right shin has the two inner halves. Kind of hard to tell exactly because they do not have the original inner halves to begin with (only the modified outers as inners).
-
That makes all the sense in the world now. Would the side with a more defined "return" be the outer shell? On mine the left would become the outside.The reason this is happening is because Anovos has labelled the parts incorrectly. They have two outer halves on one leg and two inner halves on the other which is causing the problem.
Hopefully I'll be able to sort this out this evening with out too much mess. I will have a bit of a gap I suspect but smaller than the cover strip and I can always reinforce from the rear if needed.
themaninthesuitcase Anovos ANH Stunt Build
in ANH Build Threads
Posted
In a break from our regularly scheduled program I broke out the sewing machine. I have a new nemesis.
Initially I had the machine set for a small tight zig zag but was having lots of issues with snapped thread.
That one snapped about 2/3rds of the way across.
After a lot of trial and error on some sacrificial 3" elastic I discovered I needed to increase the tension and also change to the next size larger stitch. This gave me almost perfect seams going forwards.
On my 1 inch elastic I left the stitch the same size but reduced the tension down to 7 from the max of 9 I was using on the 3" elastic. I'm not sold on if sewing the 1" doubled over for the snaps will be worth it.
I folded over 3" and after sewing this left a hole 2 3/4" wide for the waist belt. Currently I am trialing a belt I got with some outdoors trousers but the large loop gives room for a more robust belt if needed.
As I did with the shoulder elastics I've not cut the elastic and just added the loops at each end. Next job for them will be to figure out how long to make these and to glue them in. Thankfully my new mask came today so I will no longer be starved for oxygen when using the mask.