
.jpeg.ff3078cf696d324fa576c149490ede78.jpeg)

themaninthesuitcase
-
Posts
4,112 -
Joined
-
Last visited
-
Days Won
31
Content Type
Profiles
Forums
Gallery
Articles
Media Demo
Posts posted by themaninthesuitcase
-
-
Hi Dave,
Noticed you are new, have you also signed up with the UK Garrison? We have some processes you will need to go through if you want to join, and the earlier you get started the easier it is: https://www.ukgarrison.co.uk/join-us.html
-
You're probably looking at the Tramp (Trooper Amp). They are made by a member of the UK Garrison, and are pretty popular all over the world.
-
18 hours ago, gmrhodes13 said:
Interestingly those are showing as GBP on that link for me. Also the length and hole centres are within 0.25mm so in theory that will fit my mount if I use the right hole size.
adds to shopping list
-
I also did this 3D file, which should meet Nato specs (I think anyway, it was a while ago I did it), and doesn't have the fake screws.
https://www.printables.com/model/238211-standard-f-11d-tfa-to-tlj-conversion-parts
-
 1
1
-
-
It's not what I would choose, but it should work. 2 AA in series will give between 2.4 and about 3.2v depending on if you're using rechargeable or brand new Duracells.
The biggest issue is you will need a very low value resistor, around 51ohms. If you're using anything larger than that then you will be losing brightness.
Would be good to see how you have things set up.
-
Here is the spec chart for those:
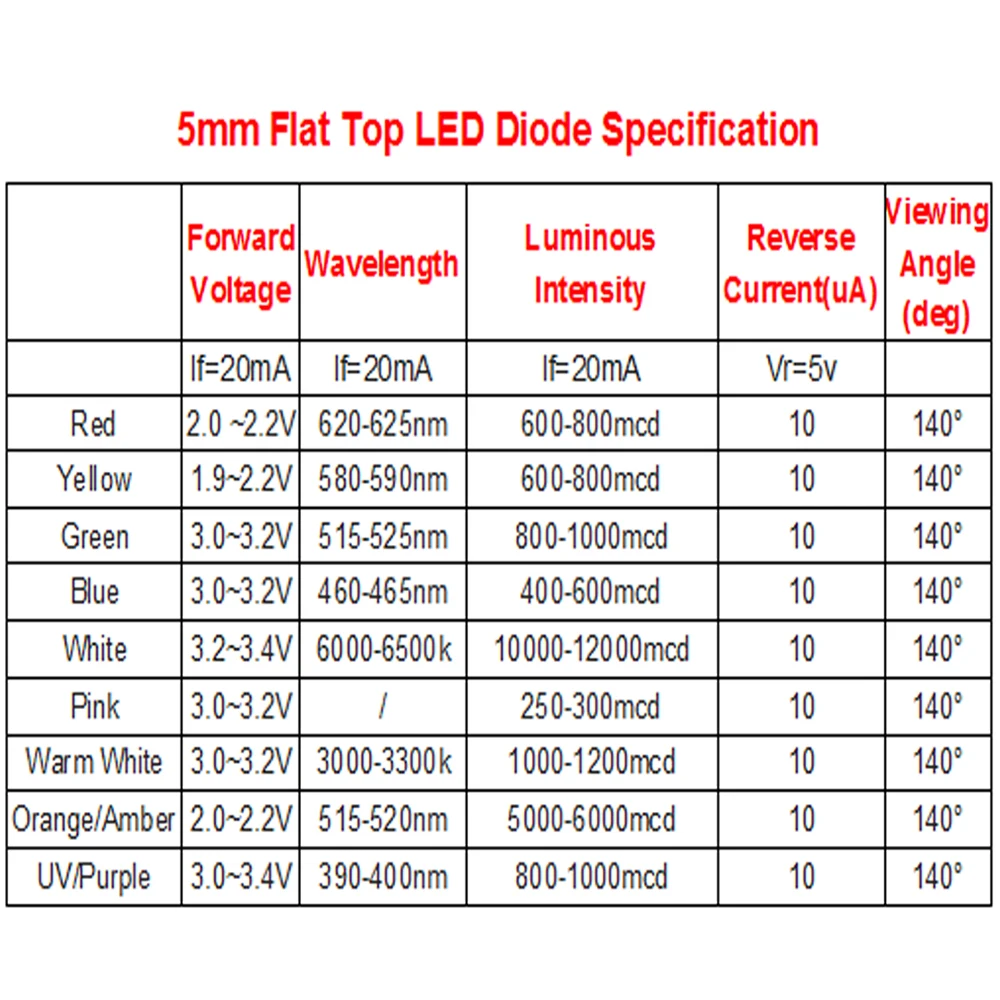
The numbers we care about are the Vf (Forward Voltage, the amount of Voltage the LED will "use" essentially), Luminous Intensity (measured in mini Candela) and the Current rating (If).
The max current for them all is 20mA (milli Amps, 1000ths of an Amp). It's not the voltage that kills and LED, with in reasonable values anyway, it's the current. Which is why we use a current limiting resistor.
Brightness is 600-800mcd (red/yellow) which is what I would call a "bright" LED. So better than the one on your TV standby but it's not going to blind you. Orange is much better at 5000-6000 which is in the "super bright" sort of range and will have you seeing spots if you look right at it. For reference the white ones they use for torches will be in the 10,000-30,0000 range and they will be using a around 10 or more of them, the one in your TV is something like 50-65mcd.
By adjusting the current with the resistor we can change how bright they get, we just have to keep it under 20mA as much past that and they burn out very fast. More resistance, less current, dimmer LED.
If we make the assumption of a 2V Vf for them all (which is close enough here and inside all of their quoted ranges) and 5v supply to get max brightness you want a 150ohm resistor (of at least a 1/8w rating).Whilst I can do the maths for this it's tedious, so I tend to just use this web site: https://ledcalculator.net/#p=5&v=2&c=20&n=1&o=w
What voltage are you using to power them, and what is the value of the currently limiting resistor you are using?
-
2
-
-
2 hours ago, Startide said:
I sure could use guidance, just got my leds and resistors, but they don't seem that bright to me. Have to take some pictures or make a drawing of the thrower, that will make more sense of what I am trying to achieve
Do you have a link to what you ordered and I’ll be able to tell you why they are dim.
-
1
-
-
11 hours ago, Sly11 said:
Kinda needs to be done towards the end of a year to have it up for the full 12 months of the following year.
I'd say you want this locked in by August/September so you have them in hand before the ball drops!
-
1
-
-
4 minutes ago, gmrhodes13 said:
My friend used that and was cleared. Though It was a TON of work and he's now replacing it with a Denuo Novo vac form kit for comfort reasons.
The helmet is also a bit fussy, and around 10% over sized. I've got one mostly printed. My friend modified a Black Series helmet instead.
This isn't intended to tell you no, more just let you know what you are in for.
-
2
-
-
On 1/4/2024 at 9:33 PM, The5thHorseman said:
I'm not sure not sure if they are still available to purchase anymore to be honest. This was quite a while ago now. Here's a link for a more detailed look at the reference. This can can be a good starting point to source a similar one.
I spent a fair while hunting and could not find one, or anything the same size or even similar.
If anyone finds something close, I am happy to help try make it fit.
On 10/21/2022 at 1:47 AM, JPaolone said:if anyone has the dimensions for the f-11d blaster vs the heavy version
Just saw this and I have the files handy:
Standard 481mm long x 123mm wide x 216mm tall.Heavy 736mm long (inc stock) / 563mm (no stock but also no D ring mount) x 152mm wide x 2551mm tall
Rough measurements done quickly but it's roughly 20% bigger, plus the stock.
-
1
-
-
Looks like it will be perfect, just needs to be filthy now!
-
6 hours ago, TheRascalKing said:
mo, allow both since there is clearly precedent and don't let these things keep you up at night when there are already so few people building these kits to standard.
This is the practical approach. Update basic so that either is acceptable and people can make the one that they prefer.
-
2
-
-
On 1/4/2024 at 8:19 AM, Startide said:
Well I am trying to give a "flame" look to that smoke, so kinda bright I reckon. But then it's not an industrial smoke machine either. I have picked up the ones recommended by gmrhodes, we shall see how that turns out
")
Thanks again for the support guys !
If you want some guidance, a few of use here know our way round an LED and a microcontroller.
If you want to really whole butt it, Neopixels are an option and would allow for animated lighting effects.
-
1
-
-
Made the first one up using a "medium scratched" back plate.

Worked almost perfectly. I used a few small dots of thick CA glue and there was just enough squeeze out to glue it to the jig

I got it out with a bit of careful leverage from one bolt. I will remake the jig with a couple of holes in the back I can poke it out from. I also did a bit of light dressing to the edge to remove the glue but will see if CA remover does a nicer job.
And as for this.
On 1/4/2024 at 6:55 PM, themaninthesuitcase said:As I am feeling a bit extra I might see what a run of say 10 scope rings would run to, maybe the support bar thing too. The simpler parts with less machining steps.
I was expecting a price of about $
 but it was actually not too bad (because China I assume) based on 10 of each scope ring. So each set would be in the $20 ish range at this qty, but I need to buy 10 sets and I have no independent indication of quality atm. I'll try find some examples of their work and make a decision another time, probably the day after the quote expires.
I also requested a price for the scope rail but there was a section that didn't meet the minimum thickness requirements. I could probably make it work for me but then everyone would need a custom matching hub as well so I suspect that's off the table. I will have a think though, it's a problem with the screw hole location so maybe leaving it off and relying on adhesive is an option.
-
2
-
-
Delivery day (was Tuesday)!
Same place but 2 things.
First the main PCBs for my effects setup have come

(top as the come all joined on 1 assembly, bottom with the daughter boards cut free)
There is 1 small balls up, I somehow managed to delete the "mouse bites" before getting them made. These are a line of small holes that make snapping the 2 extra boards of simple, and tool free. I've added them back to the files now, just incase I need to make more. For now I just cut them of with some side cutters.
I have the transistors, LEDS and most of the bit to build up a test board but I need to make a parts order for the resistors and a few spare bits. Seeing as January has approximately 8000 days I'll probably do that next month.
For those who know a bit about electronics, I've opted to use SMD parts to keep things small as space is a premium. So here is a through hole version of the transistor, the kind I am used to and the SMD version. The exact same part, just a different "package"

Small and fiddly is an understatement. At least SMD parts are a fair bit cheaper so I need not worry about parts costs.
The other parts that came are the parts for the thigh bracket!
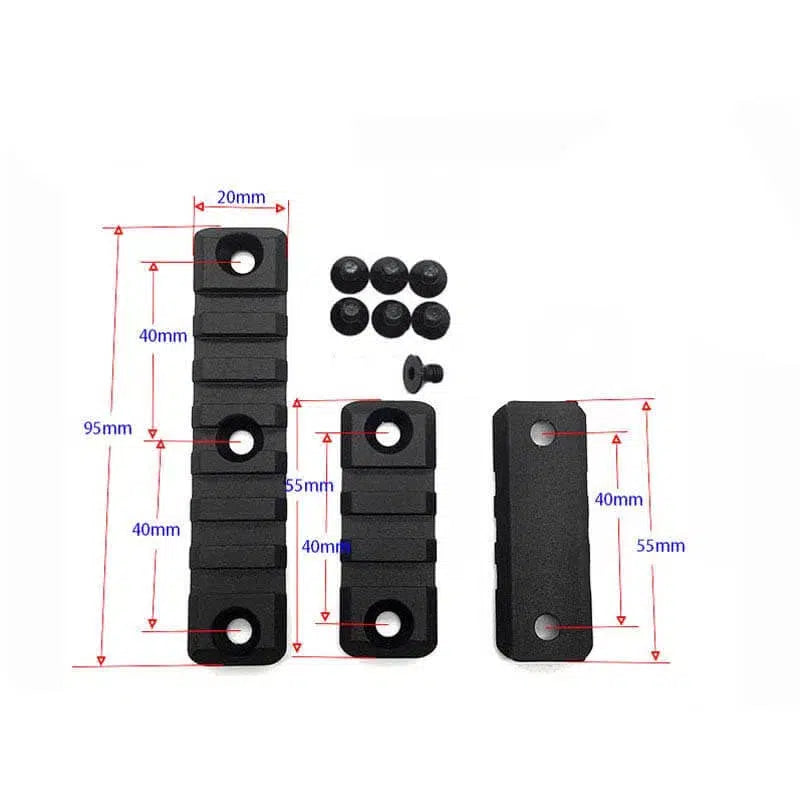
These are 2 1mm Aluminium PCBs cut to match the printable ones. One change I have made is adding the 5mm holes to save having to drill for these. The spacing is 69m which should give a good fit in an R2Dan holster (once I get one).

Again there was a small, irritating, balls up.
The aluminium PCBs are single sided, so I assumed wrongly that if you ensure there is no copper on them you will get 2 clean aluminium sides. The reality is that the "copper" side has some kind of grey coating on it. Which on the rear most plate was the side I wanted on show.

top to bottom : Grey PCB "top" side with poorly placed part number, Aluminium rear side with some text I added to say who made them, Aluminium face sanded with 240 and ruined, Aluminium face sanded with scotch bright probably close enough, Top plate with aluminium face side as expected.
I also forgot to move the "part number" to a place it won't show once the fab house populates it. On my design it fit behind the front plate, on the final item it was longer so was on show.
I have also fixed this and will probably order a new set at some point. No huge rush now as I will be able to prove the theory with these.
To try make lemonade I tried to sand the printing off of the 1 aluminium side. I started with a 240 sand paper and this was FAR too aggressive. I then tried some scotchbrite. This mostly worked but has left some small and but visible scratches. Lastly I tried some 800 grit which seems to have worked, a couple of tiny scratches but you have to look to see them.

Because I know they are there I will almost certainly order some more. I have already updated the production files to ensure they end up how I'd like them.
As these come as 2 parts I need to assemble them. To do this, easily and get a good result I've made a jig. This is 3d printed to a close tolerance to help align everything.

The bottom plate gets put in first, then apply a few keenly place dots of CA glue and pop the top on. Next is a compression plate and finally 2 5mm bolts go through the whole lot and ensure it's all aligned, and act as clamps while the glue dries. There are 2 nuts on the bottom side so it's all nice and robust. This will need to be done reasonably quickly, but I won't use accelerator so should be okay.
With any luck I'll test this theory tomorrow but see how it goes.
-
1
-
-
2 minutes ago, TheRascalKing said:
They're exist, but I'm not aware of anyone consistently producing them at the moment for sale.
I think I remember seeing these now, though as you say it’s not some one doing a regular run.
As I am feeling a bit extra I might see what a run of say 10 scope rings would run to, maybe the support bar thing too. The simpler parts with less machining steps.
-
1
-
-
Those cuts look deliberate to me, it looks like it's designed to taper in to match the cod. Why they are one some but not others? Pass, might be down to something like replacement belts and was forgotten?
-
On 6/21/2022 at 8:30 PM, lockedup said:
not sure what the "Jay" part is about?
Could it be "July"?
-
In the ongoing saga of me not finishing what I have already started, and making things harder than they need to be: I present my new handguards build thread. Why buy something when you can make it your self for multiple times more money!
At my last troop I noticed my gloves are starting to perish, not surprising given they are almost 8 year old rubber gloves. I also thought I could use some new handguards. The ones I have are silicone due to a latex allergy in the house, and they never where really as nice a moulding as I would have liked.
Problem is they are not made anymore, the chap who made them moved on and rather than ask around "it can't be that hard". Which is always a terrible thought.
As mentioned I don't believe the ones I have are currently made, I believe the moulds where first made by Sonneschein. Though I thought that have an appealing shape that matches the armour well. So I have based mine on these, but will be starting from scratch, no recasting here.
I took a photo of the better of my gloves as square on as I could get it. This was imported into Fusion 360, and I got to work. For the most part these are not overly complex items. The hard parts turned out to be the taper towards the thumb, and then getting all of the various round overs to interact nicely.
Once I had a first draft I printed one on my Prusa Mk2.5S. This wasn't intended to be a final item, but a quick test to check size, shape that sort of thing.
It needed a few minor tweaks to the length and a few heights and I think I have something that will work.


The next step will first to change the year on the bottom to 2024, and then mirror the files to get a right version.
Once that's done I plan on getting a clean pair printed in resin to start the road to mould masters.
-
That's the OT list, they will need one for First Order.
Neck seals are made by a number of vendors, just make sure the one you get complies with the CRL.
I've just have a quick look and I can't find one for the first order. I remember people using "belts of the first order" for belts but looking at their Facebook there's not much going on so they may have closed.
Which mat mean you're going to need to roll your own.
I have a bunch of stuff in my eBay watch list but I haven't confirmed any of this yet, so pinch of salt and do your own research:
- Ribbed top layer https://www.ebay.co.uk/itm/402300779926?var=672255164758
- Neoprene middle layer (I THINK 5mm thick but check I am working from memory) https://www.ebay.co.uk/itm/373396396391?hash=item56f028d967:g:WqAAAOSwBKBg-ZC2&amdata=enc%3AAQAIAAAA4JcbkljUt29%2Fv2lMKOjTrJ%2BIskFH4TExSqqaG%2BlM0JQyXu2ohflZ6APAGUzE1Ed%2BiLorSGWbzr%2FkQHayJP5YcW3s0PSfmvP0Nf%2BS5lmVl%2BiG4gEPkttPK2%2FJp9nyXDZ7GYoFhM1mE62APcdAC6bOeMd0Q86l2i0hTkY49qSumDLevdt9nx%2FXzmFemvDtzmCdra7ogg4kjJBHNV57y4O%2FPhEwY41xUqlxdErtBnapULtwgCAMOW6gT094x8Hvoy6Qxx3CzGTuWKiiDAoGzq5zuWGHJ9LjMFvgwmMQiA%2FD%2F70m|tkp%3ABFBM-KPE2phj
- You will need a length of 50mm black Webbing such as https://www.ebay.co.uk/itm/402300779926?var=672255164758
- 50mm buckle (they should be the more squared off style) https://www.ebay.co.uk/itm/133612946142?hash=item1f1bf3c2de:g:HI4AAOSwFqJWkt2X&amdata=enc%3AAQAIAAAA4Cdf6oDdN%2BpwTj%2B8BruXoiMO0reqD72Plo%2FkOq9xL6LDK%2BrX%2BnBix3Q62YRPILCFU8L8jzWZu%2BYa91x1odrPZVU8H6LZ1vs2%2Bm5yXXPl1ybGhMqSISe2Qpu8F7YW%2B15Xo2WC795sSlJPgAnjJlI7n8Nv5u7duAc5jnsVacOVtNOMbcEn3dhEt%2BFfA%2B1aBuyhp6j3UOsS0fowoutxDG1BaS4mZnEA0nXpNlSdFAlzWsquPxZCVBOPSgg2qV%2BaERWL4Rylu%2F9dphmjvaXrVSfmlIqvtvAIPDAsislZ1r9tukvU|tkp%3ABk9SR_yUsNqYYw
Again I've not built one yet, this is just a collection of stuff I've collected over my time researching.
-
13 hours ago, GermanRedrum said:
I am looking for either chrome or polished steel parts for the f-11d, but I can’t find a solution. Anyone know where I could get some?
Most people just paint them as far as I am aware. If you look at the reference the more hero weapons appear to be metal, but are a sort of satin ish finish, maybe brushed?, rather than a real polish. The stunt weapons are just painted silver. I am not 100% on what I will do yet, I'll probably run off a few tests in the various metal finishes I have to have and pick the best.
R2Dan does a machined aluminium plate for the pistol and F-11D iirc.
I also have the 1st run of a F-11D plates arriving next week, but still very much a theory until I try them.
-
The problem with basing it on a single trooper is you would need to do so as they are on screen. If you base it on say that image above, how much of that was from 1976 and how much of that is it's 47 years old?
The idea for them on screen is they were white and clean, though by the end of filming we know that wasn't the case anymore.
If you wanted level 4 I'd be more going down the route of bra hook shins and the bent wire for the chest attachments. Though that's prop replication at a functional level which is never what we've been aiming for, though I believe MEPD do.
FWIW a lot of us do have weathered armour, after a few troops you end up more like Tontine IV than the Death Star. Some people polish this off, others let it build up (like me
)
-
3
-
-
I am planning on printing them on some printable adhesive vinyl. You can get it on eBay and Amazon. though probably work a light spray of clear coat to help prevent any runs if they get wet.
-
1
-
-
I can’t see where you are located, but based on your posts I am going to guess UK? If so please make sure you have signed up to the UK Garrison forum as well as we have a mandatory armourer program in place which will help you ensure there are no nasty surprises come clearance time.
RWA is a solid pick I troop with many who wear it.
A bit of DA history from what I can remember. It’s been a while so I won’t go into huge detail incase I get it wrong.
Andy was based in the south of the UK but moved to France around 4 years ago.
He did do TKs but TIE pilots and helmet was probably his most popular products from what I saw being talked about on “the shed of glittering delights”. The helmet had a tell of a bump on one cheek tear.
DA was never huge inside the legion for reasons I never worked out. He was a solid mid pack pick at a time those were rare here. He was however a lot more common in Europe and with non legion groups in the UK.
-
2
-
Death trooper is coming…
in Death Trooper
Posted
Good luck with the build, look forward to seeing more.