


Novak Dimon
-
Posts
714 -
Joined
-
Last visited
-
Days Won
2
Content Type
Profiles
Forums
Gallery
Articles
Media Demo
Posts posted by Novak Dimon
-
-
Hi,
I just measured the guards of my Sterling. They are exactly the same size. 25mm x 15mm x 10mm.
Cheers
Christian
-
Are these Blasters sold in Disney World Paris?
Perhaps a French member can get some to send them to UK? May be cheaper to post em in Europe.
By the way, I would love to get one myself.

-
I like the idea! I want to make a helmet myself that is equipped with com-equipment and ventilation like a "real" one.
Actually I'm still researching how to do it the best way.
Will follow this thread!

-
It's truly looking like Star Wars!
I love the new Trooper style too. I only hope the whole movie will be like this!!
-
Cool! I'll watch out for one of these here.
-
Looking great!
-
Absolutely impressive!!!
-
Awesome armor!
I want to order my own TM-kit soon. Until I have it, I admire pics like yours!
-
 1
1
-
-
Wow!
I think I may be stealing...erm borrowing quite a big from your build for mine
Stunning work.
Thank you!
Feel free to adopt what you like.
I´m happy to help and inspire others with my work!
I benefit from all the awesome information I found here and in the German Garrison myself! Becoming a part of this great community is making me proud! 
-
Thank you for the positive feedback!

I just updated the image gallery on my webspace. Now you find a lot more pics there and with higher resolution.
http://www.novakdimon.de/Novak%20Dimon%C2%B4s%20E11/index.html
Enjoy!
-
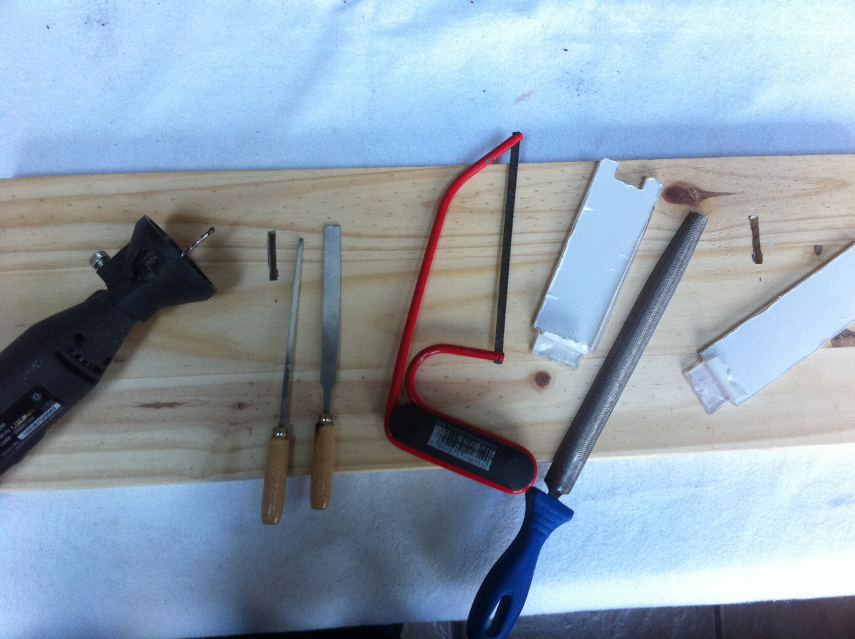
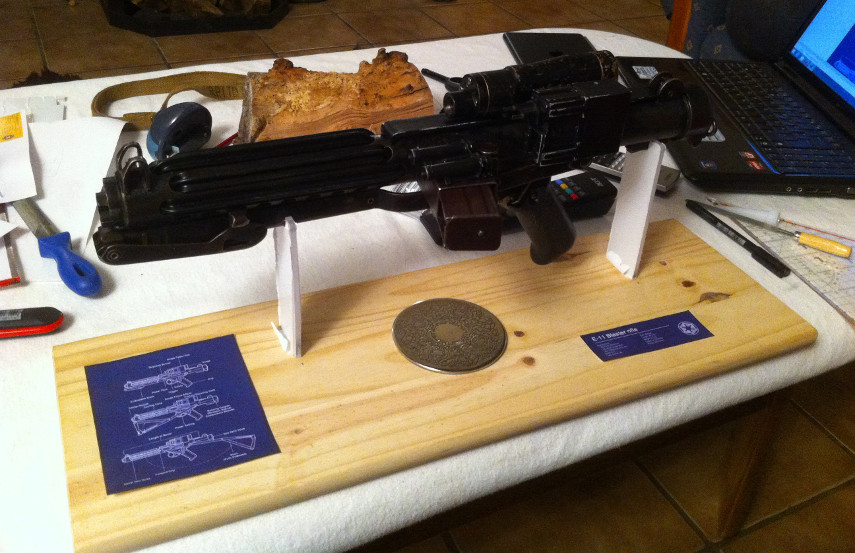
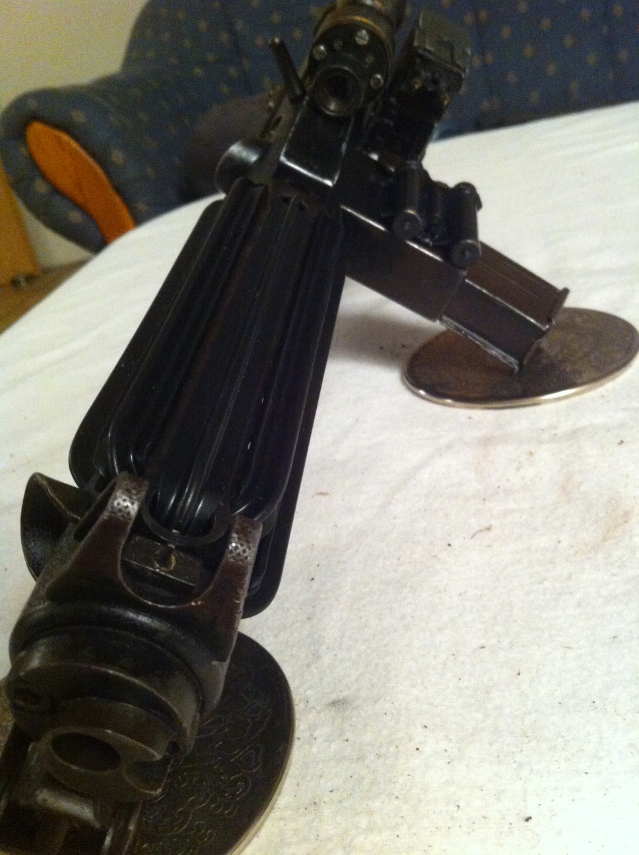
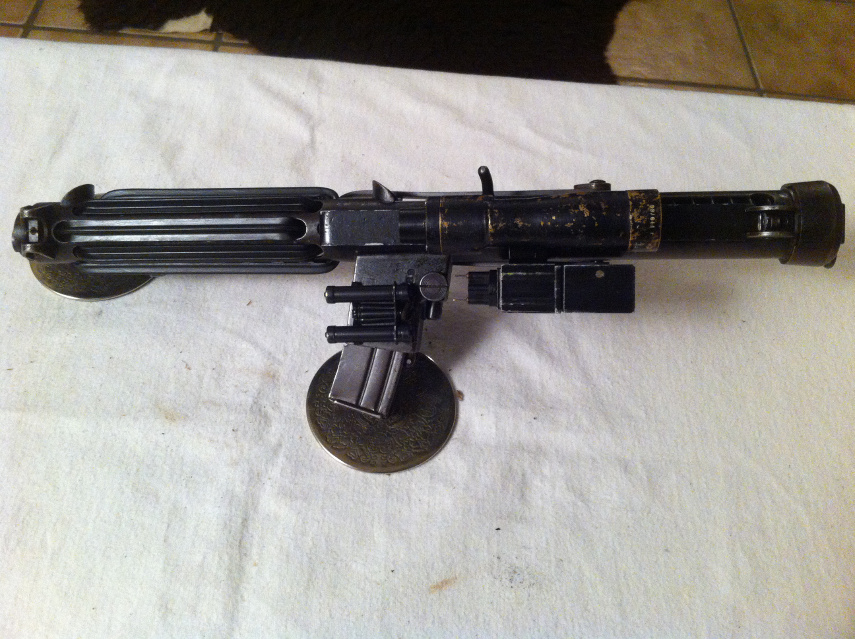
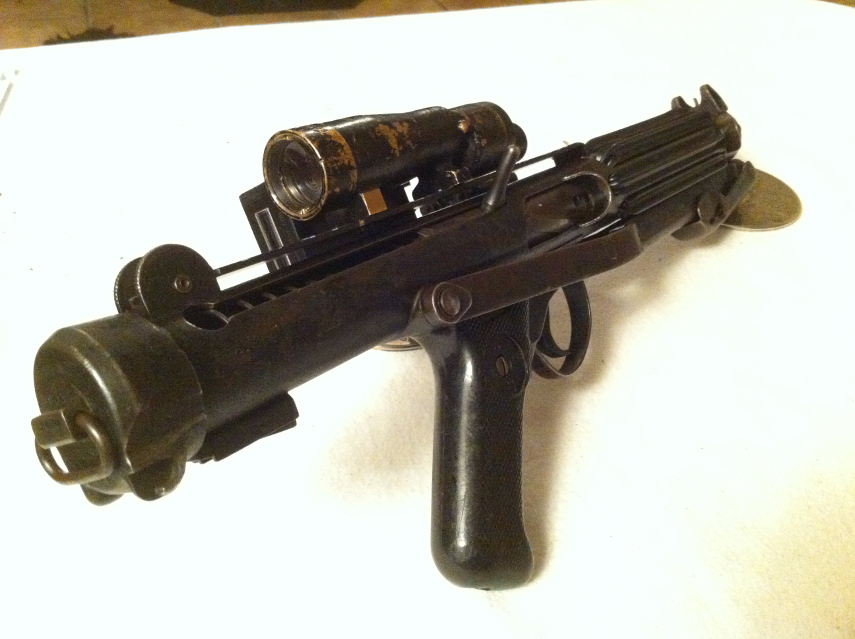
Part 7: Display Stand & Final
To present my blaster adequately I needed a worthy display stand. I had an unused shelf im my storage room which had exactly the size I needed. At work I found some Plexiglas in the bin and I started to shape it with my dremel, handsaw and files:
I sawed an imperial emblem...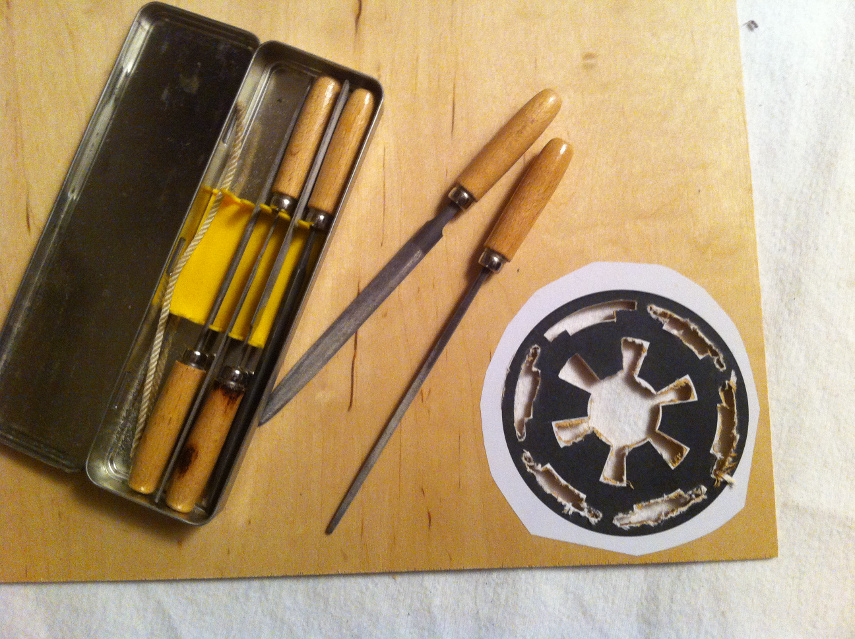
And after some more filing, polishing and painting It was completed.

Here are some impressions of my E-11 Blaster rifle:
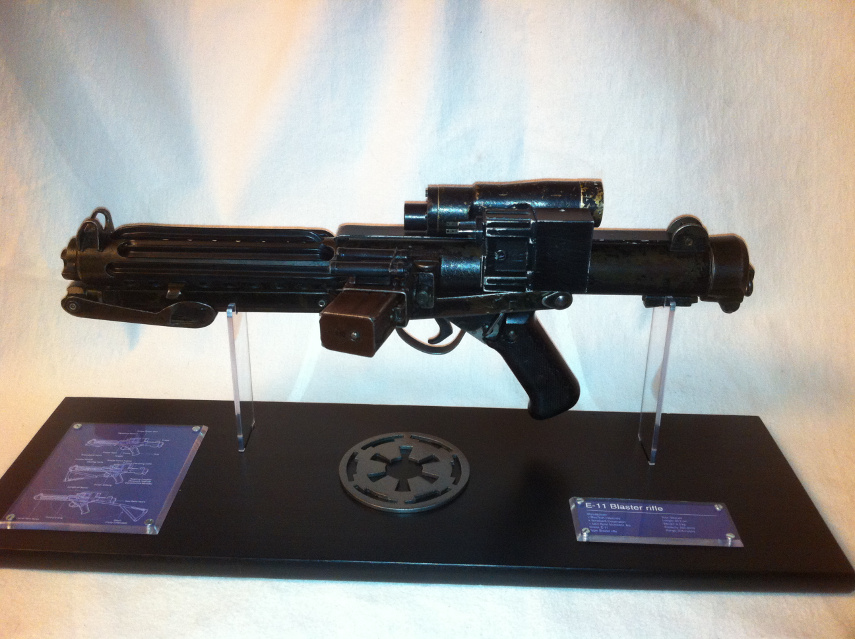
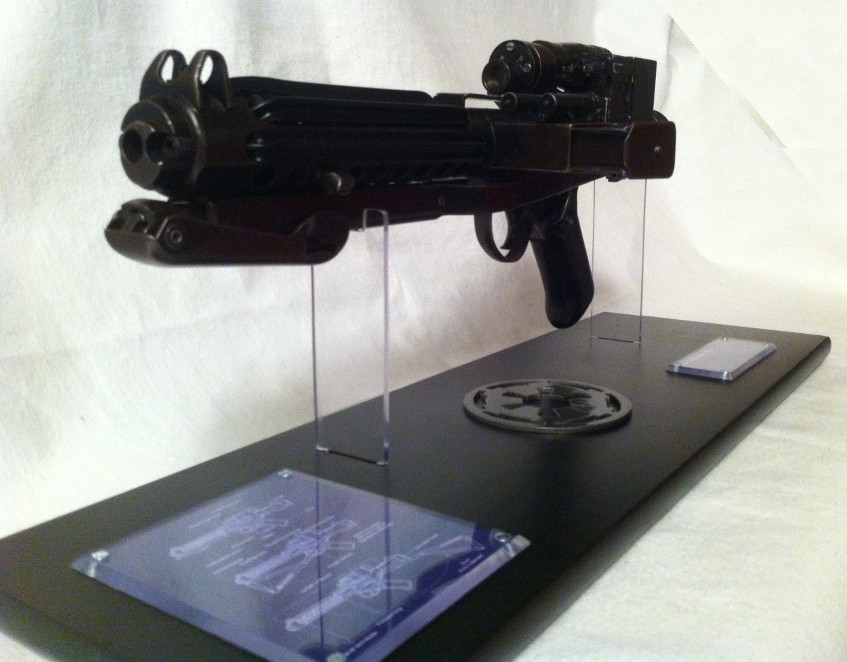
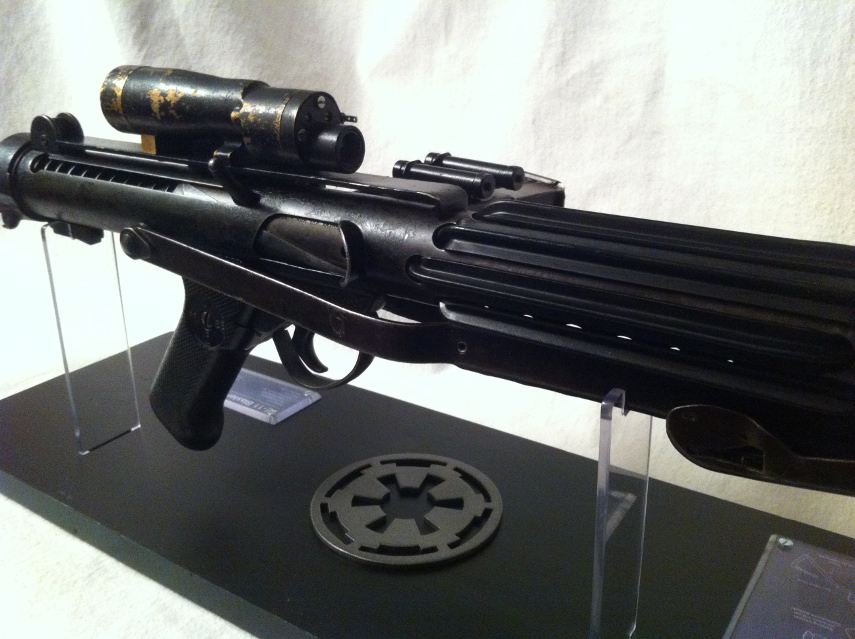
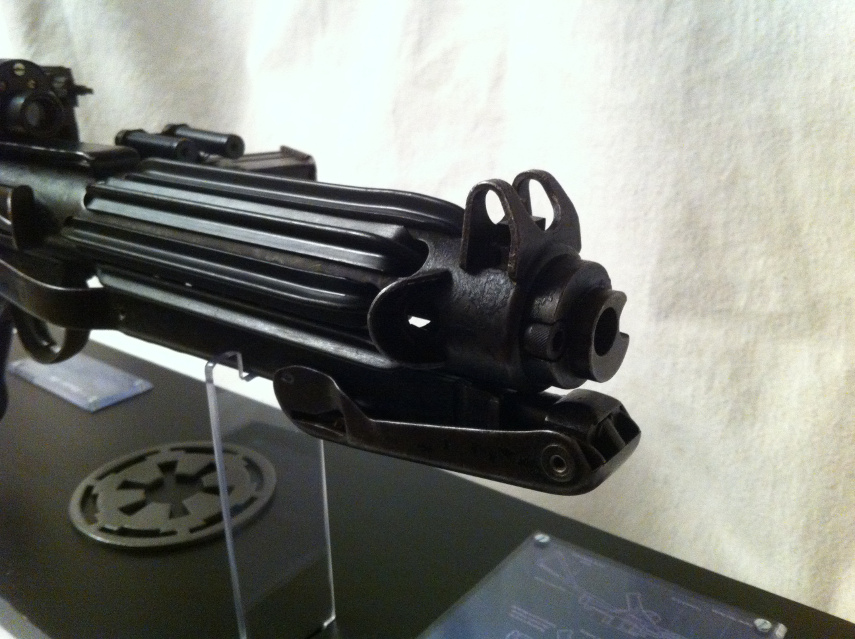
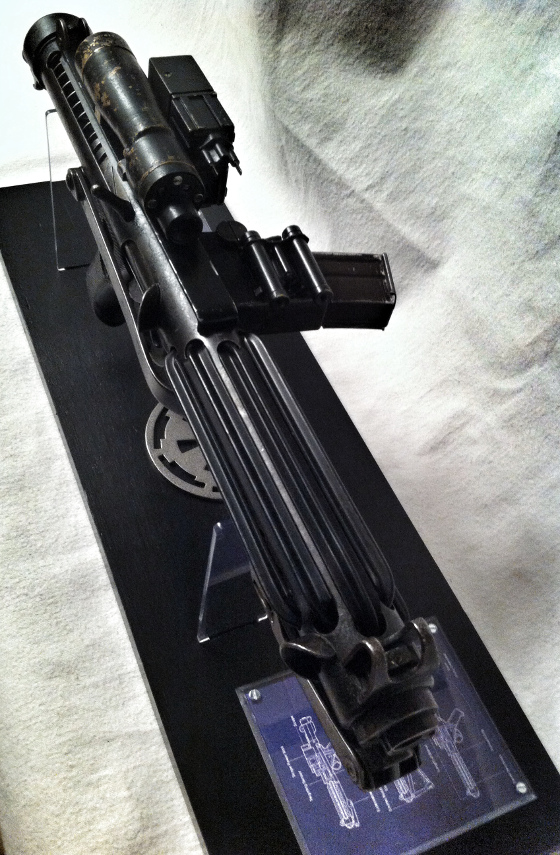
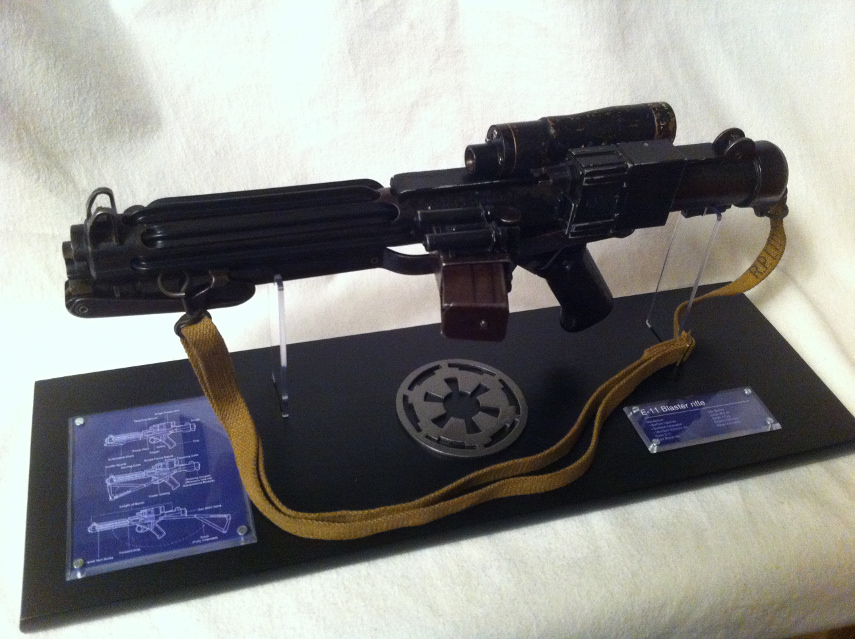
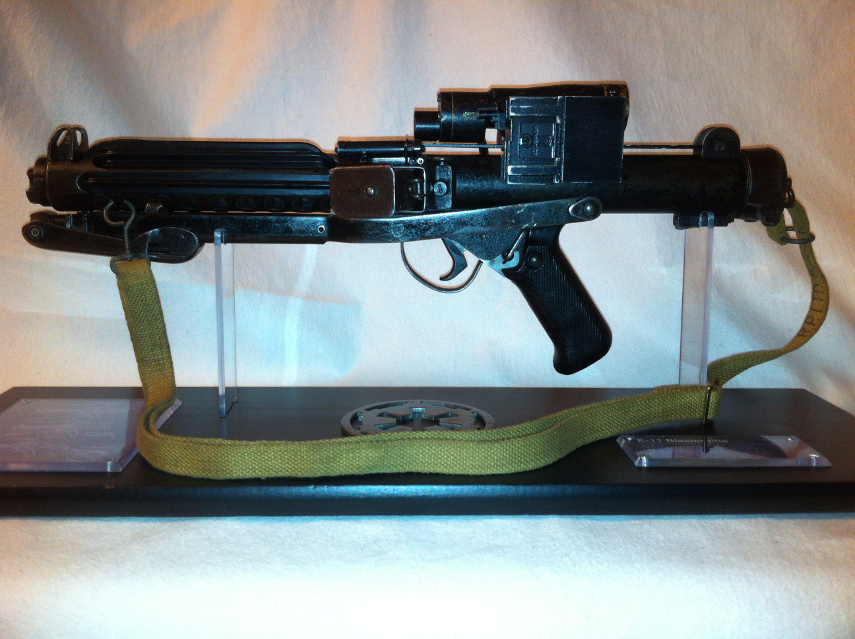
IMHO it is looking not bad.
I hope following my report was big fun for you. I enjoyed making it!

I´m not absolutely sure what my next project will be. Converting a MG34 into a DLT-19 becomes more and more interesting... perhaps I make my armor first... I would love a TM-kit!

Kind regards from Germany!
Christian-
4
-
-
Impressiv work! I'm looking forward to the upcoming updates!
-
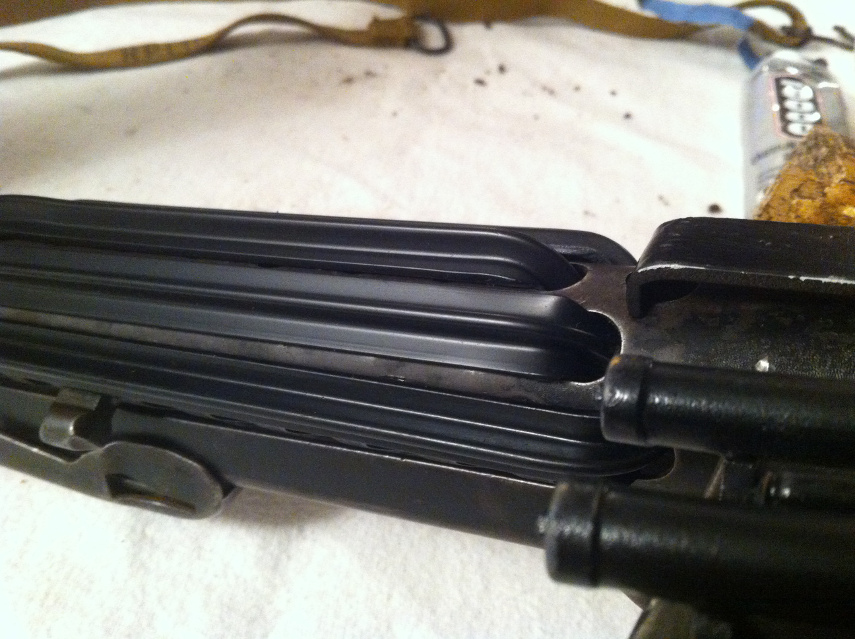
Part 6: t-tracks
I ordered my set of t-tracks from Roy. For me, his tracks are the best mixture of accuracy and price.
I tried several ways to find the perfect solution for me to shape the t-tracks.
First I used the mini blowtorch, I used for soldering the Power Cylinders, to heat one track. But the flame is too hot and on the surface of the t-track appeared bubbles.

Second I used a lighter. That worked better but I wasn´t happy with this way because the heated area is clearly visible and I need one hand to hold the lighter.

So I tested my big blowtorch. After ignition I put it on the table and can use both hands to handle the t-tracks: the result was very satisfying. The tracks are heated very consistent without any visible traces of heat. And it is a quick way to heat them.

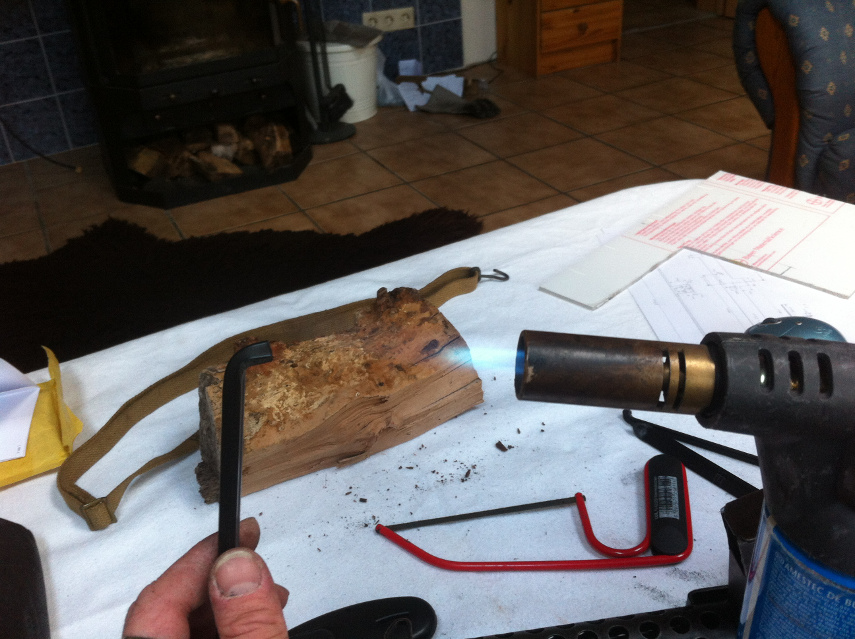
To bend them I first used a 13mm socket but I had to correct the bending radius using my hands... well why use a tool anyway?
Finally I shaped my t-tracks with my bare hands. They were not that hot to burn my fingers.
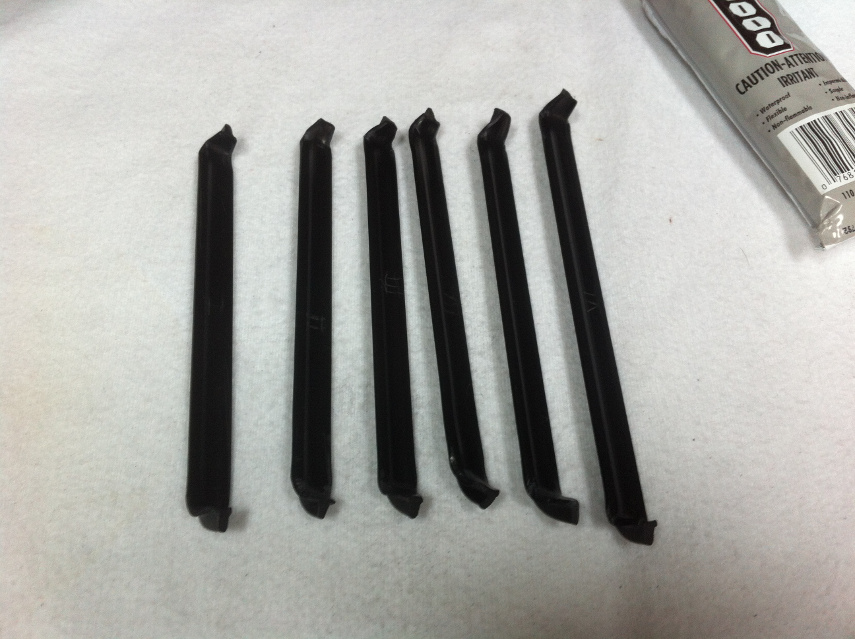
During my research I read several comments that you have to wait some time befor reheating t-tracks. Well I didn´t have to do that. The ones Roy delivered had another interesting feature: I bend one to short. While heating it a second time it went back to its former shape by itself, allowing me to start again. Thats cool!
To form the ends of the tracks, making them fit into the holes of the Sterling I used keyfiles. After some filing the first didn´t fit the way I wanted it. I thought "It might be more easy if the end is flexible." So I heated the end caerfully and pressed the now soft end into the hole and it fit perfectly. I just had to wait a moment until the part is hard and had a perfectly shaped t-track.
Did it with all the t-tracks. Saved lot of time!Then I glued the t-tracks onto the Sterling, using E6000.
The smell of this stuff is breathtaking
 but the result is great! Yes, the worse the smell the better the glue! The same with cleaner!
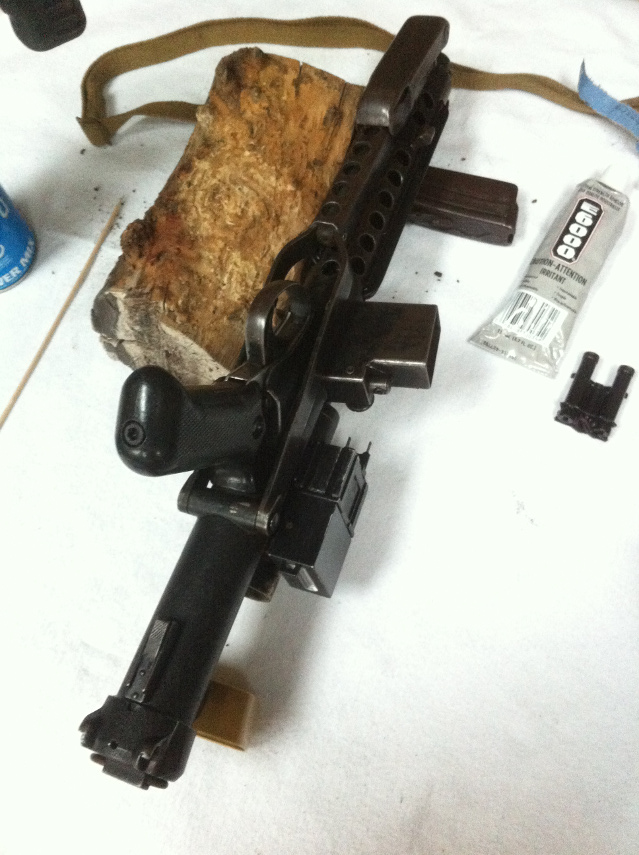
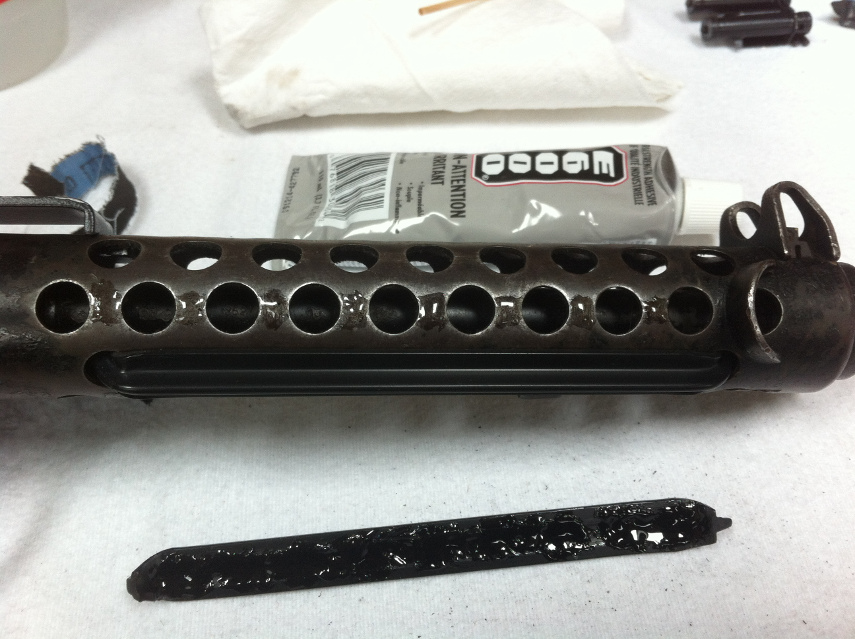
First I wanted to leave the t-tracks unpainted but It looked not very nice. So I painted them with a paintbrush.
Here you can see the difference:
And here completely painted:
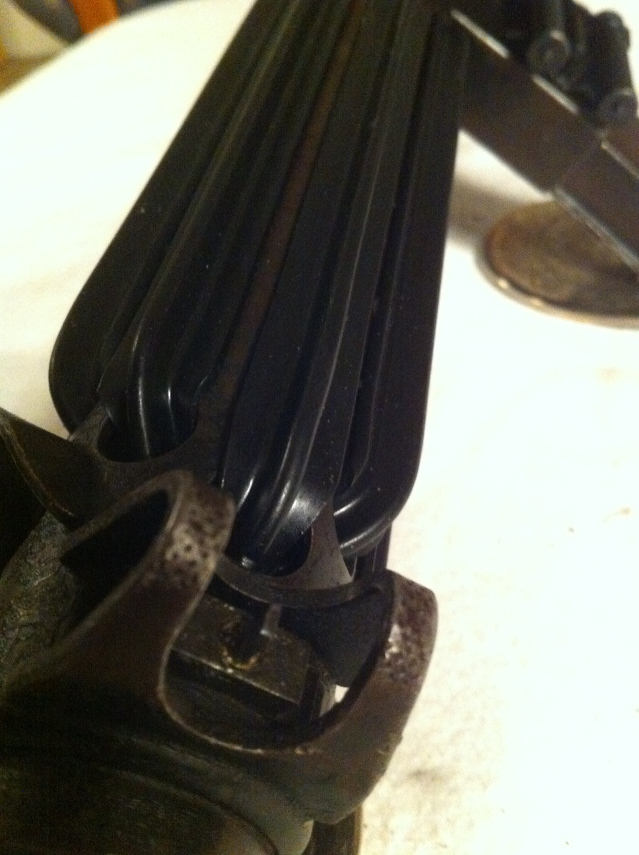
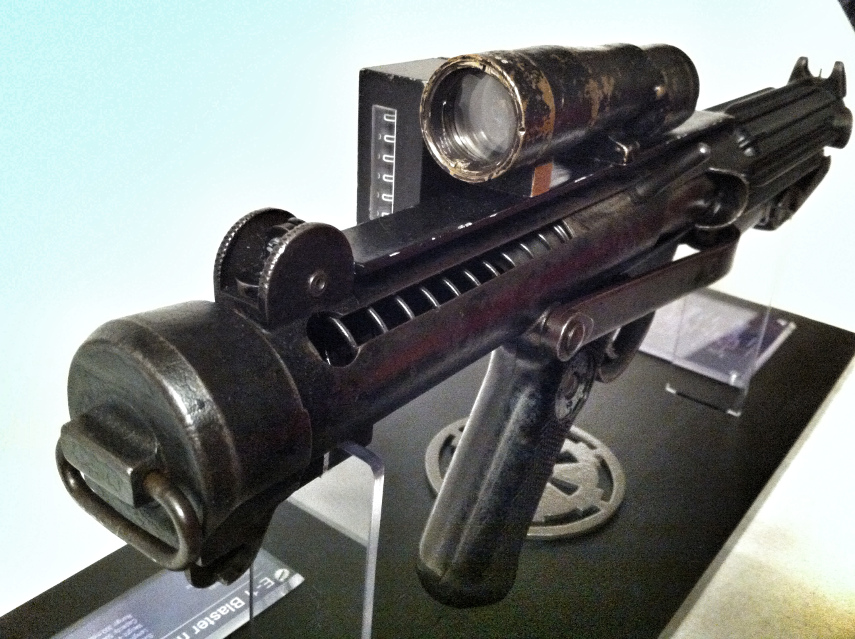
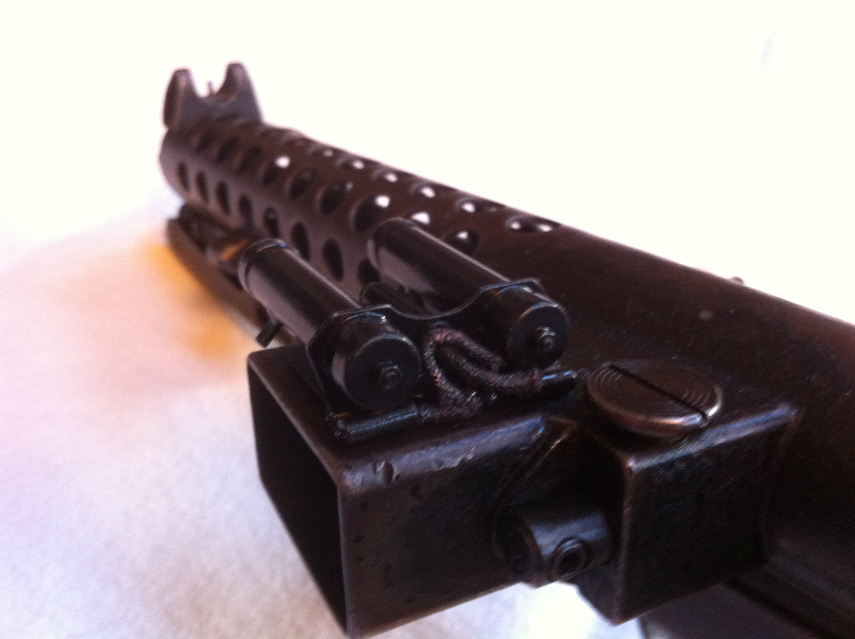
Here some impressions of the Blaster with the t-tracks.
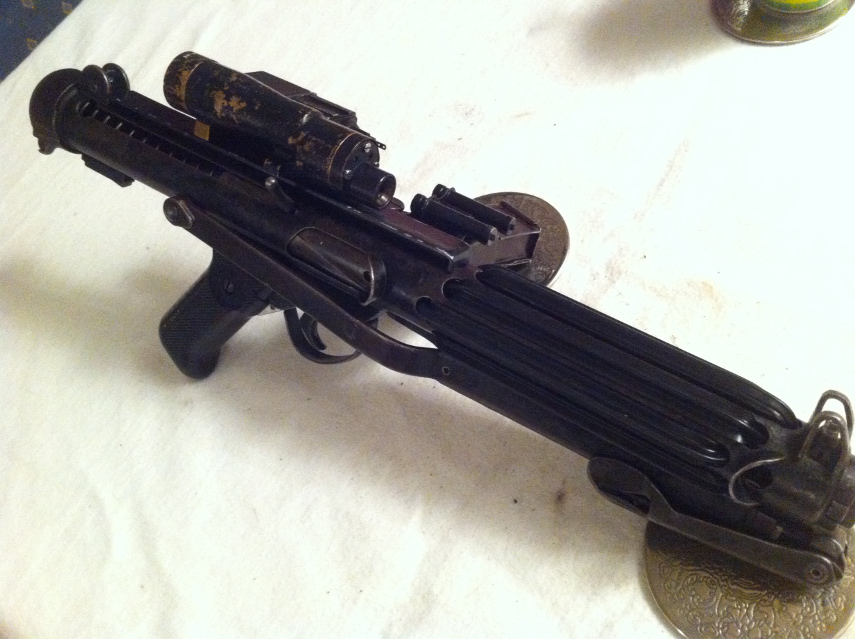
Perhaps I will install the cable between the Power Cylinders and the Counter later.
Actually I´m building an adequate display stand!
After finishing I´ll make a proper photoshoot!I wish you all a great weekend!

Christian
-
2
-
-
Thank you Andy for the compliment!
I painted them close to your description and pictures to make them as accurate as possible.
-
That's awesome!!
Fantastic work!!
-
Part 5: Cutting the ammo clip
Sunday night I was sitting in front of my TV and started to shorten the ammo clip to E11 size.
Prior to I checked a lot of pictures and read some tutorials. Finally I decided to cut the clip after the 4th circle.
Primary task: stripping the clip...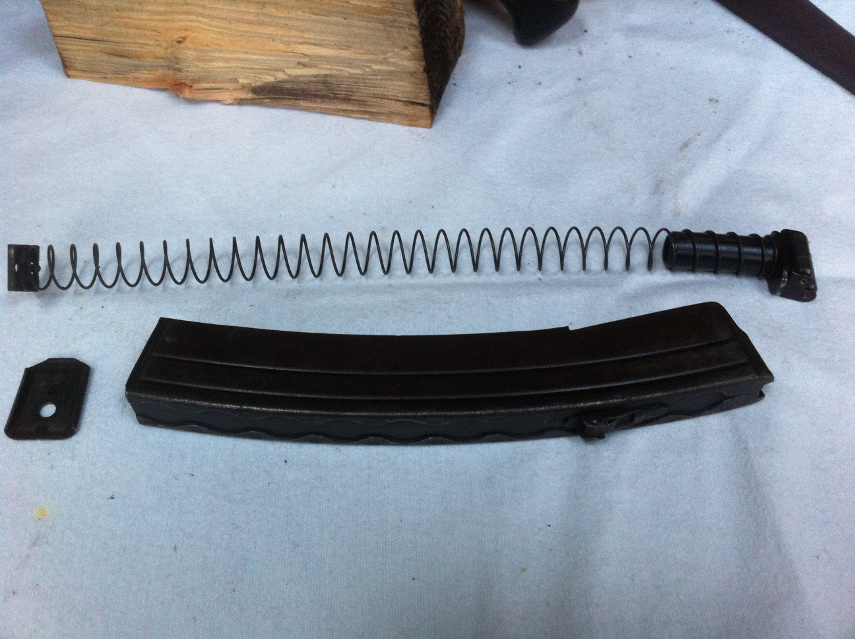
Then I marked the final lengh with some tape and cut it with a hack saw.: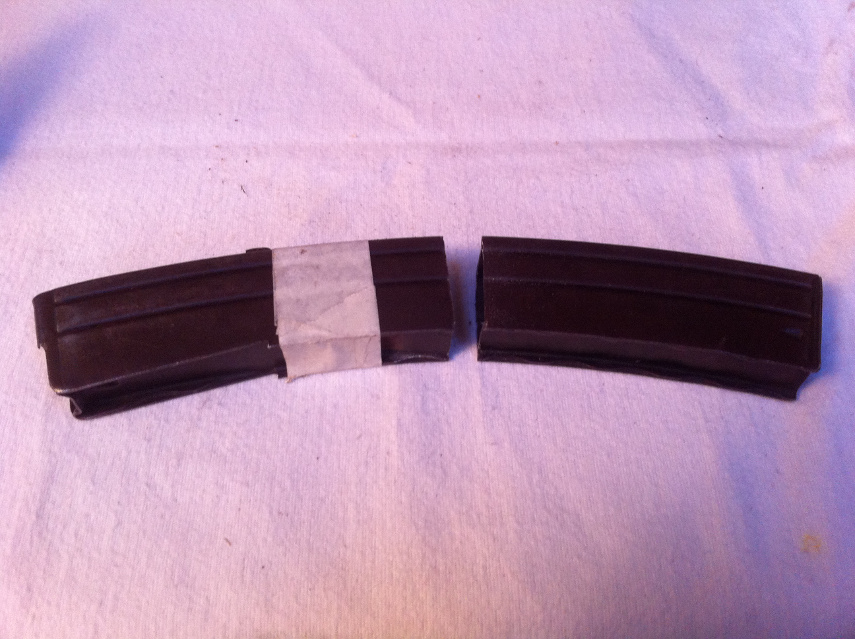
I simply broke off the small pieces. I just had to bend them two times and they were gone. I bend the long sides with my multigrip pliers.
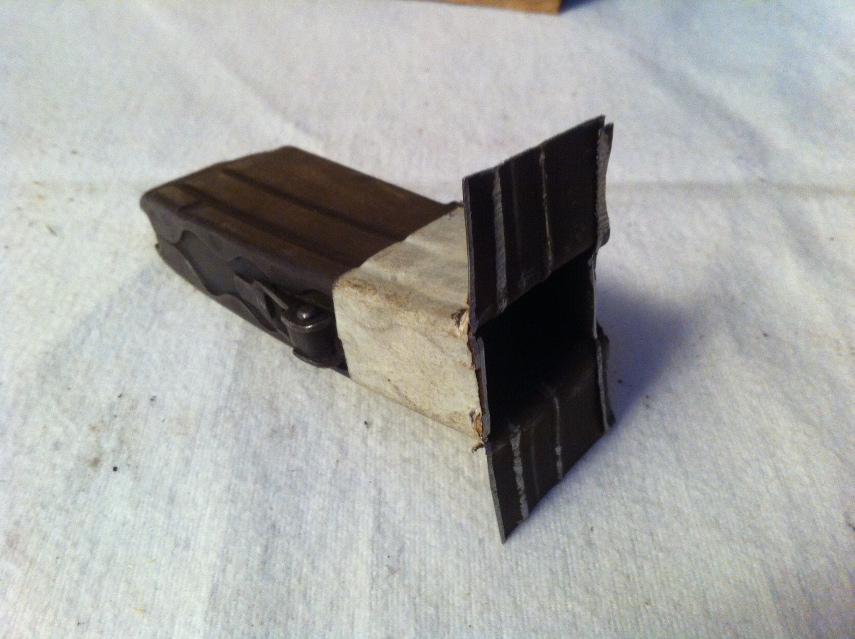
I then cut the sides with a small "Puk"-saw and made them fit with some files afterwards. This took some time but at the end everything is fitting perfectly.
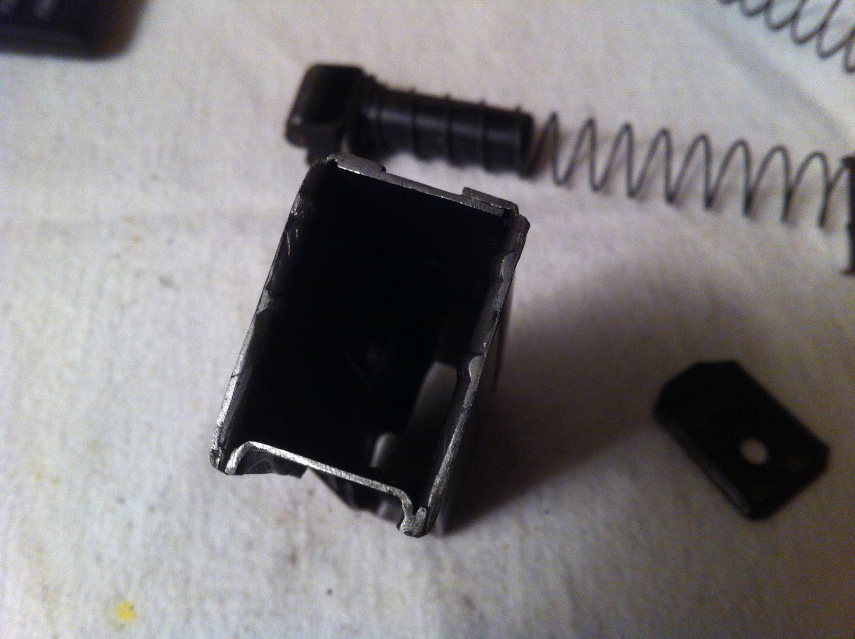

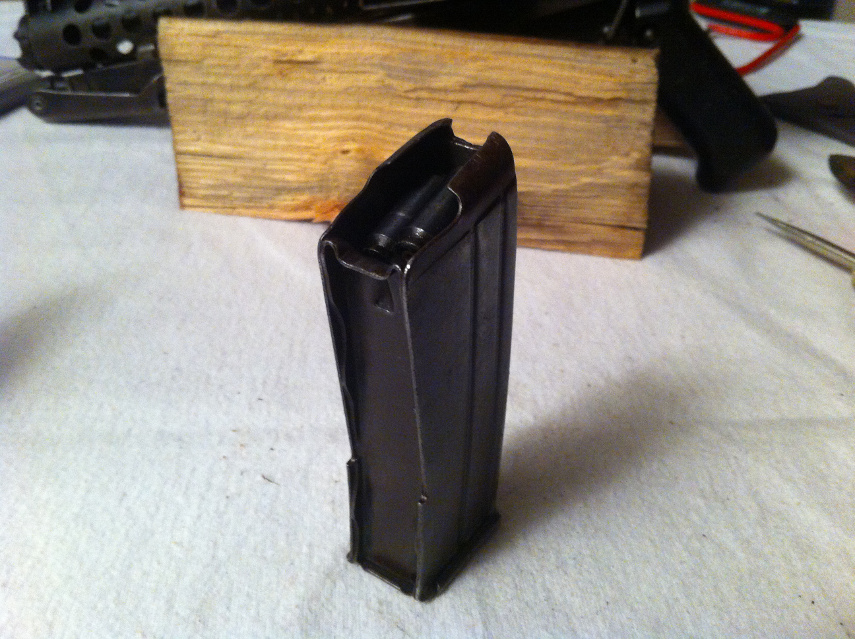
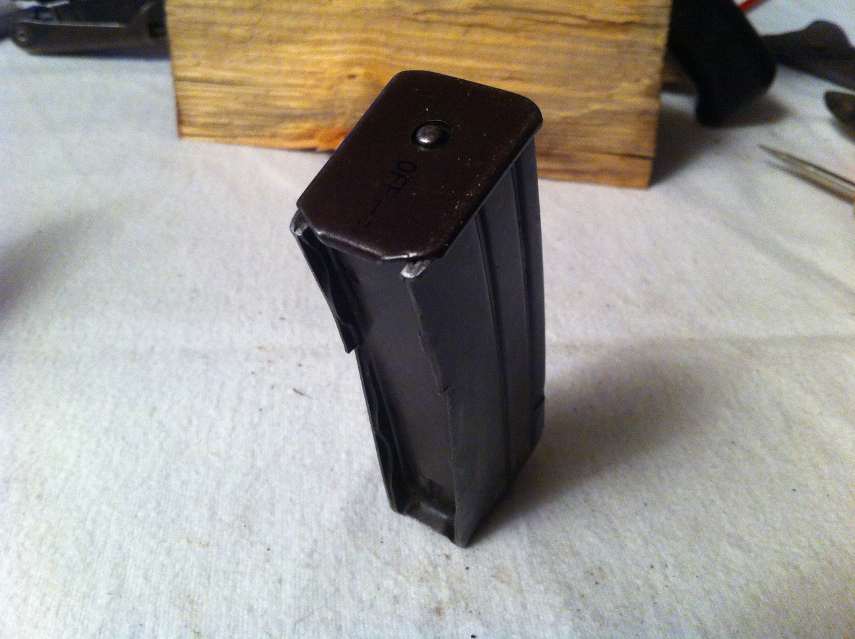
Thats my status quo now:
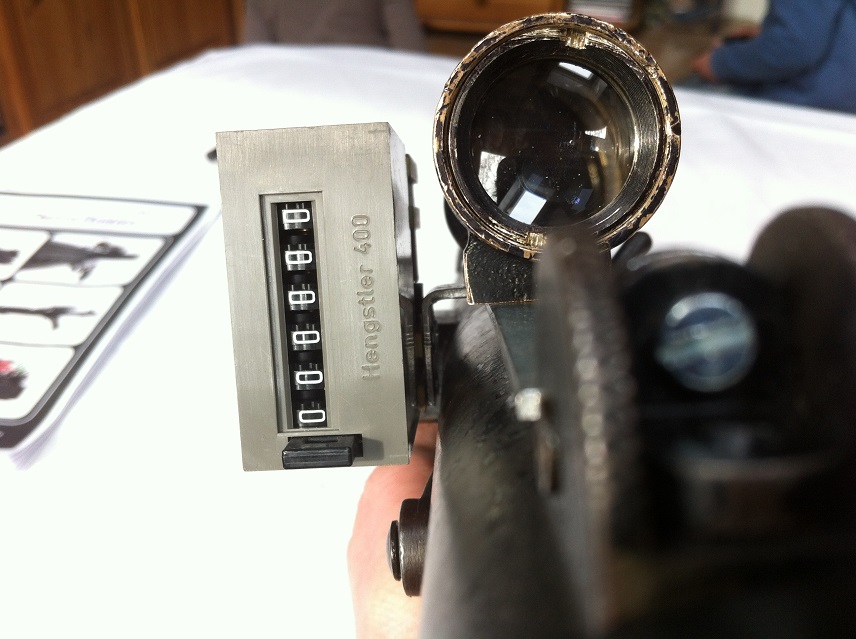
View through the scope: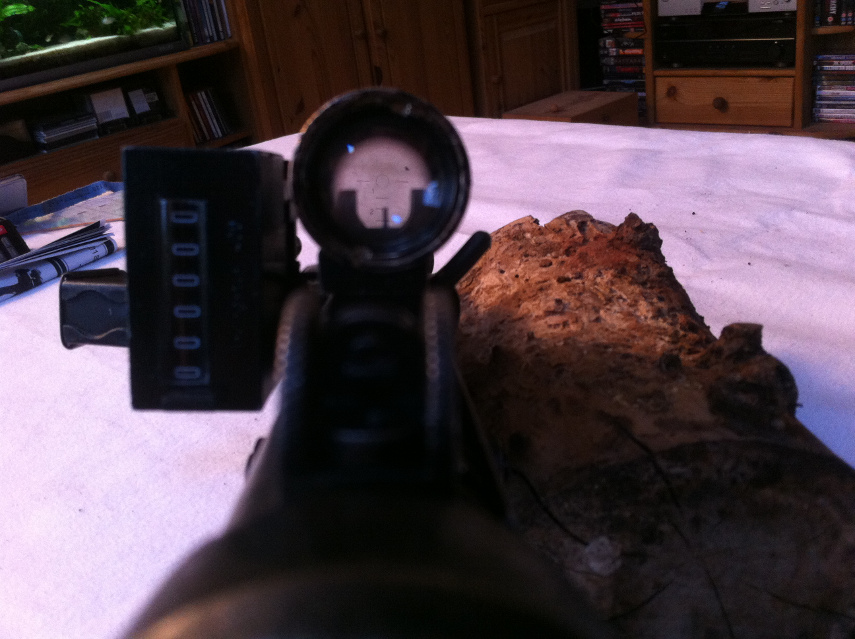
I got my t-tracks today from Roy that´s the next task.
Kind regards from Germany!
Christian-
1
-
-
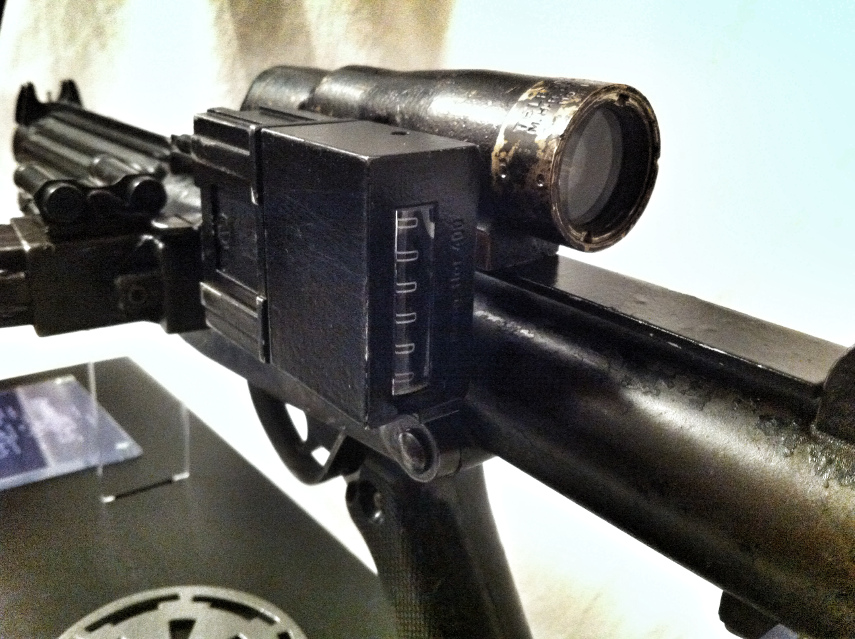
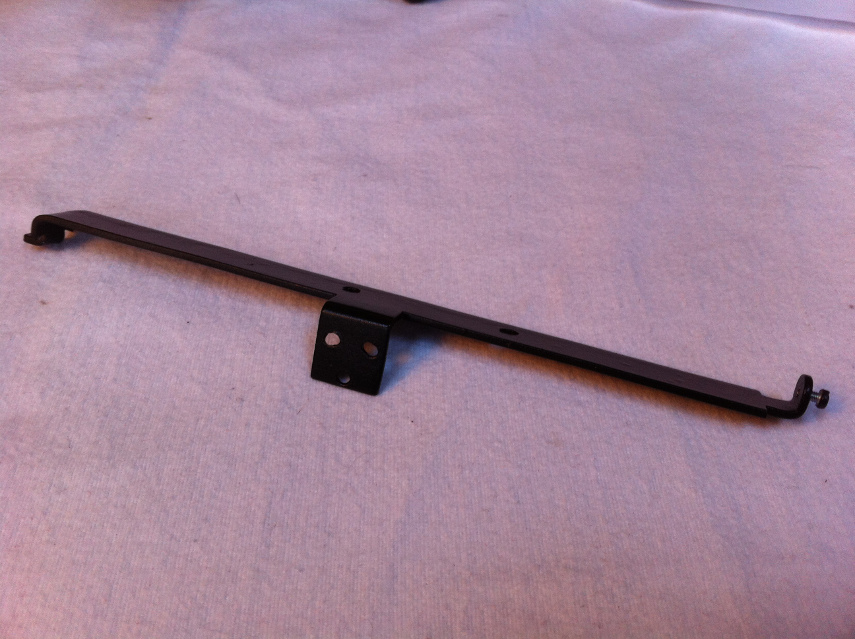
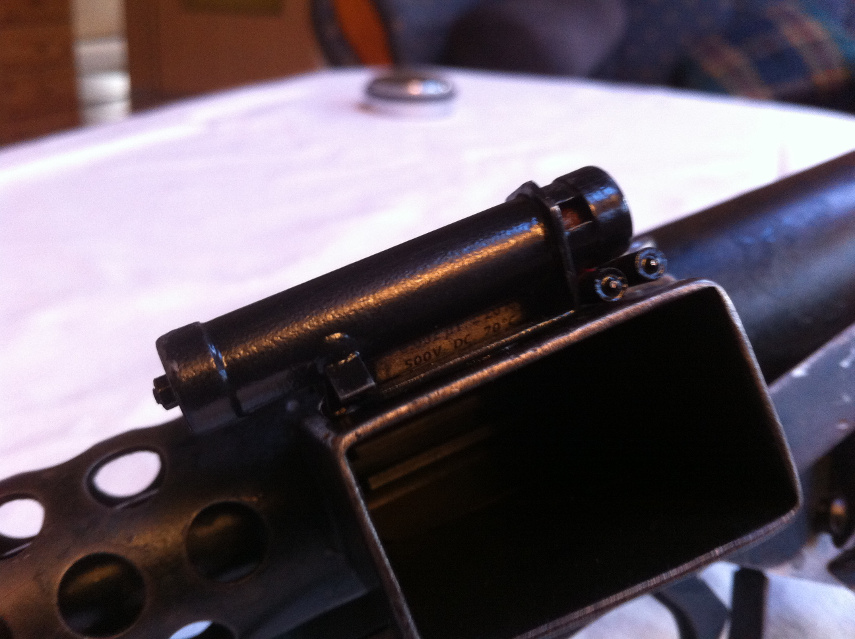
Part 4: Painting of Rail und Counter
After finishing the scope-rail I used last weekends perfect weather to paint the rail and counter.
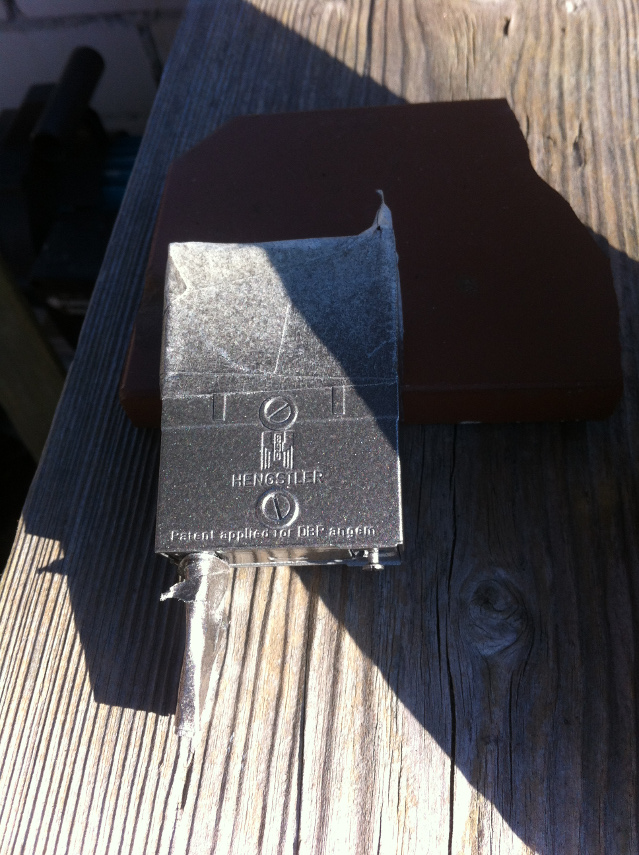
First I stripped the Hengstler completely:
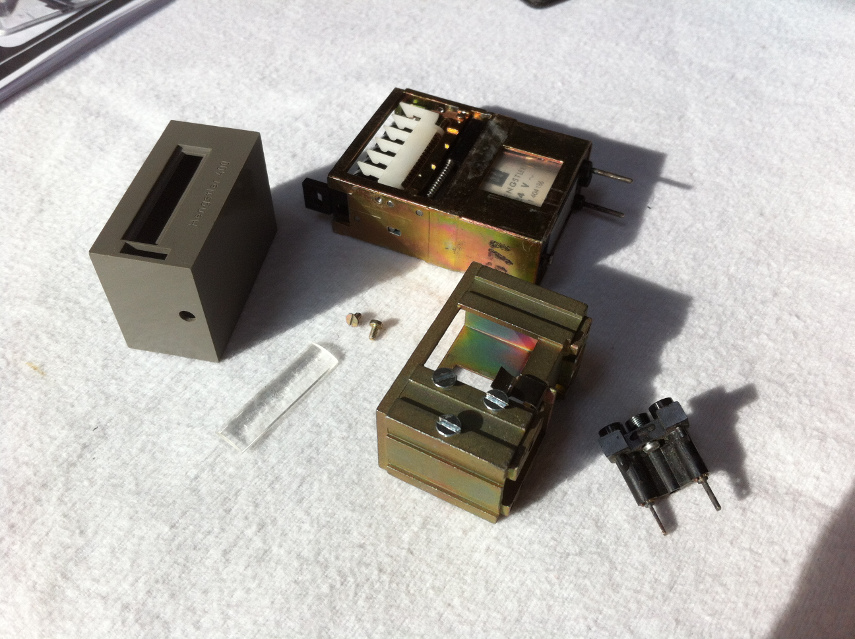
I had some luck when I disassembled the viewing panel of the counter. It was not glued. After pressing onto it with a screwdriver vigorously it popped out right into my hands.
Next step: prime coating:
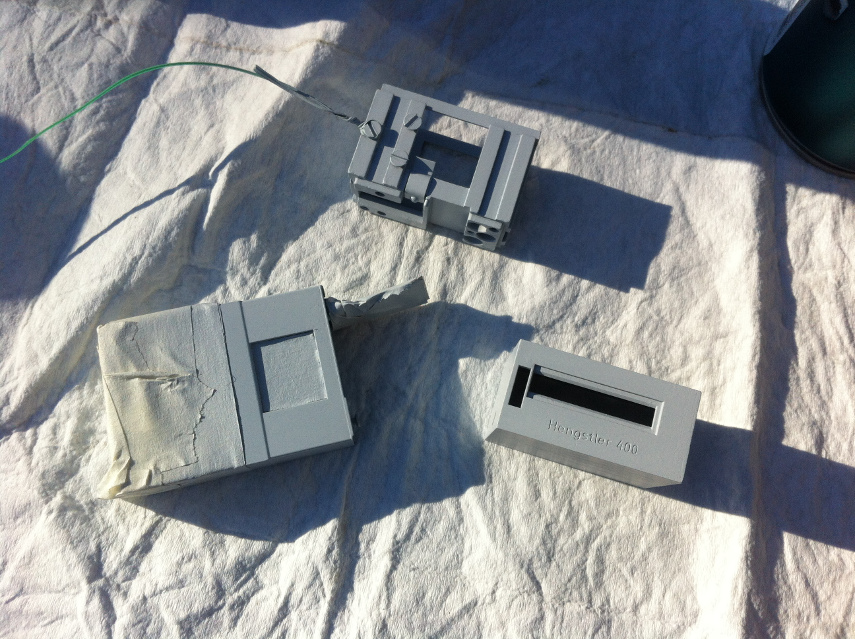
The next day I sanded the parts carefully and painted the parts with dark grey hammertone.
Obeying the instructions I applyed one layer every 15 minutes. Three times the hammertone and then another three layers of flat black:
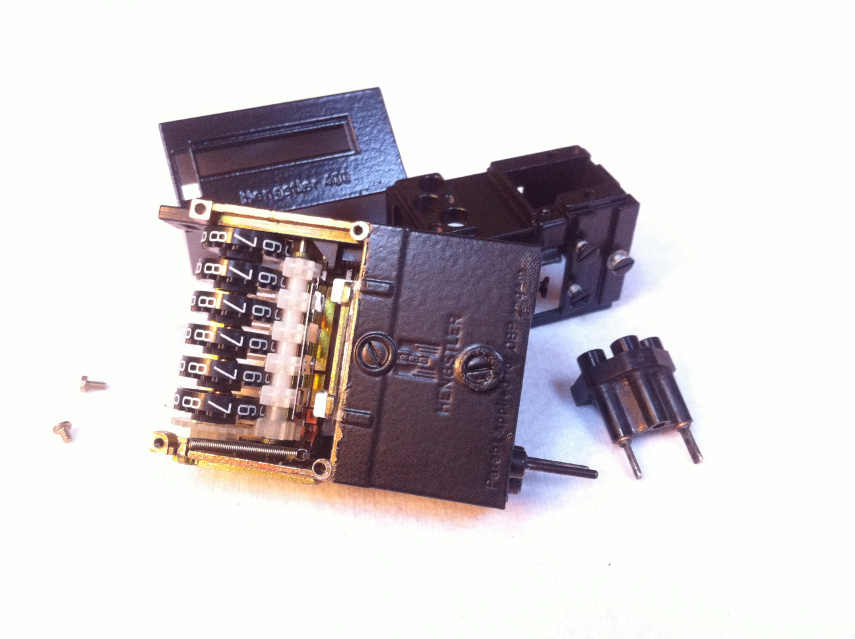
Another day later the paint was dry and I made the weathering. I used what was left of the cable rail I used to make the scope rail and some grinding fleece to make the parts looking used. Real scratches are the very best for a truly worn look!

-
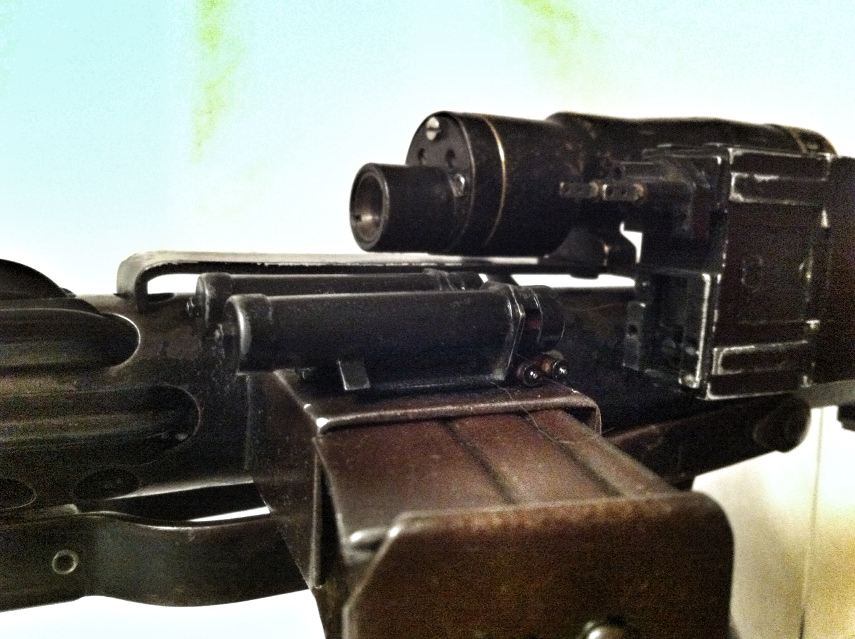
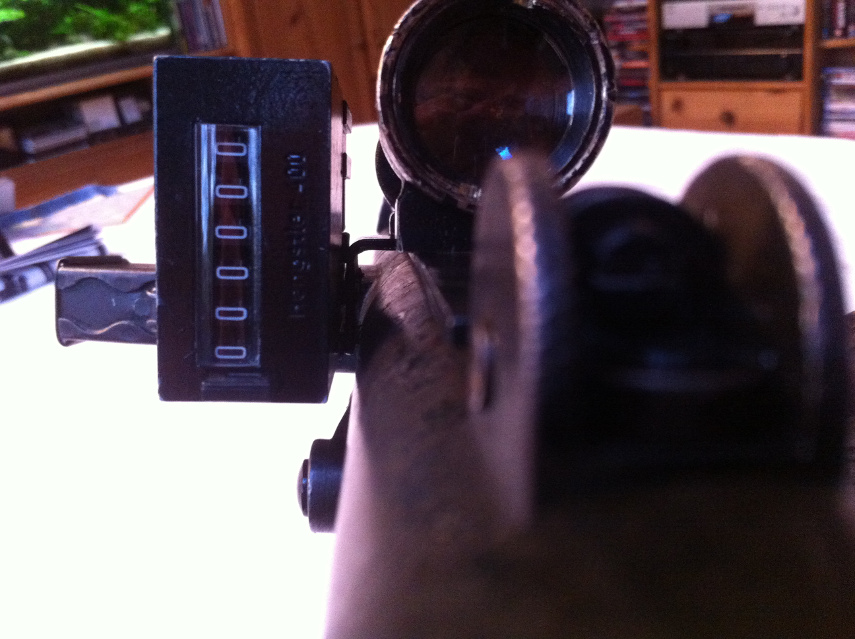
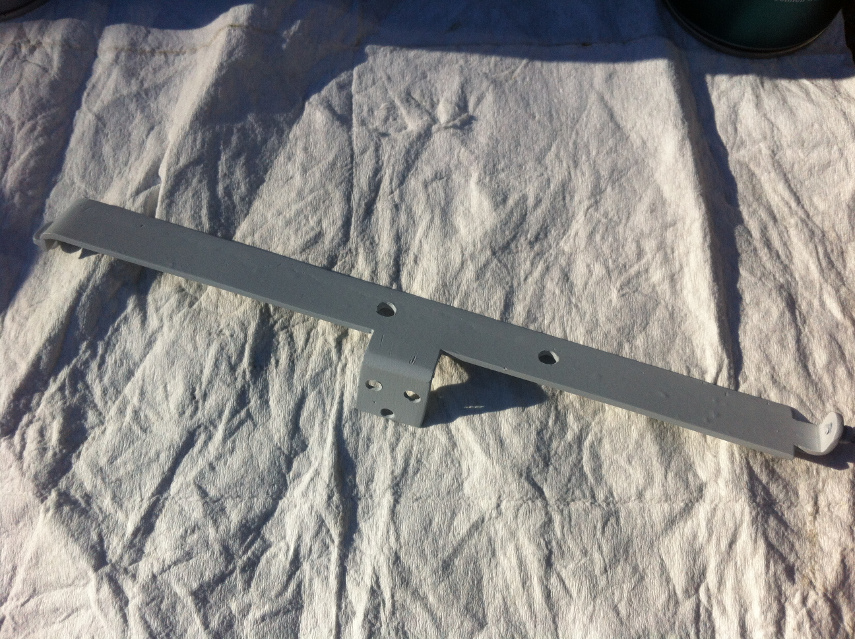
Scope Rail
I wanted to make the scope rail myself. I begun early to look after the raw material. Like the originals It had to be made of 2 or 3 mm thick steel. And I wanted the scope rail and the counter bracket to be one single piece. I found a promising looking piece of cable rail in the scrap.
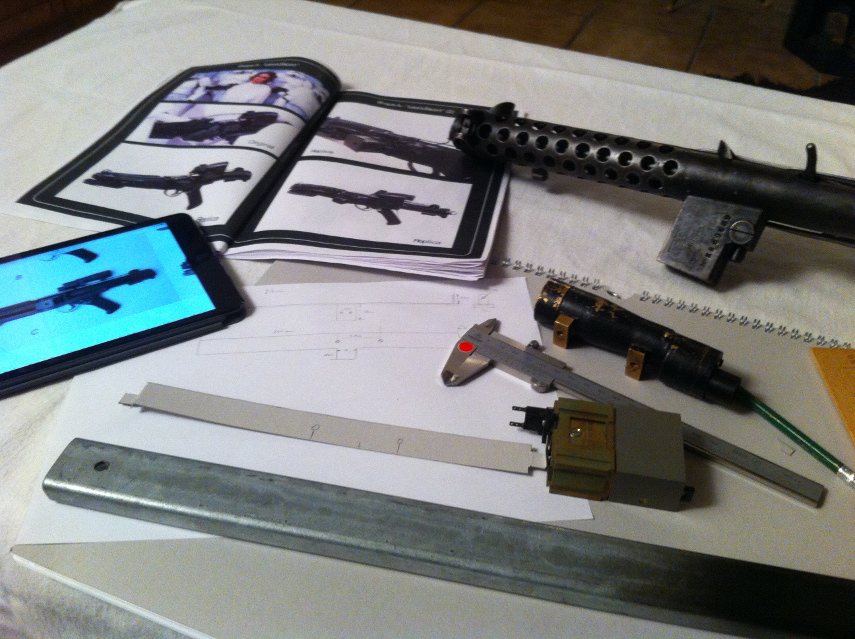
I used it to hold the power Cylinders during painting them. That´s why black paint is on the rail.
After measuring the Sterling I build a model of cardboard. That was fitting well and I startet to cut the average shape of the rail out of the cable rail, using an angle grinder and a jigsaw.
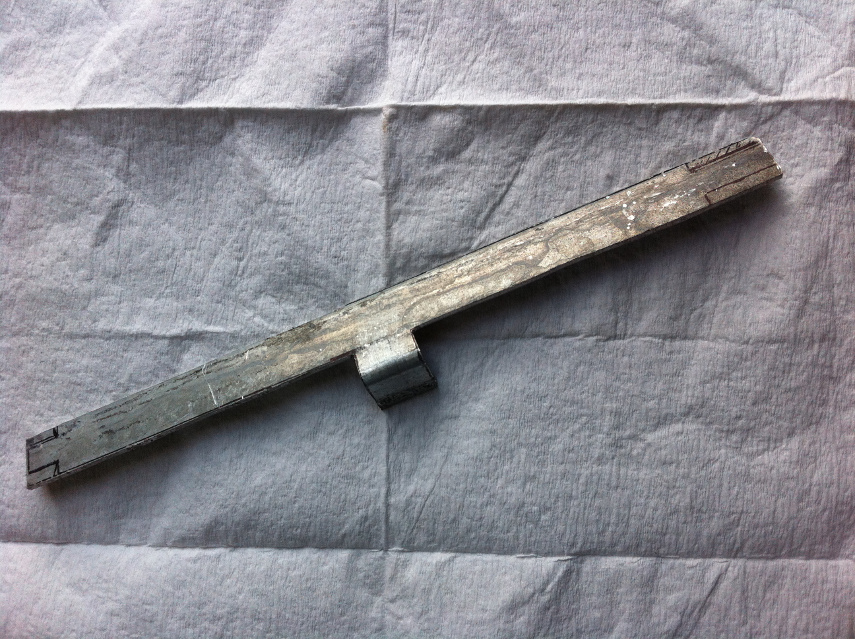
Then I used a file to correct the size and shape and form the bending radius more cornered.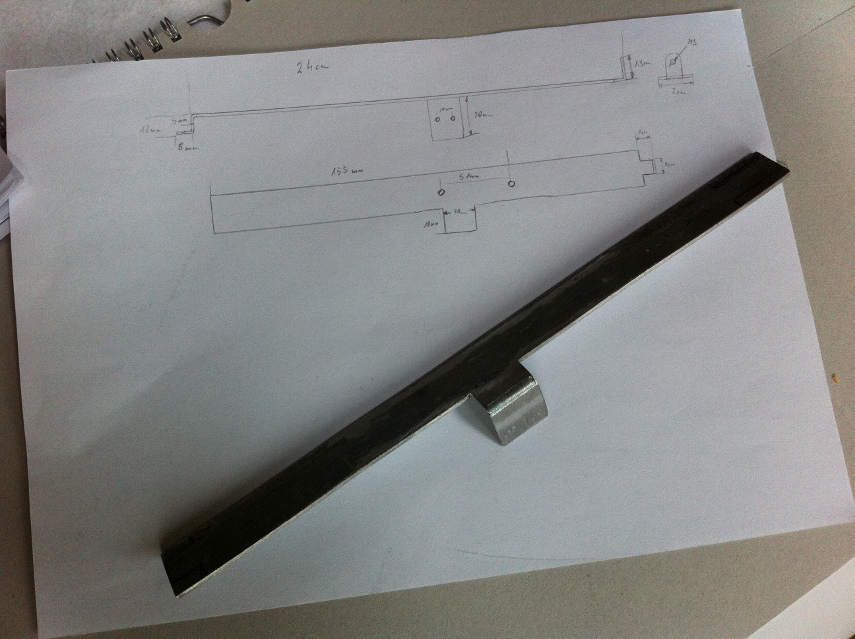
To bend the front and back I used a multigrip pliers.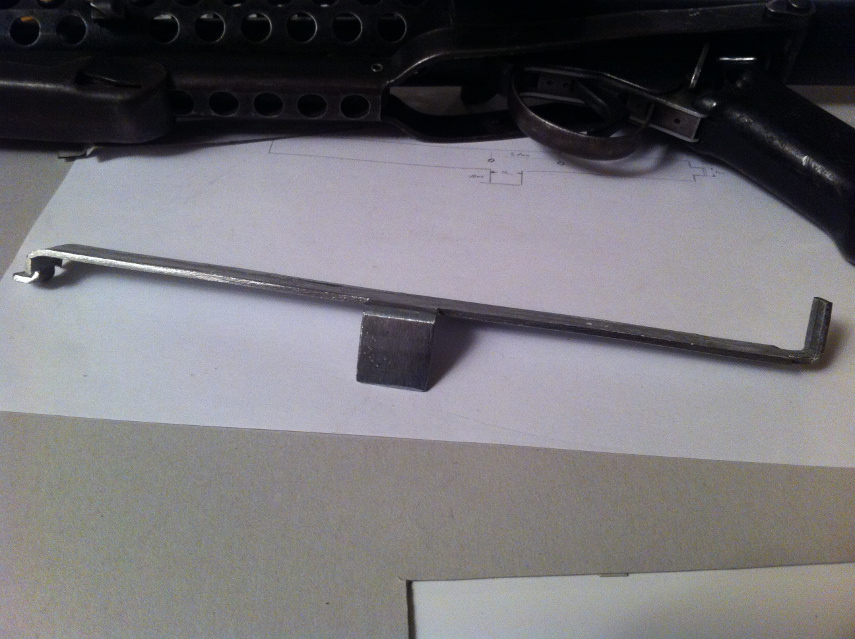
Then I had to drill the holes and a M3 thread. I made the threads of the counter prior to the holes in the bracket. I used a cordless drill driver to make that job. Was easier than I thought.
The top holes (the bottom ones on the picture. ) are slotted holes for adjusting the position of the Hengstler Counter. The fore hole for the scope is a slotted hole also to equalize the scope with the sights of the Sterling.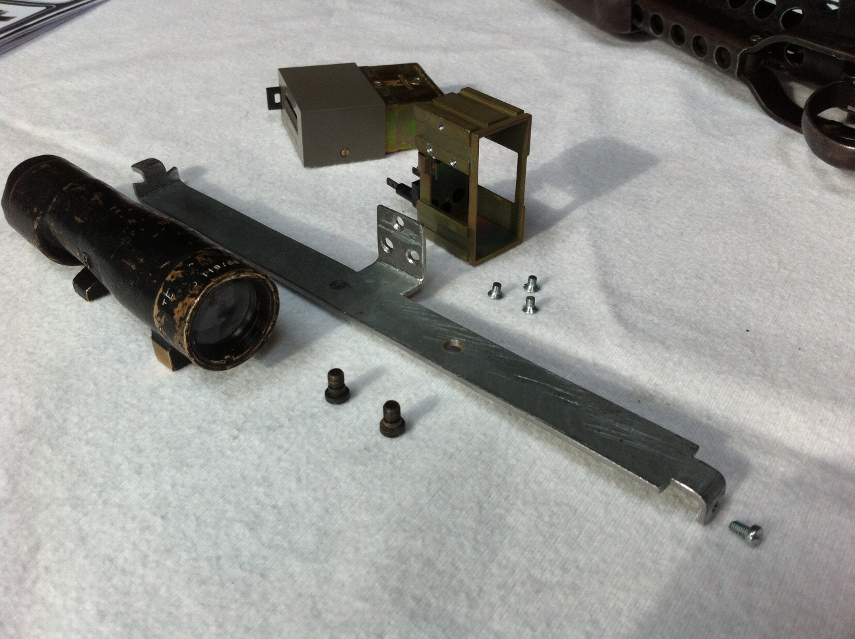
I had to countersink the holes for the Hengstler Counter because the Counter should be as close to the Sterling as possible. That´s why I need the screw heads flush-mounted.
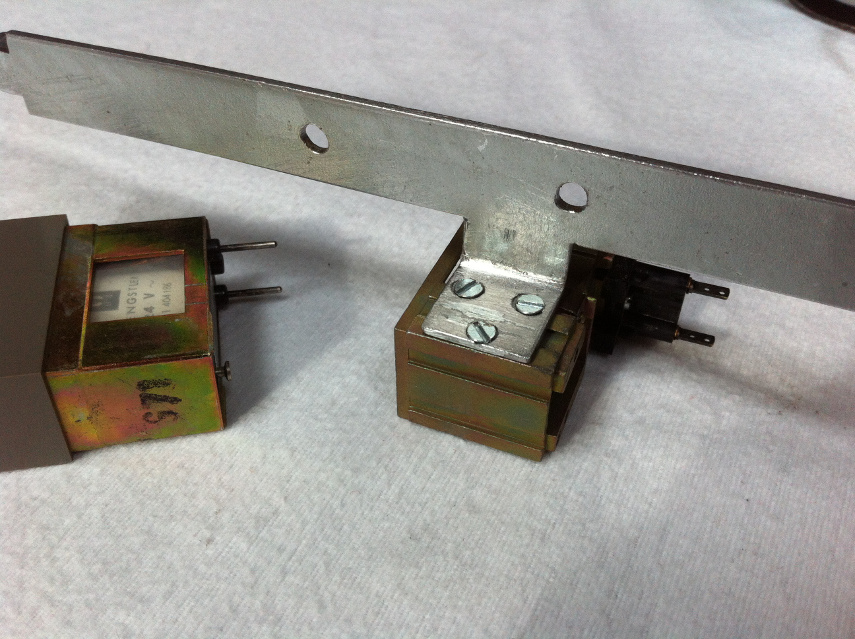
Test assembly: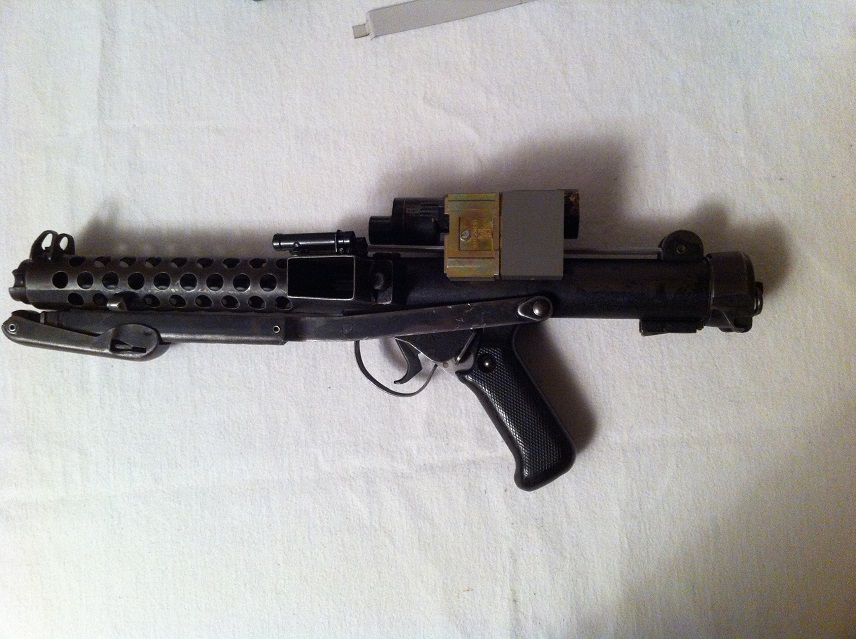
During my research I didn´t find any detailed drawing of a Scope Rail. So I decided to make one myself and post it here. Might be helpful for someone else.
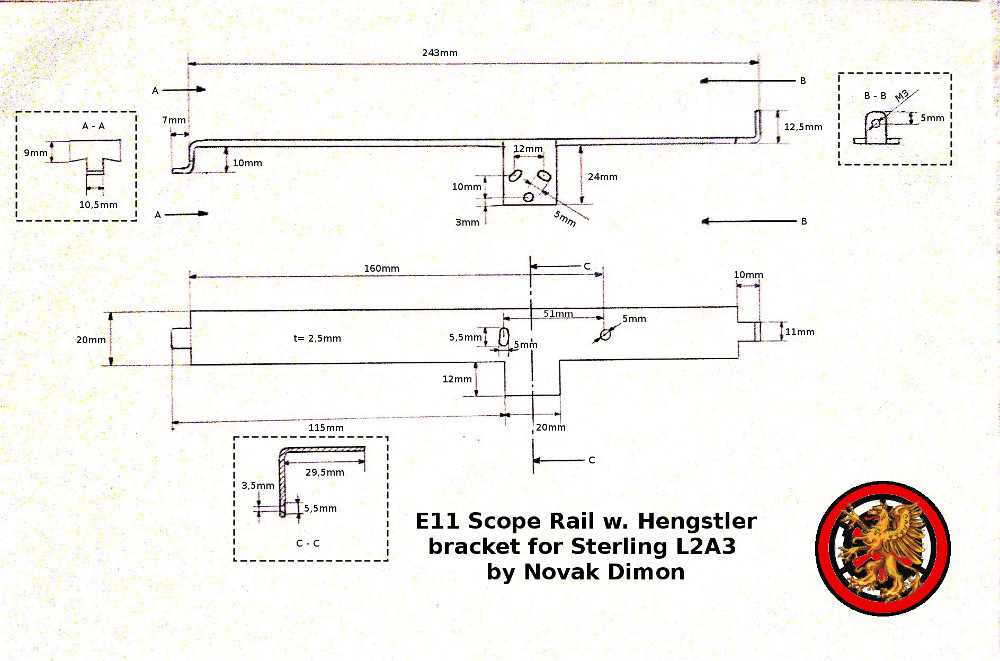
More and bigger pictures are found in my Blaster-Gallery: http://www.novakdimon.de/Novak%20Dimon%C2%B4s%20E11/index.htmlCheers
Christian
-
1
-
-
WOW! Great work!!
-
Lovely conversion
and a very nice sterling... ( no welding marks or cuts )What was your first impression when holding it in your hands
And i was given the same tip...
Don't paint it ''yet'' or never, couse you will never get it back the way it was.
Thank you for the pic, and awaiting more, couse these things never get bored to look at

My first impression was kind of WOW!
That´s the real thing!! I´m really happy that I found a gunsmith who made the deactivation the way I asked.
And now after I´ve seen the completed Cylinders at the Sterling I´m convinced to keep the Sterling as it is until everyting is finished.
Cheers
Christian
-
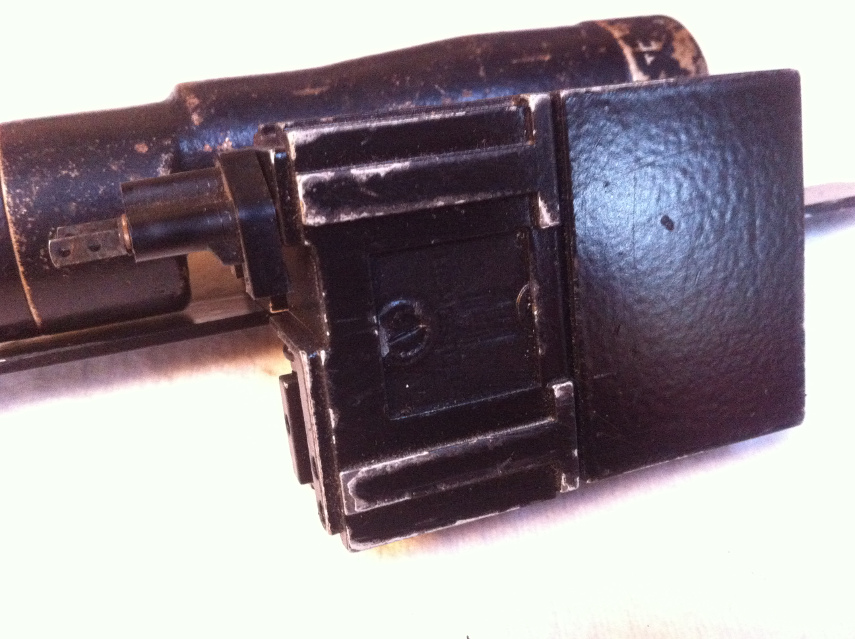
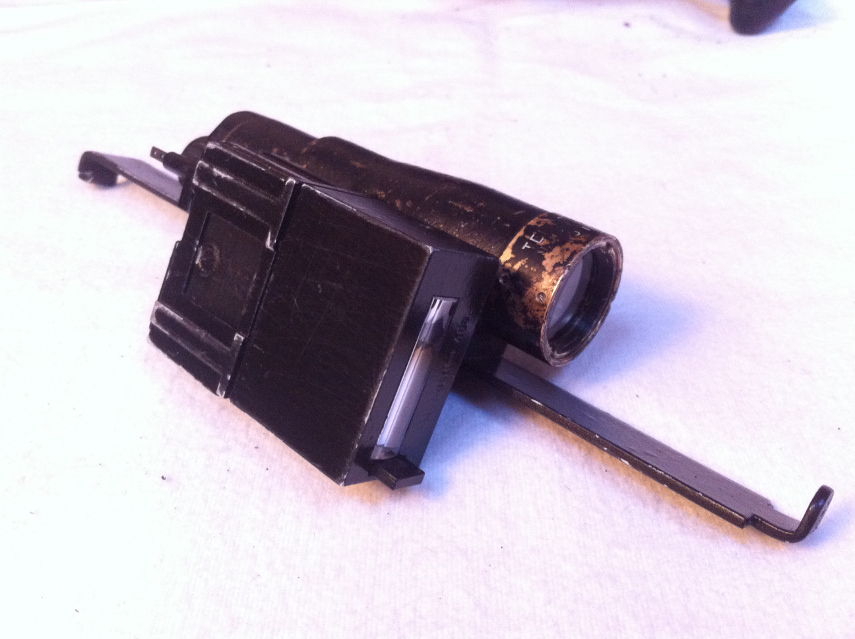
Power Cylinder final
Yesterday I was back from my work early, so I used the time to complete my Power Cylinders.
At the beginning the small resisters demanded soldering onto the UBER-Caps. To get that done I used some flux to glue a piece of solder right onto the joint and heated all together with a soldering iron.

Perhaps not the most professional way but I think the result speak for itself.
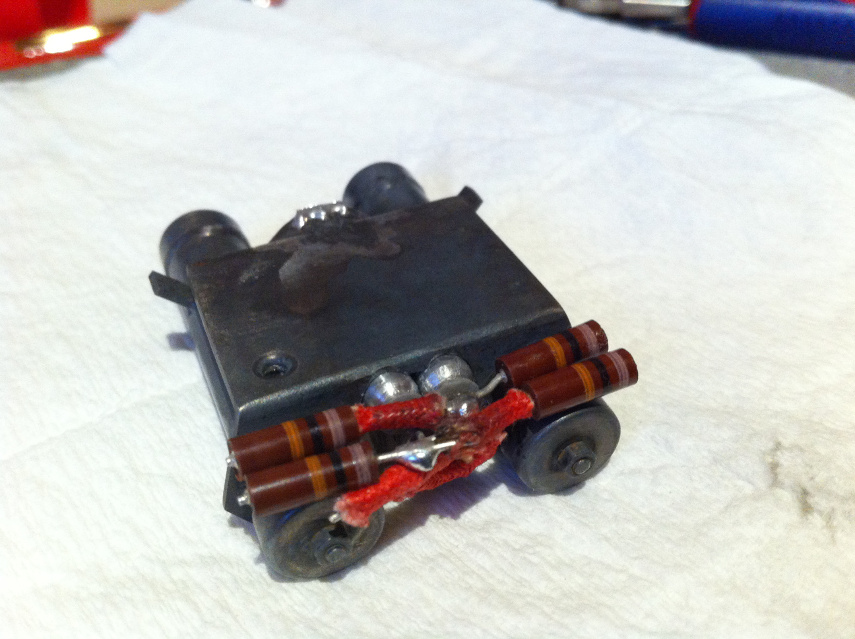
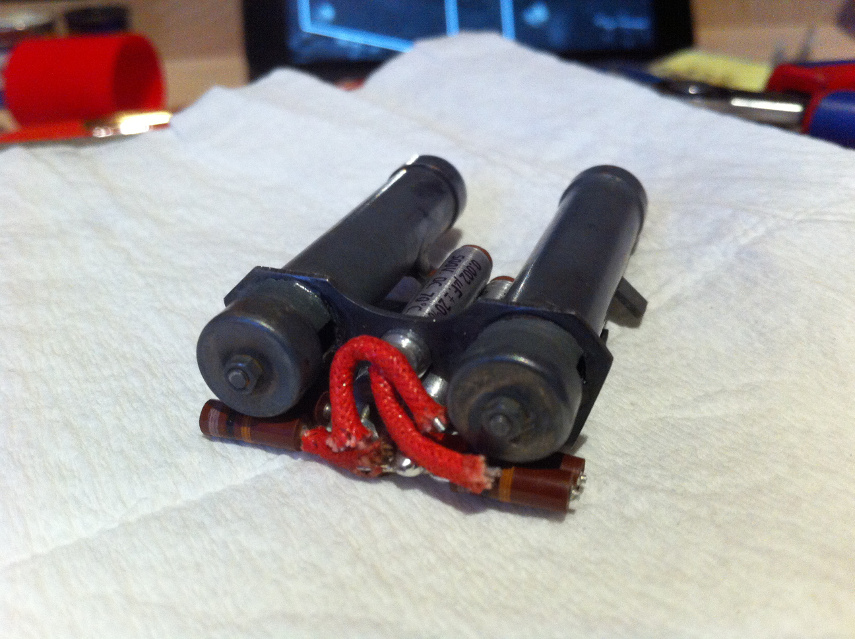
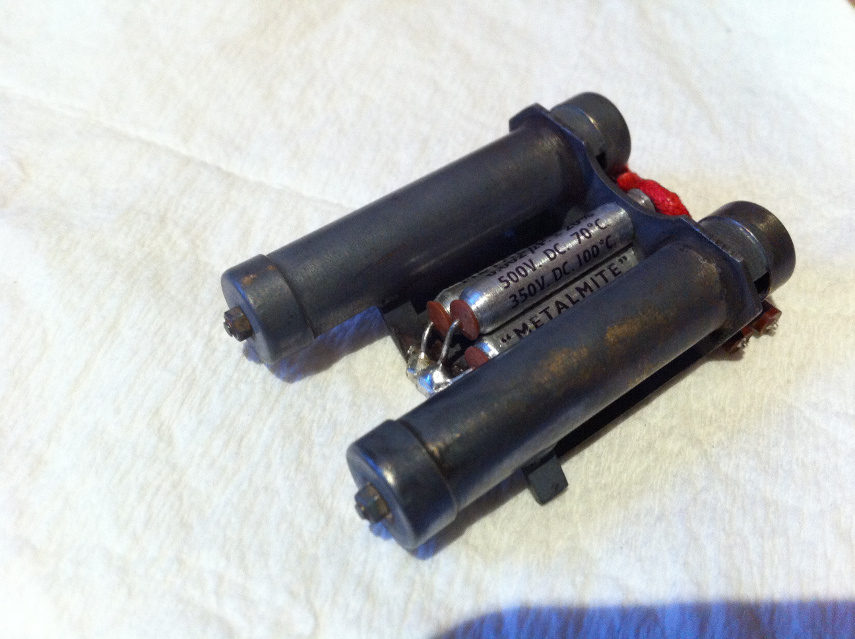
By the way, that´s how I soldered all connections.
When all parts were assembled I had to paint everything. In the forum of the german garrison the member Vadier posted a great conversation WIP. I used the same spray paint he used. It is a flat black for use on unpaintet metal. Alien from his tutorial I decided not to use primer do reduce the thickness of the paint. Besides my tests on zinc plated steel prooved that I can use it that way. Ok, for the handrail of a balcony primer is indispensable but I don´t plan to store my Power Cylinders outside in the rain.
After the painting I weatered the Cylinders through realistic strain with miscellaneous objects, I found on my workbench.
I proudly present my selfmade Screen Accurate Power Cylinders: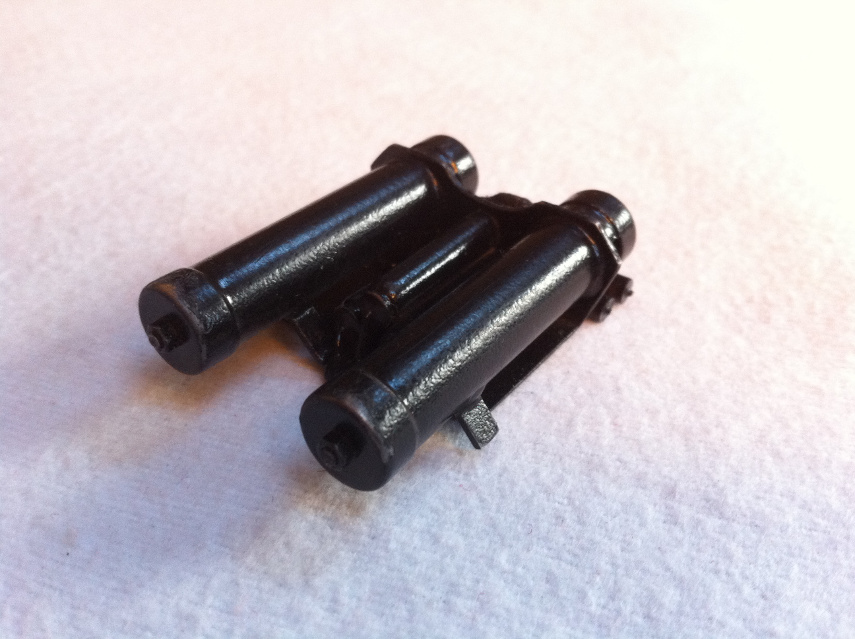
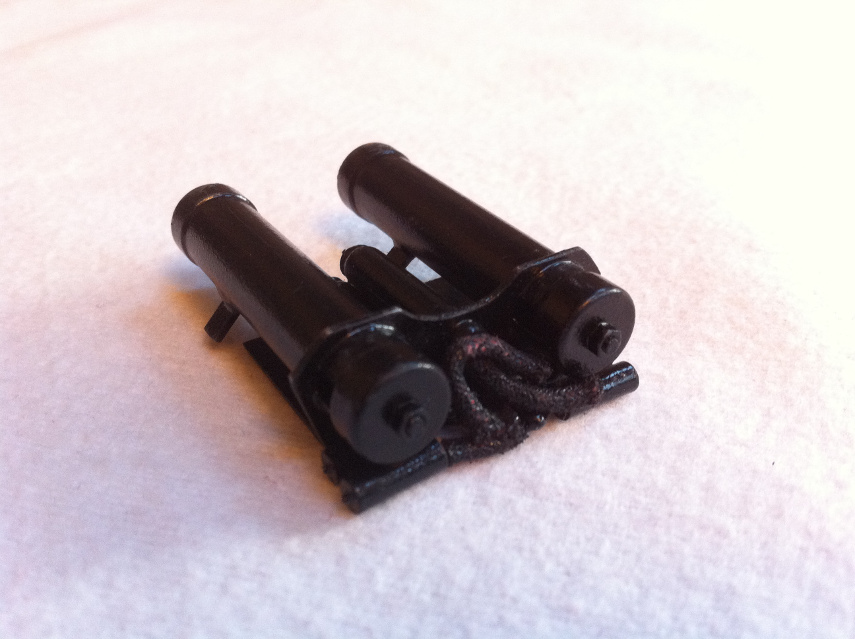
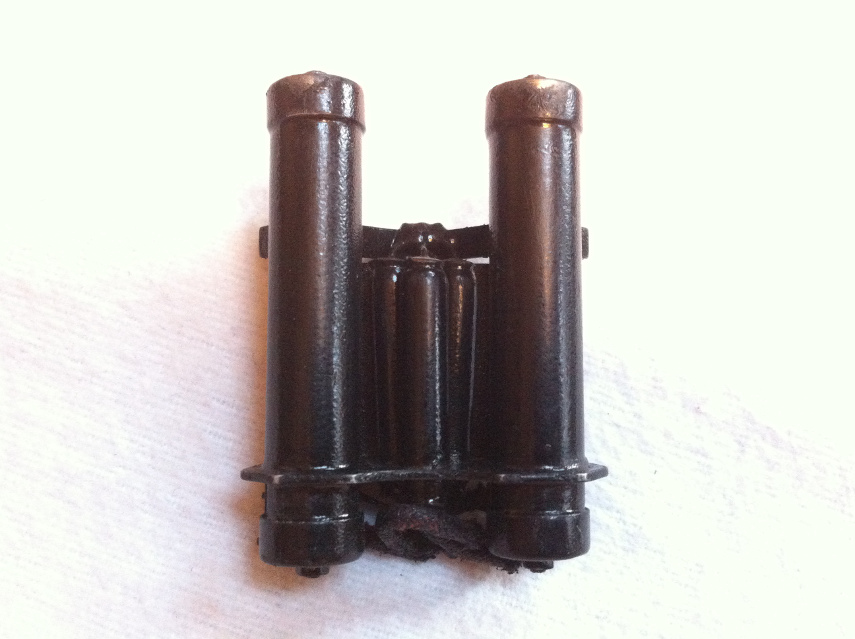
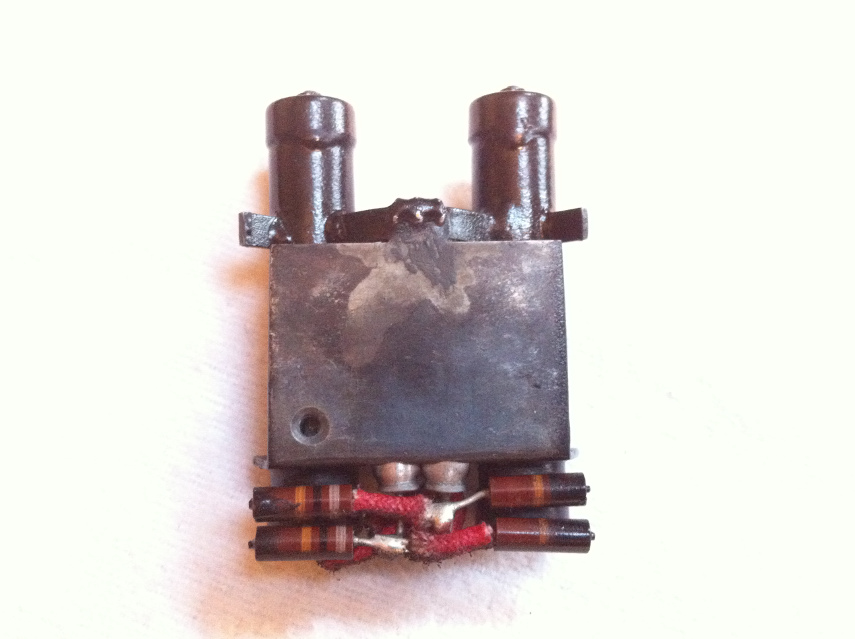
Test assembly on my Sterling: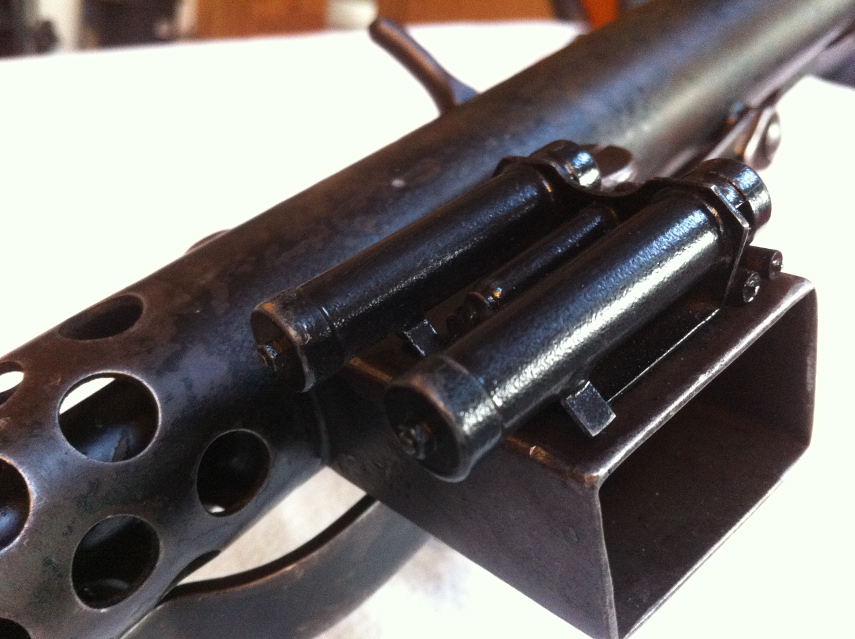
I´m really happy with the final result. Besides the process of making the Cylinders is big fun! I truly recommend it!!
I uploaded a lot more pics to my gallery: http://www.novakdimon.de/Novak%20Dimon%C2%B4s%20E11/index.html
That´s it for today.
Kind regards from Germany!
Christian -
Nice photos of your cleaned Sterling.
Eventually I do the same with mine.
-
I'm glad you like what I made of your kit until now.
I'll do my best to keep it that way. Thank you for your point of view about the Sterling.
I'm really unsure about what to do. I like the used look but isn't it too much?
I guess it's really the best way to put everything together and then see how it's looking. Actually it's to cold for a good paint job anyway.
Kind regards
Christian
-
Hi, pictures of my Sterling are now found in my own Blaster thread.
http://www.whitearmor.net/forum/topic/29911-novak-dimons-sterling-conversation/?st=20
Anovos TK armor preorder
in Hard Armor (General Discussion)
Posted
At last I was unable to resist and placed an order for a kit too.
It will be my first armor but I'm in no hurry to get it. Until delivery I will continue to learn from all the experienced troopers here and get all the small bits I may need for later EIB or higher approval.