


justjoseph63
-
Posts
12,745 -
Joined
-
Last visited
-
Days Won
326
Content Type
Profiles
Forums
Gallery
Articles
Everything posted by justjoseph63
-

ANH Stunt Photos for approval
justjoseph63 replied to Marcus Dingman's topic in TK Pre-Approval Questions & Discussion
Overall a really nice build, Marcus! Some fantastic advice so far, and it looks as if you are darned near ready for your first troop! Basic approval looks as if it's pretty much within your grasp, and it was a great idea to ask for advice. Yeah, there are a few items that could use some attention, but in looking at your build I can tell you are able to handle them! Of course Basic 501st approval is all you need to get out there and have a blast, but as you may have noticed we always suggest ways to make your armor look it's best. Sometimes it's the small details that really set you apart, and with a few adjustments I can see you qualifying for the higher levels of approval! Whether you are aiming for Basic 501st status or going all the way to Centurion, just know that we are here to help with anything you need, and never be shy about asking questions.... answering them is what we do best! See you around the boards soon! -
IG-41985 ANH Stunt TK Build Thread! (AM Armor)
justjoseph63 replied to Artooritoo's topic in ANH Build Threads
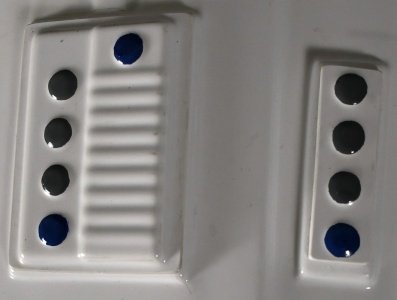
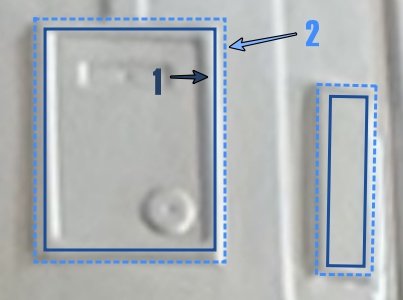
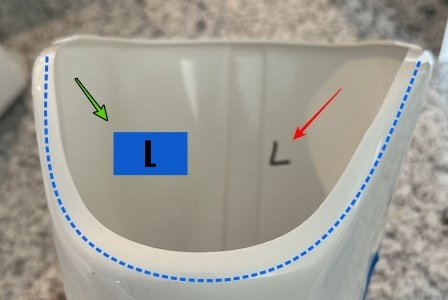
Looking good on the trimming so far, David. If I could make a few suggestions: As mentioned in my "Return Edges" thread, the ridges on the inside front of the biceps can cause discomfort after wearing them for a while. While not all troopers experience this, it may be the reason they removed them entirely in screen used armor (second pic). I would also steer shy of marking the pieces in (what looks like) permanent marker. Although ABS is not generally considered to be porous, it may bleed through on thinner pieces. What I would suggest is to use a regular pen and strips of our blue painter's tape. On the areas like the wrist openings a soft lead pencil works great and is easy to remove. When cutting out the sections for the Ab plate buttons, take your time trimming them. They should sit on the raised rectangle ridges but not overlap the tops. Hint: Paint these BEFORE attaching them to the Ab plate. Here is a good example (AM armor). Lastly, if you are going to use interior cover strips on any of the connecting areas, I like to do these first. This is because if there is an issue with fitment, it's easier to remove them without potentially damaging the exterior of the armor. E-6000 can be removed, but it's not a lot of fun, lol. Even if you decide not to use interior strips on the other connections, I highly suggest using them on the inside fronts of the shin connection. They don't have to be pretty (no one will see them) but the added strength in that area will help when opening and closing them a lot while suiting up. Trust me. Keep up the great work, keep those questions and awesome photos rolling in!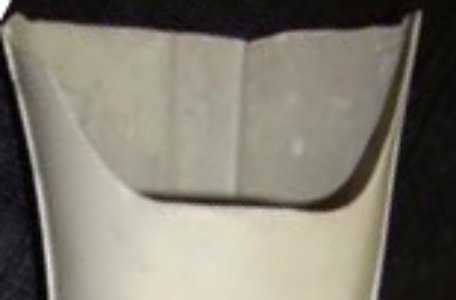
-
ChrisThePropGuy NEW ERA/R1 TK
justjoseph63 replied to ChrisThePropGuy's topic in The Foundry - Armor and Prop Making

-
FISD Forum Fundraiser 2025 - Completed
justjoseph63 replied to themaninthesuitcase's topic in Announcements
Donation sent on June 20th but I forgot to post (oops). Transaction # 73S15956EP181163H -
IG-41985 ANH Stunt TK Build Thread! (AM Armor)
justjoseph63 replied to Artooritoo's topic in ANH Build Threads
I'm gonna' start with one comment: GREAT photos! Clear and detailed, just the way we like em'! My first question is are you going to be aiming for Centurion level? (hint hint) The reason I ask is that it is MUCH easier to do during your build rather than after, and if we know this ahead of time we can better tailor our replies to your questions. It takes a little more effort on your part, but is well worth it when you end up with a spectacular looking set of armor. Looks like your kit is already pretty much trimmed, but have you ordered an undersuit yet? Having it on hand will help during fitting (don't try to fit the pieces wearing regular clothes, trust me). There are 2 options available, a full (one piece) set like this (link), or a two piece like this (shirt Pants). I prefer the two piece, as it makes it much easier to answer the "call of nature" when suited up, lol. Whatever kind you use just make sure there are no visible markings (logos) that can be seen. One last bit of advice- Don't rush. Take... your... time. When in doubt, ask before cutting/trimming/gluing, and keep those pics rolling in! -
ChrisThePropGuy NEW ERA/R1 TK
justjoseph63 replied to ChrisThePropGuy's topic in The Foundry - Armor and Prop Making
Looks like I may be taking out a second mortgage once these are ready to ship. I think you nailed the curve, Chris, absolutely spot-on. It may be the photo or just me, but the inside angles seem just a tad off. Looks like I will be taking out a second mortgage once you get these kits ready to sell. Damned fine work, sir.
-
You beat me to it, Justin! Their boots will last many, many years (trust me) but as mentioned their sizing runs a bit on the small side. Side note: Since they are made from leather, I suggest an inexpensive boot/shoe stretcher to keep them in shape between troops. re: the Armor party, I would definitely attend and ask lots of questions. Bring your armor if you can, but even if you don't it's a great chance to learn and meet some of the folks you will be trooping with. I have a thread here that may help.
-
GREAT news, David! Sounds like you are getting all your ducks in a row, and I'm looking forward to following your build thread and helping you if/when needed, sir. Ordering the boots this far ahead will help a LOT, as it makes life easier when fitting the lower parts of the calves. One other important aspect is the canvas belt. You can make it yourself if you have the skills, but my go-to source is Imperial Issue. Rob makes an outstanding product, and I personally would not do a build without one. (Heck, I'm doing another one now with one of his). Remember, photos are important, as are questions. Lots of both!
-
Welcome, David, and congrats on the AM kit! Since each maker creates their product a little differently, there are nuances to each one. AM is a fantastic (my favorite, actually) set, and although it is designed for average to large troopers it can be cut down if needed to fit almost any frame. As you mentioned, research is the key. I would suggest looking at some of the AM builds in the ANH Build area. Tony has an outstanding one here that should answer most of your questions, but ALWAYS feel free to ask about anything you are unsure of. The best bet is to start your own build thread there. This way you can ask all the questions you like (the more the better) as well as post up pictures of your progress. Posting pics is especially important when you have an issue. I have a few links in my signature below that may help, and I look forward to seeing your thread!
-
I'll second the quality of AM, and can promise you will get many years of enjoyment out of it. It is made a little larger to accommodate a wide range of sizes but can be cut down to fit.
-
Welcome, Robert, and GREAT to hear that you are aiming to "rise in the ranks" with your upcoming build! The best way to accomplish this is to build to Centurion specs right out of the box. Making any changes is much easier during your journey rather than after. The one thing I stress to all new TK builders is "When in doubt, ask before cutting or gluing". We are here for ya' brother, so hit us up with any issues you may have, no matter how small.
-
Hi Will, and welcome to the forums! There are 2 schools of thought when it comes to armor: Commission set- Yep, it saves you a lot of work, and as long as you send the exact measurements to the builder you should be OK. Know ahead of time though that it can take patience.. a sort of "hurry up and wait" scenario. Some make their armor in batches and there may be a waiting list to construct it. As for adjustments after you receive it, this is common. The issues come when a piece is not large enough or you have to separate a glued area. This can be tricky, but most issues are solvable. It can also cost quite a bit. Build it yourself- To echo what has been said, building your own has more than a few advantages. You will be able to custom fit it to your frame, as well as take pride in knowing what you have accomplished. You will find that the vast majority of the folks here never attempted anything like building a set of armor (myself included) but with our help and a little patience I think you can do it! We are here to assist you every step of the way, beginning to end, and we encourage any and all questions (no matter how small). Either way, I wish you the best on your TK journey and look forward to seeing you here on the boards!
-
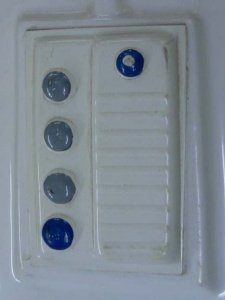
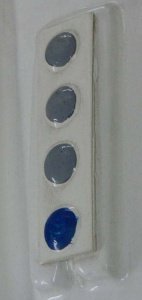
I agree with Glen, they should be trimmed down. If you look closely, the yellow arrow shows a suggested ridge. The line shows the least I would trim. The other two examples (RS bucket) are how much you can trim. Just follow the contour of the cheeks like you did and you should be golden!
-
The reply from the CMG may be going to your Spam folder, so that may be something to check.
-
Old trooper aiming for anh hero tk
justjoseph63 replied to steinandre's topic in New Member Introductions
Welcome, Andre! There are a LOT of references available here for almost every aspect of Luke's armor. At 5'9" he was a little shorter than the Stunt TKs so there were certain alterations on his armor that are completely acceptable at all levels of Hero approval. For instance, most noticeable were that his chest plate and shoulder bells had no return edge on the bottom, the biceps (and other parts) were cut shorter than were used on standard Stunt armor. If you want to duplicate these it's fine and dandy (and screen accurate). If you need close-up references you can find them in the gallery section (link here), but if there is anything specific you have a question on just ask. We are here to help! -
Inside cover strips don't have to be pretty, and are not required for any level of approval. However, I would not build a set of armor without them. They add an extra level of strength at the joins, and are especially important on the calves. The reason being is that those get opened up quite a bit when putting them on, creating stress on the front seams, and I always make the inside cover strips a bit wider for this reason. The reason for the difference in thickness is due to the vaccu-forming process. Dave starts with crazy thick ABS, but the pieces that get stretched the most will be a bit thinner. The thinner strips are good for he forearms, biceps and thighs and the thicker ones are what I would suggest for the calves.
-
Hi Dorian! When you went to the CMG site, did you sign up first? When you click on the link that Jim provided there is a link on the top right of that page to do so. Looks like you will have to join to see any content. Hope this helps!
-
TK-18199 Requesting ANH Stunt Centurion Status [TM] 542
justjoseph63 replied to Spadille's topic in Request Centurion Status
Well done, Rachel! All that hard work has paid off, so welcome to Centurion! -
Welcome to the FISD, Noah, and great to hear that you have ordered your armor! As has been mentioned, research is the key to a successful build. Another bit of advice is to take... your... time. Trying to rush through a build can (and usually does) lead to "oops" moments. When in doubt, ask. We are here to help every step of the way! Another thing I suggest is to get all of your build supplies in order before starting. Having things on-hand and organized will make life easier. Trust me. As Andrew mentioned, there are 2 optional accuracy levels after Basic 501st approval which are honestly not that difficult if you want to go the extra mile. It's much easier to tackle these during your build rather than after, and the extra work will definitely pay off with a much better looking set of armor. If you have already joined the Outer Rim Garrison you should ask about "Armor parties". There may also be some local TKs that are willing to help in person, but know that we are here for any and all advice you need. Have FUN with your build, and I look forward to seeing you around the forums!
-
UPDATE: I will be updating this thread with the new imgur procedures on Saturday morning (if not before), so hang in there!
-
TK-12953 - A Dave's Darkside Depot EIB AHN Stunt build
justjoseph63 replied to jsilvius's topic in ANH Build Threads
20mm is good for the front. The backs should be the same but can be a little wider if needed. -
First Time Build (ESB TK)
justjoseph63 replied to TheEmpireStateStrikesBack's topic in ESB Build Threads
Excellent news, John! One thing I would suggest is that when you receive it, put everything on, take pictures and then post them up in the "Pre-Approval" thread here. This way we can help you with any tweaks you may need and make the 501st approval process a lot smoother. You won't need a blaster for Basic, but do you have your boots/undersuit/neck seal/holster on hand or ordered? -
First stormtrooper armor
justjoseph63 replied to LordVader66's topic in Getting Started - Read this First!
Welcome, Micah! All of the armorers Glen supplied the link to are "vetted" (tried and true) suppliers. Lots of sellers on ebay and such also sell armor kits, but many (if not most) of them are either not accurate enough to be 501st approved or require a LOT of work to get them to our standards. There are sellers that will build your armor for you, but that can be pretty pricey. Most of us build our own from kits, which is not as hard as you may think (especially with our help). This is not the least expensive hobby by any means, but well worth it. -
Imperial Attaché Outstanding Achievement Award Announcement
justjoseph63 replied to MaskedVengeance's topic in Announcements
A well deserved honor for both of you! Now that you will be on Staff in the new term, we will be expecting even MORE from you.. Thanks for all you do for us, my brothers. It doesn't go unnoticed or unappreciated! -
TK ANH Stunt by CloseTheBlastDoor
justjoseph63 replied to CloseTheBlastDoor's topic in ANH Build Threads
I wouldn't suggest Testors for painting the tube, Hanson. It would take quite a few bottles and it would probably leave ridges due to the viscosity. What I would suggest is to follow what Glen recommended and use gray primer (spray can) which will leave a smooth finish. I would also sand it down with some fine (500 or higher) sandpaper to take the shine off and give the paint better adhesion. Posting photos is pretty easy once you get the hang of it. I have a tutorial here which will help. Looking forward to following your progress!

