justjoseph63
-
Posts
12,745 -
Joined
-
Last visited
-
Days Won
326
Content Type
Profiles
Forums
Gallery
Articles
Everything posted by justjoseph63
-

TK 21020 ready for duty!
justjoseph63 replied to SpudsMcKenzie's topic in Newly Approved Members - Sound Off!
Great to have you here, McKenzie! -
ANH build: this is where the fun begins
justjoseph63 replied to LoudDragon's topic in ANH Build Threads
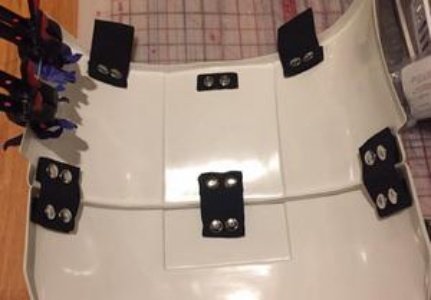
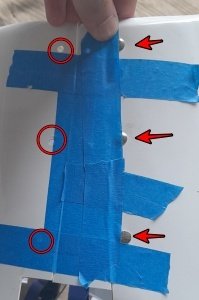
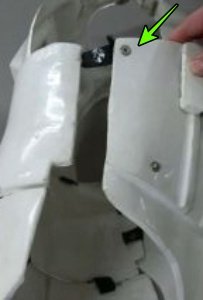
You may have addressed this already, James, but I noticed in an earlier photo that you had rivets/snaps on the right side of the the kidney and ab plate (1st pic). In the second one it looks as if you have replaced the snaps with rivets (red arrows) and removed the rivets on the kidney (red circles). Unfortunately there should be no rivets (or holes) on the right side of either piece. The ab plate should have one snap (the "Han" snap") on the top as seen by the green circle in the first photo and green arrow in the third one. I'm doubtful that your GML will allow the holes or rivets for Basic approval, but fixing them is not impossible by any means! The way to do this is to make up a small batch of ABS paste, just as Glen mentioned for your vocoder. You can put some blue tape on the front (outside) of the holes, fill them just enough to cover and then sand down any excess inside. Should take about 10-15 minutes! Screen used armor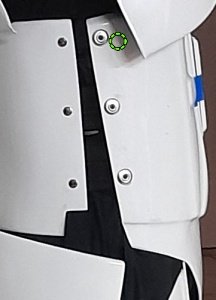
-
TK 17300 reporting in
justjoseph63 replied to SenseiFetter's topic in Newly Approved Members - Sound Off!
Welcome, Craig! No matter how many Troops you do, you never forget your first time stepping out in public wearing shiny white armor. I have a few tips that will help in my thread (link here) that will give you a heads-up on a few things to expect. Looking forward to seeing some pics! -
I couldn't tell from the first pics you posted, but those look spot-on, Z! Just remember when you get to the painting part not to carry the gray too high or too low, leaving a tiny space at the top and bottom (yellow arrows). Screen used examples
-
TK-25097Requesting ESB EIB Status RS Props
justjoseph63 replied to Daveybobs's topic in Request Expert Infantry Status
Good news- I can see that you are having issues, David, so I went ahead and loaded the pics for ya'. Bad news- You now owe me a pint of Boddy's.
-
No one here is going to break out a micrometer, Z, (well, not at this stage, LOL). Just kidding. The most important thing you can do during your build is to always ask for advice before cutting and include a few of those awesome photos. ABS can be forgiving in some cases, but once it's removed it's danged difficult to fix. Once you have the boxes sanded and fitted I would post up a pic. Side note: You are doing a GREAT job so far, sir! If I could ask a favor, can you post up a close-up of the teeth area on your face plate?
-
IG-41985 ANH Stunt TK Build Thread! (AM Armor)
justjoseph63 replied to Artooritoo's topic in ANH Build Threads
Exactly. Excellent advice! -
IG-41985 ANH Stunt TK Build Thread! (AM Armor)
justjoseph63 replied to Artooritoo's topic in ANH Build Threads
GREAT photos, David, and fantastic to see that your build is coming along so well! If I could make a small suggestion, it would be to round out the inside corner of the cutouts a bit The reason behind this is that any sharp angles can be a possible source for splits/cracks in the future. Just a few passes with a round needle file or some sandpaper wrapped around a nail in the corners should do the trick. -
Way to go, Ben! No matter how many troops you attend, you never forget your first. Looking forward to seeing you around the boards!
-
The rear of the front drop boxes should ideally be flat with no ridge, Daniel, as seen in the second pic below (green arrow). Looks like you did a great job on trimming, but you still have a bit more to go. What I would suggest is to use sandpaper (starting with a lower grit) laid on a flat surface and rub the bottom section until it it even and flat all the way around. The inner drop box (yellow arrow, second pic) should fit neatly into the outer one with little (or none) of it extending past the edge. By the way, if you are still in need of flexible hand guards I have those available (link here).. Keep those photos and questions rolling in!
-
Posting on Imgur is a breeze once you get the hang of it, Jonathan. One thing to keep in mind is that once you add the pics to your "Gallery" in Imgur, if you delete them from that site any time in the future they will disappear from your post(s) as well. There is basically an unlimited amount of storage there, and we advise keeping them so that any future troopers who have the same issues can reference them.
-
I have a build thread (link here) where I turned an ANH E-11 into an ESB, Terry. I have the greebs available** (except for the "swoosh" and small round "buttons" on the right side, which can be made from scrap ABS). The pan head and star screws to attach the left side greebs can be found at your local ACE hardware store. Shoot me a PM if interested. ** No charge, just cover postage.
-
TIP Request: Paint Options in Japan
justjoseph63 replied to unitaam's topic in Tutorials, Tips and HOWTOs
I really like your mini spray booth set up! One thing to think about when using spray paint is the temperature. I know it can get well above 90 degrees at this time of year in Japan, but the paint ideally is applied below 90 with a low to medium humidity level. Otherwise it can actually start to atomize before it hits your armor and cause a grainy texture. Also, avoid letting it dry (cure) in direct sunlight when the temps are high. Looking forward to seeing your results! -
Slow but sure wins the race! If I could make a small suggestion it would be to round off the edges of the cod tab as seen below. In some cases those squared off ends may cause a little discomfort (chafing) in the groin area after being in your armor for a bit.
-
Help Needed: 2MB Photo Limit for EIB Application
justjoseph63 replied to Daveybobs's topic in Request Expert Infantry Status
Looking forward to seeing your submission, David! -
ANH Stunt build (DDD) by TI/SL/IC 93339
justjoseph63 replied to Retroactive's topic in ANH Build Threads
Way to go, Dave! I'm following your thread and looking forward to seeing your progress, . Hopefully you have downloaded and familiarized yourself with imgur so you can start posting pics of your build, and get ready to begin asking questions! -
Welcome to the boards!
-
IG-41985 ANH Stunt TK Build Thread! (AM Armor)
justjoseph63 replied to Artooritoo's topic in ANH Build Threads
-
ANH Build (putting on and taking off the armor correctly)
justjoseph63 replied to TrooperMiles's topic in ANH Build Threads
Getting armor on by yourself can be a challenge, but when you are at a troop there will always be more than a few folks around that will be more than happy to help. Trust me. At every event I have ever attended I have needed some assistance, like putting on my thermal detonator, attaching the shoulder bells, etc. It gets easier over time, and you will probably be asked to help someone else (even Rebel types, lol) suit up as well. It's what we do as a community and there is absolutely no shame in asking for assistance. If you haven't attended your first troop yet, I have a thread here that will help. -
PM sent
-
Congrats on your armor order! I was out of the loop for a while and I'm not sure if Dueno Novo (formerly Anovos) is using the same exact canvas belt**, but the old belts were really flimsy and had 4 rivets (ANH Hero style) holding the holster on. If you are (hopefully) aiming for Centurion (wink wink) it will need to be replaced. It has no internal support and tends to sag quite badly. If you do need one, I suggest one of Rob's (Tkitell) link here. Heavy duty, approvable at all levels and will last basically forever, but you should wait to order it until you get your armor. The reason being is that they are made to order and the length is based on your waist wearing the armor. which will be quite different to your regular waist size. Looking forward to your build thread, and keep the questions coming! ** Hopefully someone can chime in who has ordered this kit in the last year or so.
-
Since Dave (AM) normally includes flexible hand guards with his kits**, just PM me and I will shoot you a set for free (just pay postage) as I am the one who makes/supplies them for him- link here to see them. ** He may have been out of them at the time you ordered, as I was out of commission for a while.
-
To answer your questions: - I see that it's 3d scanned from an original. Does this version eliminate the warts on the helmet? Only RS armor has those nifty bumps. - Are the straps and mounts that are included helpful or do I need to replace them? The strapping they include is all Velcro. I REALLY don't advise using it. Trust me. - Are the included instructions helpful? The pieces are numbered (VERY helpful) and you have US to help you after that! - I think I was told the belt will need upgrading? The belt they include is very flimsy, will sag and is not acceptable at Centurion level. I highly suggest an upgrade. We can help with that too! - Besides under armor suit, shoes (purchased), neck piece, electronics (fans, voice changer, hearing assistance) blaster and potentially belt... are there any additional pieces/expenses I should expect with this kit? (flexible hand armor). - Be aware that some members have experience a blue/black color bleeding onto their armor from the under suit that is included, at least on the older kits. You can get a nice set on Amazon for pretty cheap. Examples: Shirt (link here) Pants (link here). Note the lack of logos/markings (important). It helps a LOT to have your under suit on hand while fitting. The flexible hand guards are an option, but are required for Centurion level. There are a few options out there, but I sell them here. Keep the questions coming!
-
TIP Request: Paint Options in Japan
justjoseph63 replied to unitaam's topic in Tutorials, Tips and HOWTOs
Hi Andrew! The person I would suggest getting in touch with is Brian (Bulldog44), the FISD Imperial Attaché for Japan. A link to contact him via PM can be found here. If you haven't heard back in a few days, contact me via PM and I can email him for you. -
IG-41985 ANH Stunt TK Build Thread! (AM Armor)
justjoseph63 replied to Artooritoo's topic in ANH Build Threads
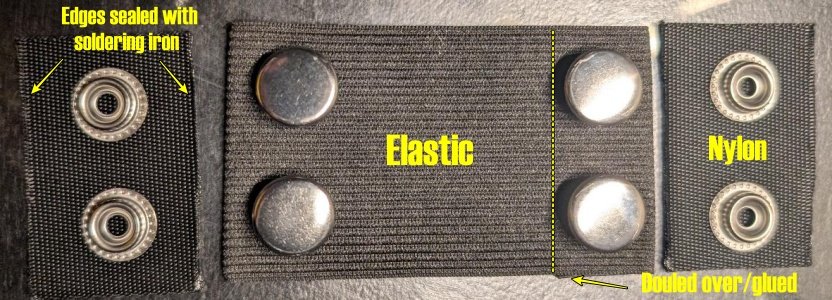
Great job so far, David! I am spending my morning today working on the strapping for my new build as well! When it comes to snapping systems, I have a suggestion. On my very first troop, the connections on both of my shoulder bell/shoulder bridges failed. I was using one snap on each of the bells and they came undone. After that, I changed all the connections to the double snap type and have used that method ever since with no issues. Many troopers successfully use one snap, but I like to be extra cautious. I blame it on my OCD. Yeah, it costs more for the extra snaps an takes more time, but well worth it IMO. I have a thread here which may help. Here is a pic of the way I personally do it. These snaps are not set yet, (burning holes in the nylon/elastic stinks so I can't do that part inside) but it should give you the idea. The second photo shows a good example of the finished product. Here is a pic showing my shoulder bell to shoulder bridge set up. I have 2 inside the bell as well, May be overkill, but that's just me... SUPER nice job on those return edges!