


Sly11
-
Posts
12,418 -
Joined
-
Last visited
-
Days Won
255
Content Type
Profiles
Forums
Gallery
Articles
Media Demo
Posts posted by Sly11
-
-
Hey Lucho, like ukswrath said, please let us know if we can help.

Sent from my iPad using Tapatalk
-
11 on left,12 on right, also the longest edge is the elbow edge (bottom) otherwise if you have it at the top it is harder to bend your arm
Sent from my iPad using Tapatalk
-
Oh yes it is, totally worth it. Have a look at the Expert infantry and Centurion higher levels of accuracy. If you start your build with those in mind, it is a lot easier to attain, rather than having to pull things apart and mod at a later date.
Good luck and enjoy the TK journey.
Sent from my iPad using Tapatalk
-
It's ABS paste, a mixture of off cuts of ABS and dropped into a jar of acetone. The smaller the bits the quicker it melts and becomes a goop.
Don't use too much acetone as it melts abs, you don't want it to melt your armour, but as you can see from the above images, it comes up a treat .
Sent from my iPad using Tapatalk
-
Hi Ashley, welcome to the FISD.
Good Ro see you are well underway on your journey into hard armour, I know you will miss the ability to sit down in costume
 .
.Plenty of support and an abundance of information here, so have fun.
Sent from my iPad using Tapatalk
-
G'day and welcome to the FISD.
Sent from my iPad using Tapatalk
-
About time you showed up here Scotty

Sent from my iPad using Tapatalk
-
 1
1
-
-
G'day, Steve, welcome aboard.
Sent from my iPad using Tapatalk
-
Can't wait to review the new APv2 armor for EIB and Centurion.
Well done Mark for these very welcome additions to an already great kit.
Sent from my iPad using Tapatalk
-
Well deserved mate

Sent from my iPad using Tapatalk
-
Wow, you move fast Richard good work.
Tony and I will review your application shortly, Thanks for your patience.
-
Hi Justin, welcome back to your EIB review, and thank you for applying, now it really is time to get stuck into it.
CRL and EIB Application Requirements:All the required photos have been posted. Your armor contains all the necessary elements to qualify for EIB. With that, I would like to congratulate and welcome you to Expert Infantry.
Thank you for posting the pictures as suggested by your fellow troopers.
Armor Fit/Assembly:
This section is reserved for the observations of Ukswrath, myself and your fellow troopers. Suggestions to change certain things may also come up. If any of these changes would be required, they will be noted in the Centurion section below.
You have certainly shown us a beautiful build, great work, you should be proud. There are only a few of minor things that need a tweak to get you looking the best you can be. We noticed that your belt looked to be loose causing it to sit a bit low in the front and possibly causing the side of your Ab and kidney plates to slip vertically out of alignment, but when you posted the missing arm up images, it appears to be fine.The ammo belt canvas looks a little long for you, if it could be trimmed down in length, that would just tidy up the look from the back. (not a deal breaker)
We have a question regarding your shoulder bridge attachment to the chest plate. They appear to be Velcro-ed down, or are spaced up off the chest plate, if they are glued, the sections that are not touching will need to be glued down as Darth Aloha has suggested.
Centurion Suggestions:
It is quite obvious in the detail and quality of your build that Centurion is the goal.
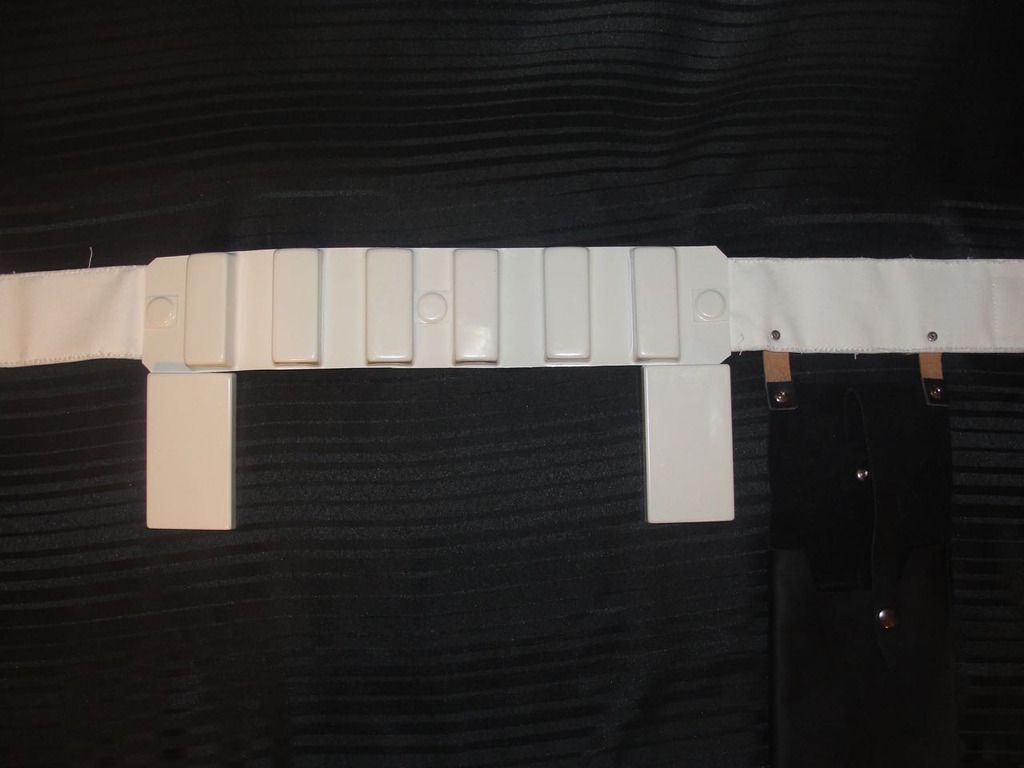
Make sure your drop boxes are aligned at the end of your ammo belt, currently they sit in from the ends, if they move around it might pay to add some Velcro between their straps and the canvas belt to prevent this.Correct Drop box alignment for centurion level
Shoulder Bridges to chest attachment:
Finish gluing the shoulder bridges to the chest. This is a tricky one to determine as we are not sure currently how you have them attached. They should be sitting flat and not raised as they are, I have every confidence that you can fixed this easily.
Thermal Detonator:
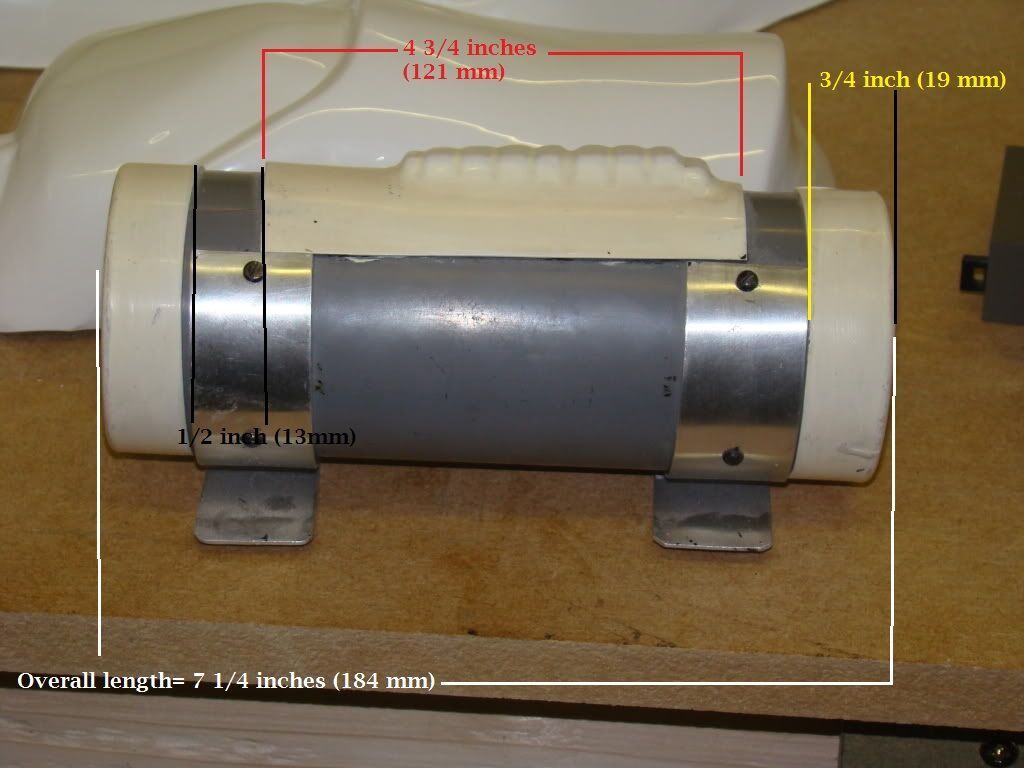
It does appear that some measurements on your Thermal det may be out, changing the overall proportions. I have provided the image below as a guide for you to check against,
Things of note: End caps should be approximately 19mm wide and overall length of Det, approx 184mm.
Once you modify the end caps you will need to reposition the belt clips, so they are almost, if not touching the end caps again.
Paint detail on ears:
First off, great job on the painted details of your helmet. I would recommend that you thin out the black outline on the ears though, as it is quite thick compared to the other outlines on the traps and tears. This will be a nice touch up on an already beautiful set of armor.

Excess paint can be removed with a toothpick dipped in turpentine, and scrapped toward the painted area. Handy tip for cleaning up paint bleed as well.
I must compliment you on a very well constructed armor, attend to the above suggestions and I see a Centurion in the near future.
Once again, Congratulations.
-
Hi Justin Please post a photo of your helmet so we can see the green lens clearly, maybe shine a torch behind them as many do
Thank you.
-
Hi Stuart and thank you for your application to Expert infantry.
You are the first RotJ application to be review by the new DO team, nice milestone. Secondly I think you are also the first member of the Redback Garrison to apply for the RotJ EIB badge, congrats on coming this far, it was an absolute privileged to be able to review your application.
Time to get on with it.
CRL and EIB Application Requirements:
All required photos have been supplied and your armor meets all the requirements as per the EIB CRL.
With that I would like to congratulate and award you the EIB badge, well done.
Other-Armor Fit/Assembly:
In this section we will go over observations from your fellow troopers and ourselves. If these observations should lead to suggestions for corrections or adjustments, they will pointed out, if those adjustment would affect an application and be required to change.
Man your armour looks fantastic, Mark from CFO should be proud of you. There are only a couple of very minor adjustment you could make to the overall look, but these will not have a bearing on your approval.
I'm not sure if your forearms are attached to the Biceps, but your right one sits a bit lower than the left. Easy adjustment.
Your shoulder bell top straps could be shortened just a tad, so the top of the Bells virtually touches the shoulder bridges.
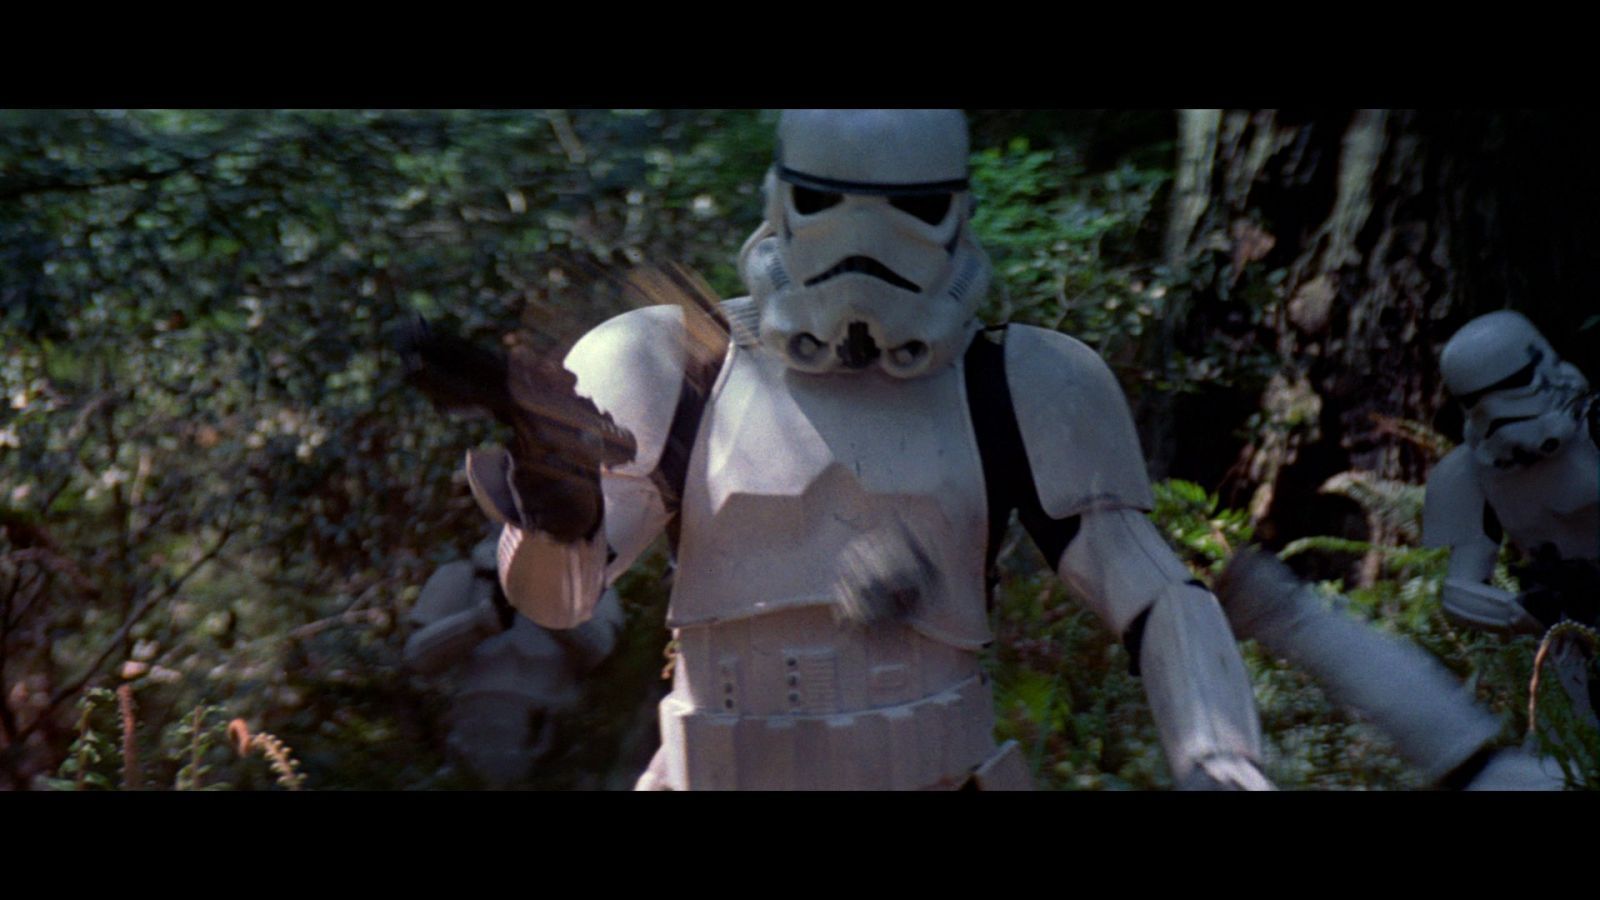
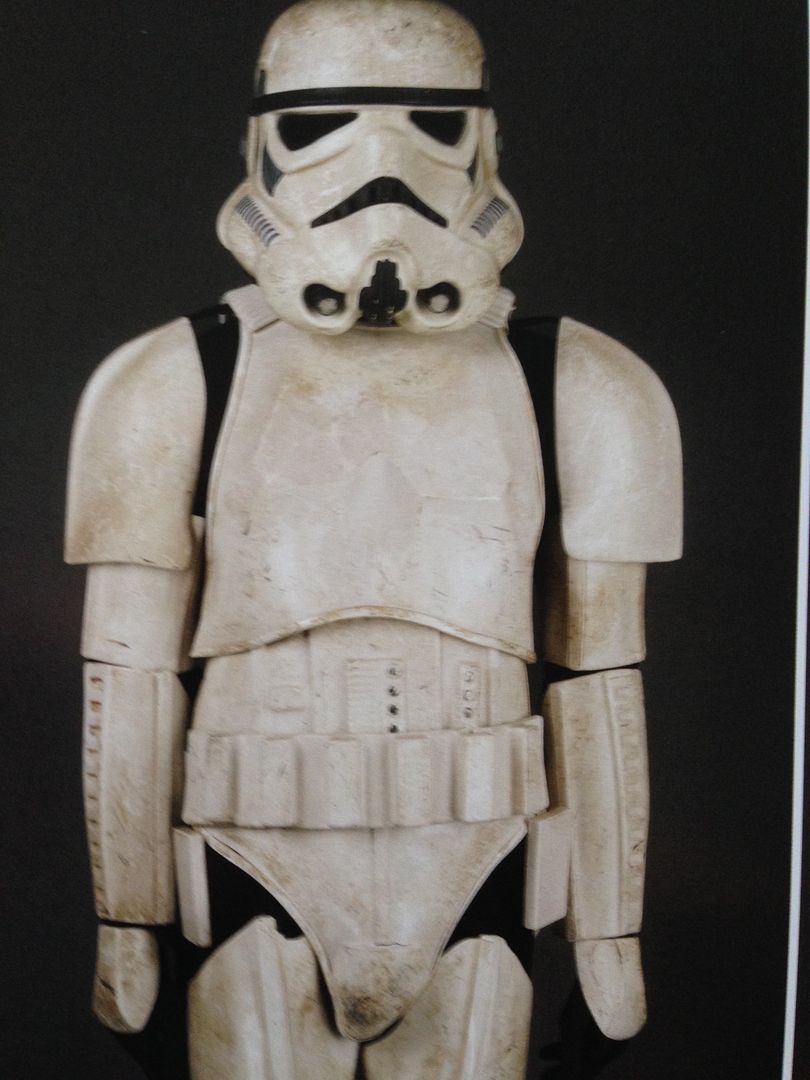
Ammo Belt: Looks like it may have slipped down during your photos, but it currently is sitting quite low. As the ammo and nylon belt proper are attached to the Ab plate on RotJ armour I believe they are pivoting downwards from those two rivet attachment points. This could be fixed with some Velcro in the center between the Ab plate and the belt proper itself, and possible wearing the belt a little lower and tighter at the back.
Your current belt position

As in this screen grab, and photo from the Lucas archives where it should sit.
It is very obvious that you have built this armour with Centurion ambition from the outset, as we can
see from the various additions and extra photos.
One other suggestion, perhaps just tidy up the top and bottom edges of the button plate on your Thermal det, they still have a small raised lip generally caused when trimming using the score and snap method. Take your Stanley knife (box cutter) and run it across the edge down the length, this will remove a very small amount and take that lip off.
Centurion Suggestions:
I am really struggling here to find something missing or not quite right. We haven't had many RotJ applications in the past either, hence the reason maybe not many of your fellow troopers have chimed in with suggestions.
Make those minor adjustment mentioned above, check the CRL and photo guide to make sure you have everything correct, and we shall see your Centurion application in the very near future.
Get out there and make the Redback Garrison proud.
-
G'day Richard and thank you for your EIB application, lets not delay this and get into it.
CRL and EIB Application Requirements:
Only one photo missing, a close up of your Ab detail, (this will not delay the approval process as we can see the ab details in your full front on picture).
Thank you for adding the D ring image as mentioned by Germain, and the internal strapping photos.
For reference, I use the Expert Infantry and Centurion Photo checklists
http://www.whitearmo...-requirements/ With that said, we would like to award you the Expert Infantry badge, congratulations, well done.

Armor Fit/Assembly:
In this section we will discuss observations made by your fellow troopers as well as any we make. Sometimes changes and or adjustments are suggested. These are made so you can look your best. If any of these changes could affect a future application, we will discuss that separately in the Centurion section below.
Fabulous build mate, you wear it very well. Your attention to detail is evident, from the outstanding quality paint job on the helmet, to the overall proportions/fit and tidy cover strips.
If there was anything we could find, it would perhaps be only a few very simple modification.
Re position the button plate on your Thermal Det, moving it down to meet the top of the belt clips, as in this photo.

Shorten the elastic between your forearm and bicep so as to decrease the gap between the two, make sure your shoulder bells are as close to touching the bridges as they can be, but I think you are already intending to work on these.
Only minor modification, which will add to the accuracy of your quality build, and to look your very best.
Centurion Suggestions:
We try to catch everything that can help you to meet the ultimate goal of Centurion, but to be honest there are only a few suggestions. Well done.
Close the small 1/2" gap between Ab and Kidney plate, although it may have only opened when you raised your arms for the photo. Shortening the internal strapping in this area will close it up easily.
There are a couple of reasons we like to see internal strapping photos in EIB applications. They allow us to make better informed suggestions on any mods that may be required for Centurion, like closing a gap between AB and kidney plates, or the positioning of the six side rivets if they have already been installed.
Last of all, make sure, all the required photos are in your application.
http://www.whitearmo...oto-checklist/ Notice that the D ring is not listed on this but is required.If you have any question, please don't hesitate to send Tony or myself a PM
Congratulation once more on a very clean, build and welcome to EIB rank
We most certainly are looking forward to reviewing a Centurion application when you are ready.
-
1
-
-
Hi Richard, quick heads up.......internal strapping photo missing from your application
-
Hi Curanthir they do look a little long, and wide . The width is the easy part to fix as there is no return edge to worry about.
First work out how much you want to bring them closer to your chest and shoulder bridge. Once you have that measurement (1/4", 1/2" ) what ever it might be you then need to mark a trim line evenly around the bell. This is easy. Grab a pencil and some coins and make a stack that takes the point of the lead at the desired height (the amount you have decided to trim off)
Place the bell on a flat surface hold your pencil on top of the coin stack.
The idea is to keep the pencil in one spot and carefully slide the bell around the pencil leaving a perfectly level trim line right the way around the base of the bell. Trim this off with either a box cutter using the same method and lightly scoring as you would if making cover strips using the score and snap technique, then sand the edge lightly to smooth off.
The trickier part.
The bottom of the bells which have the return edge are probably angled so if you trim this off you will need to make a new return edge as well as following the contour of the bottom to keep the angle.
There is a thread on making return edges here on FISD, if I have some time I will try and find it and post the link for you.
Hope this makes some sense for you.
Sent from my iPad using Tapatalk
-
Hi Richard, Ukswrath and I are currently reviewing application and will get to yours shortly. Thank you for your patience.
-
Hi Justin, welcome to your EIB review, and thank you for applying, time to get stuck into it.
CRL and EIB Application Requirements:
Unfortunately there are still a picture missing which is required to complete the approval process.
Both left and right side detail arms raised, and a photo that shows your green lenses. Thank you for posting the pictures as suggested by your fellow troopers.
All other submission photos are present. you are only a few photos away from your EIB badge.
-
Hi Stu, Ukswrath and I will review you application shortly.
Cheers
-
1
-
-
Sorry guys, it was a rookie mistake, if you like.
I will clarify and also amend my comment in Terry's app.
A blaster is not required in Basic approval only.
EIB and Centurion have not changed, you need a blaster that meets the requirements of the CRL in both levels.
Hope this clears things up

Sent from my iPad using Tapatalk
-
Thank you Mark for adding those additional photos, I have updated your application, congratulations you are now Centurion approved.
-
1
-
-
First of all, thank you Mark for your Centurion application and making the mods that Gazmosis suggested in your EIB application. Let's go straight into it.
CRL and Centurion Application Requirement:
There's a few photos missing from your application we'd like to see, a close up of the Hovi mic tips, a clear shot of the D ring on your blaster, and the opposite side of your Thermal Det however, we can clearly see the Hovis and D ring are in place and appear to be correct. Though lacking these two image won't effect the application please post them when you have time.
Before moving forward we will need to see a close up of the other side of your Thermal Det to verify components like the control panel and screw detail, as well as verify position of the clips in relation to the end caps as seen in the reference pic below.
Get this picture in and all being correct, the centurion badge will be yours.
Thank you Mark for adding those extra pic's, with that, I would like to congratulate you, welcome to Centurion rank.
Continue to do your garrison proud.
The only thing I could mention on the Thermal det is that the button plate should be positioned to sit closer, to almost touching the belt clips as in the below image, an easy mod purerly from a cosmetic accuracy point.

As for your armor, Wow, you have done a great job.
Other-Armor Fit/Assembly:
In this section we'll cover observations made by both myself, ukswrath and fellow troopers. Things that can help you look your best. Gaz had you update a few areas in your EIB app and you have masterfully attended to all of them. The only things we could find, and this is just us being picky
would be tidying up the black boarder around the Traps on your helmet. they are a little thick, as mentioned by Chilis. This can be accomplished by carefully applying more of the grey paint around the inside edge. You are one up on me personally, as I took the easy way out and used the Dave M decals, so congrats for taking on the hand painted route. As for the ab button color concern mentioned we found them to be correct. And finally we recommend you rein in the back to kidney gap a bit when convenient. We think the gap is a bit excessive and updating it will give your armor a cleaner look. Excellent Job!I see you mentioned in your comment, that you had your submission pictures taken after two hours of being shot at! well you survived, congratulations always a good day when a trooper doesn't go down.
-
Looks like you are enjoying the challenge, we all learn by mistakes, hell I know I have in the past. Looking good by the way.
Sent from my iPad using Tapatalk


Leaving the sandbox
in New Member Introductions Archive
Posted
Welcome Chana.
Sent from my iPad using Tapatalk