


Ales
-
Posts
136 -
Joined
-
Last visited
Content Type
Profiles
Forums
Gallery
Articles
Media Demo
Posts posted by Ales
-
-
Ого! даже не заметил такое обновление на форуме - руÑÑкоÑÐ·Ñ‹Ñ‡Ð½Ð°Ñ Ð²ÐµÑ‚ÐºÐ°! КлаÑÑно, надеюÑÑŒ тут будут поÑвлÑÑ‚ÑŒÑÑ Ð½Ð°ÑˆÐ¸

-
Sorry for late response David. This forum don't send the notices to e-mail by my posts.
I wait shortly after painting and then SLOWLY remove the decal using the tweezers.
-
Good progress Ron!
I see your work and understand now that no stencils required actually to paint the helmet. The brush #0 and original pictures are the best friends for that moments.
-
Hi Gleb, nice to see countryman here. And also nice to hear that Russian legion is alive. Unfortunately I didn't contact closely to Alyona V. But I hope will do soon.
-
You really wont need any extra air though the mic tips, you get plenty around the base of the neck, a couple of squirrel fans will help to stop fogging and allow air circulation

Absolutely agree with Glen.
Also there will be less the ventilation but more the hole for the sound when you talk. I think you anyway will need the I-comm or romfx voice changer for trooping, so your actual voice will be heard through that holes. The frown and fans are enough for ventilation for my opinion.
-
What did you use to mount the fan inside the helmet ?
Sent from my iPhone using Tapatalk
Fan bracket just fit good inside the helmet, so it's don't need to make any special mount. If you are talking about the fans itself - I used the silicon bolts, that use in computer fans mounts (see one of above images)
-
... But look at the second picture -- are the bottoms supposed to match up like that? Do I trim any of that first??
I don't I've ever seen how the bottom matches up on any build thread.

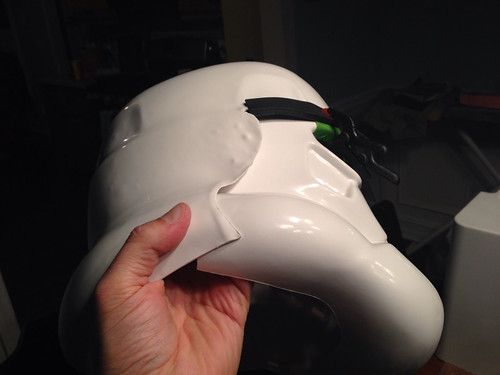
Don't worry about that. I've met the same position when fit the face and back. Just follow the brow position and right/left trapezoid to the ears position. The thing is that the ears will cover this point. When you will jont the face, back and ears with screws so then go to bottom trimming. It could be easily aligned "in-line" by dremel or rough sandpaper and then hided by rubber trim. Just do not touch it before you screw the face, back and ears.
-
I had such item.
I want to say that this is much worse than radio shack voice changer kit.
A lot of sound feedback and as a result uncomfortable in use. The only good thing is a loud sound.
Dismantled for spare parts.
-
There is no Jar Jar Binks hand signature! That is why this is not a million roubles sale (in my country currency)
And... thanks to the seller for every page pictures, it's greatly save my money to read this book
-
Is there anybody who makes the car plastic stickers for car?
It would be great to have such logo on my car back window.

-
The longer I shelve building of armor, the stricter requirements to the armor.
-
the box is the best part keep that!
Yes sir! roger that

-
That's not a problem for me about the money. Let it be on my shelf.
Actually I didn't see the perfection of neither doopydoo, nor sci-fire, nor even hyperfirm blasters. The only thing I laid my eyes was the DVH kit. But there is no time for building this.
The one hope (no... - a new hope
) is that Vern will start producing his very promising blaster kit, which I think I'll try to bought. -
I used humbrol paint and wait about 10 hours between layers.
-
Nice package , but the overall details are a bad joke as well as this cheap hengstler sticker which get called " serial number".
May i can ask what you paid for it?
Hope not more as 150 USD.
Not a secret - 194,98 GBP (with stand) plus 25 GBP shipping.
See the site http://www.originalstormtrooper.com/e11-blaster-collector-edition-167-p.asp
-
Yes, when viewed from a distance of 2-3 meters it looks well, but the detailing... Also forgot to say that the cocking lever is absent. How to recharge?
-
Hello troopers! Just want to make a topic with AA's E-11 blaster product overview, as I didn't find a lot information about this blaster in the internet. Recently I've ordered this item to see how much is this "authentic replica" in reality. And to see how much changes need to make it closer to our requirements. Also this should help to anyone who want purchase this blaster. So see the detailed photo of this blaster and make comments please.
Blaster arrive in good shock resistant box (which was packed in additional cartoon) with hard foam liner:


So don't worry about postage safety.
The stand is three pieces construction. The unique serial number is just printed on small self-glue paper and sticked to place (also with the hengstler counter). But may be this is good for me to remove it and place my future TK number


Some parts are plastic, some composite... and some feels like.. wood may be.

The hole for the attaching to stand:

The vent holes and front details:


Hengstler counter

Rear serrated detail (with one imperfection):

Back cap without D-ring:

Back side:

Fake spring (vacuformed plastic):

Strange hole:

Telescope:

T-tracks are cool:

Front details (right-side):

Trigger:

Front:

Interesting that front sight is made from rivet:


Power unit:


Hengstler details:

Inner barrel:

Patent casting:

Foldable stock:

Pistol grip:

Back latch:

-
I'm leaving in Russia Far East (near the Japan), so I sure my parcel goes around the world before I got it. And it takes 100$ for the kit with delivery. But I never regret for this. Just take it!
-
I started to test battery life for my setup, and the fans run of nine consecutive hours and still not over. But I see that the last hour the rpm decreased a little, so will end soon, may be 1-2 hours else.
-
is the cylinder purchest sepretly?
Yes, ATA comes without pipe piece. You need to find PVC (or other material) pipe with 60mm outer diameter.
-
Don't waste your money on it.
Absolutely agree! For this price I got the full ATA kit (if not to take into account the long waiting list).
-
The armor details are not clearly seen on this picture. But the helmet need to repaint at least. CRL says (for basic approval):
"Frown is painted gray and does not leave the teeth area. Six total teeth on the frown are cut out and the frown is tapered at the ends."
The butt plate should be separate from kidney plate.
See HERE more requirements if you want have hero ANH derive costume.
-
Very nice! You'll have to let me know what the battery life is on the 6 AAA's as well as if the air flow is good for the 15mm wide fans. I tried some of those but was afraid it wouldn't be enough for most people so I stuck with the 20mm wide ones.
No problem, will test. The air flow is very well and enough for me. And there is no "sand in eyes" effect when blowing upwards onto the lense. Even if both working.
-
I've got the Echoworks fan bracket system few days ago. Some little tweaks. Replacing the fans (which I will use in my other project
) with the ultra quiet nidec gamma26 fans, it's required 6 X 1.5V batteries, so I replace also the battery racks:


Replacing bolts (that gives the vibration from the fan to the helmet plastic) with the fan "silicon bolts":

And I have quiet fans, hidden battery racks and perfect view of the helmet interior with Echo's brackets:


�ова� ветка форума
in Русскоязычный форум
Posted
Видимо переносили со старого формата. А русский язык не подхватился.