Obey Wann
-
Posts
148 -
Joined
-
Last visited
Content Type
Profiles
Forums
Gallery
Articles
Media Demo
Everything posted by Obey Wann
-
OW's NE build: ANH Stunt
Obey Wann replied to Obey Wann's topic in Build Threads Requireing Maintenance
Thanks to ScottM, we made a ton of progress on the TK last night. We worked until 9, and I wasn't able to get pics... (too busy working.) I'll try to get pics tonight of it all together while it is still light out. Thighs and calf armor are glued, trimmed and fitted. I *should* be able to walk up and down stairs now. We fitted the boxes onto both legs and the knee plate, so they are 98% done. Just need to add straps to keep the thighs from wandering and straps to keep the calf armor from moving up from the boots. I had to remove most of the return on the upper thigh so it would fit. I removed some of the return on the upper calf armor so it would fit, but did not have to trim anything on the back. It barely fit my calves as it was, but we made it work. Scott did a bit of heat gun work to get them to bend right for my calves. We tweaked my belt and have it almost done. I need to add some plastic and a snap to the ab section to hold the belt in place, and it should be finished. Once again, thanks for the reminder on E-6000 --I had to pop off the center button cover yet again. Mental note to others: Don't put the rivet covers on until much later in the build. We did use CA glue on the calf fronts and on the back of the thighs... they will take a lot of stress, especially the clamshelled calf armor. The E-6000 was popping off when I was fitting the calf armor. Main things left: Do touch-ups on all painting accomplished so far to helmet and ab buttons. Fit and attach ab button strips. Add straps to the chest / ab to keep them from separating. Add black pin stripe around the ear rank paint. Fit and finish assembling the forearms, add velcro so they can clamshell together. Trim shoulder bells and add snap plates to shoulder bells. Add strapping to shoulder bells and biceps. Tweak one part of the bucket plastic near the left ear/tube. Add decals to the helmet. (Scott's decals should fit this bucket) Finish painting the interior of the aerators and attach them to helmet. Add lenses and either hard hat liner or padding to helmet. Final fit and trim so I can walk up and down stairs and put my bucket on and off. It might sound like a lot, but most of these are relatively easy things that I can do from home, without power tools between now and the weekend. One more solid build day on Monday and it'll be done!!! -
Fantastic! And that stand is most impressive.
-
OW's NE build: ANH Stunt
Obey Wann replied to Obey Wann's topic in Build Threads Requireing Maintenance
Thanks! It looks like we're getting together tomorrow night, so I need to get those legs gluing when I get home tonight. I did some research today on painting the bucket... I'll do that this weekend if I don't hear from them about the decals. -
OW's NE build: ANH Stunt
Obey Wann replied to Obey Wann's topic in Build Threads Requireing Maintenance
Thanks! -
Looking good!!!
-
OW's NE build: ANH Stunt
Obey Wann replied to Obey Wann's topic in Build Threads Requireing Maintenance
Thanks, you're right --I had to change those yesterday. I was able to work on it all weekend, made tons of progress. We worked until almost 10 last night, and I didn't get good pics at the end of the night, but here's what I have: An early op-test of the front: And the back: After I took this, I cleaned up the back plate and lengthened the gap between the butt, kidney and back plates. It looks much better now. Through the copious use of white shoe polish and spray paint, I got the elastic white. Mandatory shot of glueing cover strips on forearms. I have since had to remove them for trimming and fitting. I was trying to be efficient, but thank God for E-6000!!! Thanks for turning me on to the stuff!!! Another test fit: Per ScottM's recommendation, I am going to use black nylon strapping to hold the chest and ab together. He said that elastic will stretch too much, and potentially leave a gap betweent eh chest and ab. So I'll be gluing those tonight. On Saturday, I was visted by two new folks who were working on their TX's (and a TK). It's kinda fun doing an armor party in a campground. Granted, our tools were limited, but we all made progress, and we enjoyed the beautiful colorado weather. The sun was shining and it was a fantastic day. Then on Sunday, we had a squad armor party at ScottM's place. ScottM helped out with the bucket build. I couldn't have done it without his help. Sorry for the crappy late night cel phone pic, but I was happy to have finished my belt build. I was foolish and glued on the cover squares first, before riveting the plastic belt to the canvas one, so once again, E-6000 saved my bacon. Other progress: Painted the frown and ear cap rank grey. Painted my dots on the ab. Assembled and trimmed the biceps. Made my snaps for the chest to back and to shoulder bells. (just have to add my snap plates to the bells.) Trimmed and re-hung the back armor parts. Trimmed the thighs and calf armor so I can start gluing the front of them. Painted the aerators black. (Need to paint part of the inside white, and install, then add aerator screen.) I added some JB weld behind the aerators on the inside. It was really, really thin. This will give the aerator screw more to hold onto. All in all, it was a very productive weekend. Question: Should I trim down the shoulder bells? To-do's before the next get together: Do touch-ups on all painting accomplished so far. Add straps to the chest/ab Glue the fronts of the thighs and calf armor Add black pin stripe around the ear rank paint. Pray the decals arrive soon. Fit and finish assembling the forearms If needed, trim shoulder bells and add snap plates to shoulder bells. Add strapping to shoulder bells and biceps Tweak one part of the bucket plastic near the left ear/tube We are going to try and get together on Monday (Memorial Day), possibly sooner. I'm trying to get this done in time for Denver Comic Con on May 31. -
OW's NE build: ANH Stunt
Obey Wann replied to Obey Wann's topic in Build Threads Requireing Maintenance
Thanks. I also just got this advice from a garrison mate: I'll give that a try tonight. The foral paint just gets sucked up like the elastic is a sponge. -
white paint for boots - anyone try it?
Obey Wann replied to TK5144's topic in Boots, Soft Parts, and other Accessories
That sucks. Did you use the white dye first? I used almost a whole bottle of white dye on mine, then have been using the spray after. What is killing me is spray painting the elastic white. This is about half a can of Design Master: --------- -
OW's NE build: ANH Stunt
Obey Wann replied to Obey Wann's topic in Build Threads Requireing Maintenance
I've been painting the black elastic on my boots, using Design Master floral fabric paints, the same stuff I use on my Endor Rebel Trooper... the elastic is just sucking up the white and not showing it much. Is this white enough, or do I need to keep going? From the looks of it, some of their boots were pretty rough: -
I usually host pics on Picaa, flickr or facebook, then post the link to the /jpg using the tags. Good luck, can't wait to see your progress. I'll be working on mine like mad this weekend.
-
What decals for the NE armor
Obey Wann replied to olpc1701's topic in Hard Armor (General Discussion)
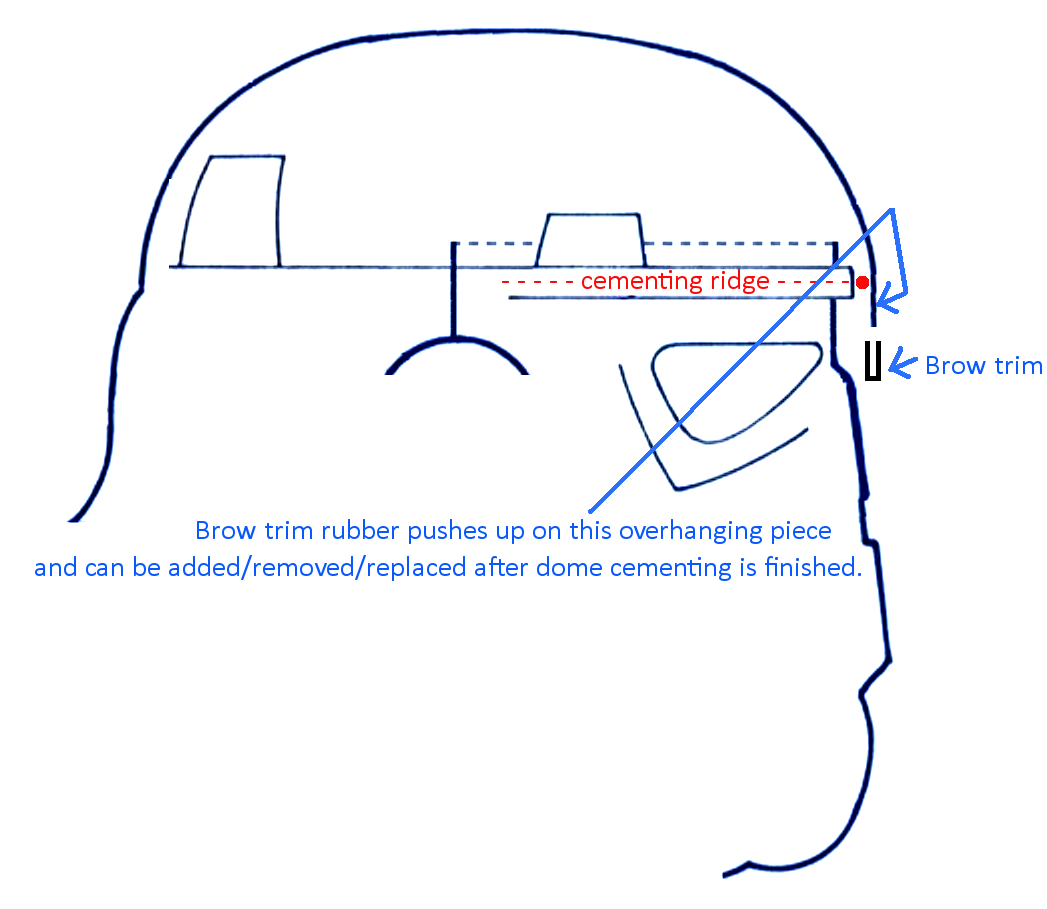
Here is the email I got on May 1: I also got this description of what all the straps are for: ------------- I also got this pic showing helmet construction (see attached.) I hope this helps.
-
What decals for the NE armor
Obey Wann replied to olpc1701's topic in Hard Armor (General Discussion)
What Ian said: They emailed us saying that they are making decals and will ship them when they are ready. No ETA, but probably within a month or so. -
Truth. I have to do that soon, and I am kinda dreading it. Do you cut on a forearm box line? Or does it matter as long as it fits properly?
-
OW's NE build: ANH Stunt
Obey Wann replied to Obey Wann's topic in Build Threads Requireing Maintenance
I made some progress today. First, the easy bit: I attached the straps for the hand plates and straps for the belt boxes. (It rained a bit while I was working outside tonight) I made trim lines for the shoulder straps. I'll go to a friend's shop tomorrow and probably trim these down on the belt sander. Attached the butt and kidney armor using the straps that came with the kit: Trimmed up the forearms a bit. Mainly, I trimmed the return edge on the wrist end. The line in green is about where my wrist is when I have my elbow bent. Trimmed the return edge on the top of the biceps. And I put the final coat of spray on the boots: And I glued the TD plate on and added snaps for an elastic strap to hold the end caps on. Do most people trim their forearms before or after they glue them together? Which end of the bicep do I trim off? Top or bottom? They are a bit long and will definitely pinch. We have an armor party tomorrow, I hope to make a lot of progress. -
OW's NE build: ANH Stunt
Obey Wann replied to Obey Wann's topic in Build Threads Requireing Maintenance
I made some progress today. First, the easy bit: I attached the straps for the hand plates and straps for the belt boxes. (It rained a bit while I was working outside tonight) I made trim lines for the shoulder straps. I'll go to a friend's shop tomorrow and probably trim these down on the belt sander. Attached the butt and kidney armor using the straps that came with the kit: Trimmed up the forearms a bit. Mainly, I trimmed the return edge on the wrist end. The line in green is about where my wrist is when I have my elbow bent. Trimmed the return edge on the top of the biceps. Do most people trim their forearms before or after they glue them together? Which end of the bicep do I trim off? Top or bottom? They are a bit long and will definitely pinch. We have an armor party tomorrow, I hope to make a lot of progress. -
Let the fun begin!!!
-
Thanks, brother.
-
OW's NE build: ANH Stunt
Obey Wann replied to Obey Wann's topic in Build Threads Requireing Maintenance
I haven't made any progress on building in the last couple of days, but I did pick up this uber tote at the Container Store: And I got this strap guide from TupperwareTK. I figured there was a plan for all of the straps, and here it is: I am considering adding snaps to them as well, for double security. We'll see. I don't want to waste the work they put into the system, but local feedback, is telling me that snaps > velcro. I am also considering using the webbing for the connections like what Redforce is doing. I have some extra webbing since they included the straps with the kit... might as well use it. I'll be doing a lot of work this weekend.... can't wait to make progress. What do folks usually start with for TKs? Biceps and forearms? With clones, I usually started with the ab section, but that's because it all had to be seamless. -
What glue are you using for the webbing?
-
Looking good!
-
Nice work!
-
Slave1138 NE Build W.I.P.
Obey Wann replied to Slave1138's topic in Build Threads Requireing Maintenance
Very cool tip there, thanks! -
IN-6960 requesting access. http://www.501st.com/members/displaymemberdetails.php?userID=7762
-
OW's NE build: ANH Stunt
Obey Wann replied to Obey Wann's topic in Build Threads Requireing Maintenance
Chris, NE is tupperwareTK. I'm a TK N00b, so I can't identify Troopergear. When I was doing my research, local TK experts recommended this kit for me. I'm still new enough to the TK world that I can't identify the particular makers. I know (or knew) clones a lot more. This TK world is still completely new to me. Christopher: I am 5'8", and about 235pounds. 48" chest, and a 40" waist. (I gained too much weight post-Navy to fit well into the skinny-guy kits... the joys of a desk job, school etc.... :-/ ) I have not tried it on yet, beyond a quick test fit of the chest during the initial unpack and inventory, but the chest felt like it was proportional to my frame. We're having an armor party this Saturday, so I should make some good progress and I'll get some pics for you. I think it's tough to get a feel for how a kit looks unless you are wearing underarmor, so I really can't say for sure. -
First TK Build - ANH Hero
Obey Wann replied to McDNet's topic in Build Threads Requireing Maintenance
Excellent!