gmrhodes13
-
Posts
31,199 -
Joined
-
Last visited
-
Days Won
1,068
Content Type
Profiles
Forums
Gallery
Articles
Everything posted by gmrhodes13
-

FOTK WIP
gmrhodes13 replied to TK32945 Waynocerous's topic in TK Pre-Approval Questions & Discussion
Looking good so far -
You could send a request to our DL Chris @themaninthesuitcase to manually update him but it's normally updated before each election cycle. Members must sign into to the forums at least once every year to remain "active"
-
WTF First Time build. Need some feed back, thanks in advanced !
gmrhodes13 replied to Woody's topic in ANH Build Threads
If you are interested in a read there are a few threads on sizing and larger cover strips -
WTF First Time build. Need some feed back, thanks in advanced !
gmrhodes13 replied to Woody's topic in ANH Build Threads
Normally if required we add bigger cover strips on the rear as the public don't see our backs that much, as long as they aren't HUGE, if they are too big it's better splitting the sizing over front and back. I would fill the ridge area rather than using 15 mm on the rear if your ridges are wider. Align the bottoms of pieces as you can trim the tops to suit. -
WTF First Time build. Need some feed back, thanks in advanced !
gmrhodes13 replied to Woody's topic in ANH Build Threads
Correct 15mm front and back, same on biceps. Also ridge should be same front and back, unless you need to leave more material for larger sizing, you would also use a larger cover strip on the rear if sized bigger. I normally trim standard size on front pieces and size the back to what is needed, most would use standard 15mm sizing front and back. Thighs 20mm front and back (unless you need bigger sizing) Shins 20mm front and 25mm back to allow for velcro or hook elastic. -
TK-10866 Requesting ANH HERO EIB Status [RS Props]
gmrhodes13 replied to TK10866's topic in Request Expert Infantry Status
Looks like you are needing a few other photos, have a read of this checklist Also -
Any market for an Anthony Forrest RS Props Sandtrooper helmet?
gmrhodes13 replied to TreeHead's topic in eBay Armor
You could post it in our sales area (you need to have at least 5 forum posts) Also on MEPD home of everything Sandtrooper https://forum.mepd.net/ Ebay would probably be the best bet. As to price RS Props had one up for sale on Facebook https://www.facebook.com/media/set/?set=a.10151970503909333.1073741836.265114729332&type=3&paipv=0&eav=AfYE3zrnTC6bSvBdSPmXCNmYkghpRqO8Yga_ergaSWCXT84gmK0YsvsffkiMq-iIWa0&_rdr -
Info in this thread
-
Congratulations and welcome to the ranks trooper You can request TK access here which will allow access to runs of detachment only merchandise
-
Really would depend on how the armor was made, raised cod area centered or offset, most makes of armor appear to have the raised area of the cod offset to the abdomen (like screen references), but some are centered like my ATA Screen used raised cod ridge offset Some align the belt to the center of the the abdomen, some align the belt to the center of the raised cod ridge (under ab plate ridges) the later being more screen accurate EIB examples of different makes of armor Offset raised cod area RS Anovos MTK TM Centered raised area cod AM ATA AP WTF RWA Most also having their belt centered to the large ab plate. If your armor has the offset raised cod area then you could definitely make it absolute screen accurate, but if you have the centered raised cod area you are stuck, you can't bring it over as it would interfere with your thigh gap.
- 1 reply
-
- 2
-

-
Stormtrooper Helmet Mic Tip Hovi Mix Aerators - Ebay
gmrhodes13 replied to gmrhodes13's topic in Off Topic
Item sold on Fri, 4 Oct at 9:20 PM. £4,101.00 32 bids -
TK-10866 Requesting ANH HERO EIB Status [RS Props]
gmrhodes13 replied to TK10866's topic in Request Expert Infantry Status
If you are having issues adding photos many use a free image host "Imgur" upload photos there then copy and past the direct links into your forum post, a how to here -
You still have TK access

-
WOW
-
Reviews on TK armor parts. AHN STUNT
gmrhodes13 replied to Viko2307's topic in TK Pre-Approval Questions & Discussion
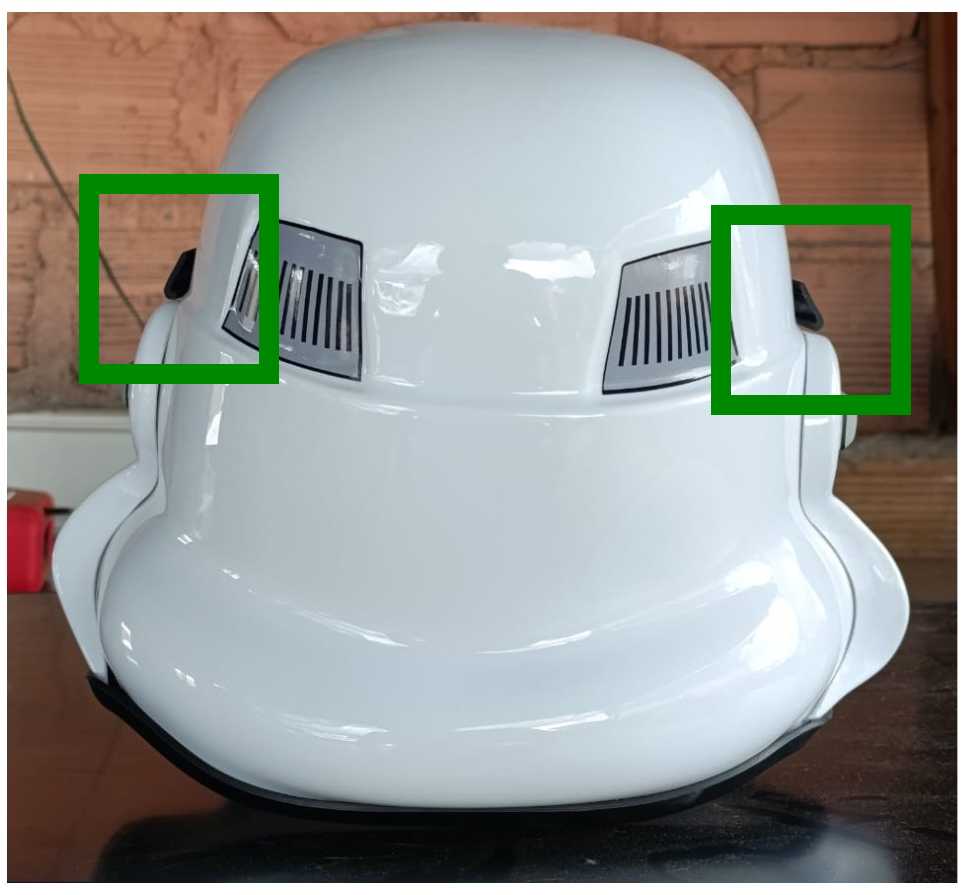
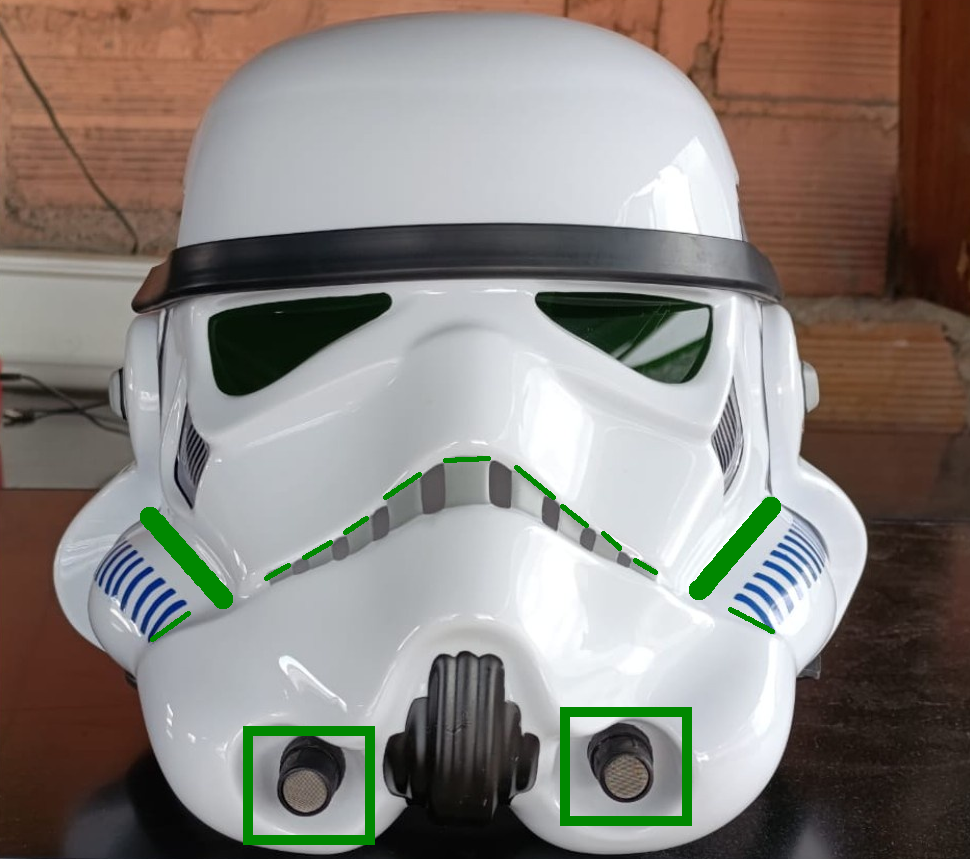
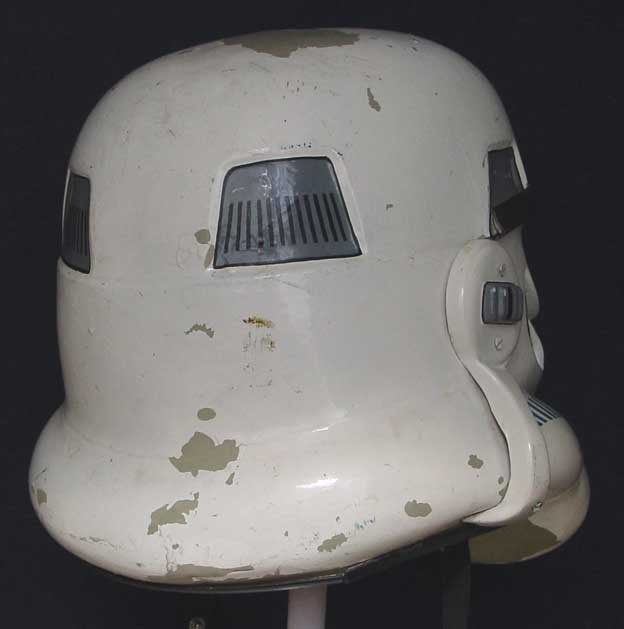
Some information and references to compare with screen used helmets http://www.starwarshelmets.com/original-ANH-Stunt-Stormtrooper-armor-helmets.htm Ear bumps and mouth should be gloss grey, note no paint on gums Also refences in our gallery Some details from the CRL, some higher level requirements you may wish to address: Helmet Frown is painted gray and does not leave the teeth area. A total of 8 cut outs in the teeth area of the frown are present. OPTIONAL Level two certification (if applicable): Ideally, the tube stripes are positioned approximately a pencil width from the side of the cheek. Fall of tube stripe tops ideally lean toward the front. Correct Aerators/Hovi-MIX tips are present. Screens used shall be of a wide type mesh, with the rim of the mic and the inside white or painted white. OPTIONAL Level three certification (if applicable): Ear bars shall have only one bump painted in black (rank stripes). Ideally, placement of ears (and screws) should closely follow the rear angle of the trap above them Rank stripe Fall tube stripes, pencil width The "ideal" ear placement is as seen below, where the screws line up with the rear angle of the trap right above it. Because some armorers design their helmets differently or send them pre-assembled this is not always possible to achieve, but it is suggested that you try to get as close as you can. Note: Top ear screws should ideally be located directly below the rear of the trap. Brow trim open at rear Hope the information is useful for you

-
Info in this thread
-
Reviews on TK armor parts. AHN STUNT
gmrhodes13 replied to Viko2307's topic in TK Pre-Approval Questions & Discussion
Image is too small to see any details Try uploading to Imgur then copy and paste the link into your thread -
It's ever too late to join the empire
gmrhodes13 replied to guard65's topic in New Member Introductions
Hello and welcome to the forum, a thread full of information should help you on your way -
Congratulations trooper
-
Info in this thread, you must log in to the forum at least once every year to remain active
-
Bumping this thread as the legion census has begun and the standard "why is my affiliation pending or expired" questions have begun
-
Currently no maker (that I'm aware) you could get one 3D printed if you have or know someone with a printer
- 1 reply
-
- 2
-
-
You have TK access on the forum. Some info here on detachment affiliation
-
RS Prop Masters Stunt TK Pre Approval
gmrhodes13 replied to Wookie Mistake's topic in Request TK Pre-Approval
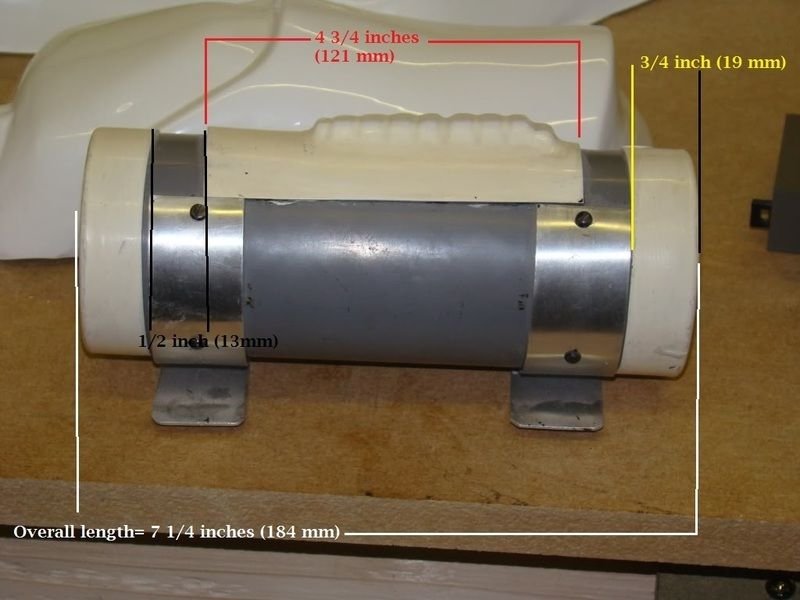
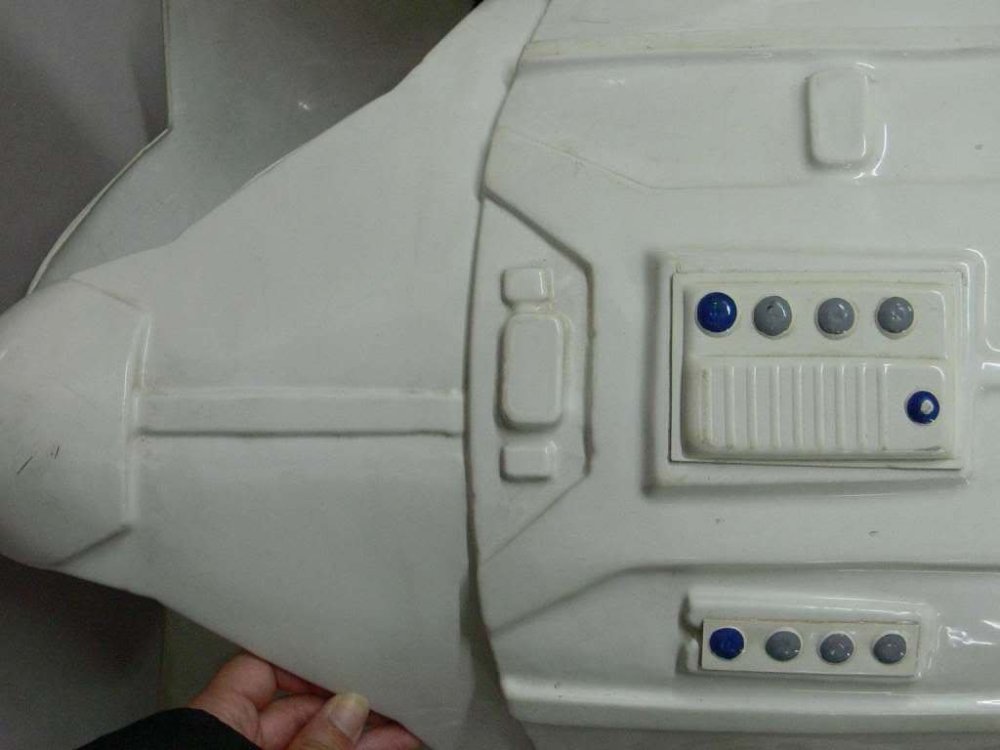
Nice work, just a couple of things Your detonator is rotated backwards a little too much, you may also want to check the measurements between the end caps and control panel Drop boxes should align with the end of the plastic belt For Level 3, Drop boxes are vertically aligned with the end of the ammo belt with minimal gap between belt and box. Your images are a little small in resolution which makes seeing some details a little difficult. I'm sure you should breeze through base approval and a few tweaks for higher levels. Good luck and hope to see you with a TKID soon