gmrhodes13
-
Posts
28,377 -
Joined
-
Last visited
-
Days Won
827
Content Type
Profiles
Forums
Gallery
Articles
Media Demo
Everything posted by gmrhodes13
-

TK ANH Stunt by CloseTheBlastDoor
gmrhodes13 replied to CloseTheBlastDoor's topic in ANH Build Threads
I prefer using snaps, it's easy to swap them out if any elastic stretches over time, also easy to swap out if you need to shorten or lengthen the elastic. I found using nylon was the easiest for snaps as the nylon conforms to the armor and does not need recessing, unlike snap plates that take a little more work. Here's a full set I made for another members build Most elastic I shorten the position of snaps by 5 mm, gives a little extra pull when wearing. I also have some snaps added to a strip of elastic in a few places so I can trial the length and change position to work out the best length. I also like to double snap, not everyone does but I found it saved me at a troop once when my shoulder straps snap failed and I had the spare one These may be of help Rivet Setting 101 by justjoseph63 (Print PDF) Snap Setting 101 by justjoseph63 (Print PDF) Snap Placement Snap Setting Hardware Solutions by TheRascalKing E6000 and Snaps Discussion by Harbinger, Snap Options by ukswrath Snaps with Rivet Heads by TheSwede -
TK ANH Stunt by CloseTheBlastDoor
gmrhodes13 replied to CloseTheBlastDoor's topic in ANH Build Threads
You can also dampen a cloth and rub that against the glue, comes off quite well. Looking good -
Normally we try to add any extra material on the rear as this is not seen as much by the public, but some add additional sizing to the front and rear, at the end of the day it would be best speaking with your GML as they will be reviewing the armor and may not allow larger cover strips, best to check . A thread on the subject of larger cover strips
-
TK ANH Stunt by CloseTheBlastDoor
gmrhodes13 replied to CloseTheBlastDoor's topic in ANH Build Threads
The ridges are a tad wide towards the bottom. There can be a little width but normally closer to the top as you can see in this reference Personally I know it's a pain to rework but it will pay off in the end and look much better. Shouldn't be too hard to pry off the cover strips, once you have lifted an edge the pressure of pulling should release them. -
You may need to reduce the size of your shins as you have a lot of room space showing in them and they do look a little large from the front.
-
SublimeBW's Armor Master's (AM) ANH Stunt Kit - Build Thread
gmrhodes13 replied to SublimeBW's topic in ANH Build Threads
Looking much better, just make sure there is no paint on the gums, I can see a few places.thumb.jpg.a7e4e4497482798ce3250a378ea232fb.jpg)
-
It's normally the gap that needs filling, even with a piece behind the thigh. Reference Sugru or ABS paste will fill this gap
-
I'm so happy / TK-11454 reporting for duty
gmrhodes13 replied to dblcross's topic in Newly Approved Members - Sound Off!
Congratulations trooper, good luck with the LFL event, if you haven't had a read yet here is the Troopers Survival Guide some great info about canon events -
Looking forward to seeing the improvements
-
That's pretty standard for ROTK's
-
Hello.and welcome to the forum
-
TK ANH Stunt by CloseTheBlastDoor
gmrhodes13 replied to CloseTheBlastDoor's topic in ANH Build Threads
Fit can be close and most trim if they need to have a little more room, average would be a fingers width I would say. It just depends how high up your thighs will need to be which will determine how much you can leave or trim. -
TK ANH Stunt by CloseTheBlastDoor
gmrhodes13 replied to CloseTheBlastDoor's topic in ANH Build Threads
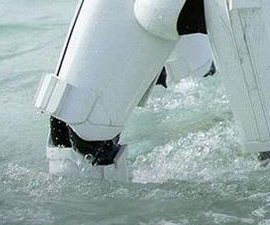
I have to add some foam inside the thighs to keep them central, even bringing them upward they were still loose. What will be a factor is where your cod will sit, you don't want your thighs hitting it or you posterior so final strapping/fitment once you have your body clamshell strapped and on. Also how much gap will be left between the thighs and shins, there is some adjusting to do will the full suit on. I can sit down and have done on many occasion, it's just as comfortable just to sit on a corner of a table/desk, getting the weight off your legs does help during a long troop. You do need a little bit of wiggle jiggle to get in the sitting positions, just make sure no circulation get's cut off in certain areas -
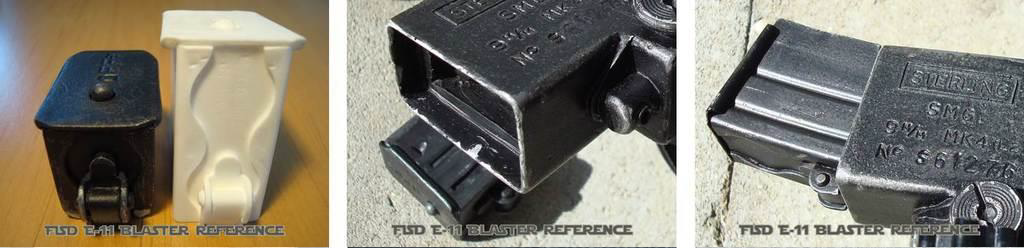
E-11 PVC Pipe Build Templates (Imperial and Metric)
gmrhodes13 replied to usaeatt2's topic in ANH BlasTech E11
You could reach out to your local garrison and enquire if anyone is offer 3d printing. Files for the E-11 are here https://www.thingiverse.com/tk14082/designs Length would need shortening
-
TK ANH Stunt by CloseTheBlastDoor
gmrhodes13 replied to CloseTheBlastDoor's topic in ANH Build Threads
Really depends on your size, I have skinny legs so left quite a lot of return edge to take up some of that gap, just looks better. Screen references @ 5mm return edge, but you can trim it all off if it's too tight and that will be approved all the way to L3 From Joseph's return edge thread Thigh tops The tops of the thighs are where we see a lot of questions. I recommend removing all the return edges from the entire upper parts, and here is why: As mentioned above, you will be doing a lot of walking. If you have the edges (or at least a large portion of them) intact, the friction and inside facing angles can really chafe the heck out of you, especially on the inside of the groin area. (Ouch). If there are sharp edges/points on the tops (below) these will poke into you. When trimming these, just follow the existing line. Also, if you do your final fitting, glue everything together and find this out afterward, you will have to take the entire thing apart, remove the return edges, trim down the sides and then re-build/glue them back together. The reason is that afterward the opening will be entirely too large and you will have a giant gap all the way around. Not a good look. Easier to do it beforehand, trust me. As seen below, there were no return edges (or at least minimal ones) used in the films. -
E-11 PVC Pipe Build Templates (Imperial and Metric)
gmrhodes13 replied to usaeatt2's topic in ANH BlasTech E11
Should be some in this thread Since we have seen more 3D printing it's very rare anyone scratch builds their E-11's, but "snaps" for you, looking forward to seeing your build -
Getting Level Two Or Three Certification
gmrhodes13 replied to Fruit's topic in Forum Help & Support
Have a read here, and note you have to be approved at L2 before you can apply for L3 From our monthly newsletter: So what exactly are and levels? These programs were designed for those who choose to take their armor above and beyond the minimum requirements for basic 501st Legion approval. It gives you the chance to show a level of dedication and pride that takes your armor closer to being as "screen accurate" as possible, without as much extra work as you may realize! You can find more information on the programs here. For those unaware it is possible to achieve extra awards at Expert Infantry for each additional version costume you have approved, additional awards are not issued with another Expert Infantry number (you are only issued 1 Expert Infantry number) but you will see a star above the award on your profile and the thread title will show [APPROVED] 2nd, [APPROVED] 3rd, [APPROVED] 4th and so on. Multiple EIB award recipients and info here What do you gain for those levels? the warm fuzzy feeling of self accomplishment, a spiffy certificate to frame and display and banners on your FISD profile. As well as access to EIB and Centurion merchandise when they become available.- 1 reply
-
- 1
-

-
So the snaps sit flat against the plastic apply a little heat:
-
TK ANH Stunt by CloseTheBlastDoor
gmrhodes13 replied to CloseTheBlastDoor's topic in ANH Build Threads
I've seen a few add an extra inner strip with more velcro but I haven't needed it so far. Inner strip reference -
No issues with Anovos no longer around, just an issue if you need replacement parts, can it be approved depends on how it was built, Anovos kits have been approved up to Centurion with a couple of modifications, helmet mesh, correct belt/holster combination and a few other tweaks. This is a great build thread You can check the kit against our CRL costume reference library https://databank.501st.com/databank/Costuming:TK_anh_stunt and make sure it meets current base requirements
-
TK ANH Stunt by CloseTheBlastDoor
gmrhodes13 replied to CloseTheBlastDoor's topic in ANH Build Threads
I also feel naked without a blaster, I try to keep my hands on the belt but there's not much else you can do except of course high five or wave. -
It's also a lot easier in this thread as the DO suggestions/comments can also be accessed and compared with any questions you may have. Looking forward to seeing your centurion app soon
-
TK ANH Stunt by CloseTheBlastDoor
gmrhodes13 replied to CloseTheBlastDoor's topic in ANH Build Threads
Spacer worked well, I used just a strip of offcut coverstrip in-between the shin and sniperplate. The twist is very hard to get rid off but not impossible with this armor, clamps, magnets, tape and even more tape under stress can work but definitely leave it all clamped for at least 72 hours, any areas of pressure needs longer for the glue to dry. I'd think you should be fine as you are for basic approval, may get mentioned for EIB L2 -
Tim’s first time build (RS Prop Masters ESB TK)
gmrhodes13 replied to TrickyT81's topic in ESB Build Threads
Albeit not shoulder straps but how to hot water bath some parts in this thread Another way is a heat gun or torch, these take some practice to use, there is a fine line between hot enough to bend and molten mess, so take care. A hot water bath is a lot more gentle on the armor. Some even make wooden plugs that they can rest parts on once heated so it keeps them nice and straight, so there is no or little warping Some heat gun work in this thread -
Really depends on the files and how accurate they are, I've heard the files print very small. I would suggest before you start printing comparing your files to this image, as you can see the chest is lower and wider around the neck, different angle of the coversrips, not as long as a regular TK and also is very wide on the sides, like wings
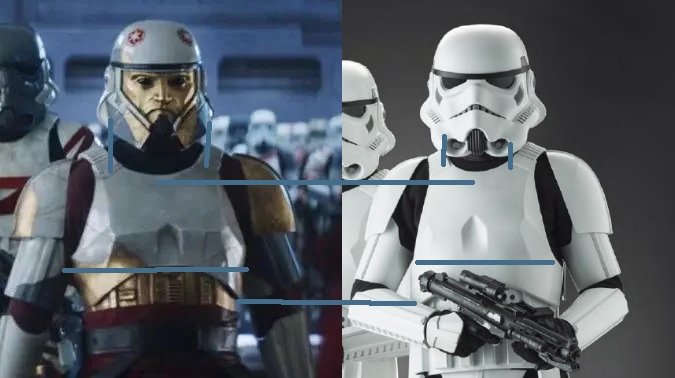
.jpg.1ac77e2c188319818578d96ab1e2acfa.jpg)