

skyone
-
Posts
326 -
Joined
-
Last visited
Content Type
Profiles
Forums
Gallery
Articles
Media Demo
Posts posted by skyone
-
-
When I use the amplifier module the speaker picks up a little bit of distortion as well as a pulsating kind of noise. However, when I pluck the speacker directly into the WT5001 it's absolutely silent except when a sound is played.
I was wondering whether anybody experienced something similar or if I have a caught a bad amplifier module?
i think it's normal, we should use ferrite and/or capacitors to have more clean sound.
as for led bar how to detect anode and cathode
just look at kingbright dc-7g3hwa datasheet pdf there is a very clear scheme where you can notice that the cutted corner is Anode side

-
Right on the money, as always bro ;-) Yes, I switched the positive and negative side. I still don't see any clear markings to distinguish them on the bar counter but I just used the other pole ;-)
So, finally it's working - Manuel, I hats off to you, you've been a tremendous help!!
I haven't installed the LEDs yet for 2 reasons. First, I'm still waiting for the current regulators and secondly - as I'm aiming to put this into an MG15/RT97 - I'm still thinking of using a different setup where you have the lights going up the barrel. I'll definitively put up a vid of y final setup once it's finished.
P.S.: My little kids found the Jawa noises hillarious

good work!
-
Today I've soldered the ammo counter but it's not working. Did I make any mistakes with the soldering (the resistors are all connected to each other and GND on the other side)?
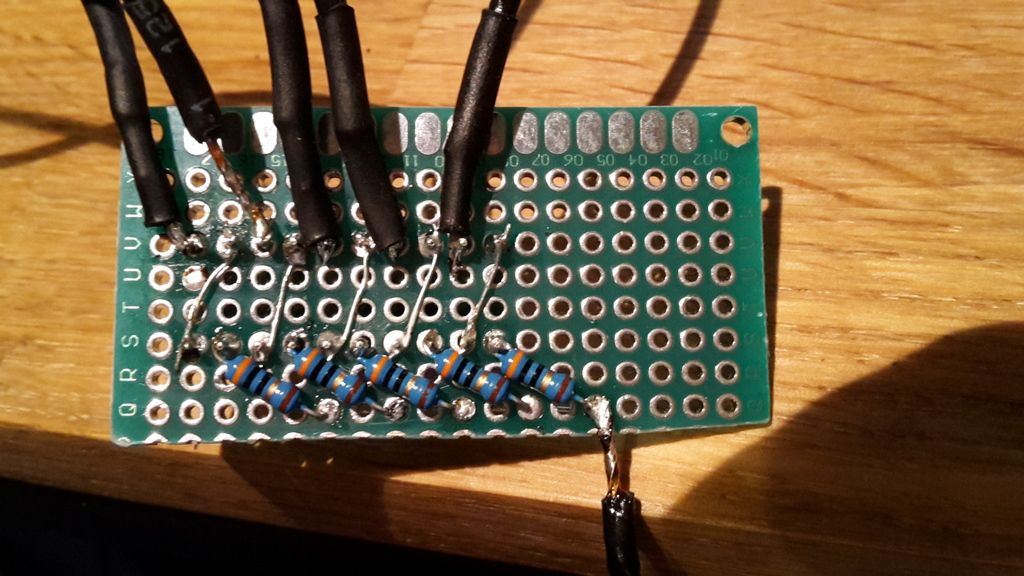
Would it be possible that it doesn't work with the 5V Akku I'm using?
did u find the right positive and negative side on the led bar?
-
Thanks, Michael. Yes, those were the first things I've tested. Even if the firepin is unswitched it automatically goes into auto-shoot when I start up. It only stops when the pin is installed and pressed (it's wired C / NO). Then everything is functioning normally (the other 2 pins as well) with the exception that the function of the firepin is reverse.
Can anyone confirm that the code is correct in this regard? I'm not sure with all the different IF commands
did you try to invert HIGH/LOW in the code of your trigger switch?
-
Thanks for the reply, however, it happens when powering from a high discharge LiPo.
voltage?
-
OK, tonights update. Ie significant progress. I've swapped HIGH for LOW where I could find a reference such as: <br>
digitalWrite(ledPin, LOW); //red<br>
digitalWrite(ledPin10, LOW); <br>
digitalWrite(ledPin9, LOW); <br><br>
Now my LED is diminished most of the time with one colour flashing which I've found is based on one of the delay times (think it was set to 250 default). I found by changing the value of this, the blinking rate of the main led changed, but why it blinks in the first place is still a mystery. If I hold the "fire" button the led goes off altogether (ie stops flashing) likewise it doesnt flash during the reload cycle.<br><br>
However I'm still not able to "fire" the led when pressing the fire button, so there may still be something I've not changed or done correctly. I am particularly unsure of where there is a "fade" control in the code, but I feel like I've made a little progress. At least I seem to have proven the HIGH = Off PWM setting on my particular drivers
It might be not enoght ampere / volts for your driver, try ysing other external power supply 8v / 12v 1 ampere to your drivers
-
Hi Manuel Here is the Zip file for the Code I am having trouble with.
Basicaly Weapon 4 TIE blaster sound, will not work and the green LED will not activate.
Perhaps i have the sound files in the wrong order on the SD card, but everything else is working.
from your code i see:
//-------------------------- WEAPON 1 --- BLASTECH E11 SINGLE FIRE MODE
// play file 002_E11_single.mp3
Serial.write(0x7E);
Serial.write(0x04);
Serial.write(0xA0);
Serial.write(0x00);
Serial.write(0x02);
Serial.write(0x7E);
//-------------------------- WEAPON 2 --- BLASTECH E11 - Rapid Fire (3 shots per trigger pull)
// play file 003_E11_multi.mp3
Serial.write(0x7E);
Serial.write(0x04);
Serial.write(0xA0);
Serial.write(0x00);
Serial.write(0x03);
Serial.write(0x7E);
//-------------------------- WEAPON 3 --- BLASTECH E11 - STUN
// play file 004_E11_stun.mp3
Serial.write(0x7E);
Serial.write(0x04);
Serial.write(0xA0);
Serial.write(0x00);
Serial.write(0x04);
Serial.write(0x7E);
//-------------------------- WEAPON 4 --- BLASTECH E11 Tie FIRE MODE
// play file 008_TIE_.mp3
Serial.write(0x7E);
Serial.write(0x04);
Serial.write(0xA0);
Serial.write(0x00);
Serial.write(0x02);
Serial.write(0x7E);
the blaster sound for weapon 4 is linked to mp3 file name sorted as 2, so it can't be 008_TIE_.mp3
remember my instructions on the first message and instructions inside the code:
sound tracks numbers need converxion to hexadecimal letters/numbers
you can use the script in this website: http://www.statman.info/conversions/hexadecimal.html
example:
if track number is "10" ---> "A" hexadecimal
// start sound
Serial.write(0x7E);
Serial.write(0x04);
Serial.write(0xA0); // A0 for SD card
Serial.write(0x00); // track high byte
Serial.write(0x0A); // track low byte
Serial.write(0x7E);
if track number is "280" ---> "118" hexadecimal
// start sound
Serial.write(0x7E);
Serial.write(0x04);
Serial.write(0xA0); // A0 for SD card
Serial.write(0x01); // track high byte
Serial.write(0x18); // track low byte
Serial.write(0x7E);
it's very important the order of the files saved in the microsd... Even if the files are named 001.mp3, 002.mp3 ecc... this sound module will read the files in the order they were added on the card, that means it will not respect the order by files name (and that means you can't call the mp3 files by name order with arduino code!). That's why you need to sort them after copied, follow the instructions on page 1 of this topics
as far as for the green led on pin 9, it seems ok, try to test it, turning on few seconds at startup, maybe it's a soldering problem
-
Got my counter working for shoot and reload, but not sure if change weapon is working.<br><br>
cool!
keep in mind that if you use my code, when you change weapon it should keep memory of the ammo available for each weapon.
-
the pwm input on led driver is needed to turn on and off the led via pwm-digital pin of arduino (PWM pins: 3, 5, 6, 9, 10, and 11.)
with PWM you can control LED brightness
-
Hi Manual, I have a question is it the same din pin on each of the drivers, or is it a different pin for each colour?
I am doing one of these builds and just need to make sure. If they are all the end connector, that is easy,
yes, same Dim Pin on each driver

-
Here it is!
communication from the JRS DL
wow great work, the most powerful kenner e11 blaster i ever seen

nice selection of sounds too!
just one thing, i would paint black the battery
-
I am working on the voice activation
i successfully swapped the button switch with a tiny transistor, now i can turn on and off the voice changer digitally via arduino
next, the sound sensor connected to arduino should activate the voice changer when detects that noisy is higher than a given threshold and turn off when is lower, followed by the static burst effect
the problem is the sound sensor i am using is very low quality and not fit the project, must find another IC

-
 1
1
-
-
All done! Wont let me post the video

communication from the JRS DL
YouTube?
-
Hi there,
I've just ordered all the parts (mostly from china, hengstler from Germany) to build my sound system for my hasbro/doopydoos conversion.
Any chance you could pm me the sound files package please?
i sent you a PM
-
we can add voice activation adding a small arduino powered by the same batteries (supports 3.3v-12v) that control a sound sensor connected to the voice changer switch with a transistor
i will test it when i have all the components.
-
1
-
-
E11 arduino:
Almost done! Everything works but Im going to mod a few things, flip the led bar the right away, adjust some audio files and add a vibration motor to replicate recoil.
I customized some sound and added a Wampa set. I will be removing the jawa and adding fart gun back in.
Now to install. Im putting it in a new Disney Parks Hasbro with modified resin parts, working folding stock, laser site, and reticle. Feedback appreciated
communication from the JRS DL
well done!
-
Epilogue
I learned a lot through this build. After nearly 200 pictures have been posted, several circuit boards and LED’s were fried, and one quick video was produced I believe the goal I set for myself has been hit.
I wanted to have an E-11 (ANH style) that would on a scale of 1-10, be a 7 in accuracy. I think I got there, what do you think?
Comments and feedback are welcomed, I need to go get organized for my ANH Stunt build....
very well done! happy to see that another arduino blaster was born
and i should paint mine again following your tips, really like the finish look
-
1
-
-
ordered mini speakers to install inside the mics
-
1
-
-
here it is, ready to install into helmet

-
nope i was too busy.. for now i suspend it and move to the easy way (disney voice changer)
-
just bought one from disney store online, i will try to install on my helmet as well
maybe i should keep the activation button on the ear or swap the button with a sound activation module
-
Interesting build, I look forward to seeing how it finishes. On that note do you plan to update your original post with all of the current parts that you are using?
yes sure
i finally found an easy scheme for the microphone part, i will test it connected with the mini amplifier and speakers. If it works, i can complete the project. But that will be after celebration in anheim, where i am going to.

-
-
in that case there are 3 possible explanations
1) the 2 rgb leds are not rated 3 watt, that means that each color is not rated 1 watt, that means that each color doesn't need around 350mA at 3 volts (watt = ampere * volt)
or
2) the 2 rgb leds are rated 3 watt, but they don't light at the same time (thanks to arduino)
or
3) the 2 rgb leds are rated 3 watt, they light at the same time, but, in this case, they can't perform full light because the amperage supplied by the driver (350ma@3volts=ca.1watt) would be the half needed by the 2 leds connected in parallel (700mA)
that's just the theory, if you are not having problem with that keep up the good work your are doing


arduino: a cheap board for E11 blaster effects
in Electronics for Helmets / Blasters
Posted
yep
it supports serial commands as wt5001
http://www.elecfreaks.com/store/download/product/Module/jq6500_mini_mp3_module/Datasheet.zip