

starsaber25
-
Posts
3,936 -
Joined
-
Last visited
-
Days Won
23
Content Type
Profiles
Forums
Gallery
Articles
Media Demo
Everything posted by starsaber25
-

starsaber25's MTK ANH Stunt Build
starsaber25 replied to starsaber25's topic in Build Threads Requireing Maintenance
Hey Guys. Ian I see what you mean now. But now that I'm thinking about it, I don't know how I can do it. Unless I built it wrong. My end caps are glued on. Its going to be a huge pain to try and pry them off and then I might damage them. They were tight before the glue! Thats the way I would have to go in and unscrew the clips. I don't know overall if it will be worth it. It sucks I guess. I didn't really pay too much attention to that detail. I got them from Evilboy and thought they looked great and put them on. I guess its just gonna be an unfortunate part of my build and at some point maybe I will just have to replace the whole TD together. Unless someone else has a decent suggestion about how to get off the end caps without any damage occurring. -
starsaber25's MTK ANH Stunt Build
starsaber25 replied to starsaber25's topic in Build Threads Requireing Maintenance
Oh and Ian how would you suggest I go about making those brackets straight? I only have the normal run of the mill household tools so if there is a basic tool that I can use that would be good. Thanks -
starsaber25's MTK ANH Stunt Build
starsaber25 replied to starsaber25's topic in Build Threads Requireing Maintenance
Ok well I'm back and I finished strapping the torso. Those brackets that I got from Mr. No Stripes are awesome. The whole process went very smoothly actually. So here is what it looks like: I'm happy with the way it came out. I guess the only question I have is there anyway to try and close up that gap there between the butt plate and the kidney plate above? Its as bad as it is in the photo but its there nonetheless. Anyway, hopefully later tonight I will glue the shoulder bridges on and paint the ab plates. Unfortunately I did not realize that cutting the notches out of the kidney plate on the bottom was a requirement for the higher certifications until after I did this. I am still considering taking out the brackets and making the notches and then putting the brackets in the new location. I will probably only take me 20 min or so. So thats where I am right now. After the torso I will hopefully finish up the arms. I just got my gloves and handguards in from Karin and they are pretty darn cool. So I will try and work on that tomorrow. -
finally got my armor.....help!
starsaber25 replied to BRIZK's topic in Getting Started - Read this First!
Congrats Erick. Yes do yourself a favor and read through a bunch of build threads. First you will need to figure out what armor type you want to build and then how you want to build it. For example, if you want to strap it the accurate way or use snaps and snap plates. The trooperbay videos are an excellent resource. I also found Paul's "TM" build thread very useful. You will get comfortable more and more as you go. It probably won't be perfect. You will make mistakes. I just made one of my first noticeable mistake on my build lastnight that I haven't posted on my build thread yet. But they happen. Again like everyone says, research research and more research Good luck -
I have a TM and its unbelievable. Such a nice looking helmet. I also have a MTK that isn't built yet but just by looking at it, it looks like a really nice helmet.
-
starsaber25's MTK ANH Stunt Build
starsaber25 replied to starsaber25's topic in Build Threads Requireing Maintenance
Ok so here I am again and I have made some torso progress over the last few nights. I added the two snaps into the butt plate. I then took the ab plate and added the rivet and elastic that attaches to the butt plate. I then added the split rivets on the side of the abdomen and then the side of the kidney. I also added the snap on the top right of the ab plate along with the snap with elastic on the kidney. I think it went fairly well however I know that I suck at putting snaps in! Anyway here are the photos: First thing I want to say at this point is that I went ahead and got Echo's Centurion level rivet sets and they are a fantastic product. They work really well and it was very easy to order everything you need from one place. Here is the snap on the right side of the ab plate. And here is the snap and elastic on the kidney plate in the process of curing: For the split rivet placement I followed this thread by Droidhunter: http://www.whitearmor.net/forum/topic/26886-split-rivet-placement/ Here is my outcome. I also felt that I wanted snap plates in case i wanted to change the sizing a little after I put this together. I felt that if you put the split rivets in and went right into elastic, you were stuck with what you did forever and could never change the sizing. I am pretty happy with the way it came out: And this is what it looks like together right now. I know I need to paint the rivet heads white. Anyway there is my progress over the past few nights. The next part I'm going to tackle is getting all of this together using the strapping brackets. So stay tuned because that will be coming your way. Thanks for looking! -
starsaber25's MTK ANH Stunt Build
starsaber25 replied to starsaber25's topic in Build Threads Requireing Maintenance
Ok so here is a small update for now. I actually have been working on my armor for the last 4 nights straight but its amazing how long it can take to do some sanding! I think I did my final sand on my Chest, Back Plate, Ad, Kidney, and Butt. I'm not going to post pictures of that now, I will just wait until I do something else to them. However, I did put the strap and the sew on snap to the shoulder bells, I finished the thermal detonator, and I followed Toybiz's (Adam's) ESB build and gave my left bicep a hot steamy bath and I think it turned out rather well and I am happy with the outcome. Here are the shoulder bells: Not the best sewing and I will end up cleaning it up a little but that is basically it. I used one inch black elastic for the straps and the snap elastic. Nothing too hard here. Now on to the Thermal Detonator. I used Dark CMF (TIm's) suggestion and got a can of Testors Gray Spray Enamel and painted the tube: A couple of weeks ago I reached out to Evilboy (Jonathan) and bought a couple of his TD clips. They are fantastic! I recommend them to anyone! I also bought some 6/32 3/4 inch Round Head Slotted Machine screws from my local building supply store. The measure of the length of the TD is 7 1/2 inches. Am I super happy with my outcome? Its acceptable to me but I wish I could redo it and do it perfectly though. Here it is: And now the left bicep. I went and bought a 3" PVC coupling and gave it a bath. Here is that: And I am very happy with the outcome. I think it made the left bicep look closer the the size of the right bicep then it did originally. But I guess most of you can be the judge of that. I did 7/8 cover strips on the biceps. Here they are finished for the most part. I just need to finish up the coverstrips. Glueing It still is a little more oval then the right bicep but it certainly helped. I think they look a little more even on my arms now. Ok that is it for now. I'm just happy I got most of the sanding done. I'm not sure what I'm going to do next. I added a couple of snap plates to the chest and back plate already just to get the feel for making snaps. I am thinking I may add the snaps into the butt plate and start working on the torso connections. Like I said I am going to install the rivets for accuracy purposes however I am going use snap plates to actually hold it together. I thinking of making a long snap plate and putting the rivets through it to hold it in like many others have done. But we will see. Ok thanks for looking! -
starsaber25's MTK ANH Stunt Build
starsaber25 replied to starsaber25's topic in Build Threads Requireing Maintenance
Hey thanks for the replies guys. Jonathan, I get what you mean about the research and asking about every step along the way. Its actually sort of funny but I've been on this forum for probably about 2 years now looking at things and writing things down. Believe it or not I thought I was really ready to go with the armor and thought I had my act together. Then all of the sudden you start doing it and it is nerve wracking and you dont want to make a mistake so bad that you start second guessing yourself. I am going with the screen accurate bracket system. I got my brackets from Mr. No Stripes and they are fantastic. For the most part I am following along on the Trooperbay videos as a guide as well as looking at a few different peoples build threads. I am plugging along at a slow speed at the moment and will eventually get there. -
starsaber25's MTK ANH Stunt Build
starsaber25 replied to starsaber25's topic in Build Threads Requireing Maintenance
Adam wow thanks for the thorough input! This is exactly the input i need from this forum! I did not know that you would need to put the same size cover strip on the thigh and the shin. That is going to make me think a little harder. I was thinking of doing a inch on the thighs and 7/8 on the shins. See all of this would help if I wasn't sitting here scarfing down a beef gyro and french fries. Then i could try and make things smaller! I am going to keep plugging along and hopefully I will make some progress on these things in the next couple of nights. Thanks for your inputs! -
Donations needed for website hosting fees 2014
starsaber25 replied to Darth Aloha's topic in Announcements
Paypal Donation Sent! -
starsaber25's MTK ANH Stunt Build
starsaber25 replied to starsaber25's topic in Build Threads Requireing Maintenance
Thank you for your response Eric. I think I have an idea of what to do now. Ok I have moved on to trimming the shins and the thighs. However I did not completely trim them yet because I have some questions. Here are the shins first. I think I will be going with the 7/8ths cover strips on them. My calves aren't that big so I think they will fit. I am just unsure if I know what is the right or left shin. Here are my pictures: I think this is going to be my right shin: And this will be my left shin: Please let me know if I have them right or if I need to take more pictures. I would say that the only thing I wish MTK kits came with was a right or left sticker on the parts. I had no problems with the forearms or biceps but the shins are really hard. Now onto the thighs. I trimmed them but again like the shins I left the edges where the cover strips go untrimmed. I was thinking of trying for a 7/8ths strip on the front and going with whatever on the back but then I thought that I still wouldn't be able to get them to fit, I would say out of everything that I am worried about getting to fit the most it is certainly the thighs and the ab and kidney connection. Are there a lot of people who put a 1 inch cover strip on front of these? I think then I would be able to get them to fit. I also think that I am going to have to cut the tops off a little bit. Just by holding them on I can tell that they are going to be too long. My question with that is, if I have to trim the top a little, do I have to remake a return edge or is it not imported to have a return edge on the top of the thigh. Here are my pictures: Thats it for now. I know its slow moving but I am doing the best I can. I hope that some of you armor experts on this forum can chime in and give me a hand. Thanks! -
Its great that you got photobucket to work Jaren. I've been lucky to be able to look at Ian's and Adam's MTK builds. Now I can also look at yours along the way as well. Quite a few MTK's popping up lately. They really seem to be great armors and look great when they are finished. Now its actually time to get get going and finish them! Good Luck...
-
Hey Tim this is an awesome build thread. A lot of useful information is in this. I do have a question for you. What is the color of that Testors spray paint that you used to paint the thermal detonator? Thanks
-
It's happening! [*CAP]
starsaber25 replied to Grimez's topic in Build Threads Requireing Maintenance
Congrats! Yeah I'm with Tim. I started trimming my shoulder bells, forearms, and my biceps first. I felt that those would be the easiest parts to start getting used to the trimming. As far as tools go I have used for the most part a shop knife and a rotary tool. I have used scissors as well but I tend to shy away from mine because they are straight. I would say you should purchase a set of curved ones. After that start looking at build threads and favorite the ones that are most useful to you. Maybe even follow mine that I am currently doing . It is moving slow but I am trying to be as thorough as possible as far as measurements and pictures go. Its an exciting time and very nerve wracking. What I found to be helpful was to just get to the trimming and not think about making any mistakes. Good Luck! -
starsaber25's MTK ANH Stunt Build
starsaber25 replied to starsaber25's topic in Build Threads Requireing Maintenance
I am doing some building right now and I am working on the thermal detonator. Are you supposed to paint the tube a certain color? My tube is gray but I just didn't know if you are supposed to paint it. Any help would be greatly appreciated. -
starsaber25's MTK ANH Stunt Build
starsaber25 replied to starsaber25's topic in Build Threads Requireing Maintenance
Ok everyone I am back. I have a huge update today. And Ian thank you so much for you assistance and advice. It is helping me tremendously! In the last week I have trimmed the Belt, ,the chest button plates, the cod, chest, kidney, back plate, and the butt plate. Now I have trimmed and roughly sanded so they are not completely finished. But talk about nerve wracking! Man these are some important pieces and I was so worried that I was going to screw something up. So here we go with all of the photos. Again, I really appreciate Ian helping me along the way but it would be really cool if some other experienced builders could chime in with some feedback. Thanks in advanced. Here is the belt. I used the Bill Hag template: It seemed pretty straight forward so I think I got it. Next is the ab buttons. Again I used Bill Hag templates: Do I leave these at 90 degree corners or do I round them out? Next is the Chest piece. For the most part I just followed what appeared to be trim lines and then back and forth to pictures and this website. Its really interesting how there really are so many different ways to do this. This is what looked right to me. I will be using the original strapping systems and I got the brackets from MrNoStripes. They are fantastic by the way. Now the Butt Plate: Next the Back Plate: Now the Cod Plate. This was very nerve wracking: Now the Kidney Plate. This one I didn't take off too much because I couldn't find a good reference picture. Is this too much of a lip on it? Also, there is a little notch right in the middle of one of the lips. Does this signify something? Like does this mean this side goes up? The Notch but you can barely see it in this photo: OK that is it for now. Sorry for all of the photos and if you are a guy that doesn't like seeing all of the photos I am sorry. But when I was looking around build threads to try and find pictures like this it was very hard. So I'm looking at it as a way to try and help future builders to try and find a large quantity of photos. I just hope I'm doing it right! Again any feedback will be great. I really am looking for all of the input I can from this board. Thanks again. -
starsaber25's MTK ANH Stunt Build
starsaber25 replied to starsaber25's topic in Build Threads Requireing Maintenance
Ok so I'm back and slowly getting back at it. I trimmed up the dropboxes and the shoulder straps. For the Dropboxes I decided to go with 13mm. They look like this now Do these look ok? I know they are just the dropboxes and people probably do not even notice them most of the time, if ever. And the shoulder straps I took some advice from Sith Lord (Ian) and went with 51mm. They were so hard to get straight but right now mine look like this. Do the corners get rounded off or are they supposed to be at angles? Finally I roughly cut the knee ammo boxes and then I got a little confused. One side is 7.5mm from the last box and then the other is 6mm. Now do I end up keeping it like this so it fits on the thigh and can just make my corner edge now? Or do they get cut to the same size on each side and then rounded off? Is it kept different so people can fit it to their thigh? Thats all for now. Any feedback would be great. And if someone can answer those couple of questions that would be cool. Thanks. -
Another noob post =P
starsaber25 replied to ortophonic's topic in Getting Started - Read this First!
Or you can go right to the sales thread... http://www.whitearmor.net/forum/topic/26954-fs-am-armor-master-kits-are-back/ Good Luck -
Starsaber25s Walt80 Helmet Build
starsaber25 replied to starsaber25's topic in Build Threads Requireing Maintenance
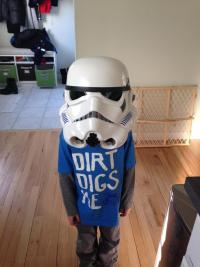
Ok so here are the final pictures for now. I made my deadline for his birthday yesterday. He was really excited and loved it. I can see from the pictures that there are still some things that I need to fix or finetune but its pretty good for right now. Next to my awesome TM -
MTK Build - ANH Stunt
starsaber25 replied to I'm Batman's topic in Build Threads Requireing Maintenance
Awesome job! Keep going Ian so I can follow what you are doing! -
starsaber25's MTK ANH Stunt Build
starsaber25 replied to starsaber25's topic in Build Threads Requireing Maintenance
Hey all. I finally got back to working on some of my armor and I have a few questions that I was hoping to get some help on. Is there a specific measurement for the shoulder straps? I think I remember once seeing that they are two inches wide and then the shoulder elastic is 1.5 inches. Is that right? Also is there a specific measure for how thick the drop boxes should be? Finally I saw on Toybiz's ESB build that he used a 3" PVC coupling to reshape the left bicep a little in boiling water. Is this a recommended move or would it be wise to just leave it as it is. Thanks! -
I believe he sells a booklet now on trooperbay.com
-
Starsaber25s Walt80 Helmet Build
starsaber25 replied to starsaber25's topic in Build Threads Requireing Maintenance
Thanks Charles for looking and sending me those pics in the beginning. Yeah those ears were really tricky and I don't ever think you could get them perfect. The left ear is what it is. The other spare is lost beyond repair. I could still fix up the spare right one at some point and have it fit probably even better then the one thats on there. But we will see. -
Starsaber25s Walt80 Helmet Build
starsaber25 replied to starsaber25's topic in Build Threads Requireing Maintenance
Hey everyone. After a little break, I started back up on my sons helmet. His birthday is June 30th so that is the deadline. It needs to be done! After spending two days trying to get the ears right, here are the pictures. I went through two sets and I think these are the best two. Please let me know what anyone thinks. Also if you have any comment on the paint job that would be great as well. Thanks I know its not too great but I kept reminding myself that this was for a 6 year old and it doesn't need to be perfect. But man these ears are a super pain! Thanks for looking. -
starsaber25's MTK ANH Stunt Build
starsaber25 replied to starsaber25's topic in Build Threads Requireing Maintenance
Hey everyone. I have been on a hold since my last post because I'm trying to finish up my sons Walt80 before his birthday. I have a question about the undersuit and was hoping you could help. I want to keep it cheap and I will go to Target, Walmart or Kmart and wanted to know who has gotten undersuit pieces from these places and what is the best one. I ask because I can't just drive 10 minutes down the road to go to these stores. They are an hour away from me and I'm going to get one shot for the time being. I want to make it count! And does anyone have any feedback on my progress so far? Thanks!