gazmosis
-
Posts
4,043 -
Joined
-
Last visited
-
Days Won
23
Content Type
Profiles
Forums
Gallery
Articles
Everything posted by gazmosis
-
I think the final presentation of the blaster would go towards you overall look when your armor is done. Are you gonna be an "out of the box shiny"? Or a "seasoned" trooper?
-

ANH Stunt ATA - First Build
gazmosis replied to gamesforbreakfast's topic in Build Threads Requireing Maintenance
Our leader beat me to the point about your belt being proper. You will, however, need to trim back the cover strips on the back of your thighs. They should end at and not exceed the molded ridge at the bottom of the thighs. I can't see because there aren't any close ups, but the tube stripes look to be the Trooperbay hand painted Dave M decals. If they are, you applied them backwards. These tube stripes are evenly spaced and positioned right up until the lower most stripes. The are supposed to angle slightly away from the frown. Yours angle towards the frown. Since they are decals, it's an easy reposition fix. I think it was Jason that brought it up, but I grew about scaling back on the ab button paint. You should shoot for 10-11 mm in diameter. Great looking armor!,!!!!! -
static burst walkie takie talk
gazmosis replied to TKedt's topic in Electronics for Helmets / Blasters
Everyone is entitled to their opinions....even myself. I think the Icomm is too sensitive. The guys in my Garrison who have them are crackling and popping all the time without even talking. It's just plain distracting. I like just the plain "click" before and after my voice which I can do with my own mouth. Hail to the Aker! -
TK-20421 Requesting ESB EIB Status [TM][394]
gazmosis replied to Cantina Security's topic in Request Expert Infantry Status
It's not fair to look that good.......it's just not fair -
TK-20421 Requesting ESB EIB Status [TM][394]
gazmosis replied to Cantina Security's topic in Request Expert Infantry Status
The boss speaks wise words. It is a 10 minute upgrade. That would be the right thing to do -
unclesven's RS ANH Stunt build [*RS]
gazmosis replied to unclesven's topic in Build Threads Requireing Maintenance
First off.....tasty looking summer sausage. I bet your burps smelled wonderful after that! NOM NOM NOM NOM NOM Back to business.... Your thighs are paired up correctly. You mentioned wonkiness. You are correct. The left thigh will work itself out fine. The right one is the one that has choices. First off you will find that top of the thigh will look like this: You could leave it like that, but as you can see by my markings, I decided to trim it even and re-create the return edge Also, don;t worry about the uneven bottom portion either. Don;t clip it off. IT will be hidden under the thigh pack, plus, You can use it to as a gluing surface so your thigh pack doesn;t hinge. -
http://www.whitearmor.net/forum/topic/21229-helping-a-little-girl-that-was-bullied-for-liking-star-wars/ http://www.501st.com/forum/viewtopic.php?t=81970&postdays=0&postorder=asc&start=0 As many of you know, The 501st and the FISD have come together to battle the effects of Bullying. LCO and Garrison mate Aimee Jorgensen contacted me to rally the FISD to continue the battle against bullying and ask its most artistic members if they would like to draw up an entry for the main 501st anti-bullying logo. Please visit the link to the main Legion page above that will explain all procedures. We have REAL power. We have the power to change people's lives in so many ways. Some of the most talented and dedicated people I know come from these pages. Let's continue to use that power!!! Good luck troopers!!!!
-
what to do inside my new TM stunt helmet build
gazmosis replied to valo's topic in Build Threads Requireing Maintenance
It's what the public sees that matters.... The inside is up to you -
Either is fine
-
Hey Cary: Your application is mission a few pictures. Could you please post full body side shots with your arms raised, and a close up shot of your holster attachment. Thank you!
-
TK-74210 Requesting ANH Stunt EIB Status [RS][393]
gazmosis replied to LeMaxim's topic in Request Expert Infantry Status
Hey Maxim!!!! Armor like this is what improves the overall look of the Legion!! So well done it is inspiring! I LOVE the "trooped in" or "served in" look to your armor. Really gives it character and authenticity. CRL and EIB Requirements: All required submission photos have been posted. Perfect application post! Your armor meets all standards for EIB. This was an easy one!!! With that, I would like to congratulate and welcome you to EIB!!!!!! Other-Armor Fit/Assembly: This section is where your armor is looked at and suggestions are made to further improve the look and comfort of your armor. Nothing here affects your applications. The only suggestion I have is to perhaps add a touch of weathering to your blaster. It would just give it a little depth and realism. If that is not your thing, then perhaps adding a little silver in the trigger group area like you see here: I do want to bring up a couple of observations. I don;t see any issues with your thigh height or excessive gapping between parts. There are no issues with your tube stripes either. In regards to the rank bars on your ears, there are no standards requiring the stripes to be on the rearmost or the second bump. The rank bars, (to the best of my knowledge) were not seen in ANH forward of that. I have suggested consistency. I have believed that if our pretend PEW PEW PEW world was real. the rank bars on the sides of the helmets would indeed indicate your rank as a trooper. You should be able to tell what rank you are from whatever side of you I am standing. But again, I am just suggesting consistency here and there is no stated requirement. We are allowed to keep this fun. Outstanding paintwork on all aspects of your armor! I like also the way you kept the waist belt rivet covers to the outside edge of the belt!! Centurion Suggestions: I hope to see a Centurion application from you. This would be a no brainer. The only thing that needs to be done is to cover the logo (if it is indeed a logo) on your under suit above your right thigh. If it is a logo and you have covered it, please present this correction in your Centurion thread. You requested suggestions for tips on further improvements.......I just can't find any. Well done, trooper and congratulations again!!!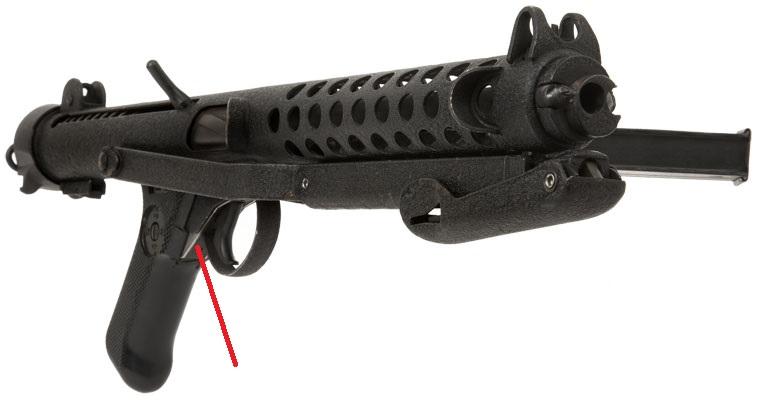
-
Sadly no......but it will not go to waste. If you have never made TD clips before, you might need a little extra. Then you can show yours off and make a set for a Garrison mate or two.
-
Where do you live, Ed? If you are in the US, Lowes sells what you need: 1 inch by 1/16 aluminum strip. I think it's $7 for 8 feet of it.
-
If you choose to use Velcro rather than the metal "U" hooks for the closure on your calves, that should be the only Velcro on your armor. ( your belt has some but I am talking the plastic parts) Glue is the only way to make the parts sit flush when finished. Glue is your friend. If you are nervous, stick with E6000 then if you make a mistake it is reverse able.
-
I am in no way hijacking the thread but I do want to thank Rob for chiming in on some of these builds!! A pleasure to see you lurking, Sir!!!
-
Keep in mind.....when finished, it must be sent to me for approval. That process takes no less than 2 years sorry to say.
-
TK51500 requesting ANH Stunt EIB status [AP][392]
gazmosis replied to Snaps's topic in Request Expert Infantry Status
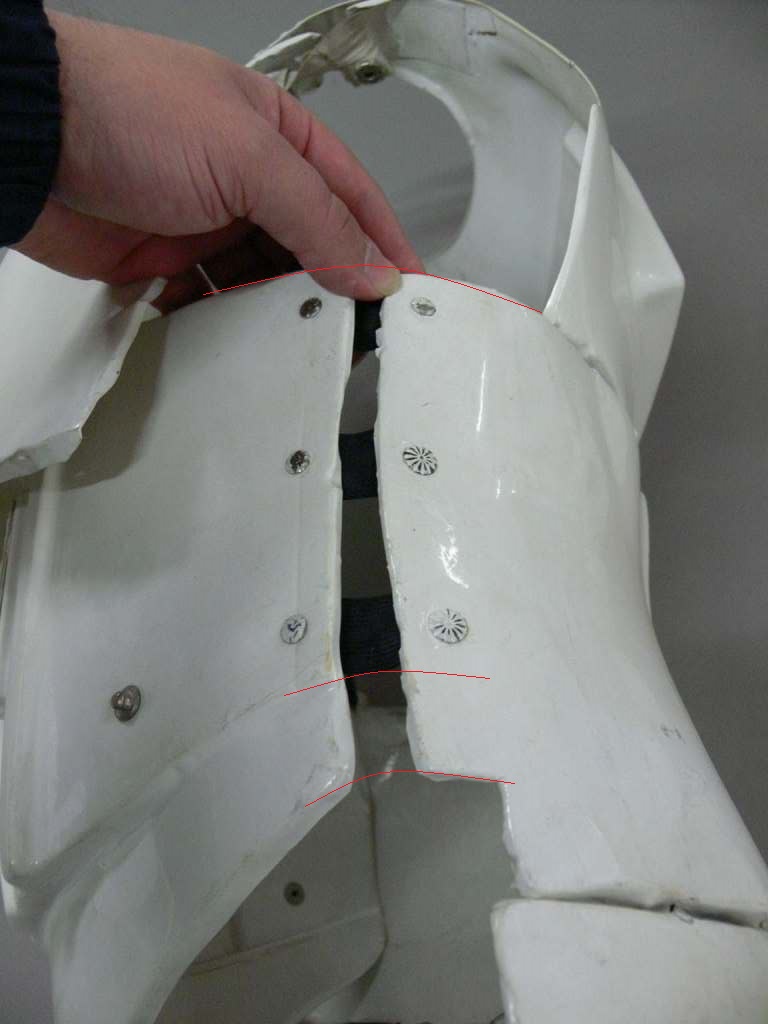
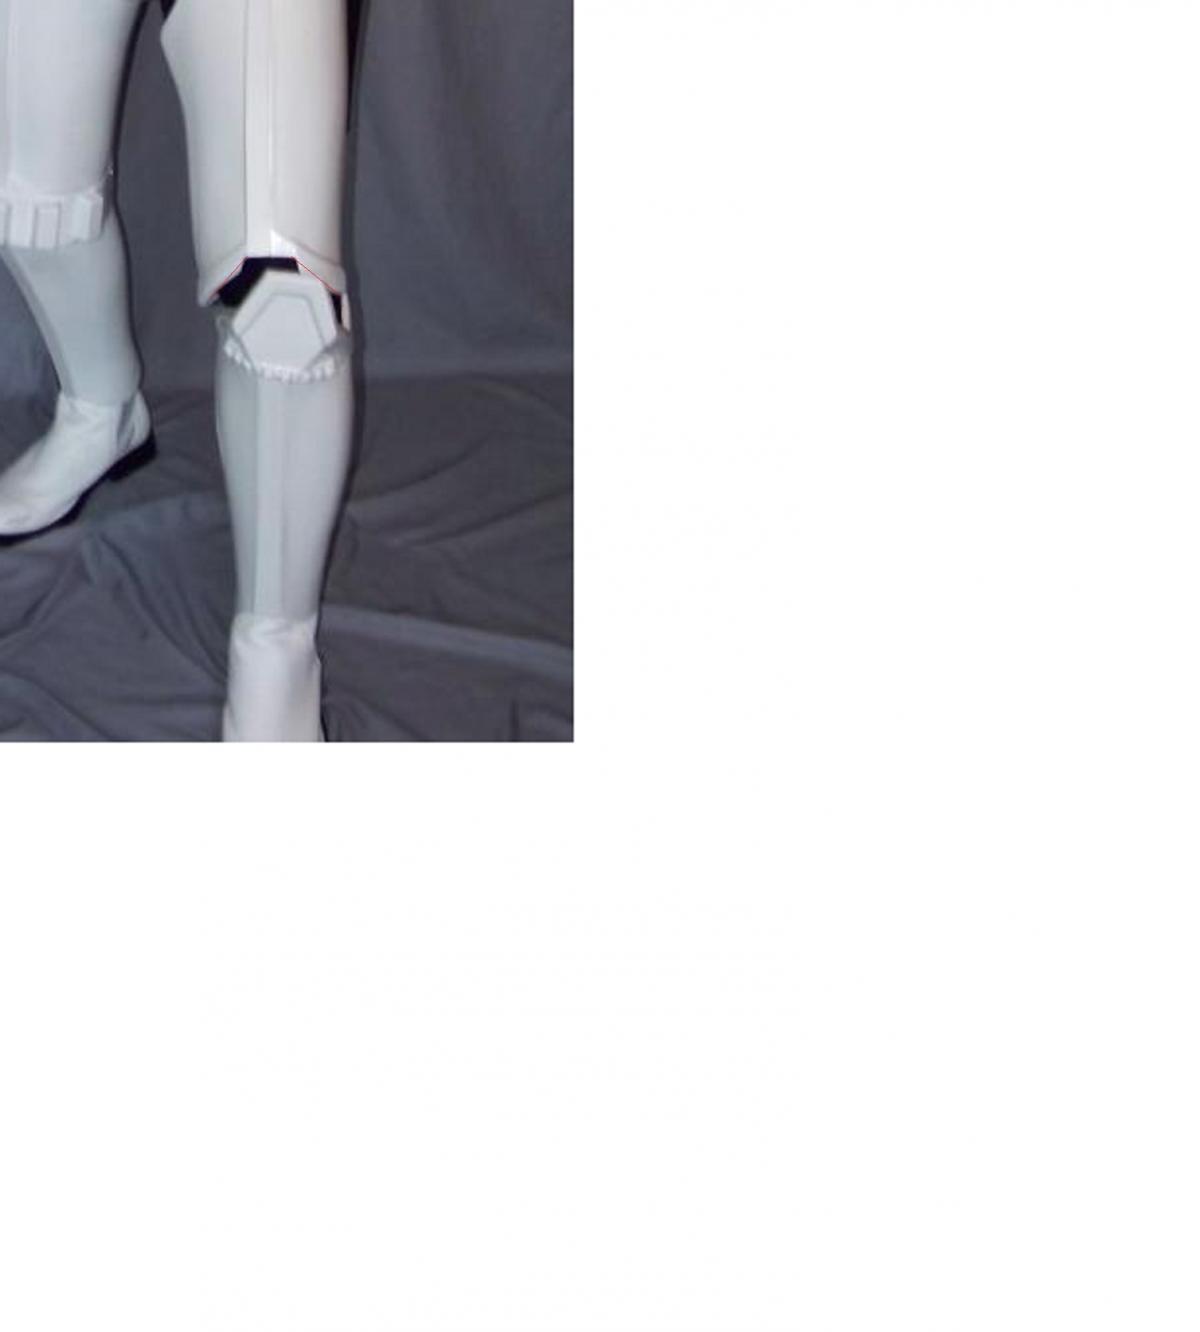
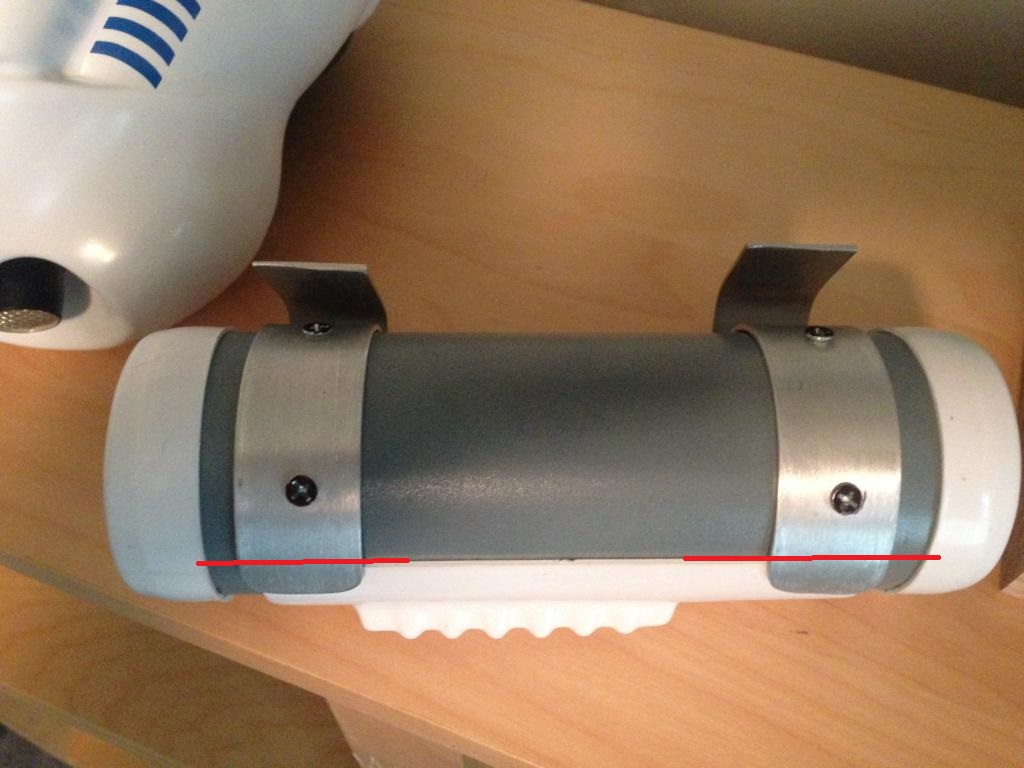
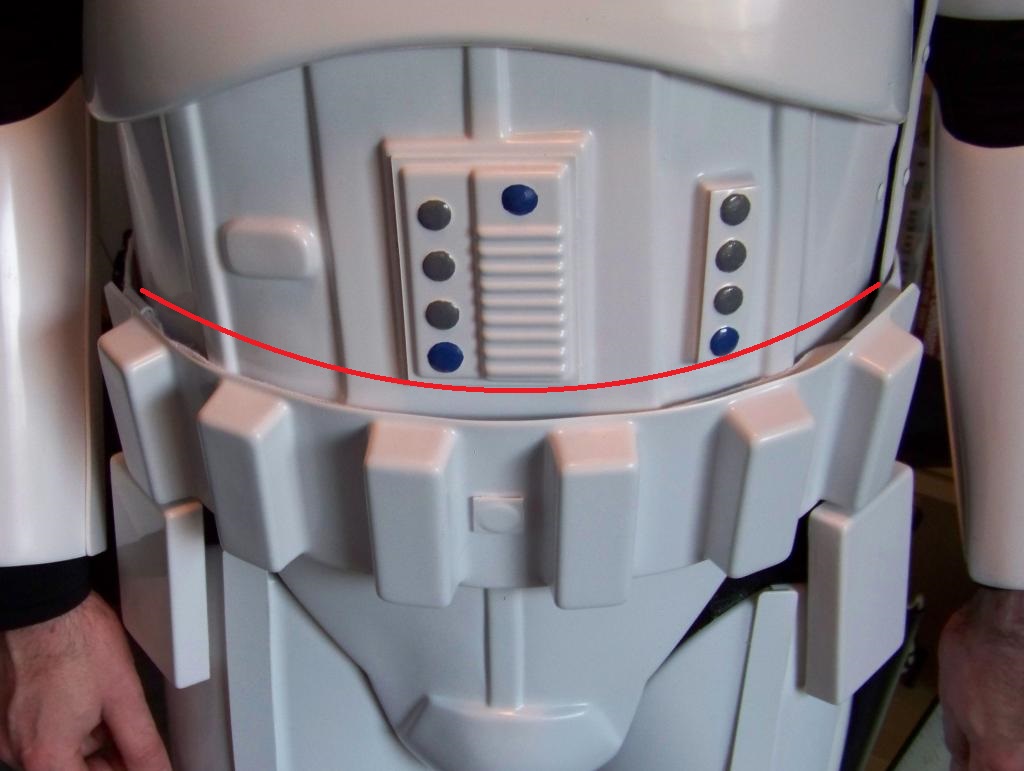
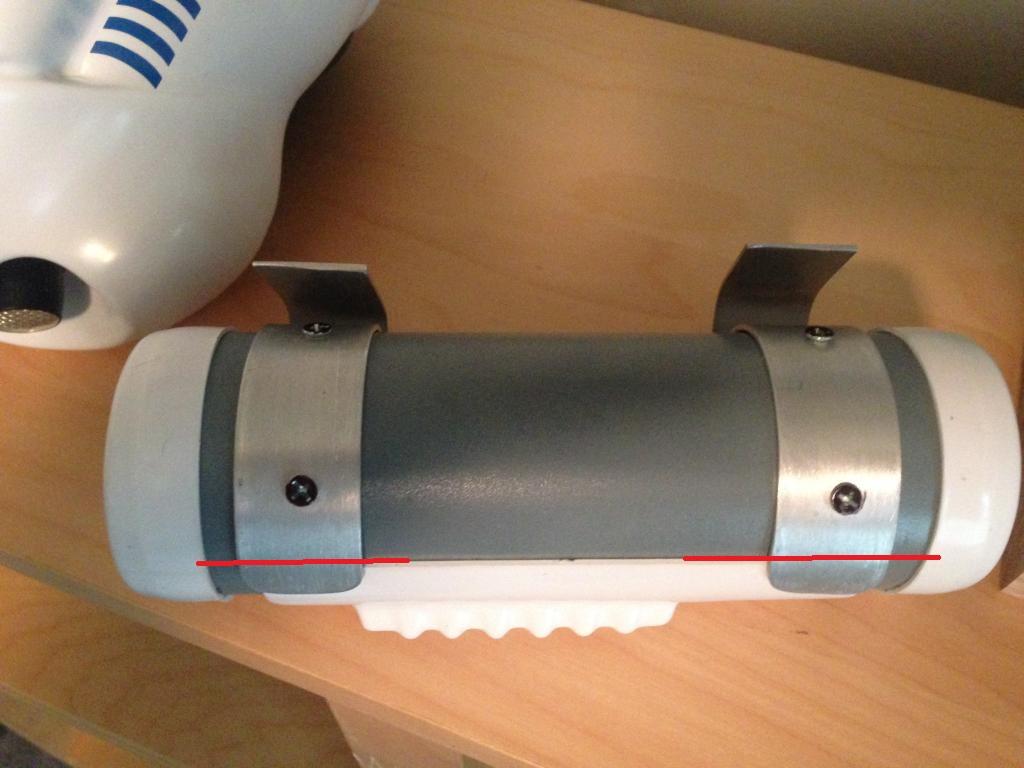
Hey Steve!! Thank you for your application to EIB!!!! You have a great looking set of armor. Very well fitted to your frame. Nice work!!! Let's look at your armor a little more closely! CRL and EIB Application Requirements: All required submission photos have been posted. After reviewing all photos, your armor meets all requirements so with that I would like to congratulate and welcome you to EIB!!!!!!! Other-Armor Fit/Assembly: This is where myself and your fellow troopers make suggestions that do not affect your application, but are suggestions to improve the overall look of your armor. The first point is something that boarderlines on the nit picky. I like that your side rivets are the correct distance from the seam and evenly spaced across from each other. For this reason, I am not requesting a change here. I do believe they are a little close together in their spacing top to bottom. I marked off what I mean here:. Here is an example of the spacing from an archive suit: I do have a small request regarding the cut out at the bottom of your left thigh. I am not too sure why this was cut in the shape it is, but I'd like to see the corners heat massaged or trimmed to blend more with the line of the ridge at the bottom like this; In reviewing this picture, See "Centurion Suggestions" below for further comment on this thigh. The other thing that would look great but is not required is some weathering on your blaster. If that is not your thing, then perhaps just to add the silver color near the trigger group as seen here: might just add some further depth to your blaster. Oh, nice magazine by the way Centurion Suggestions: From the many specific details you have added to your armor I can only assume that I will see a Centurion application from you at some point. I sure hope so!!!! There are a few changes that will need to be made. First I want to go back to your left thigh. Whatever reason it was that you needed to trim that square notch out is adjustable by evening up those corners. A closer look however shows that your cover strip extends beyond and onto the lower ridge. The cover strip should not do this as seen here: If you do apply for Centurion. the decals on your helmet in the trap and tear areas will need to be removed and be hand painted or be replaced with the Dave M "handpainted look" decals. Next I want to go over your thermal detonator; specifically the belt clips. First off, they need to be bumped outward towards the outer caps to either touch or have minimal gap between the clips and the caps. Second, the clips should be straight across the top and sit even with, not overlapping, the control panel like this:I have marked my suggestion on yours here: If you want to really WOW the accuracy factor, you could get slot head screws rather than phillips but that it up to you. There is one more adjustment that may lead to a correction in another. Your waist belt is sitting a bit too low. The top of the belt should touch if not slightly overlap the main button plate. I have marked this in red: I noticed that you have a slight "V" gap at the top of your ab/kidney seam. There is also some overlap at the bottom of this seam. I just wonder if the belt was raised to its proper position would it eliminate this gap because the pressure would be in the right spot on your armor. The last thing is in regard to your MASTERFUL work blending in those side shims. I'd like to see a little more artistry go into that seam to eliminate the notch at the top to make it more seamless. The notches just make it seem like something was added so it doesn't look natural. Please feel free to contact me should you have any questions! Great work and congratulations again!!!!


-
Hey Lee! Thank you for your application for your Centurion badge. Let's look at your armor!! CRL and Centurion Application Requirements: All submission photos have been posted. IT is always a pleasure to see yet another well built set of TM armor. You should be proud to wear this armor, Lee! There was, however, one correction that needed to be done. There was a bit of excessive overlap of the back plate over the kidney on the right side. Lee has made this correction and the original back shot was replaced with the updated photo, The side shot showing the overlap was left for comparison. Thank you, Lee, for taking the time and making the extra effort to improve the overall look of your armor!! It shows!! With that, I would like to congratulate you for taking your place among the other Centurion troopers!!!! You will make your Garrison proud!
-
AP has always been a strongly supported armor here. This armor works best for the smaller framed trooper with a waist measurement of around 32 inches. If you are much bigger than that, you will have gaps on your sides or need to ad plastic shims to close that gap.
-
Nice work!
-
ATA (Affordable Trooper Armor)
gazmosis replied to Torpedo's topic in Hard Armor (General Discussion)
Darth Aloha LIVES!!!!!! -
I have two words that solve this problem........side cutters. The brass screws that usually come with these kits cut like twigs with side cutters.
-
Make it about the same as your side rivets; about 10 MM in from the seam. You can just eyeball it so it sits in the center of the corner.
-
TK-32627 Requesting ANH Hero Centurion Status [NE][125]
gazmosis replied to JLight's topic in Request Centurion Status
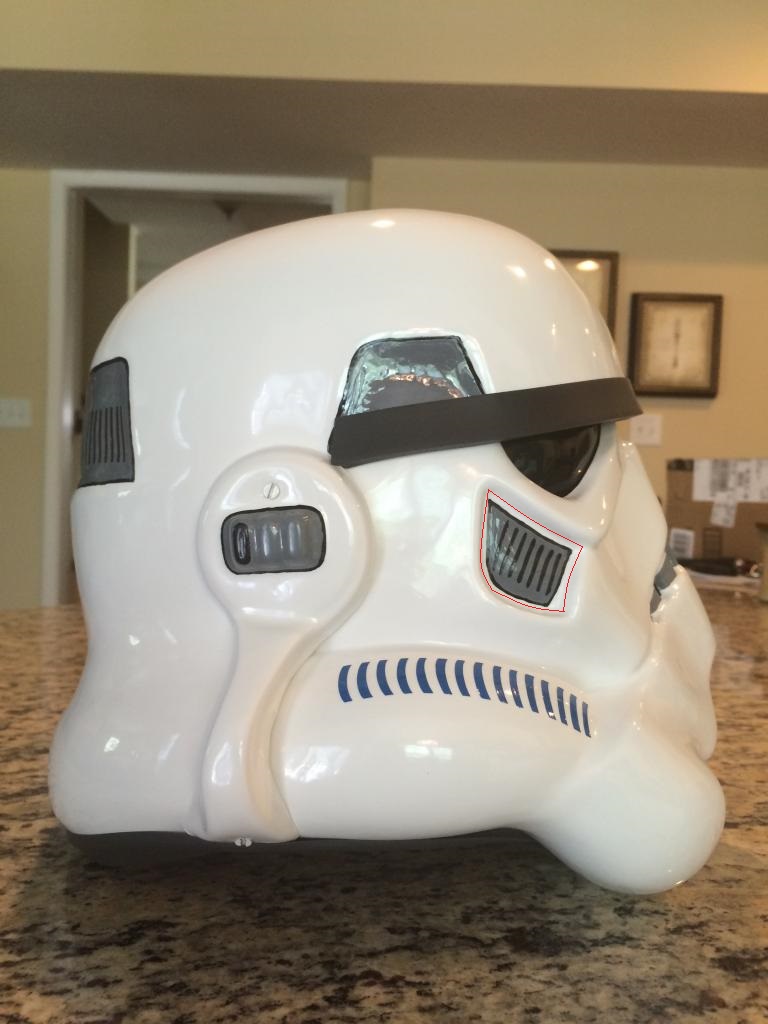
Hey Jonathan: Thank you so much for your application for your Centurion badge!!! In looking over your armor, it makes me sad that the NE armor program didn't work out as your armor is a stellar example of the beauty that could be made with it. *Sigh* ANYWAY...... CRL and Centurion Application Requirements: All Centurion submission photos have been posted. I feel I need to mention a correction that Jonathan was kind enough to work with me on and make. A Centurion application and its submission photos should be the final presentation of all the hard work to accomplish the level of accuracy that accompanies "Centurion". If corrections were necessary and noted on the EIB application, new photos need to be taken and submitted with the proper corrections made. The main issue that was noted in Jonathan's case was the gap on the right side that I knew could be eliminated by just tightening up the belt. Jonathan suited back up and took new photos with the tightened belt and re-posted them into this application thread. This was the candle on the birthday cake!!! Nice work Jonathan!!! All other aspects of your armor meet the requirements for "Hero" Centurion. With that I would like to congratulate and welcome you to Centurion!!!!! Other-Armor Fit/Assembly: There was another adjustment that was made that can be noted. The belt clips on the Thermal Detonator should align with the bottom edge of the control panel. Jonathan trimmed these back so that they would. Would I rather see clips with flat sharp corners at the control panel rather than rounded off? Yes. But this is nothing that would restrict the badge. Another thing that might be updated later on is a point that Jason brought up regarding the tears under the eyes. Leaving the teeth out of the discussion, any of the other details (traps and tears) should be painted up to the "ledge" or "wall" of the indent. You can see I marked this on your helmet, Jonathan: Compare this to Luke's helmet from this screen grab: That is something for a rainy day. Thank you again for all your efforts towards making this Legion a better looking place! Your Garrison should be proud!
-
Thermal det belt clip material and widths.
gazmosis replied to Sly11's topic in Hard Armor (General Discussion)
I know you are overseas and I don't know what hardware stores you have there but I am sure one has a section they call the metal shop. What has always come through is 1 inch wide by 1/16 thick. That is very close to what was used originally.