gazmosis
-
Posts
4,043 -
Joined
-
Last visited
-
Days Won
23
Content Type
Profiles
Forums
Gallery
Articles
Everything posted by gazmosis
-
I'll take a Beru burger...extra crispy, please!
-

TK-7961 Requesting ESB Stunt Centurion Status[128]
gazmosis replied to Front-a-Little's topic in Request Centurion Status
Hey Pat! Thank you for your Centurion application! Thanks again for your incredible building skills and your service to helping other troopers live their dreams! Your armor is a pleasure to look at and very inspiring! CRL and Centurion Application Requirements: All required photo submissions have been posted. Your upgrades and improvements have honed the look of your armor. Your trooping has given your armor a used look that gives it so much character. With that I would like to congratulate you and welcome you to Centurion!!! I really have nothing further to ad. Did I tell you that you look good in your armor? Nice work, Sir! -
Hey Matt! What a great looking set of ATA! Well assembled and a great fit makes a kit like this a pleasure to look at. Now let's look at YOURS!! CRL and EIB Application Requirements: All required submission photos have been posted. Your armor build meets all the requirements for EIB. With that I would like to congratulate and welcome you to EIB!!! Other-Armor Fit/Assembly: This is the section where your armor is looked at and suggestions are made for improving the overall look of your armor without affecting your applications. The sharp eyes of your fellow troopers beat me to a few suggestions that I will cover here and in the "Centurion Suggestions" section. First, I don;t bring this up often but I do like to note that ideal finish for the hovi tips and the vocoder area between them should be a satin/matte finish. Not so uber glossy. I wanted to commend you on your outstanding holster placement. Centurion Suggestions: From the looks of the details you have built in your armor, I can assume we will see a Centurion application from you. Jason already beat me when mentioning the long cover strips on your calf closures. Thank you for trimming those down. The other mention was your thermal detonator which you have upgraded by adding the more accurate screws and moving them outward. However, one more issue exists that may or may not necessitate a replacement. As you see on this screen used detonator, the clips should be up to and touching the bottom edge of the control panel. If you are able to move your clips to this position and still have enough to clip onto your belt, GREAT! If not, a different option might be looked into. Last thing I would like to see changed is the "D" ring on your blaster. The Hyperfirm cannot be modified at all with the exception of some paint. The "D" ring should look more like this Sterling one: These are easily obtainable at most hardware stores in the chain link section or from Karin on these boards. It is an easy switch that will go along way to making your blaster more accurate. Congratulations on EIB again!! Keep making your Garrison proud!!
-
You rich people make me ill
-
TK27883 requesting ESB Stunt EIB Status[TM][396]
gazmosis replied to ChrisODW's topic in Request Expert Infantry Status
CHRISTOPH!!! Well done!!! The mic tips I knew were there it's just that the application requires a picture of it. Your use of Imperial dental floss is awesome!! Looks SOOO much better. That side shot is money!!! I hope to see a Centurion application from you. With that I would like to congratulate and welcome you to EIB!!!! -
The Dremel will be very important. You will need a couple small sculpting bits to get into tight areas and a larger one for hollowing out the mag well for your new magazine
-
Full resin E-11 from DoopyDoo's with some modifications
gazmosis replied to T-Jay's topic in ANH BlasTech E11
Such an overachiever!!! AWESOME!!! -
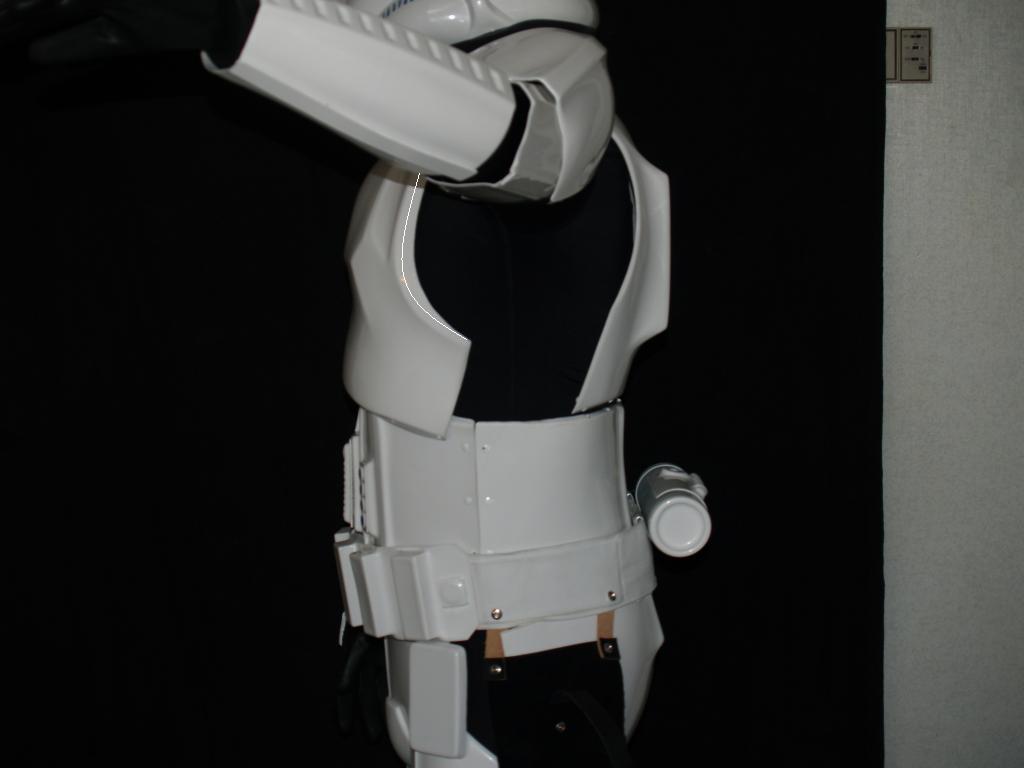
Keep in mind that the shoulder bridges do nothing structurally for the armor. They are really just there as covers to hide the gap between the chest armor and the back armor. The strap that connects the back and chest from underneath is the structure. The ribbed shoulder bridges are curved so when glued to the chest, they merely sit on top of the back "floating". The small white elastic piece was just to hold them in place. Like Brian said, look on the Centurion builds and you will find examples of thus on every set of armor.
-
Diana's RS Props Build- ANH Stunt
gazmosis replied to AsBlondeAsLuke's topic in Build Threads Requireing Maintenance
Once I saw the masking material for the tube stripes I winced...then I saw the peel back pic...ouch. Don't worry about it. That material is just tough to get a good seal on the double curved surface of the cheek tube. I gave up trying to use it as a template long ago and just use it as a guide. I place them and trace each one with a pencil then paint it. I am still blushing from all your cod talk........*shivers* -
Ah the smell of a big brown box!!! Best in the world next to a new car and fresh baked bread.
-
Unless they have changed, all Testors model paints come in small bottles. You should be able to do a search and find them online. Trooperbay has them here as well
-
It's like an ESB barracks.....you guys all live in the same house?
-
TK-23325 Requesting ANH Stunt EIB Status [ATA][395]
gazmosis replied to Frank4vt's topic in Request Expert Infantry Status
I couldn't see the screws clearly. They looked like rivets. It's all good. I can't wait to see your upgrades. You will see the difference. Congrats and it was a pleasure to help out! -
See! The awesome apron worked! Getting touch with your inner seamstress!!!! Be careful with the back of the thighs. You don't want the. Thigh backs to be so horizontal. Place the butt up against the thigh back and you will see how they should be shaped

-
TK14057 Requesting ANH Stunt Centurion Status [NE][127]
gazmosis replied to JODOKAST's topic in Request Centurion Status
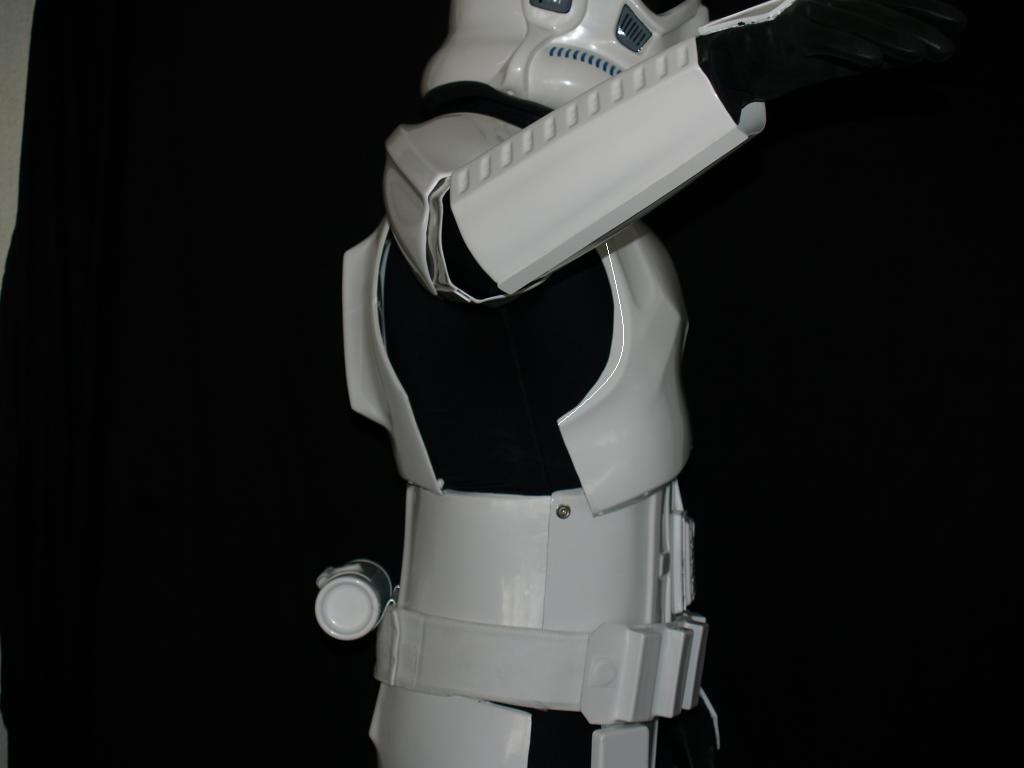
Alright Marcus! Great to see your Centurion application. I kind of expected to but still great to see it! Let's take a look!!!! CRL and Centurion Application Requirements: All Centurion required submission photos (and then some) have been posted! The corrections you have done have come along way to the overall look of your armor. Your helmet looks outstanding, between the new screws and the trimmed clips your thermal detonator shines, and the little extra you took off the corners of your belt makes a nice balance there. It is in the details...and you nailed it! Welcome, Sir, to Centurion!!! Other-Armor Fit/Assembly: Although this same category exists in EIB threads, it is repeated here because Centurion applications reveal many details not seen in most EIB applications. Remember, these are suggestions to further improve your armor and do not affect your application: There was talk mentioned regarding your thigh pack and the corners. Perhaps a bit more could be taken off the corners. What I would adjust is the top to bottom width. Like the waist belt, there should be minimal space left above and below the thigh pack boxes. If you decide that this is something you want to tackle, the end cap of your Thermal Detonator is a good source for curved corner. I have scribbled out some suggestions of what could be removed on your thigh. I don;t have a picture of it, but I would knock down the little sharp overhang of your sniper plate over the edge of the shin. These should be fairly even with the molded ridge on the shin itself. And then there is that super sharp corner on your left side at the rivet seam. ????? Tell me that doesn't get caught on everything?? I do want to say what an improvement to your blaster it was to knock the gold down on the scope. Like your armor, it looks great!! Congratulations again!!!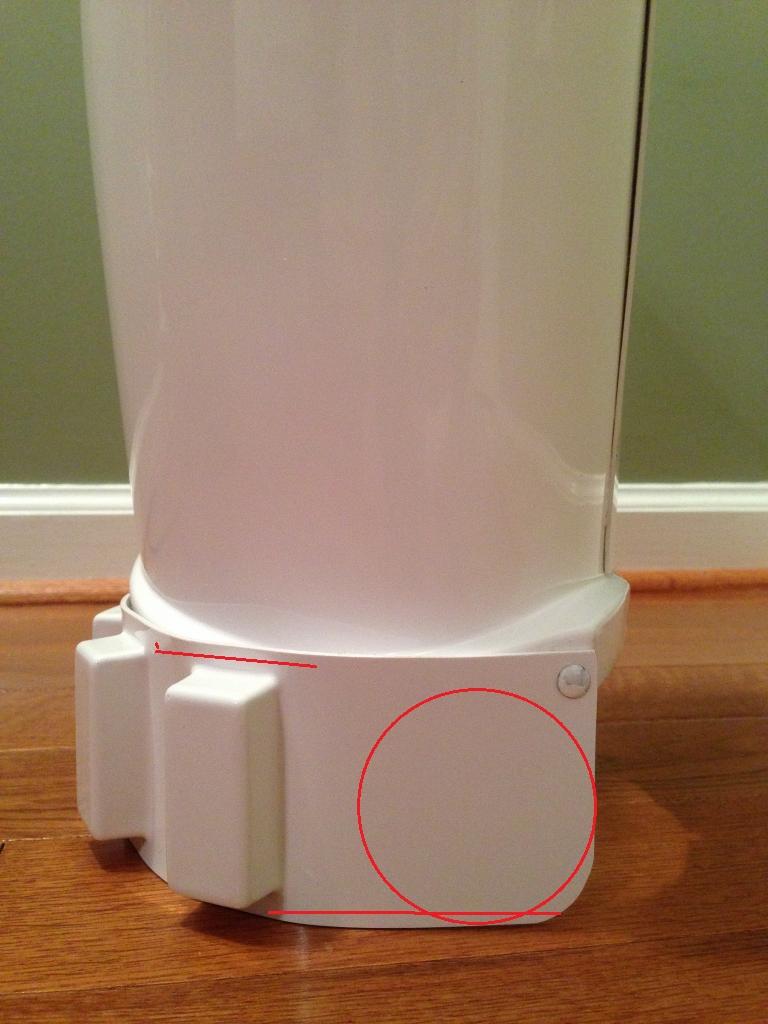

-
TK-23325 Requesting ANH Stunt EIB Status [ATA][395]
gazmosis replied to Frank4vt's topic in Request Expert Infantry Status
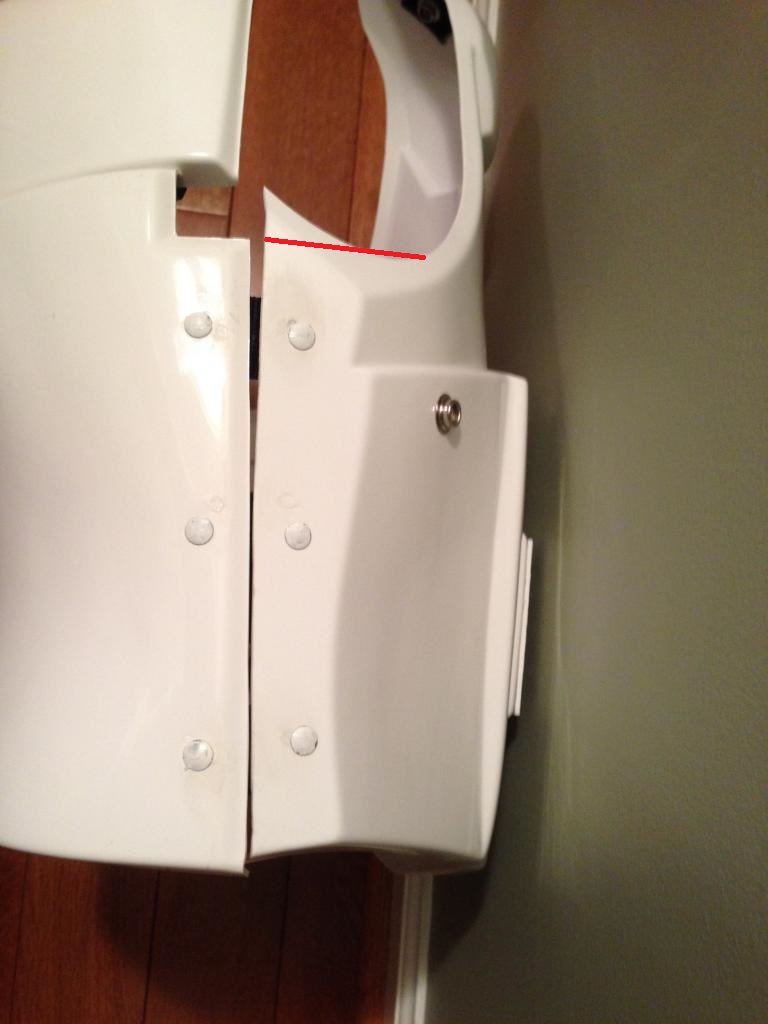
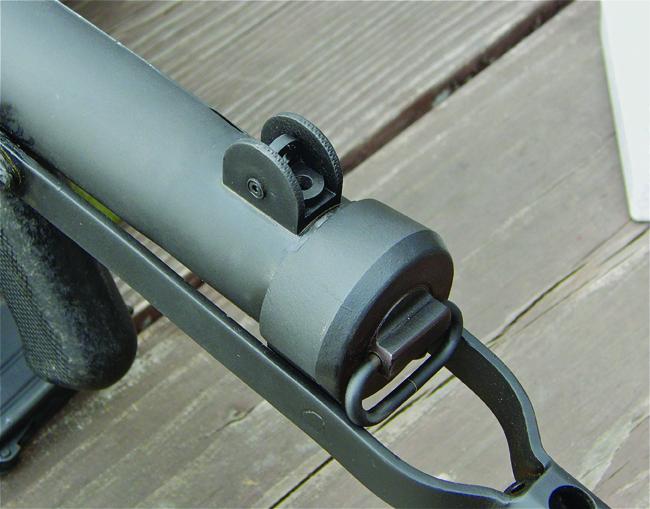
Hey Frank! Thank you so much for your EIB application. Great to see such a well fitting ATA. Let's take a look at your armor! CRL and EIB Application Requirements: All required submission photos have been posted. Your armor meets all requirements for EIB. With that I would like to congratulate and welcome you to EIB!!! Other-Armor Fit/Assembly: This is the section where the suggestions from other troopers and myself can lead to improving the overall look of your armor. Nothing mentioned here will affect any application. Jason brought up a couple good points some I will mention also in the next section. You have great paint work on your helmet. Good detail and not to thick edge lines around the traps. Also well painted are your ab buttons. ATA's buttons are molded bigger than most and often painted too large because people think the entire raised portion should be painted. Nice call on that! Something you might want to address is the excessive return edge on the sides of your chest. You can see the minimal return edge on this screen used chest:I added a couple suggested trim lines on pics of your armor: Typically return edges are right around 1/4 to 3/8 of an inch in these areas. One more thing....I like the upgrade on the inner strap brackets but did you use pop rivets to secure them to the armor? Centurion Suggestions: I love seeing so many builds come right for Centurion! With all the details you have added, I can only assume we will see your application! There are a couple things that will need to be upgraded, though. First, as you already know, a Sterling based Blaster is a requirement. Second is a point Jason made regarding the cover strips on the backside of your thighs and calf closures. As you see on this screen used thigh, the cover strip does not extend past the lower molded ridge of the thigh or the upper ridge on the calf.The last suggestion is to make sure your drop boxes can align with the outer edge of your waist belt. Please make sure your Centurion photos show this alignment clearly. Oh.....I hear you got that slotted screw issue solved Congratulations again!!! Great looking armor!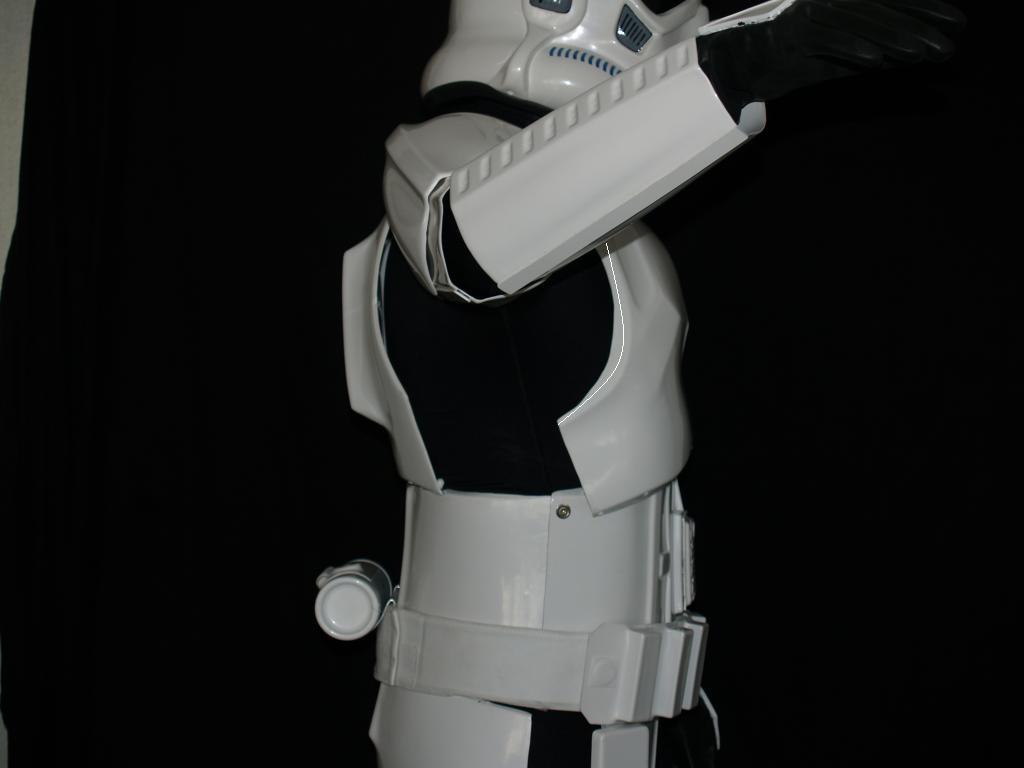
-
Make sure you have a pic of your interior strapping.
-
Ouch. Blaster is a keeper, though
-
SoCal Garrison response time?
gazmosis replied to charlesnarles's topic in Getting Started - Read this First!
Just contact your GML and send a pleasant message asking if your submission photos were received -
First-timer AP Armor Build Thread
gazmosis replied to usaeatt2's topic in Build Threads Requireing Maintenance
Ya think!? Hahahahahaha -
I usually wear a pink flowered apron when I sew. It seems to help me "get in touch". Are you going to sew your own belt? Just a suggestion, before you sew your elastic bits for the brackets, get a good sized nail, heat it with a torch and gently pull it across the edges so they don't fray. You can't just melt the ends of elastic like nylon webbing by sticking it in the flame. This is due to the rubber strands in the elastic. This will save you some future headaches
-
First-timer AP Armor Build Thread
gazmosis replied to usaeatt2's topic in Build Threads Requireing Maintenance
Nice save with the tooth hole. Were you filing with a sawsall? -
Like I said, the kidney to back seam is acceptable like you have it. If you want to adjust it, good on ya! Just make sure it remains a seam not a gap! Your belt looks great. I was just wondering if you pulled some miracle.
-
TK27883 requesting ESB Stunt EIB Status[TM][396]
gazmosis replied to ChrisODW's topic in Request Expert Infantry Status
Sounds great!!! You just keep the rank bars right where you have them. It's fine! We are already proud of you! The fact that you have been out serving the Legion making people smile for time you have is incredible! These badges will just be a bonus. Oh...and the fact you can fit in Troopermaster armor!!! -
LISTEN TO TERRY!!!! I would like to ad that there is an option #2. If you choose to paint the gray first then pinstripe the black line around it and the details within, you are an adventurous soul but it can be done with the right tools. What I recommend for this is a quality brush. If it costs a couple dollars more so be it. The quality of your bristles will affect your outcome. Make sure this is a thin bristled brush with long bristles (like 3/4 inch). Practice on scrap by marking both straight and curved pencil lines. The long bristles will allow you to make long, even strokes similar to pinstriping on a car.