gazmosis
-
Posts
4,043 -
Joined
-
Last visited
-
Days Won
23
Content Type
Profiles
Forums
Gallery
Articles
Everything posted by gazmosis
-

TK-27883 Requesting ESB Stunt Centurion Status[TM][129]
gazmosis replied to ChrisODW's topic in Request Centurion Status
AWESOME!!!!! That is absolute!!! Love it! Thank you so much for working with me on this! These little details brings your armor one step higher. Well done, Sir! Congratulations on earning your Centurion badge!!! Your Garrison should be proud! -
Alexandra has sent the requested photos. I edited them into the original application post. Everything is complete. Your armor is awesome. Thank you for doing a great job! With that, I would like to congratulate and welcome you to EIB. I would also like to congratulate you on being the 400th trooper to earn an EIB badge! We feel this is special and would like to share a few things with you so keep your eyes open, Alex!! Congratulations again!!!
-
Looks tons better!
-
Keep going with those teeth. A lot more material should be taken out to give the tooth openings in between more of a square look than an oval. An exacto knife or small files are good tools to accomplish this.It looks like you could take a little more out of the eye openings as well. The mold line here is pretty clear on the inside.
-
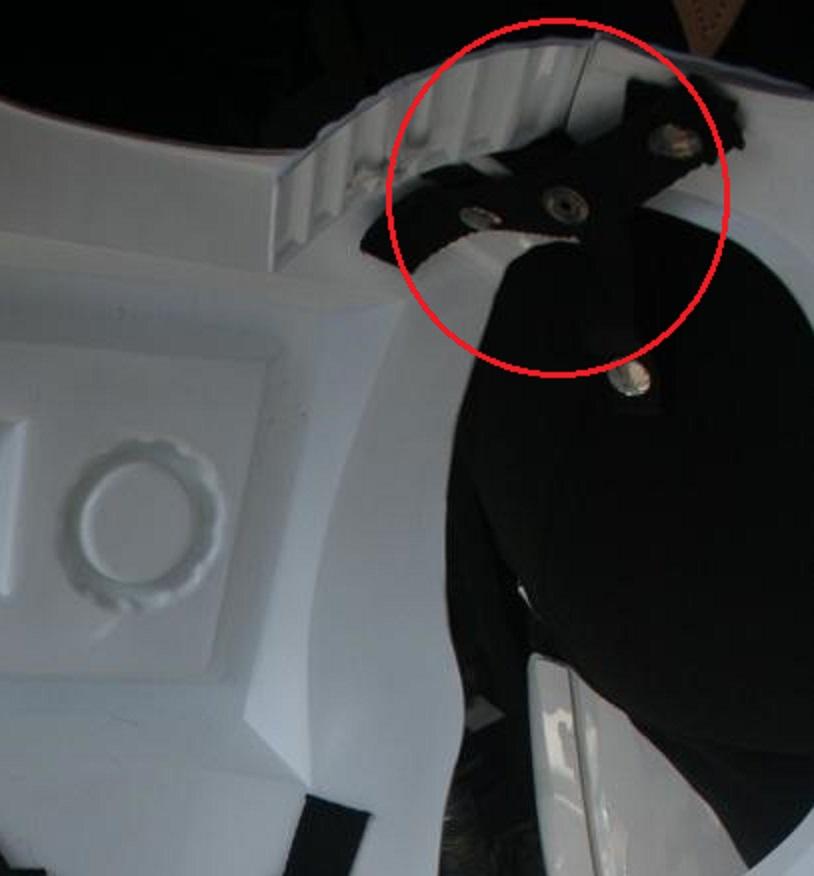
Hey there Brenton!!! This has been quite the journey for you. I commend you on your arrival to this point. I know it has been a tough road but you have a lot to be proud of. So let's look at your application and your armor a little more closely. CRL and Centurion Application Requirements: You have all the photos on the list posted but one detail that needs to be verified is the "no return edge" on the wrist side of your forearms. Please take/post that pic. Now, on your armor, there are, however, a couple small tweeks that need to be adjusted. You are SOOOO close here and these minor fixes shouldn't take long at all. The first one I want to mention is.....well.....this: It was correct in your EIB post. What happened???? The next thing that needs repair is to eliminate the gap between your shoulder bells and shoulder bridges. They should be darn near touching in that area. As for your forearm/bicep gap. I like the idea of the strap connecting the two but I hear ya when it comes to the pinching. Lowering your bicep can eliminate that. If that means your bicep shoulder bell strap won;t show, that's OK. You could also raise your forearm, note where the pinching is happening and trim that area down or like Mathias suggested, widen the area. Other-Armor Fit/Assembly: Because Centurion applications show more detail than EIB, better suggestions can be made towards the overall look of your armor. These are suggestions that won't affect your application. Congrats on those areas I know you struggled with like the thigh pack, sniper plate, and your side shims/ABS paste work!! Great job! Now, I would kind of knock down the gold on your blaster's counter. I know what you were going for here, but any weathering that would allow the brass on the real counters used to show through would be primarily on the edges. You would still see it subtlety, but sometimes less is more. Next is the elastic around your shoulder bridges. It looks small to me. Here is 1/4 inch elastic: I am just concerned that your smaller elastic might break on you. Attack these small changes and you will be there. Great job so far, Brenton!

-
The males snap isn;t really important right now or for EIB. I t just jumped out at me because of all the level of detail you have accomplished, it might have just been an oversight. Take your time. But in the meantime get into the trenches. Get a couple troops under your belt and soak up some of the joy you are going to bring to kids of all ages.
-
The TK Han waxes at point blank range right before chasing the rest down the corridor.
-
TK-27883 Requesting ESB Stunt Centurion Status[TM][129]
gazmosis replied to ChrisODW's topic in Request Centurion Status
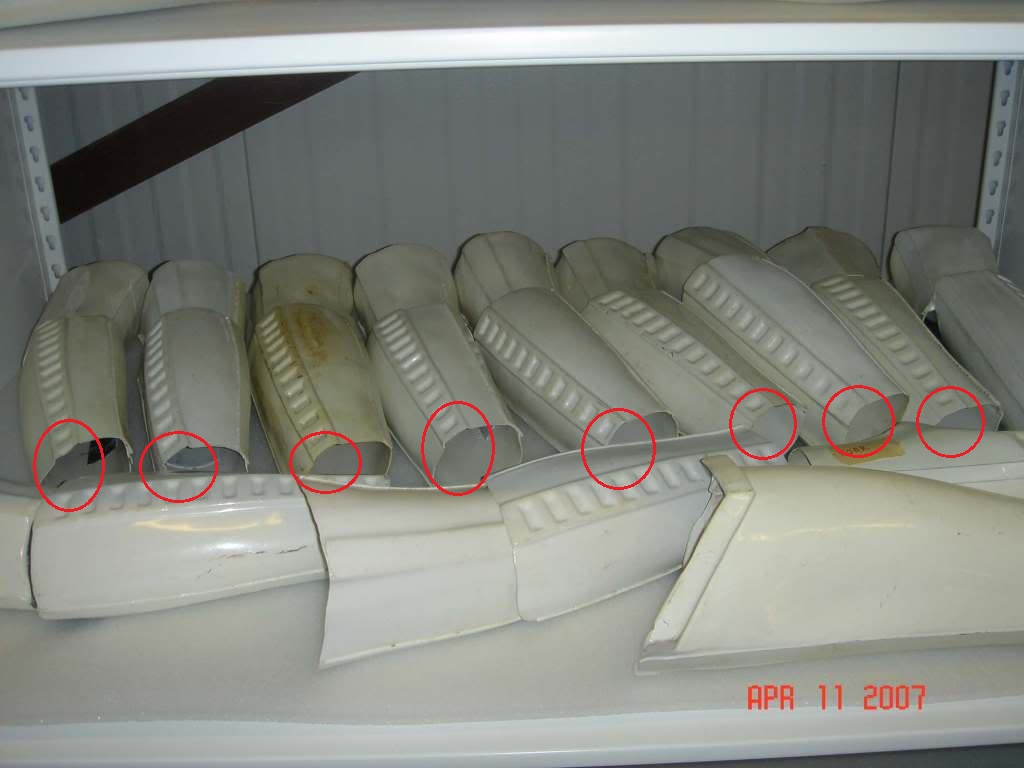
Hey Christoph! IT was inevitable that a Centurion application was going to come. So let's take a look at your armor!!! CRL and Centurion Application Requirements: We are a breath away from your Centurion here!! When applying for Centurion (or any badge) there is a checklist of photos that I need to see. Check the list, post the pic, check it off the list. I took the liberty of going back to your EIB application and retrieving the missing hovi tip close-up and missing thermal detonator pics and posting it to your application. There is one more that I am going to ask you to take. It is not missing but the detail that I need to see....I can't. I'll explain. I have asked to have this updated, but the picture of the cod/butt plate attachments should show the outside. The detail here is whether or not this hardware is painted. It should not be. I looked back on your build thread and your EIB to see if this shows anywhere and it doesn't. So please post a quick pic of this and we'll be good on pics. The only thing regarding your build that should be corrected is a 5 minute fix. The opening of the forearms at the wrist needs to be flat all the way around following the complete contour of the wrist opening including up into the raised ridges of the butt joint and the square indent ridge. You can see that here on all these original forearms: Address the cod hardware pic and the wrist openings and you are there, Sir!!! Other-Armor Fit/Assembly: Since Centurion applications show more details than EIB, this section is available to mention more points to improve the overall look of your armor. With your awesome attention to detail, there aren't too many points to mention here!! Your holster smudging seems to be a popular topic. I, too, get that on my thigh with my ANH holster. It might just be the type of leather used. We just don't see it too often because usually people post pics prior to field service. You have already been in the trenches. I think your "bruising" adds character and I'm not too concerned with it. Standard automotive rubbing compound or Novus will remove it instantly while polishing your armor at the same time. IF removing it is something you want to do. The next suggestion I wanted to make is in regards to the extra fraying you have going in the holster loop area of your belt. Alex has this same issue and although kind of cool looking, if it gets out of control, it could fray to the point that the belt structure could be compromised if it reaches the stitching. If you wanted to, you could mix up some diluted all purpose white glue or fabric glue and brush it onto the belt edges. Because of the nature of the material, it won't totally cure the issue, but it will greatly reduce it. Thank you for your service already accomplished. Your armor is outstanding and with 10 extra minutes, it will be Centurion!!!
-
Wow Ron lookin great! IF you were to hold a gun to my head, aside from your side rivets and thigh pack rivets needing paint, the only thing that bothers me is the rounded tops of the TD clips against the control panel. This was never seen. Right side male snap on the top corner of the ab?????? Other than that, you got this nailed!! Congrats, Bro!
-
any scene that I could have been shot.
-
TK 58008 Requesting ANH Stunt EIB status[NE][399]
gazmosis replied to Naborjohn's topic in Request Expert Infantry Status
Nice to see you back, Julie! -
TK 58008 Requesting ANH Stunt EIB status[NE][399]
gazmosis replied to Naborjohn's topic in Request Expert Infantry Status
Hey John! Always a pleasure to see another beefy trooper. I like to consider "us" the muscle. Looks awesome! Anyway, thank you for your EIB application! Let's take a closer look at your armor! CRL and EIB Application Requirements: Originally, one picture was missing (close up of hovi tips) but this was posted. Now all required submission photos are present. Your armor has all the required elements to pass EIB. So with that, I would like to congratulate and welcome you to EIB!!!! Other-Armor Fit/Assembly: In this section, your fellow troopers and myself look closely at your armor and provide suggestions that will not affect your application, but that goes towards improving the overall look of your armor. First off, nice holster placement! I don;t know if I have ever seen hovi tip screen that fine before. What happened to your vocoder area????? As for improvements, many suggestions have been made. If I don't name the person who suggested it, don't be angry...we're all on the same team here. Anyhoo.....One of the big things we all like to have in our armor sets is comfort. I can see this area becoming an issue: Feel free to ease down those corners a bit so that they are not jabbing you in the side. Another area that might jab you is the upper corner of your chest plate under your shoulder bridges. I see that you have webbing rather than elastic as the connecting strap between your cod and butt plate. If this starts to bind you at all, I would suggest changing this out for elastic. It will allow the armor to move with you and perhaps be a little more comfortable. Next I'd like to mention the possibility of cleaning up the outline of the rank area on your helmet ears. This outline should come close to matching the thickness of the black edging on the decals. If you moisten a paint brush with thinner and massage around this area, you can clean it up nicely and make it more uniform. This will make this area less distracting. I will make further mention of this in the "Centurion" section, but if you wanted to take your accuracy to the next level, you could dab a little black paint or marker on the thermal detonator screws. Your forearms seem to falling on you a bit because they seem to be resting over your hand guards. As was suggested, either insert a couple pieces of foam into the forearms or install a connecting strap between the forearms and biceps. This will also reduce the gap you have between your forearms and biceps. Next thing is in regards to your blaster. It's a nice build. I will let it go, but your scope rail is sitting a bit high in the front. It should be even above the main receiver from the rear sight to the vent hole. It can even be slightly lower in the front. This is an easy trim fix. the next thing is that the lock stop on the underside of the blaster in front of the butt cap is mounted a little far forward. Here is the proper position: These minor fixes will go along way to the overall look of your awesomeness. Centurion Suggestions: Because of the details you already have in place, I would hope to see a Centurion application in your future. There are, however, a few things that you will need to change prior to applying. I mentioned above that I would talk about your thermal detonator here. I would like to see your "TD" belt clips moved outward to almost touch the outer caps like on this screen used one: Next, grab some white paint and dot your thigh pack rivets. Next, your fellow troopers are correct to mention the need to bring your shoulders up to the shoulder bridges. I saw that you felt that the bicep strap is making things tight around your arm. This should be an easy fix by just installing new elastic in your shoulder bell. Then just shorten up your strap at the top of your shoulder bell to bring it up closer to the bridges. Next, I would like to see you bring your waist belt up a bit so that it rests properly at the bottom of the button plate. It can even overlap it slightly, but it definitely needs to be raised. If you need to install new snaps on your ab plate, it's no big deal because the belt covers it anyway. Check out the belt placement here: Next are the straps that connect your chest and back over the shoulders. These need to be white. Whether it's elastic or webbing or whatever, they need to be white. The strap that connects the shoulder should be black, but the main strap needs to be white. The next little improvement is in the frown of your helmet. I would like to see the corners brought down further to a point and end less bluntly. Here is how it could look: Next is your glove set up. For Centurion, your gloves need to be full rubber chemical gloves with the latex or flexible hand guards. The last thing I want to mention (unless your Centurion detail show something else) is to make sure on your Centurion pics that your drop boxes align with the end of your waist belt. You are well on your way!! Congratulations again on your EIB accomplishment!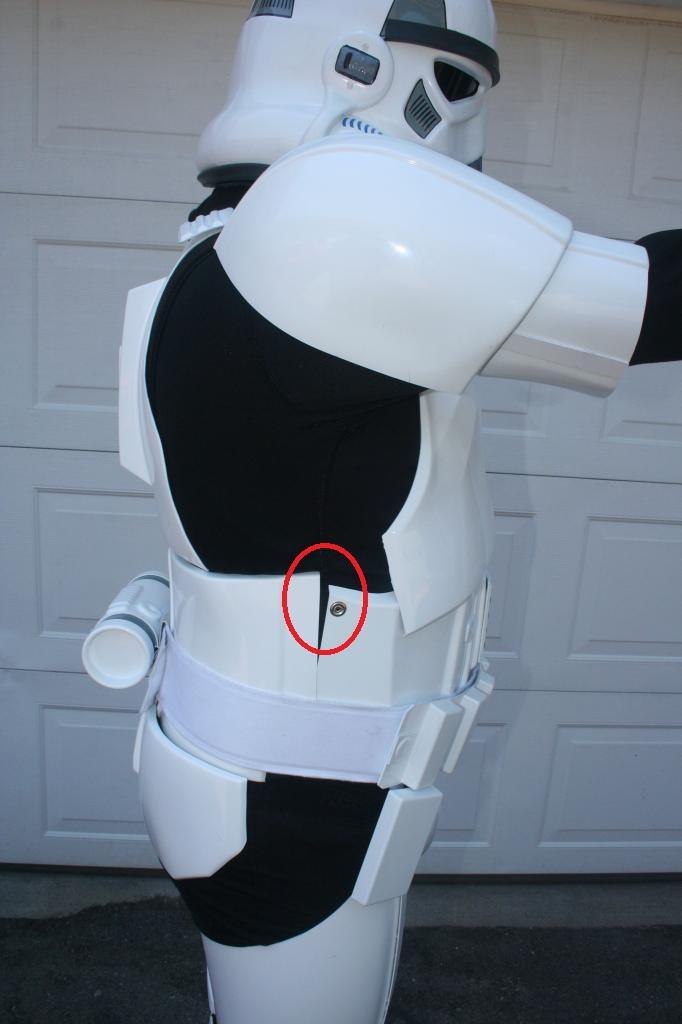
-
Hey Alex! I am just going to get your application in regards to your armor review out of the way. I know you are going to post the missing pics later (close up left/right side details). Another awesome set of TM ESB armor is gracing our presence. It was built so well and fits you so well I bet it is as wonderful to wear as it looks. Let's look at it closer! CRL and EIB Requirements: There are two missing pics from the required photo checklist; left/right side details. Other than those missing pics, your armor contains all elements and meets all requirements for EIB. Please ost those so your application will be complete and I can pass you through! Other-Armor Fit/Assembly: This is the section where myself and your fellow troopers look over your armor to make suggestions to improve the overall look and fit of your armor. None of these suggestions will affect your applications. First off.....JEEZ I love that neck seal!!!! Ok.......the first thing that I would strongly consider doing is to adjust the decals on your helmet. You have such nice looking armor, but the helmet is what everyone looks at the most.. The decals can be applied flat and clean. This small adjustment will make a big impact on the overall look of your armor. While we are on your helmet, I would moisten a paint brush with thinner and take down the thickness of the outline of your rank bar area of your ears to be more consistent with the outlines of your decals. Although replacing the neck trim is your choice, the gap where the two ends meet may lead to it falling off often when removing your helmet. When applying your neck trim, it should be first pressed on to all surfaces of the opening and compressed to the center opposite from the spot where the two ends meet. A mark is placed at the location where you want the seam. Each end of the trim should be slightly longer than this mark so that you are forced to compress the neck trim further to get the halves to meet. This creates an outward pressure that will keep the neck trim in place without adhesive. But again, this is your choice to do only if you are having issues. Jason had made a suggestion regarding yout thermal detonator screws. If you wanted to replace them with black, slotted screws for more accuracy, go for it. Lastly, I wanted to address the amount of fray you have in your belt at your holster location. This is a characteristic of the material used and is accurate. Although great for the short shooting schedule of the film, for our purposes, a belt that continues to fray like that can become structurally compromised if it frays past the stitches. I suggest to trim the long frays and mix up diluted all purpose glue or fabric glue and paint it onto the belt edges. This will greatly reduce the amount of fraying. ANH belts don't see as much as do ESB armors because of the holster looping over the belt, but it's a good idea to do this for whatever armor you have. Centurion Suggestions: I can safely hope that with your details present that we can expect a Centurion application. I hope so! I don't have too much to say that would stop you. I would like you to make one change on the frown of your helmet. I'd like to see the frown taper to more of a point on the ends and not end so bluntly. Besides that, as you post your pics according to the checklist, make sure you have a picture of your cod split rivet and male snaps on your butt plate from the outside. These should not be painted and I cannot see that from your EIB pics. Get those pics posted so I can put this through!!!
-
DLDigital's Hasbro E11 Doopy Mod
gazmosis replied to dldigital's topic in Build Threads Requireing Maintenance
Insert dramatic music!!! -
Well done, Tim. You have made all of us proud, now it's your turn to make your Garrison proud!!
-
Message sent to Alexandra regarding missing photos. Full review will be completed upon posting.
-
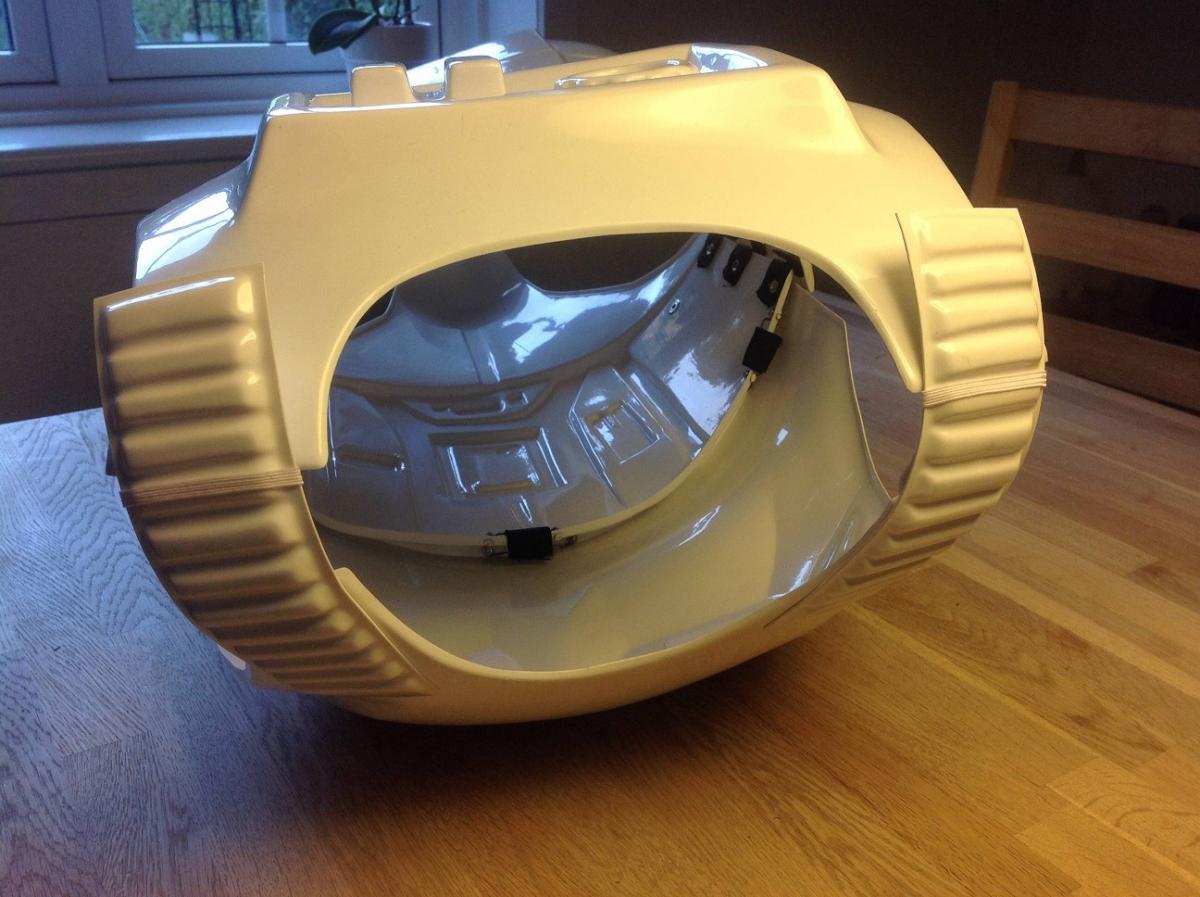
the thighs should be glued closed all the way around. Just like the front, the back should have a single seam where the two halves butt together with a cover strip. (rear cover strips should be in the ballpark of 25 MM or a little less in width. Don't guess with the thighs when sizing. Have someone help you. Prep the fronts and tape them heavily so they don't move. Put on the thigh and pull it up high. Then have your helper squeeze the halves together in the back until snug on your thigh. Then have your helper loosen it until it's comfortable. You will probably have quite a bit of overlap closer to your knee. Once the feel is how you like it, have your helper mark with a pencil down the center of the back of your thigh making sure this line is marked on both halves. It really doesn;t have to be a line, it can be a mark at the top and bottom. You can connect these marks with a straight edge when you remove the thigh. This method will ensure that your thigh is constructed to follow the contour of your leg which is conical..not tubular. This will also go along way to the comfort and the streamlines look of your armor.
-
When you are out trooping, there is no "trooping police" that will imprison you for a mistake. Having a speaker on your belt violates nothing unless you are applying for an accuracy badge here. However, with the speaker on your belt, it sounds like it is going to need to be really loud for the public to understand you. The public will automatically talk and listen into your face...not your belt. The aker amps sold here are loud and compact enough to mount in your chest piece to give you the sound you want without adding additional equipment to your belt that you might suspect shouldn't be there.
-
Just so you know, whether you have that or an accurate helmet from sellers here, you need to put it on with the screw on method. Bigger pics would help if you really want it identified.
-
Another First Time Doopy Build
gazmosis replied to cm325i's topic in Build Threads Requireing Maintenance
obligatory work mat pic...check! WOO HOO!!! -
Hopefully he doesn;t make them all CG troopers
-
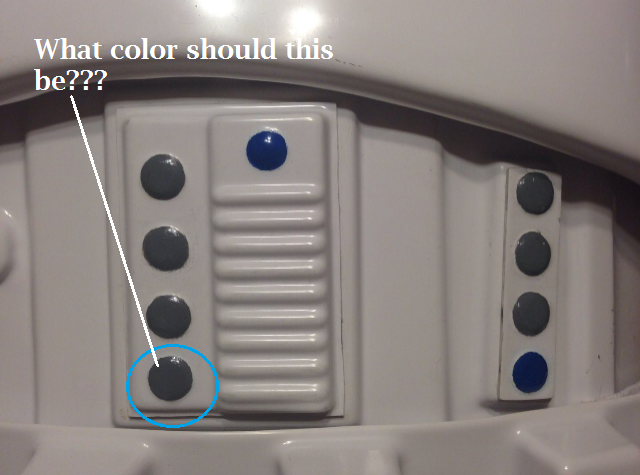
Hey Merritt!! Yet another wonderful set of RS graces our presence here! Thank you for your application to EIB so let's look at your armor!! CRL and EIB application Requirements All required submission photos have been posted and your armor meets the necessary requirements for EIB. With that, I would like to congratulate and welcome you to EIB!!! Other-Armor Fit/Assembly: This si the section where suggestions are made that can go toward improving the overall look of your armor. These are improvement suggestions that do not affect your application requests. Before the limited suggestions begin, I want to commend you on the your clean build and NAILED paint details on your helmet. Well done. A mention was made by Jason regarding your drop boxes and their proximity to your waist belt. They are not being drawn too far up under your belt that would make me suggest to fix this. To drop them 1/8 inch would be more effort than reward. It is better to have them a little close than hanging too far down too far like Evan said. Now...the holster placement. *sigh*.....this is something that is coming up more and more lately. The bad thing about this is the limited means that it can be repaired. It's not like you mix up some ABS paste and make it go away. I would hope that all troopers do their homework before mounting their holsters in a REALLY bad place. Your holster, thankfully, does not fall into that category. Although I would like to see lit a little closer to your waist belt, it is fine where it is. The main thing I look for here is that it is not mounted too high on the belt. It really shouldn't be any higher than the lower third of the belt. Front to back, they were mounted all over the place on the original suits, but they were pretty consistent on the top to bottom mounting locations sticking to the lower portion. I think the reference photo showed above was an anomaly all together...who mounts their holster on the OUTSIDE of their belt???? Plus, that wasn't even the standard holster design. As for your small elastic bands on your should bridges, As long as they are there, it's fine. If you want them to stay towards the back, some troopers actually glue them in place on the underside of the back plate. This seems to work well. Centurion Suggestions: I can assume you will be shooting for Centurion based on the details we see on your build. That's great!! I would like you to make a couple adjustments before you do so. The ab buttons on your torso should be fairly uniform in size: I know that not all the buttons on the RS button plate are uniform in size. But when painted, they should appear that way. Your lower blue button is a little enthusiastic in size. A paintbrush dampened with a little thinner will make it easy to massage off a little around the edges. This will balance your appearance. Jason was correct to mention about the crotch hardware. While you have that thinner out, remove the paint from the split rivet and male snaps on the butt. Other than those very minor fixes, I see no problems with you moving forward. You should be proud of this armor. It's gorgeous! Congrats again!!!
-
Another ATA size question
gazmosis replied to charlesnarles's topic in Hard Armor (General Discussion)
You will have no issues fitting into ATA. Keep in kind that 6' 2" is tall for a trooper whatever armor you pick. TM has longer shins but whenever you mix armor parts you risk different shades of color. Since the shins aren't attached to anything else you'd probably get away with it. Just make sure you ask for a separate sniper plate if you do that. -
"Best"/"worst" kind of E-11?
gazmosis replied to charlesnarles's topic in Build Threads Requireing Maintenance
Ian summed it up! -
You are welcome, Sir. Thank YOU! Just remember to take your time hollowing out the mag well. The walls on the real gun were only 1/8 inch thick. This will make the plastic thin if you get too close. When you have removed enough material, the mag will slide in like it was made for it. (because it was) do not force it. If it doesn;t slide in snug, you need to remove a little more. Just take your time.