


gazmosis
-
Posts
4,043 -
Joined
-
Last visited
-
Days Won
23
Content Type
Profiles
Forums
Gallery
Articles
Media Demo
Everything posted by gazmosis
-
O.K. Troops......Now that I have totally shot myself in the foot with the " new compact battery source" I posted, I like the idea of the 3.7 V trustfires but my Batteries Plus store nor radio shack carries them. Any local source have them or am I stuck with Ebay?
-
I painted my armor and was fairly anal about the finish. I too started with 600 grit and LIGHTLY sanded it until I smoothed the paint to what i wanted. You will get some paint removal here. There will be no shine at this point. Then I moved to Turtle Wax rubbing compound for clear coats. This on a wet rag and I really went after it. With two coats of paint, I never accidentally sanded through the paint. The gloss will start to come out. Then I moved to Meguiar's "ultimate compound". Unlike the turtle wax which is a paste, this is more of a liquid. Go after it with this as well. Now you will be able to pinpoint your gloss. When you think you are there, wipe it down with a wet rag, and buff it with a soft towel. There will be a tell tale high pitched squeek when polishing that will tell you when you're almost there. Look at your shine using a light as your reflection. IF there is any haze, keep going with the polishing compound, wash and buff until you get a mirror reflection. Then I moved onto Meguiar's Cleaner Wax. No water here, just a soft application towel and get after it. This will fill in all the micro scrathes. Let dry, polish with a soft towel, and marvel at your gloss. This takes time and some elbow grease but it's worth it!!
-

Need suggestions for scissor to buy to cut my armor
gazmosis replied to LittleOne's topic in Assembly, Mods, and Painting
If you have a dremmel or similar rotary tool, get hold of the small, coarse sanding drums. They're about 1/2 inch wide and was an indispensable addition to my armor building. It helped to micro-trim in areas the scissors can't reach. -
belt drooping problem at holster
gazmosis replied to gazmosis's topic in Boots, Soft Parts, and other Accessories
I don't know if you are saying that you are liking it or not? I hope you do. Anyway, I bought a beautiful piece of black cowhide from a leather man in SE Milwaukee, Wisconsin. After I cut the holster to specs, I realized that once you fold it over, The smooth,outside is at the bottom while the not smooth, almost fuzzy inside is at the top. I guess I just wanted the whole thing to look smooth so I cut an additional piece and before the guy folded over the front, he glued and sewed the additional piece in place giving the entire thing the smooth look I wanted.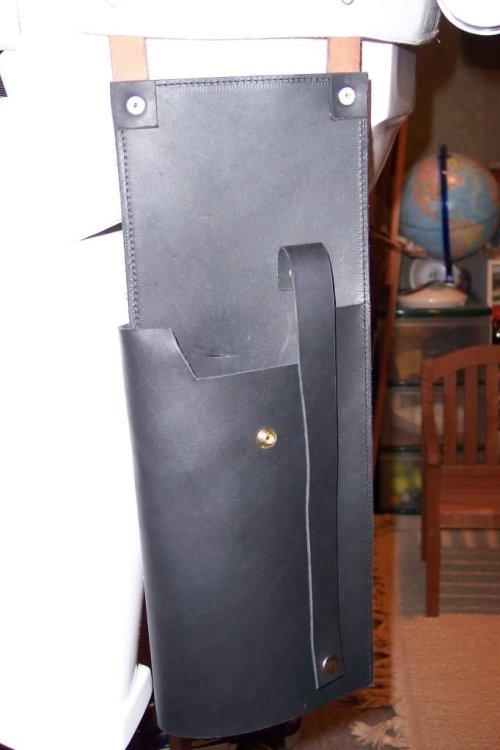
-
New power source. Compact battery
gazmosis replied to gazmosis's topic in Electronics for Helmets / Blasters
Stuart hit the lid on the head. I wish to say that I am sorry for not applying it completely in the lid before recommending it. I lined everything up and strapped it in the lid and it pulled the lid down so much on the one side it made it unusable. I sure hope that no one went out and bought one on my recommendation. ALthough the battery has a ton of other uses, this one just doesn't apply. Once again, I am terribly sorry if I steered anyone in the wrong direction. I will next time make sure it works out before saying anything. -
(sniff sniff) I love you, man!!!
-
belt drooping problem at holster
gazmosis replied to gazmosis's topic in Boots, Soft Parts, and other Accessories
Thnaks for the info guys. In looking at it carefully, I pulled the trigger on a rather permanent solution. I took the belt out of the equation and riveted the holster directly to the kidney plate. This way the suspender harness over my shoulders takes all the weight rather than the belt. I riveted the holster in the exact spot the belt rivets are so in the end it still looks like the belt is holding the holster.--------- -
belt drooping problem at holster
gazmosis posted a topic in Boots, Soft Parts, and other Accessories
I have a little issue with the weight of my holster plus the blaster pulling down on my belt. Any suggestions to reinforce the belt without yet another snap?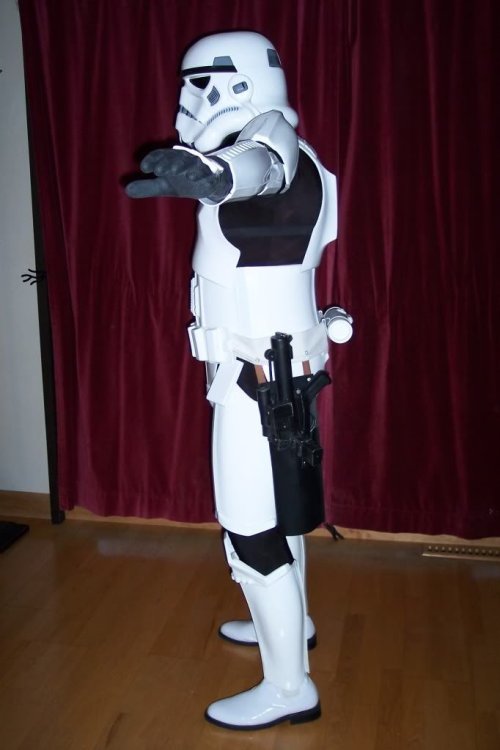
-
New power source. Compact battery
gazmosis replied to gazmosis's topic in Electronics for Helmets / Blasters
Although It did fit into my lid, I did think of the larger melloned troops and how this might not favor them. I need to be sent two CPU fans to replace the two that arrived broken. As soon as I get them in, I will post pics. -
New power source. Compact battery
gazmosis replied to gazmosis's topic in Electronics for Helmets / Blasters
Piss on my chips? Hahahahaha I am laughing hard. Anyway, I held it with the tip of my thumb against the rear corner of the helmet. This would be between the ear and the back of the helmet. My head went it fine. I do have kind of a small mellon (so I'm told) I do see this being a concern, however, in a smaller helmet like AP. But if it works for the tiny mellon crowd, then it is what it is. Can I use the " piss on your chips" ? -
I am building 3 fans into my lid (two vent and one intake) Since they are all 12V fans, I searched for a new, compact battery that could run all three and fit into my lid. I went to a Batteries Plus store and here's what I foundp-------------- It measures 3 3/4 inches long by 1 5/8 wide by 2 inches tall. It is 2 5/8 on a diagonal. I hooked 3-12V fans to it last night and they ran solid for 3 hours. I tested the voltage on the battery at that time and it was still at 14 volts. Most CPU fans draw about .05-.08 amps. This is a 1.3 amp battery. Rechargable wth a 12V 600mA charger.
-
How do I get approved or registered?
gazmosis replied to gazmosis's topic in Getting Started - Read this First!
Wow! Thanks for jumping all over this reply! Not that it surprizes me. The troopers here really give tooth to the meaning of brotherhood. I have been posting and contributing now for a couple of years but have yet to see mtself in armor due to my size. Although I will need 3/4 inch side shims, my forearms, biceps and shins no longer need them. I could have shimmed these all from the start, but altering my armor several times leads to problems in the future. 40 Lbs. was a hard goal to acheive. However, I did it naturally the way it is supposed to be. Although my diet was a drastic change, I believe that it is the diet we were designed to eat. It is controversial I know. Tons of fruit, veggies, whole grains, brown rice and (here we go) no dairy products and limited animal protein. This with regular excersize is what did it for me. I am not looking to stand on a soapbox or start a heated debate on vegetarian or not vegetarian. This is what I did. Everyone who wants to lose weight wants to know, "how'd you do it?" Back to trooping. I will get on the right steps and see you all soon!!!!! Thanks again!!! -
It has been two long years that I have been waiting to do this. Gathering all the information from all you hard working troopers and losing over 40 lbs. to fit in the armor, I think I am am finally ready to present myself and my armor. One problem, though. I don't know where to start. Where do I submit my photos? To whom do I need to contact to receive a TK number? Do I need to apply for the status that I am looking for (EIB or Centurion)or am I just assigned a status? I just want to take the right steps. Thanks
-
flexible hand guards and the forearms
gazmosis replied to gazmosis's topic in Boots, Soft Parts, and other Accessories
Thanks a bunch guys. As soon as the guards arrive, I should have pics up of the armor. -
I need to ask a stupid question. I just ordered a set of Karin's hand guards. I am really looking forward to getting them. I am also polishing my armor parts preparing for assembly. I looked at the forearms and wondered if there is enough room to slide the forearm over the glove/flexible hand guard combo. Anyone else have an issue here? The forearms are supposed to be glued on both sides, right?
-
painting your armor ---tips, thoughts, my experience
gazmosis replied to gazmosis's topic in Assembly, Mods, and Painting
Tru dat!!! -
Looking for advice on Return edges (ANH/ESB)
gazmosis replied to ZeroRoom's topic in Assembly, Mods, and Painting
One thing to remember....at the time of principle shooting for the original ANH...they were on a rediculously tight schedule. These stormtroopers were slapped together and pushed onto the set. In fact, the sandtroopers were the first to be shot for the film so the armor was really still in development and changing. I am sure that at the beginning, there were no definite standards that could be measured in millimeters. It took severe scrutiny to find what we know now in regards to certain details. Yes the forearms have no return. We know this from screen grab after screen grab. But in regards to the rest of the returns, most of your armor pieces have return edges marked. Just don't go too nuts and leave too much or cut away too little. The return edges were there just to give the armor the appearence of being thicker and heavy....not plastic. Have fun and good luck. -
For all you troopers who have pulled the trigger and bought armor that requires painting, I will share my experiences(good and bad) and hopefully you won't have the issues I ran into. Here we go!!! Make sure all you armor pieces are cut, trimmed, edge sanded and fit together properly. I suggest to glue the seam strip on one half of your thighs, forearms, shins and biceps before you paint. On the opposite pieces, make sure to mask off the areas that you will be gluing to!! Drill all holes for rivets(left side of ab plate, sniper plate, power pack for thigh. There will be some drilling once the pieces are painted because the power pack and sniper plate can't be applied until the halves are glued. Also, I highly suggest applying all snaps prior to painting. There will be a couple you will need to apply after parts are joined (top of thighs on or in biceps) but most you can apply beforehand. Do this especially for the ab plate to belt snaps. Snaps and snap covers should be in place on ammo belt prior to painting. Now for some planning. Choose a day that you will not be bothered so you can focus on the task. You should choose a day that is calm, warm and sunny. Rainy humid days are not suggested, and windy days tend to send bits of debris into your fresh paint. Set up an area that you can place your freshly painted pieces to dry initially before you put them into the sun. I personally set up small blocks of wood to rest the pieces on so that they did not touch the ground. You should also have a designated place for your armor to sit and cure. Someplace that is safe from kids or other curious souls. Next your materials. Rustoleum professional gloss white seems to be the choice of champions but this is only a suggestion. Just make sure that you do not use two different types of paint. EVEN FROM THE SAME COMPANY! Colors will vary and believe me, if you have a brilliant white ab plate with a slightly different white chest piece, there will be no hiding the difference. All paint will be from the same type of can! You will need a can of primer(white). And mucho patience!! Now, surface prep will be the difference between success and failure. The surface of each individual piece needs to be wiped down with either alcohol, mild paint thinner, laquer thinner, or mineral spirits. This will remove any oils that WILL BE on the armor from you handling (and probably sweating on)the parts. Once wiped down, the parts will dry quickly. I saw somewhere that someone used a mild detergent and a scrubbie pad. Detergents scare me because if ANY is not rinsed off the paint will not stick to that area. One crucial point that caused me countless problems was that I did not have enough paint to do all my armor pieces. I thought two cans would be enough. I was wrong. I bought another can an applied more coats 72 hours later. To my horror, I watched as the paint lifted and crinkled on my chest piece, butt and kidney plate. Some would suggest that this was due to poor surface prep, however all other parts that received a full two coats turned out perfect. Anyway, three cans will give you two coats on all armor pieces and your helmet. If you want more coats, get at least two more cans. YOU WILL HAVE ONE SHOT AT THIS! ALL COATS NEED TO BE APPLIED WITHIN ONE HOUR. THINGS WILL GO BAD IF YOU APPLY MORE COATS TWO OR THREE DAYS LATER. IF YOU BUY TOO MUCH PAINT.....RETURN IT. IT'S BETTER TO HAVE IT AND NOT USE IT THAN NEED IT AND NOT HAVE IT! Start by shaking the heck out of the can of primer for at least 1 minute then give each piece a light but firm coat of primer. Hold can about 8-10 inches away. Begin spraying outside the piece moving across the piece then finishing outside again. Do not use a continuous spray. Always go back and forth depressing the sprayer each time. The primer should dry fairly quickly. By the time you finish spraying your last piece, the first one should be dry enough to top coat with the gloss white. Shake the heck out of your can of gloss white for at least a minute. Turn the can several times during this mixing time. If you plan on holding the piece as you paint it, a long sleeve shirt is highly recommended or wrap your arm in celophane. Begin spraying as you did with the primer. Do not get too close! Spray no closer than 8 inches! Spraying too close and moving too slowly is how runs happen! The finish will take shape almost instantly. Cover the piece evenly but pay attention to the edges to insure they get enough coverage. If there is a spot that is slightly duller than the surrounding area, don't worry about it you will give the piece a second coat. It is inevitable that a spec or a tiny hair will show up in your paint. DO NOT TRY TO DIG IT OUT! If a leaf or a bird falls in it then go after it, but if it's something really tiny move on to your next piece. When you finish the first coat on all the pieces, determine if you need to start a new can. I suggest to mix the next can at this time so it is ready when you need it. There is NO reason to touch your first coat on any of the parts. Don't do it!! Resist the urge to touch the paint!!! Give your parts a second coat in the same order as you did the first coat. This will be your final coat(unless you choose a third) so if there is a spot that's slightly duller, spray it again LIGHTLY until an even gloss is obtained. If there are any slightly dull areas at this time, don't worry about it you will polish them out later. I do not suggest moving your pieces to the open air until the outer layer has had a chance to set for about 30 min. Then carefully take your pieces and set them in the sun to cure for the remainder of the day. At then end of the day, move the pieces into their resting area. Now is when you will need your patience. Those glossy pieces will be calling your name. The paint dries from the outside in. Just because it feels dry on the outside, doesn't mean it's cured all the way through. I suggest 96 hours(4 days) at around 69 degrees or warmer to cure properly. If you received a helmet with your kit I highly suggest to paint that seperate. Your helmet is the crowning jewel of your armor. You want to give this the attention it deserves. Once your armor has cured, I suggest that you polish your pieces. This will bring out more of the paint's gloss as well as remove any little specs that ended up in your paint. Do this with polishing compound(liquid or paste)and a damp rag. Rub each piece as you would wax a car. In this step, you can rub aggressively after all you are essentially sanding the paint. Don't worry about sanding through the paint. It takes hours to sand through two coats. You will see some white come off this is normal. Check the piece periodically by wiping it off with a soft dry towel. You will see the morror gloss come through. If it is hazy...also normal. This will go away when you apply the car wax or polish. Let this dry, then polish out with a soft towel. Stand back in awe!!! These are all just suggestions and what has worked for me. PLEASE feel free to add or comment.
-
I am blown away by the responses that you troopers have left in regards to my new DLT 19 that I just finished. Thanks again. Several of you have asked if I have considered making a run of these and I would love to, however, the company that I bought several resin parts from is no longer making these parts. I know that Ebay is kind of a bad word around here, but I have been buying and selling stuff there for years and don't believe that everything sold there is junk. The Ebay company that I bought the resin MG 34 parts from had always served me well.(house of shadow wolf) I bought a few scopes for e-11 from them as well. Apparently this is not the case with everyone----especially the folks over at the MEPD. I found out that this company had some major problems and pulled out of Ebay all together. I searched around for over an hour for anyone that might be selling resin cast parts for WWII reanactments or for ,of all things, DLT 19's. I came up empty. I am not willing to sacrifice accuracy. Although mine is NOT 100% accurate, I do feel that there are some parts that just need to be accurate if you are like me and want people to look at your BFG and say, "hold on...wait a second...let me see that! Holy S***" Admit it...you like that as much as I do or you wouldn't be involved with this hobby. So, in a nut shell, although the desire is there, without certain parts, I just can't make anymore of these. If you know someone who is willing to disassemble and cast their MG 34 (doubt it) then please let me know. See you all soon!
-
DLT-19 build Mucho pics part 2
gazmosis replied to gazmosis's topic in Build Threads Requireing Maintenance
Hey guys thanks for the kudos on the DLT. IT was a fun project and I would love to make a run of these however after seeing the first request for a run I scouted around for the guys I originally bought the resin pieces from and I can't find them. And then there is the issue of the bi-pods which are not that easy to come by. I suppose I could cast the one I have, but the other resin parts I used in my build are kind of permanantly attached now. SOOOOOOOOOOOOOOOOO....if there is anyone out there that has an MG 34 and is willing to cast certain parts...hint hint. I will continue to look around and see what I can come up with. Thanks again. -
DLT-19 build Mucho pics part 2
gazmosis replied to gazmosis's topic in Build Threads Requireing Maintenance
If enough people respond like you did......maybe. If the resin parts are still available. And the bi-pods.......a little tough to come by nowadays. Thanks for the kudos though! -
At this point, I realized that I still needed to build the feed port cover. I posted a request for these measurements and the troops came to my rescue!! Thanks to all who responded. I built it from sheet styrene and attached it.Now onto painting! The whole was coated on Model Masters chrome. Gloss black was mixed in and used to give certain areas depth and an aged look. The grips and butt stock were painted gloss black.Since the muzzle was cast from a real MG34, the bi-pod collar slid right into the track. This was attached with the help of a screw and washer. The t tracks were cut to length and had the tops angle trimmed at the ends. A small channel was cut in the ends to accomodate the attaching wire. I initially superglued them then wrapped the wire around, twisted it tight and trimmed it underneath. The wire I used is small diameter electrical wire for model trains. I also used this on my e-11 for the hengstler to power cylinder connecting wires. The wire is copper core so when wrapped around a pencil, it held a nice tight coil.Before the final assembly, I needed to paint the details so I went back to the chrome paint and with a fine brush I painted all the little paint chips for a weathered effect. I also dabbed the screw heads. I sprayed down the whole thing in satin poly for protection.Finally, the DLT-19 with its Imperial friends.
-
Before I began, I knew there would be several items I needed to buy in resin for accuracy. I bought the top cover, the grip/trigger assembly, and the muzzle. I did get hold of a genuine bi-pod!!! I also picked up a 1/6 scale version of the MG34. This little toy was crazy accurate and detailed. I started by printing a reference photo and coverting measurements off the toy and multiplying them by 6 to get the final measurement. Darn it if the toy didn't convert perfectly to a final 48 inch length. The main receiver body was fashioned from wood. As I look back, I made the receiver about 3/4" too tall. Anyway, the butt stock was also from wood. This was connected to the main body using a double side,course threaded stud. I put a PVC ring in between for the collar. I knew this was not going to 150% accurate, but I added as many small details as I could just to make it look cool and well,........detailed. The muzzle was attached to a small piece of wood dowel with another double sided, threaded stud. This was inserted into the PVC barrel and attached with screws.I needed thin wall PCV for the barrel details. I found and old, plastic shelving unit and the legs were perfect thickness. They didn't slide over the barrel however, so I cut them down the middle and attached them with rivets on the underside.The "conical disk" ended up being and extra bumper bolt I had from a muscle car resto I did a while back. It was more domed than conical but it worked.I attached the barrel to the main body with the same studs I mentioned earlier.The cooler than heck real bi-podI still had some left over BLASTECH t-track and many lawn rake pieces.Now onto priming. The wood parts were going to be a bit too grainy and look too much like......wood. I coated these parts with sanding compound that seals wood grain for a glass like finish. Although not all the grain was eliminated, it did the job.
-
Battery box/ belt feed cover DLT-19
gazmosis replied to gazmosis's topic in Build Threads Requireing Maintenance
That looks sweet....so does the MG 34! Looks like the real deal there. I couldn't get a real one...had to scratch build mine but Hopefully the troops will approve. -
Battery box/ belt feed cover DLT-19
gazmosis replied to gazmosis's topic in Build Threads Requireing Maintenance
Whoa!!!! That feed cover made from the project box seems a bit oversize. But the other link with the screen used DLT is what I will go with. Thanks to all for the info!!!

