Leaderboard


Popular Content
Showing content with the highest reputation since 04/12/2024 in all areas
-
So the journey started back in December, now completed this week. Below are the images of the final build along with individual parts in high definition so you can capture the details. In the next threads below, I will explain how I did end up with this final result. I will also try to share the tips and tricks for you guys to make your life easier. I based all the design and parts on the reference document I have put together (you can find it in the reference section in my post). Here's the build: Boots from Crowprops Leather gloves from Crowprops Abs section made out of urethane foam rubber molded, per screen reference Suit from Keeptrooping a good portion of the 3D models are from Big Fred Customs who did an amazing job already (I did modify almost all of them for screen accuracy and trooping) Several parts modeled by me (single piece Shin/spat, abs mold, dart launcher and greeblies on gauntlets, top box on chest plate, jetpack, jetpack attachment to the back plate, cod piece, etc) Soft goods made by my girlfriend (MW11271)- belt and holster, velcros, harness,...!) I will post the build process of these parts in the following threads. I will show how everything was printed/ prepared, painted, assembled. I will make the models available when possible (only the parts 100% designed by me, for the modified parts, I will sync with Big Fred to see how they could be shared. Goal is to provide you info on how to build a suit that is designed by a guy who knows the pain of wearing the armor (my Sithtrooper is a tuff one to troop... Front top to bottom:8 points
-
Greeting all! I'm about to start down this road. I was gifted a 850 armor works R1TK, minus the helmet. My son and I are planning to build it for my Wife (DS-32076), she currently only has a Mara Jade that she wears, but she is jealous of al the attention that Jarod and I get, so she wants to be a TK too! With her disabilities, our local Garrison Armor and GML both suggested the R1 style might be better for her as it maybe a bit easier to customize for her conditions. We plan to build it standard, but we will be setting it to have the cod and butt plate be strapped for easy removal as she often has to use a powerchair for larger events and needs a walker otherwise. We may need to cut the thighs and shins for easier sitting, and we'll see what other changes we need to make post build. This will be the build thread. Let's see how it goes.6 points
-
First enhancement, replace the solid resin detonator with an accurate, two piece 3D printed detonator. The model came from here on the FISD forum. It is sooo much lighter than the resin. Painting the tube and the enclosure using the Behr satin black and gloss white:5 points
-
4/9/24 - Ronald McDonald House Party 103rd TK troop, 9th for 2024 In April of 2024, Dewback Ridge finally got to go back to Ronald McDonald house after a roughly 5 year absence. COVID stopped these troops and I never got to do one... until now! We began the troop with a serious meeting discussing ways in which to spread smiles and enjoy troopy antics that wouldn't break our little plastic necks. Or butt plates. No one likes a broken butt plate. A moment of reflection as the sun set to the west. A quiet song at the piano to set the mood for dinner. A ball game spread smiles between posing for pix. Every time I see a McDonald house troop in someone's log I get a little jealous. Well, no more!!! I finally get to cross that one off. Next one I hope to cross off is a Weird Al tour, but I'm not holding my breath.5 points
-
Troop #9 It was an eventful evening with the Indy Eleven to put on Star Wars Night! The Indy Eleven is the professional soccer team in Indianapolis, Indiana, and they played Charleston Battery of Charleston, South Carolina (Charleston Battery won). Like usual, the Bloodfin Garrison teamed up with the Mos Espa base of the Rebel Legion and the Taakure Clan of the Mando Mercs to make this event a success! The Indy Eleven incorporated us into many different aspects of the evening to make Star Wars Night very immersive! They requested some of us to walk with the players as the players gradually arrived for the game, and the Indy Eleven social media team was quick to post photos of us walking alongside many of the players. We also got a photo of the crew for the players' walk. After the players' arrival, the Star Wars crew was guided into the stadium to provide the right atmosphere for some of the before-game activities, such as Star Wars bingo and visiting with many of the season ticket holders who were allowed to enter the stadium early. We were then stationed near the various entrances to greet the spectators as they entered the stadium! After some time greeting the spectators, we were then ushered near the stands to be part of the players' introductions as they entered the stadium. The Indy Eleven social media team made sure to take a photo of many of us with the game ball shortly before the players took to the pitch. Once the game began, we were then ushered over to the fun zone for families with kids, and I remained there until the troop was over. We made sure to get a group photo at this point. I also stumbled upon the rebel base! It was a tiring evening with lots of walking, but there's no doubt it was a super fun experience!4 points
-
Troop 39. Big Lick ComicCon NoVA Sent from my SM-N981U1 using Tapatalk4 points
-
Troop #8 The Bloodfin Garrison and the Taakure Clan of the Mando Mercs teamed up for a showing at a school carnival in Lafayette, Indiana. Most of the troop was spent inside in a designated area for taking photos with Star Wars characters, but we did venture around the school and went outside at one point. Vader wanted to get some photos of his cape fluttering in the wind, so I provided some help as well. Like many troops, we got a bit goofy toward the end. One of the students told me I slayed, so I joined her and her friends in different slaying poses! I later recreated one of the slaying poses for the camera: I think it is a decent pose!4 points
-
4/15 preapproval troop (GCO approved) at Randall Children's Hospital, Portland, OR: Wore the costume for about 1.5 hours, walking for most of it. Overall went very well. Learned that I have a few things that need adjusting.3 points
-
Troop 49 Niagara Falls , Ontario April 6, 2024 Niagara Falls pre Eclipse Party This was a Star Wars themed pre eclipse party put on by the City of Niagara Falls. We were asked to be there to interact and take photos with guests. Unfortunately the event was not well attended and only 20 to 30 guests came. We still had a great time dancing away in our costumes. Pre event group shot Obligatory elevator selfie There was an odd pole in the middle of the room we used to change. So I had to try it out. Got a bunch of credits for my effort from the FOTK in the back. Had to also grab a photo with my new transport vehicle. They said the barrel ride was completely safe. Not so sure3 points
-
We completed most of the rigging today (I am waiting on a belt from Amazon for the thigh rigging) and it felt really cool (and tricky) to give everything a test fit at once. Sadly, I grabbed the wrong set of under clothes (with white seems, the set came with both white and black) so have that little annoyance in the picture.3 points
-
Finally feeling inspired again, back at it. Almost at the finish line. Rough leg fitting: Rough torso fitting: Rough torso + legs fitting: Rough arm fitting, need to raise the bicep a bit: Converted from velcro to magnets for attaching the outer chest to the inner chest: Results look good: Final piece is the detonator. The decals provided do not properly cover the end caps, so I painted black:3 points
-
4/6/24 - Surreal Comics 1 Year Anniversary 102nd TK troop, 8th for the year This one was an unofficial troop at a comic store. The owner is a friend of the garrison and does a lot of favors for us. Getting to help celebrate their first year was great. And it was my first troop with the elephant gun! T-21, baby! It's the same length as a DLT-19 but it sure has a lot more presence. This one was made by Tye, the Boba Fett in the above photo about 8 to 10 years ago. It appeared on the 501st forums for sale in Texas and I jumped on it. It's fantastic and will be going out with me in the future. At about 7 lbs, it's not bad to carry around for a few hours. These vintage motor cars requested that I pose with them. My only price was that they take a pic with my own datapad for my archives. Back to the troop, a local radio station was covering the event and the host wanted to interview someone with a voice changer. I was the only one in attendance with the little speakers and our CO (also in attendance) agreed it was fine since it was just radio. So I did about 30 seconds with Erica Viking. SO awesome!!! And then I got paid again for my services - with a selfie. I've listened to Erica since college (she's been a local DJ on various stations for a while) and it was awesome to be able to do this. 102 troops... Being a TK is still every bit as good as my first troop.3 points
-
Troop 101 was a birthday party troop at a gym... at which I forgot my bucket at home. 100 troops without a problem and I forget my bucket on 101... UGH. So I had my first event handling and my first non-TK troop. 3/24/24 - Nerd Poetry Slam TK Troop 101, 7th for the year. A small group of loyal Imperials showed up to protect the nerds from Rebels. This was part of a larger city-wide Slam that involved a lot of different stages and poetry types. The finals were later that night. This was the nerdy poetry. TK9-Mabel was ready for some nerd love. And sniffing out Rebels. And treats. Opposite angle shot a few seconds later Mabel was popular. I thought "hmm... this might be a troop for Mabel to get some therapy hours and really connect with people." and it was. She got so much love all day. Didn't mind the loud speakers on stage or the clapping. She was in her zone. We entertained the crowd before the poetry started. I think they only came to see her tho... Later in the afternoon, once the troop was over and poetry was going, Mabel and I kicked back and soaked in the culture.3 points
-
It's BBB day!!! Just ordered my boots and the chiffon. Once I get it coated in plastic dip I'm going to start drawing where I want the cracks and different sections.2 points
-
Hello everyone, I'm Laura from Spain. I've had my ESB trooper costume for a month. Let's go girls!! 💪2 points
-
I think you will find that gap will be reduced once worn2 points
-
Completed the new detonator: Install on the spine plate just using a couple of wood screws: Been working on some refinements to my suit-up process. * Put spat on the shin before putting shin on. This puts less stress on the spat than trying to spread it open and putting it on with shin already on leg. * Attach leg gasket to thigh before putting thigh on. This will be much easier than putting the gasket on first, then trying to get the thigh on properly without shifting the position of the gasket. Here is my suit-up process. All steps are done by myself unless otherwise is mentioned: 1. Put under-suit on. 2. Put on neck seal and balaclava. 3. Put shoulder/arm gasket on. 4. Put thigh garter belt on. 5. Put lower torso on. 6. Attach gaskets to thighs, put on thighs, attaching thigh support straps to garter belt. 7. Put spats on shins, put shins on, tucking gaskets inside. 8. Slide up shins, put on boots, slide shin down over boot, position spat. 9. Attach cod piece to butt plate/spine plate. Hang spine plate on back of lower torso. 10. Attach cod to front of torso. 11. Put fabric pouches on belt, put belt on. 12. Attach shoulder bells to upper torso, put on upper torso. 13. Put on biceps. Have helper buckle bicep under shoulder bell. 14. Put on forearm. Have helper attach gasket to inside of forearms. 15. Put on gloves. 16. Put on helmet.2 points
-
Looking zoomed in to the promo image, the waist band and front panels are defiantly leather. The red border trim matches the trim on the hips. The hip panels do not appear to be leather but harder to tell. The backing behind the 2 front panels looks fabric, something like a raw silk or taffeta maybe. To get that nice clean fold on the back I doubt it would be leather as the drape is worng. I can also see a bit of a point at the front in the promo. So this makes me think it's less of a Kama more of a skirt, with the two front leather "flags", leather wrap and then a padded panel on the hips.2 points
-
Also looking at that promo image we would want to add the ribbed texture to the under suit, either at level 2 or 3. The neck section is black with matching texture, https://i.imgur.com/BxLg18K.png this confirms black to me. The neck seal texture would be a level 2/3 thing for me.2 points
-
Thank you so much for the information! I've made contact and put it the request with the 501st! Thanks again!!2 points
-
Approved!!2 points
-
It's much easier to add reference with the text rather than going off forum looking for a specific image, makes it easy to follow. It's also good for later when referring back to the CRL creation and updating when new reference material comes around.2 points
-
Friends of Kids with Cancer's Walk with a Friend: Creve Coeur Lake Park, Creve Coeur, MO 4/13/242 points
-
Well, here we go. Looks like it is all here. There are a couple of pieces that I don't have a clue what they are, so I'm hoping that some of the build threads will be able to help me figure it out. But the first step is lots of flashing removal. Sent from my SM-N981U1 using Tapatalk2 points
-
My workbench RIGHT NOW!! This is my Nico ROTK helmet. The rest of my kit is a Frankenstein of Jim Tripon and Mr Paul’s Shoretrooper files and is in various stages of completion. This summer I will buckle down on it. I’m excited that you’re working on a New Gen TK too! Maybe we can inspire each other to finish these things up! Look forward to seeing your progress! -Mike 26300 Sent from my iPhone using Tapatalk2 points
-
A tip that I learned that helped I originally used the hovi tip speakers from @ukswrath and was having major feed back when I turned the volume up. Tony suggested lining the helmet around the mic with Frost King foam pipe insulation tape. It worked wonders. But since then, I moved my speakers to the inside of my chest plate. Like Brian said, When you start trooping and spending more time in the armor you'll find what works best for you.2 points
-
Agreed, let’s not specify specific level of gloss in this document as to my opinion reviewing the reference pictures, there is not sufficient evidence to support the level of reflectivity as there are no crisp pictures that would give definite answers. The various paint colors are all reflective, but gloss level is better not be specified in basic level. Will remove from proposal above2 points
-
Thank you for all your hard work on this project. Your costume looks amazing, and now we can get the CRL built and hopefully green lit in the very near future.2 points
-
Hello! Please enable me for TK-71120 for 501st Status. https://www.501st.com/members/displaymemberdetails.php?userID=411882 points
-
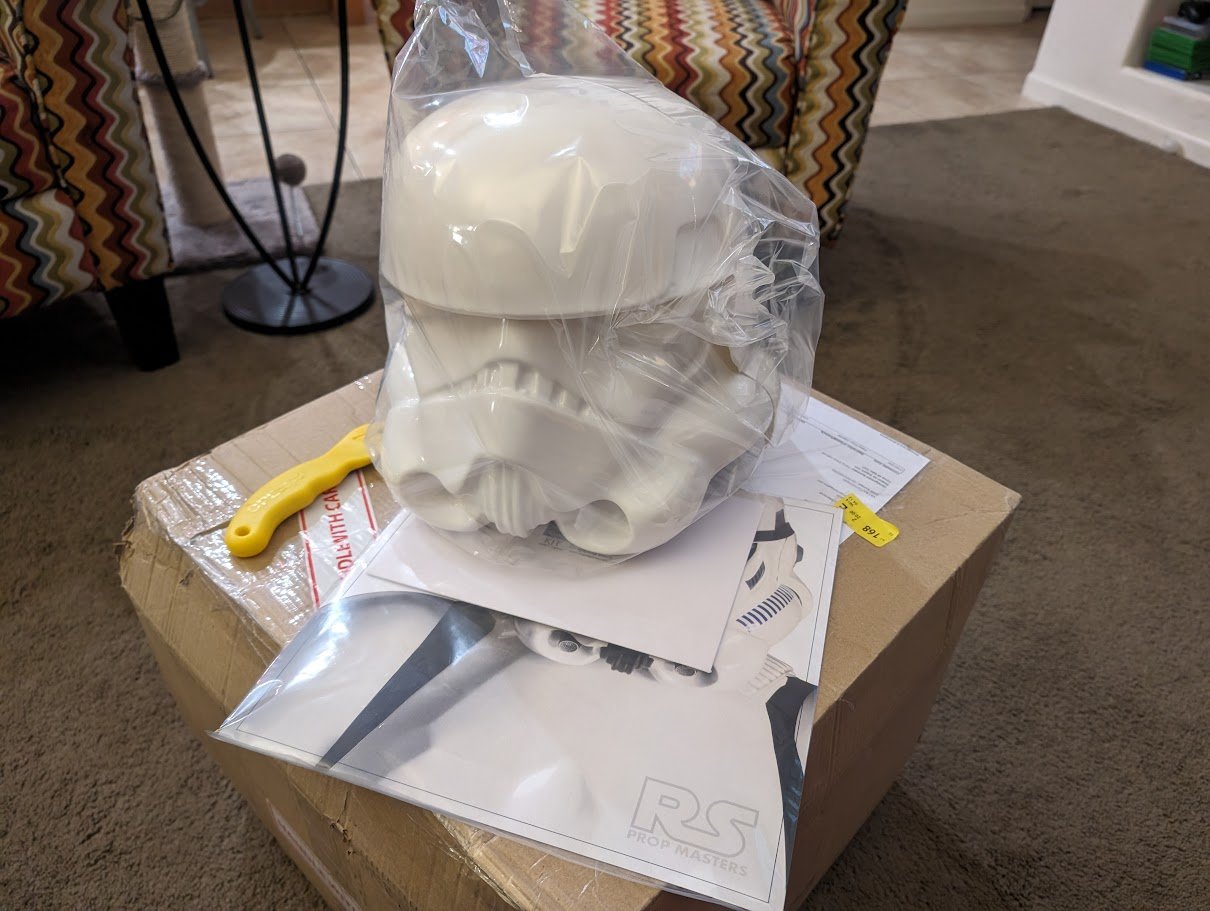
Hi All. Well, the title says it. I've been lurking for a while and posted a few times here and on the Dune Sea Garrison Forums. (I'm in the US, in Arizona) I have pulled the trigger on an RS kit, including the hero helmet and strapping package. It now sits before me. I was reliably informed it would take months to get a kit! It took less than one! (OK, that's on me) Anyway, I've wanted to be a Stormtrooper since about 5 minutes into the movie in 1977, so I am pretty determined to make this happen. I am somewhat deliriously happy right now. Everyone on the forums has encouraged me to go for Guardian, so here I am in all my spectacular ignorance. I wrote that title, so I'm committed. I'll take a second to introduce myself, as my intent here is to post the entire process, regardless of how foolish it makes me look. I consider myself a fairly handy person in general. I have some experience with 3D modeling, 3D printing and woodworking. I have a pretty good assortment of tools and probably not enough clamps. That's about all my assets except determination and all of you. I have never done anything remotely like this. However, in the short time I have spent meeting the folks in the Dune Sea Garrison I have become determined to join the 501st, and do it with Guardian armor. It seems like a great group and a great cause. So, I received the box earlier today, but was working. I just peaked in it, made sure it wasn't smashed or anything, panicked, put it back and took this picture. And here we are. No one needs to tell me to go slow. I'm pretty much paralyzed right now. If it's not too early, may I begin peppering the stupid questions? I have read through many build threads, but they're all so skilled. How prone are the pieces to scuffing? This project is going to take months to complete. I know the armor is going to get scuffed when worn, so how careful do I need to be during construction? How prone are they to cracking? The set I have is ABS. I think it is 90 mil? How worried do I need to be as I shape the parts? It seems like they need to be handled pretty roughly. I really don't want to have to buy replacement parts. I have been assured several times along the way that the RS kit is a good size for me. I weigh 175 pounds and I am 5'-9 1/2" or so. (79kg and 175cm) Any reason this shouldn't be the case, now that it's too late? Speaking of the above, I intend to use metric in this build, as most of the tutorials do. Unless that's a bad idea for some reason. Well, that's it for now. My next step is to open and categorize everything. I should be able to handle that without destroying anything. I'll post photos of "everything," whatever that is, as soon as I can. Looking forward to the experience ahead. Uh, Tentatively Toward Glory! or something like that. Jefoid
 1 point
 -
Checking in for duty from southern New Mexico! Finally enlisted into Vaders FiST! Glad to be here and start trooping with some of you outstanding troopers. Keep the great work!1 point
-
We figure we will have to cut the ab down some for this as well, so we'll fit it to her sitting and when adjust as needed for when she stands for pictures. We are excited to see how this goes. Sent from my SM-N981U1 using Tapatalk1 point
-
Minus the helmet is a blessing because... well... That 850 bucket isn't accurate at all. I'm surprised it can be approved with the tiny ears and other problems. Printing a Nico bucket will get this whole thing looking way way better. Though mine is still in the build stage, sitting does seem easier and different than with an ANH TK. The cod slides under the belt and up as you sit. The ab section will need to be cut to fit under her chest. Mine is pretty high on me and slides up over my nips as I sit, lol. But the ab and chest attachment and fitment seems pretty secondary for sitting. All the magic is in the cod and belt. Very cool project James! I'm looking forward to seeing it all put together.1 point
-
1 point
-
Finally! Sent from my iPhone using Tapatalk1 point
-
Troop 3! Memphis Redbirds Starwars night. The mandos were up to their usual selves... got to rock my DL-19 Best picture yet is with my wife! Look at that smile! Beat part of the whole troop is when a kid asked me to tell Vader he said hi!1 point
-
Rough guide on strapping and placement, some use double snaps in case one fails. Chest to backplate A couple of threads for you interest You can find a lot of info for builds in this thread1 point
-
I agree on the pants, seen a few images showing the same color as the undershirt Uniformity across CRL's is a good idea Gloves I would suggest it be the same as L2 of the ROTK CRL Gloves Black in color, made of Nomex, leather, or leather-like material, with no visible straps or logos/designs. The fingers are enclosed, non-textured. Rubber ANH style gloves are not permitted. OPTIONAL Level two certification (if applicable): The base material of the gloves will be a black synthetic material similar to Lycra, Spandex, Elastane, or Nylon. Palms of gloves shall be shiny black fabric or leather or leather-like material. On the index finger shall be a stitched piece of fabric made from the same material as the hand's underside that while stitched to the finger has one cutout towards the end of the finger that reveals the netted material underneath. Gloves shall have the correct leather pattern along the fingers/palm. Hot Toys glove reference1 point
-
Please add a link to your membership profile, info in first post of this thread1 point
-
Almost there1 point
-
Working on these adjustments. Thank you gmrhodes13!1 point
-
Title updated to reflect Imperial Armored Commando.1 point
-
While using BTS footage to teach how to use Premier Pro, I made something. Still amazed at the crew we assembled for this project (including our very own @Manbehindthemask, TK Tommy Vandemortel and Pete Myhalenko... my armor was filled by my brother). Like the students tell me, 'Mister, you're doing too much,' but I didn't have the heart to keep out all of the hard work that went into making this fan short - while this film mainly follows the story board, it's amazing how I can see contributions from each person involved in every frame. Well, this is the end of my footage so probably will be the last post for Tomorrow & Tomorrow. (but, if it's been a while, you could always rewatch the finished project) And a thank you to all of you that watched the film as well as supported and encouraged us throughout the process!1 point
-
Thanks for the feedback! Ok, so after doing a SithTrooper build from scratch ( completed and approved for the 501st) I was excited to diveo into the Imperial Commando. Did a LOT of research since there is no CRL and the resources/info even back in December were very minimal. I gathered the online reference and added a lot more for my own benefit, as I intend to be 501st approved once it's completed. I the absence of a CRL, I wanted to be screen accurate. Yu can find the whole screen capture reference I have made in the reference section of the imperial commando ( external document link). So first was clearing out the toughest parts of the build, the parts that are outside of my skill set . So I ordered the soft parts as follow, based on the research I have made to be as close as possible to screen reference: - Boots from Crowprops. The imperial commando as basically FOTK boots with added sewing. (Keeptrooping has them as well). I did ask Giovanni to add more foam to the top sections, which he did a fantastic job - Gloves from Crowprops ( only shop that has them, but from picture reference, these are easy to procure, as they are leather gloves with long sleeve, like some of the mando). Long sleeves are crucial so that they do not come out when trooping (from experience). - Suit from Keeptrooping. The suit is generic, not tailored like Sheev’s but I wanted to have one readily available. I did order one from Sheev’s... it will take longer to arrive but with better fit. My girlfriend did have to make adjustments to make it fit properly, along with moving/adding velcros at the right place to fit my buddy. Up to you, a bit cheaper and quicker with Keeptrooping, but expect to go to the tailor to get it right. - Belt and holster by me (my girlfriend). Belt is made out of white cotton with low density filler inside. The screen accurate material is thick white leather for holster/holster straps. The belt is cotton stitched with 5 rows. I found both the cotton and filler at a local fabric store, nothing fancy. - ABS are made out of urethane foam rubber, as it is visible that the part is flexible in the screen reference and it was later confirmed on the build FB page that this is indeed the material they now used. I used Smooth-on TUFF STUFF 15, as it is very robust and made for cosplay/props. - 3D printed parts are made out of PLA+ material and printed on either of my 3 Anycubic printers (2 are Kobra Max 2, 1 is a viper). I would highly recommend a large printer to do the big parts in one step, otherwise you will spend way too much time trying to cut parts and bond them afterward. For trooping, you will need to reinforce them substantially. Anycubic Kobra 2 Max is cheap and does a perfect job for all the parts. My general setting were 20% grid inflill, 3 layers, 0.2mm layers (0.1 for detailed tinny parts) Paints and coatings - Paints, I used mostly rustoleum paints, you can see them on the picture. Use ONLY flat paint when possible, NEVER use gloss paint when planning on having a gloss finish over it…you're running into trouble. So flat white and white primer under it (not shown). Grey primer for most of the parts, charcoal grey for the helmet front and one of the square on the chest plate. I used airbrush Vallejo game color 72.012 scarlet red for the red parts. Flat black for all black parts. -Airbrush paints. For metallic parts, I used Vallejo aluminum (silver like parts) and dark aluminum (steel like parts- gun base coat). For gun top paint and weathering, I used the Vallejo model air black. I took a picture of the other stuff required to airbrush easily. - Clear coats. I used rustoleum satin finish for grey/black/red parts (finish is good enough for these. For the gloss white, I used high end SprayMax 2K clear glamor, more expensive but you get car finish quality. This is one area you don’t want to cheap on… so easy to ruin a part with runout and orange peel finish. This one does a perfect gloss with some practice. I used 3 cans for the armor. Finishing My technique for finishing the 3D print is the one most people will use (everyone has his own recipe, but this one I found is the most efficient and bringing you perfect finish, so are my other teammates… after doing a Sith trooper gloss armor from top to bottom, I have several hundred hours of finishing :). So Sand the raw print with 60 grit/200grit to remove all protruding plastic and bringing to only depressions on the surface. Then Bondo+acetone (3:1 ratio) with paint brush. Then sand down with 200 grit almost to plastic, then the depressions are all filled. Then Rustoleum filler primer, sand down with 400 grit. A second pass is normally needed for gloss sections. Then paint . For gloss sections, a quick 1000 grit+water to remove paint build ups , then clear coat. 3D modeling For the armor, I reviewed several sources and ended up procuring both Galactic armory and Big Fred's custom designs. I started with galactic armory without too much attention to details, but after printing the helmet, I realized it was not as accurate as I would like to (see side by side pictures of the two printed helmets) I decided to switch to Big Fred's (grey one). I printed all the parts in all the pieces separately when required for screen accuracy and ease of printing with details. I chatted with Zach from Big Fred's and he knows his models are not perfect, but at this time he has not been able to find time to adjust them. So I decided to do it on my own. Honestly, the helmet is perfect, no change there. For the other parts, I will note when I made tweaks. So, I used ArmorSmith, 3Dbuilder, Blender, Solidworks to scale/ edit / create modified parts based on Big Fred's files. Scaling is of course necessary, not only to be comfortable, but also to maintain the screen relative reference Armorsmith is a must, I did my first build without it and ended up redoing the armor more than 2x… worth the 30$ believe me. Below a snapshot of the parts on my avatar (not that chubby, it’s the sizing with the suit on me 😊 ) Jetpack design and adjustment/ fitting to the back armor The biggest one I have seen is the jetpack, the details are all there, but proportions were not screen accurate ( to my interpretation of it). Most of it is just scaling the jetpack components to make the details thicker and increasing the central portion to protrude from the side components. Below is one of the 3D model available on the market fitted on the armor. The current 3D models do not hide the attachment mechanism, due to the curved armor back and the flat jetpack rear. Typical Mandalorian jetpack have a curve or staggering of the jetpack in some instances. In the screen reference, the jetpack has a visible recessed to hide/ embed the attachment points and bring the jetpack in close contact with the armor. A recessed area must be present to have the general screen accuracy. With this recess, this enables the back to be in close proximity as per the movie reference. Below is a modified version and better fit to armor. So to do this, I had to redo large portions of the jetpack 3D model, to include a recess portion, while maintaining the internal cavity for lighting. It was a long iterative process on solidworks/3Dbuilder, but result was much nicer and screen accurate. The jetpack should also be scaled so that the reactors do not exceed the bottom of the chest armor per reference and the top of the jetpack does not exceed the wearer’s top of collar armor. The width of the jetpack should be approximately the same size as the width of the chest armor, although it is seen sometimes larger in the screen reference. So I scaled it properly to fit correctly, but this screws up with attachment points on the back, So I had to redo all of these, downloading files from JJ industries to correct. I made new 3D models to be able to 3D print, as the jj industries are designed to be metal. I used 70% fill PETG for these attachments. As for the jetpack itself, the details on it need to be to scaled and adjusted. For Big Fred, I had to do several modifications on it to be correctly proportional. The central reactor had to be increased in size (originally the same thickness as the side reactors). Also, all the features on the main side were not thick enough. Same for the wing tip, they are way too thin and fragile to be used for trooping. I made them thicker and re-enforced them with a 90deg plate from the inside. To make sure that the jetpack will fit to the main chest armor, I also made another part, on the internal side that can be customized for proper spacing of the anchoring points ( otherwise the jetpack need to be scaled with the chest armor and nothing will fit anymore, not even the JJ industries anchoring. Talking of JJ industries, they have very good material. On my side, I didn’t to pay a 100$ for the anchoring, so I made some custom ones, that are size compatible with the JJ, because the chest armor is designed for them, so you’re kind of stuck with them. I painted those with dark aluminum finish. I printed the jetpack in one piece (except for all the grey and black parts that are separate components from screen reference (also way easier to paint). I added magnets on bottom reactor to be able to access easily the electronics. Top reactor is snug fit enough not requiring additional fixturing. For the top red light, I used transparent PETG. I redesigned it as it was too thick to be able to 3D print with clarity with 3-4 layers 100% density. Needed a lot of sanding down to a 1000, then a clearcoat over the top surface. I left the interior raw printed and clearcoat to have the diffusion effect on the LEDs. Will continue later with other parts!1 point
-
Okay, a DDR photo (or 20) is now on my must-do list. Happy graduation!!!1 point
-
Tim Platt TK-24881 Centurion A4 Doggydoc Here you go Tim. Congratulations again. https://www.whitearmor.net/eib/certificates/24881-centurion.png1 point
-
Troop #7 Finally!!! Eclipse day!!!! I had the pleasure of trooping Anna's Eclipse Celebration in Indianapolis, Indiana. The watch party was hosted by a charity for children with special needs, named Anna's Celebration of Life. The organization went all out with a DJ, photo booth, tabling by other human services organizations, a TV meteorologist discussing weather and eclipses, free food, and of course the main event, a stormtrooper! Well...actually, the main event was the eclipse, but you all get my point... I was the only one from the garrison to sign up for this event, so I was lucky to have a friend accompany me as a handler. It took a lot of persuasion (it did not) to get my friend Melissa to go with me, and she was so happy to be part of this troop! Melissa also has a real eye for good photos, as shown in this photo during the eclipse! My XO had previously told me to take some time for myself during the eclipse and not keep my helmet on. I took his advice and I am happy I did! I was fortunate to also be in the path of totality for the eclipse in the U.S. in 2017, and I am so thankful to have had the chance to be in the path of totality today! Even better, I got to troop during this eclipse!!!1 point
-
Any BBB photo is a good day1 point
-
Congratulations on number 1 !!! Bart1 point
-
Congratulations on your first troop as TK1 point