Leaderboard


Popular Content
Showing content with the highest reputation on 01/13/2019 in all areas
-
Happy New Year Troopers!!! Last month’s submissions to the Field Exercises was tremendous! It was great to see more new buckets sharing their holiday expeditions, making smiles, and warming the hearts in the season of giving. Even for me, the big ol’ jolly Santa Claus was starting to question his apparel with us having less screaming younglings and more hugs. This month we honour TK - 82214 Zac with his mic drop photo for St. Nick - never underestimate the power of the dark side big man.4 points
-
No need to get a new set of hovi tips, Corey! The easiest thing to do is remove the screens and paint the inside white. Tony sells the screens for $3.00 per set (includes shipping), and they are actually pretty easy to install. https://www.whitearmor.net/forum/topic/40706-fs-ukswraths-hovi-tip-screen/ I recommend removing the hovi-tips from your bucket first, but it is a not a necessity if you are careful. If you have any issues removing them just PM me and I will help you figure it out.2 points
-
Hi Fernando, thank you for your EI submission, and thanks for the quick fix for the TD screws. CRL and EIB Application Requirements: All required submission photos have been posted, and I am very pleased to announce your armor displays all the necessary elements to qualify for ANH Stunt Expert Infantry. On behalf of the entire D.O. staff, congratulations! Other-Armor Fit/Assembly: In this section we review observations made by your fellow troopers and ourselves. Some observations may lead to suggestions to improve the overall look of your armor. Starting with the helmet, just a few nitpicks to really improve the look. As was mentioned by your fellow troopers, the brow is a bit low. While the screen-used helmet brow position was a bit all over the place, the Stunt helmets tended to have a bit more white showing above the eyes. Next, there's quite a bit of white showing at the tops of your teeth, so you might consider extending the gray paint. Finally, it might just be the photo, but your left side tube stripes appear to be a bit lower than the right. Both sets should be about a pencil width away from the cheek. Reference Image: Continuing on the helmet, the paint on the traps seems a bit small, so you might consider extending it more to the edges of the plastic. Reference Image: Additionally, the Stunt helmets generally had the ears positioned a bit more slanted than you have yours, following the edge of the trap, while yours are positioned more vertically: Reference Image: This is certainly one of the more difficult corrections to make. Continuing down, as others have pointed out, your forearms appear to be a bit high: As you can see, there is little/no gap between your bicep and forearm, and a significant gap at the wrists. Sliding the forearms down if possible would improve the look as well as improve your mobility. Additionally, it's probably just a dressing/photo issue, but your left forearm looks a bit large in this photo. Finally, just to get a clean look, it's nice to align the coverstrips vertically: Reference Image: As others mentioned, it improves the look of your armor to have the tops of the ab and kidney aligned. It is likely just a dressing issue: Reference Image: I also wanted to point out that the tops of your thighs are touching and even slightly overlapping the cod/butt in some places: There's such a significant gap at the knees, that I'm wondering if slightly dropping your thighs might fix it. This should also improve your mobility and prevent painful pinches. Reference Image: Very nice painting job on the ab buttons. This is a very small detail, but if you like, you could adjust the paint so that it does not reach the edge of the buttons: Reference Image: Moving along, as has been pointed out, we suggest that you remove the white paint from the cod and posterior snaps: Reference Image (sorry it's so small): Finally reaching the lower limbs, this is likely another dressing issue, but your calf coverstrips are a bit misaligned, especially the right one. Reference Image: Centurion Suggestions:In this section we prepare you for Centurion. More photos are requested that allow us to make better decisions on possible adjustment etc. If there are any areas of concern they will be discussed here. Because Centurion photos show much more detail than EIB, items pertaining to Centurion might be seen there and not here. We try to point out all we can from what is seen but the final accuracy is the responsibility of the trooper. The CRL states: There should be a minimal gap between the shoulder armor and the chest/back plates. Your shoulder bells show a gap at the top. It should be a simple strapping adjustment to bring them into place. Reference Image: For the left side ab/kidney rivets, the CRL says: Rivets are equally spaced along the depth of the armor and about 10mm from the edge. It could just be the photo, but I would double check how far the ab rivets are from the edge of the ab plate; they look to be a bit far. Reference Image: Moving the rivets would involve filling the holes with ABS paste, but I have the utmost confidence in you and your armor building skills. And that's it! Congrats again from all of us! Now get out there and make The Empire proud!2 points
-
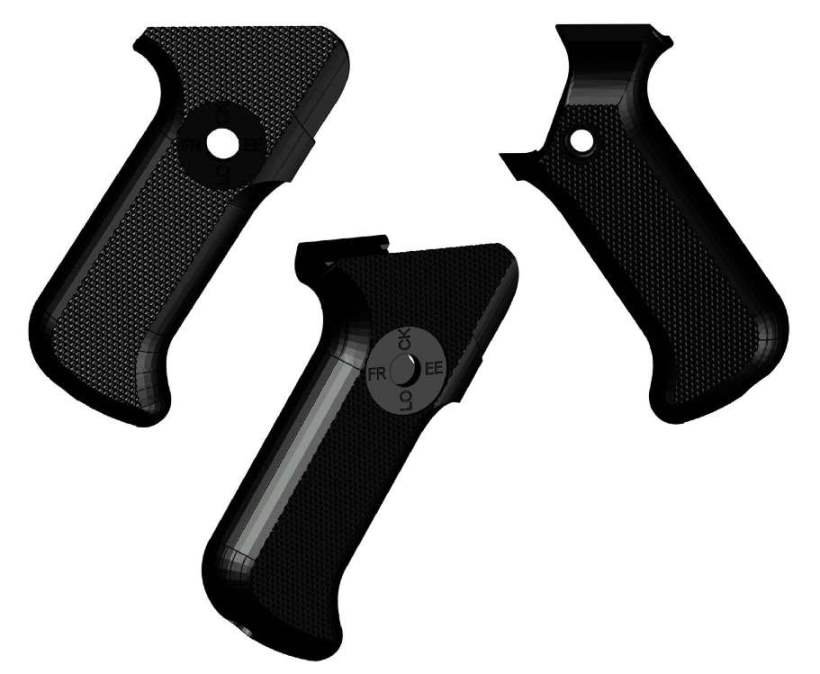
Been working on a side project, a 3D printable E-11 Grip. Here are the results. Alan
 1 point
 -
Thanks Tony, I do understand. And I used other AP Centurion apps for the adjustment, this is trimmed, glued, and curing. Will retake front, left, right shots when I can take the tape/magnets off.1 point
-
Make the straps holding the bells to the shoulder straps shorter. That’ll bring them in. And use a nylon strap not elastic elastic might stretch out over time. Sent from my iPhone using Tapatalk1 point
-
Ah yes, Joseph beat me to it. [emoji1303] Joseph’s right. No need to buy new ones. Changing the mesh and painting the inside is the easiest option. Here’s one way that the mesh can be installed. I’m sure there are other methods, too. Look forward to seeing back soon, Corey. You got this! :-)1 point
-
Congratulations and welcome to the EI ranks trooper1 point
-
Thanks appreciate it. I can start gathering parts and working on the details.1 point
-
Pretty easy to kit up on your own, but some can struggle, with time it gets easier. You only have to unsnap one shoulder strap, the other stays connected as you open the armor up, it’s like a clam shell. Still easy to get the elastic over the strap once connected. Well done with those shoulders bridges, came out great.1 point
-
Thanks for the tips! Based on your suggestions, I went with the hot water bath. It wasn't nearly as scary as it seemed! Firstly, here are the shoulder bridges as they come from Mark at AP: Cut them out: Removed the rear tab and sanded: Then came the hot water bath! I boiled a big pot of water. Q's directions were bang on. 30 seconds in the water: Then I curved it in my hand and ran it under cold tap water (no picture—hands were full, haha). And the result! Once more, and we're done. Next, as many suggest I reinforced the shoulder bridges by cutting out small bits of scrap ABS to fill in the slots on the undersides. I was rather generous with the e6000 here. I figure that, if needed, I can peel away the excess, and the goop that remains will further reinforce the bridges. And that's where they now sit. Once they dry, I'll glue them to the chestplate. Here's a question. I know that the bridges will free-float at the rear and will be secured by a thin white elastic to the straps at the backplate. How does this factor into suiting up? As we've already established, my head is on the large side and doesn't fit through the head opening on my armour on it's own, so I'll have to undo and redo one shoulder each time I put it on. I might be overthinking this—we'll find out once I glue them to the chestplate, haha. Is it doable to snap the chestplate on, then reach back and slide the bridge through the elastic? I know this is a total non-issue if you have a second person to help, which will be always when trooping. But I'd love to be able to put the suit on by myself just in case, even if it is more of a pain. :-)1 point
-
Yeah, I'm just trying to make it a little more screen accurate.1 point
-
Thanks for this tips Q. I will get started painting then.1 point
-
Coming along nicely. There are different strengths of elastic also, I found the ribbed style elastic to be not as strong as the denser sewn elastic and you can even find a thicker version of the tightly sewn elastic which is what I use, definitely makes a difference on the shoulders., or you could even double over. Most do attach the forearms to biceps, they can move around when bending and stretching, but if you find tight enough and don't move you don't have to add strapping. It is screen accurate to have it though Elastic is used in most areas that need flexibility and for stretching, bending. I use a heat gun for the shoulder straps, it is a lot quicker than using a water bath or hair dryer, here's a post on using water bath: You can bend the shoulder straps using a hot water bath (boil water, remove from heat, dip part to bend in for 25-30 seconds, bend, cold water). It is more screen accurate to cut off the larger tab at the back.1 point
-
Ok got it. Answer is No. good? Jk Basically both of them are right With the diagram on the left the rivet would be directly centered under the square. With the diagram on the right the river would be off center under the square. I would stick with the left diagram. It’ll keep everything centered and you won’t have to worry about something not fitting under the square. Sent from my iPhone using Tapatalk1 point
-
Sometimes being an electrical engineer helps. The standard approach of using a resistor would also have worked, but then the current would drop if the battery runs empty. I wanted to ensure that the LED current remains at 20mA. Just let me know if you would like a detailed explanation. I really admire the mechanical skills of other forum members such as yourself! Expecting more parts to arrive within a few days...1 point
-
Hi Corey, Thanks again for providing the extra photos requested. At this stage, I'm afraid we have hit a small road block with the Hove-Tips. The CRL requests "Correct 'Hovi mic' aerator tips." and when looking closer, the mesh on your current Hovi is quite fine and they are black inside. What we would suggest to move forward for EIB is to paint the insides white and replace the mesh with something closer to the originals. Hopefully this shouldn't take too much extra work to achieve, so just post updated photos of your helmet when the new mic tips are installed and we can carry on with your app. (No need to kit up again). Thanks in advance, Dan Level two certification (if applicable): Ears shall have three screws per side, one above and one below the ear bar and one at the base of the helmet. Ear bars have four bumps only, Not three. Traps/tears and tube stripes shall have the correct ANH TK details. Correct 'Hovi mic' aerator tips.1 point
-
What an awesome turn out and looks like some gloriously great times - many thanks for your report!1 point
-
welcome1 point
-
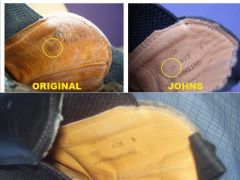
From the album: Boots - Original brand
1 point