
Leaderboard


Popular Content
Showing content with the highest reputation on 05/04/2026 in all areas
-
May the Fourth be with you! It’s not often I get to say that in my day-to-day life, so it feels fitting to drop it here today. Anyway… this is a bit of a little-big-ish update. I’ve officially hit a wall with this build. Shocking, I know. After chasing what feels like every “most accurate TK file” out there, I’ve reached a point where I’m just… tired of spending money on files that claim accuracy, but miss the mark on the exact pieces I need. So instead of continuing down that path, I made a decision: I’m just going to design my own. I’m building these using the gallery references (Celebration photos/R1 photos), a ton of 4K screen grabs (thanks @fernferro for the help here!), and a Sideshow Artillery Trooper as a physical reference. In their current state… I think they’re getting close. But I’ll be the first to admit—I’m very much learning as I go. My only real “formal” experience was a three-week crash course in Fusion360 when I reworked my thermal detonator. Blender? This is very much trial by fire. Is this overly ambitious? Yes. Am I probably risking my Halloween deadline? Also yes. Have I gotten much sleep leading up to this update? Absolutely not. Let’s move away from the wall of text (I’m starting to sound like Jason) and into what actually matters. The chest plate: And the back plate: These aren’t finished yet—but I think they’re getting close. Still left to tackle: back greebles (cog + “II”) shoulder slots (currently the bane of my existence) general refinement and cleanup Like others have done, the back piece will be designed as an insert to make printing more manageable. That’s really the core goal with all of this: Make it accurate—but also make it easily printable. (First attempt (of 8), you can see some inconsistencies in the diamond recess that I’ve since corrected.) I’m choosing to look at this as a minor setback for a much bigger payoff. This is probably the second biggest undertaking in this entire build (first being to start). I have zero formal experience in this space—but honestly, it’s been a blast figuring it out along the way. That said, updates may slow down a bit while I go deeper into this rabbit hole. I’m definitely chasing perfection more than I was before… and I’m not entirely sure how far that’s going to take me. As always, feedback is more than welcome (and greatly appreciated).3 points
-
One side note. I realized that after an additional tweak to the dome I forgot to make changes to the Mimban shield, so I will be working on that after the craziness of the week is over... Star Wars week stuff, and my birthday celebration this week. So I apologize for the delay but I'll get it all together here soon2 points
-
Went ahead and bought Nico's helmet. I messaged TKModder for the updated helmet files (obviously I said please) so I'll just be waiting on those before printing and this time I'll try to put more updates on my build process in case someone catches an issue I didn't see myself.2 points
-
Alright... I'm ready to print helmet #4. These are AWESOME!2 points
-
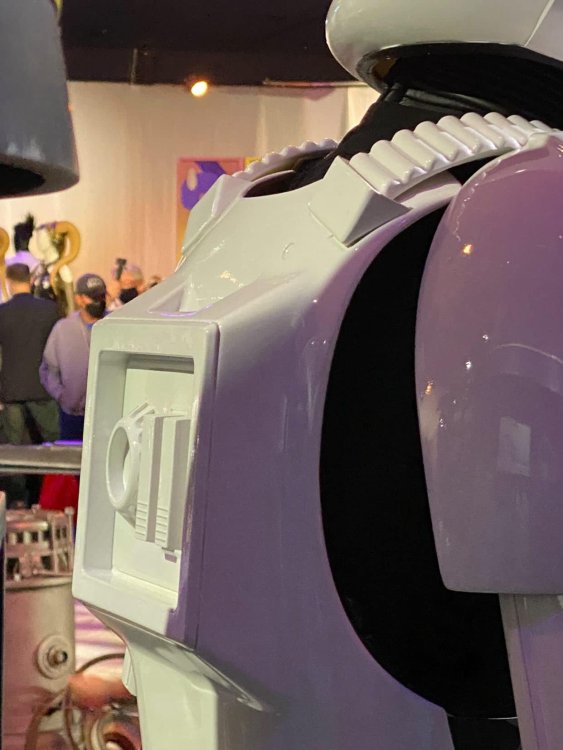
Alright, I've been working on a few additional mods for the past while and in light of a few makers and others taking on the task of giving us more options (possibly more accurate) for helmets and armor, I thought I'd better put these out in the universe before they become completely irrelevant. But I'm sure there will always be those who still want to 3D print their own helmets and this can still provide a fairly close option, certainly approvable, if constructed and finished properly. The first change was to create mic tips that appeared closer to the production used mic tips. After years of collecting reference and studying some up close images of production helmets, it became obvious that they weren't the same "found-part" mic tips that were used in the OT. So I modeled these as closely as I could to the reference I had, at the same time taking into account the proportion to this helmet and the current shape of the area on the chin where they attach. They do tend to look different in real life than they do in Blender. So I made at least 20 test prints before I was happy with the version I arrived at. I also added screw on base and a hole in both the base of the mic tip and the chin for easy installation with a washer and fastener and also to make it a bit easier to install the wire mesh. (I highly recommend printing these on a resin printer if possible) Here is the comparison between the original mic tip files and my new version: ___________________________________________________________________________ The next change is to the dome piece. I always felt the dome was a bit too squared off, so I finally took the time to modify the shape of the dome and made it more round above the temples on each side, and changed the sloping from the front to the back. You can see the difference in this comparison here: front view: side view ___________________________________________________________________________ The next change I made was to the right eye (your left). I added a curve to the top inner corner, so it didn't have the 90º angle as before. I also slightly exaggerated the eye bump, just to make it more apparent, as it was a bit too subtle before: ___________________________________________________________________________ Next I made a couple changes to the chin. I pulled down the pointy edges to either side of the vocoder and I also decreased the size of the outer edges of the mic tip inset area. In addition I added an angle to the area where mic tips lay, eliminating the need for the angling shims I had in the previous mod iteration. I also adjusted the ears slightly. On the previous mods to the ears, they made the helmet appear a bit too narrow, so I adjusted the angle of the caps slightly and went back to the original ear shapes, while preserving the full circle of the cap. Here you can see all the new mods in comparison to the previous mods: __________________________________________________________________________ For reference, here is a comparison of the original helmet files with the newest mod iteration: And lastly a comparison of all 3, the original files, the previous modifications and the newest iteration:2 points
-
i'm a junior in college and unfortunately i don't really know that much about this. i'm sorry. but i've been researching online and i can't really cohesively map out their work activities. so far my list just goes: The work activities of a Stormtrooper consists of the following areas: a.) Military Activities; b.) Security and Defense Activities; c.) Training Activities; d.) Peacekeeping Activities; e.) Propaganda Activities they do patrols? training? proliferate propaganda? curtail insurrection?1 point
-
Not a whole lot of prep at this point as I am just waiting for the kit. I've been planning on mods to the kit, but haven't made it too far as I am not 100% sure on what I will get.1 point
-
Amazing! 2 questions. 1. How do I get the updates? 2. Any further thoughts on slicing them to fit the 256x256 bed plates of the newer printers like the Bambu P1S and Elegoo Centauri?1 point
-
In some areas I have gotten some shine back by "sanding" with a sanding stick that has 0 grit, so basically you "rub" the shine back in, with friction! But Other than that I was just giving some tips, haven't had to do a whole armor myself!1 point
-
To put a bookend on this whole thread, I'm finally approved! I got approved about a month ago, and wanted to wait until my first troop to post some photos of this kit in action. It was so fun to finally be a part of the 501st Legion and I can't wait to get out more. And finally, thank you to everyone that has helped me along the way, from here on the forums, as well as the Southern California Garrison where I first got in contact with the Legion, I couldn't have done it without all the troopers that have helped me along the way. Thank you!1 point
-
Started working on adjusting the forearms to TLJ cuts. I started by trying to "iron" them with a very hot spoon but this wasn't going to work on the compound curve. Did help on a thinner bit though. With that knowledge I knew I was going to be splicing in new plastic and learning about ABS slurry, I marked both we some tape to get some nice straight lines to cut out the wavy bit. That cut out I went through my off cuts found a piece the right thickness and big enough. I also cut some joining plates for behind. I started buy attaching the backing plates with some ABS slurry, avoiding glue so there's no glue line. Then I attached the filler peices. I didn't do a great job clamping the far corner which lifted slightly so will need more sanding. I then started to fill the seams with more slurry. I am not overly good at this and have made a small mess. I definitely did a better job on one side to the other. I have sanded this back this morning, found some low spots, so have refilled those again. I also added a little bit of paste to the back to thicken out where I am sanding to try avoid any accidents. ABS filling is definitely an art vs typical fillers as it's drying from the second you remove it from the jar. Manging how liquid, or not, how much you have on the tool (I used a mix of coffee stirrers and a brush) and how big an area to do at once is a tough balancing act. So far going okay so will just iterate on this until I am happy with the flatness. It's easy to add a little more, but adding too much will encourage over sanding. I also have glued up a bunch of stuff: Shins are done, thigh main seam is done, wating for fitting for the inner shoulders, and biceps are all started as well. The shoulder bells where a pain to line up the lips. After trying various ways to measure it I found eye-balling it actually did it very quickly. Once marked I compared both a few different ways until I was happy they lined up. I have also transferred the mark to the under side for when I add the mounting points. Biceps have a small issue: The length of seam at the cut line is a good 4-5mm off. I've aligned "correctly" based on where the clip will go, the top is okay but the bottom is no good. But I've just looked at reference and these are upside down. so the bottom is good, top is the issue. Either way I think my best bet is to blend the cut down about 3-3cm into the larger part to hide the bad alignment. I also have a belt, some webbing and clips so will be looking to start fitting the strapping to the thighs soon.1 point
-
File Name: Stormtrooper Drawstring Beads Designer: Simson Last Update: 025/03/2025 File: https://www.printables.com/model/1242791-star-wars-beads Description: Diameter of the hole is 5mm. Mando, Vader and Stormtrooper will need some support. Images:1 point
-
https://www.flickr.com/photos/themaninthesuitcase/28372543485/in/album-72157671098462536/ is this any help in the back plate?1 point
-
i really like the chest piece! by far the best ive seen in a long time, but with my eyes, i think a little tweaks for the back armor. Youre going in the right direction!! I dont know how to get the models of an game, but i think if you can manage to get the SW outlaws model of the TK it would be great since you are mentioning the sideshow/hottoys. Following and keep it up!

 1 point
 -
The ANH Stunt is such an iconic choice. While the Death Trooper has that intimidating, modern elite vibe, there is something unbeatable about the classic look of a clean white TK. It’s a perfect contrast to your current kit.1 point
-
Dan, congratulations on starting your ANH Stunt Stormtrooper journey with the Makaze Squad of the Florida Garrison how are you preparing for the build and the waiting period before your kit arrives? Will it differ from assembling your Imperial Death Trooper?1 point
.thumb.JPEG.090a51d263498dd94183c8dca58c9ff4.JPEG)


