
All Activity
- Past hour
-
 spaspeckerthedull joined the community
 -
Welcome Laura @Salazar! Justin has provided you with excellent information above, and I've now also just sent you a personal message. I hope your local garrison is able to help you out!
-
Hey Jeff - I'm a fan of lexan shears for rough cutting (but it helps to have a couple different types/shapes of scissor because you will absolutely get blisters or hand cramps), then I smooth out my cuts with a belt sander and one of these big flappy wheels on a Dremel/rotary tool, and finish with emory boards for a smooth, pinch/bite-free, slightly-rounded edge. Links for inspiration, but shop around. Luckily on Anovos kits, the cut lines on the inside edge of the armor are easy and like 90% accurate if you're a standard sized trooper, so I usually mark them with a pencil, rough cut, then sneak up on my line with sanding. I only use a utility knife (AND A CUT GLOVE) and a metal ruler (with some magnets) to cut my coverstrips in straight lines really, which isn't needed for this kit (unless you make inner cover strips, which you should!). I know some people score-n-snap, but I haven't found many places on the armor that it's super practical/safe for me to do. Oh and wear a respirator. Hope that helps!
- Today
-
Hey Laura! Please submit your event request over at: https://www.501st.com/request.php This will route it to your nearest Garrison (local unit of the club) who can choose to accept it and potentially assign you a point of contact who will manage signups. Please be aware that depending on your location, the Garrison may already be well booked for that day, as it is our busiest day for event requests of the entire year - especially this year as it falls on a Saturday, and many hosts have submitted requests months in advance. Our club is of course all volunteer, but hopefully members in your area with the requested costumes are able to attend and support your charity event or future ones. If you'd like to share your general location, I can also link you to your local Garrison website in case you want to try reaching out more directly, but this forum is the international one just for stormtroopers and we do not coordinate appearances through this site. We do try to be helpful though, so welcome, good luck, and let us know if you have any other questions!
-
What kind of utility knife works best for trimming out the armor? I read someone was using curved lexon scissors...
-
Thank you!
-
 Salazar joined the community
 -
Hello all! I was told to contact you because we are in need of Darth Vader and/or Storm Troopers for our charity gala on... May 4th! How can I get in contact with him/them? Please help! Laura
-
 I think the first pic shows that there is a clearly evidence of like bias tape, that is only in the right edge, but not on the left. So it looks to me like the right big part is under the left, and the left is folded abouve the right and is attached to it, forming the line on the left edge. For the border of all panels: The front and the hips seem to have a classical red border (like bias tape). But for the big 2 panels, it looks like their border is in the same colour as the fabric itself I also checked some references from the figure (and pic 3), but im unclear: For me, the waist band and the front parts are out of leather, while the hips and the 2 back panels are out of fabric. But this is only visible from the figure, not from the show, so i may be wrong about this. Additional point: to me the shoulder bells seem to be way shorter than regular TK shoulders
 -
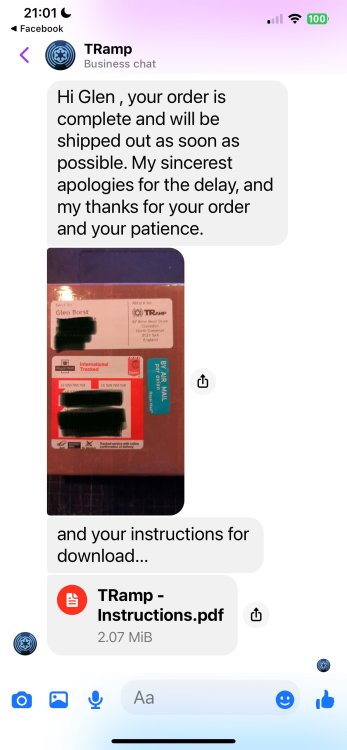
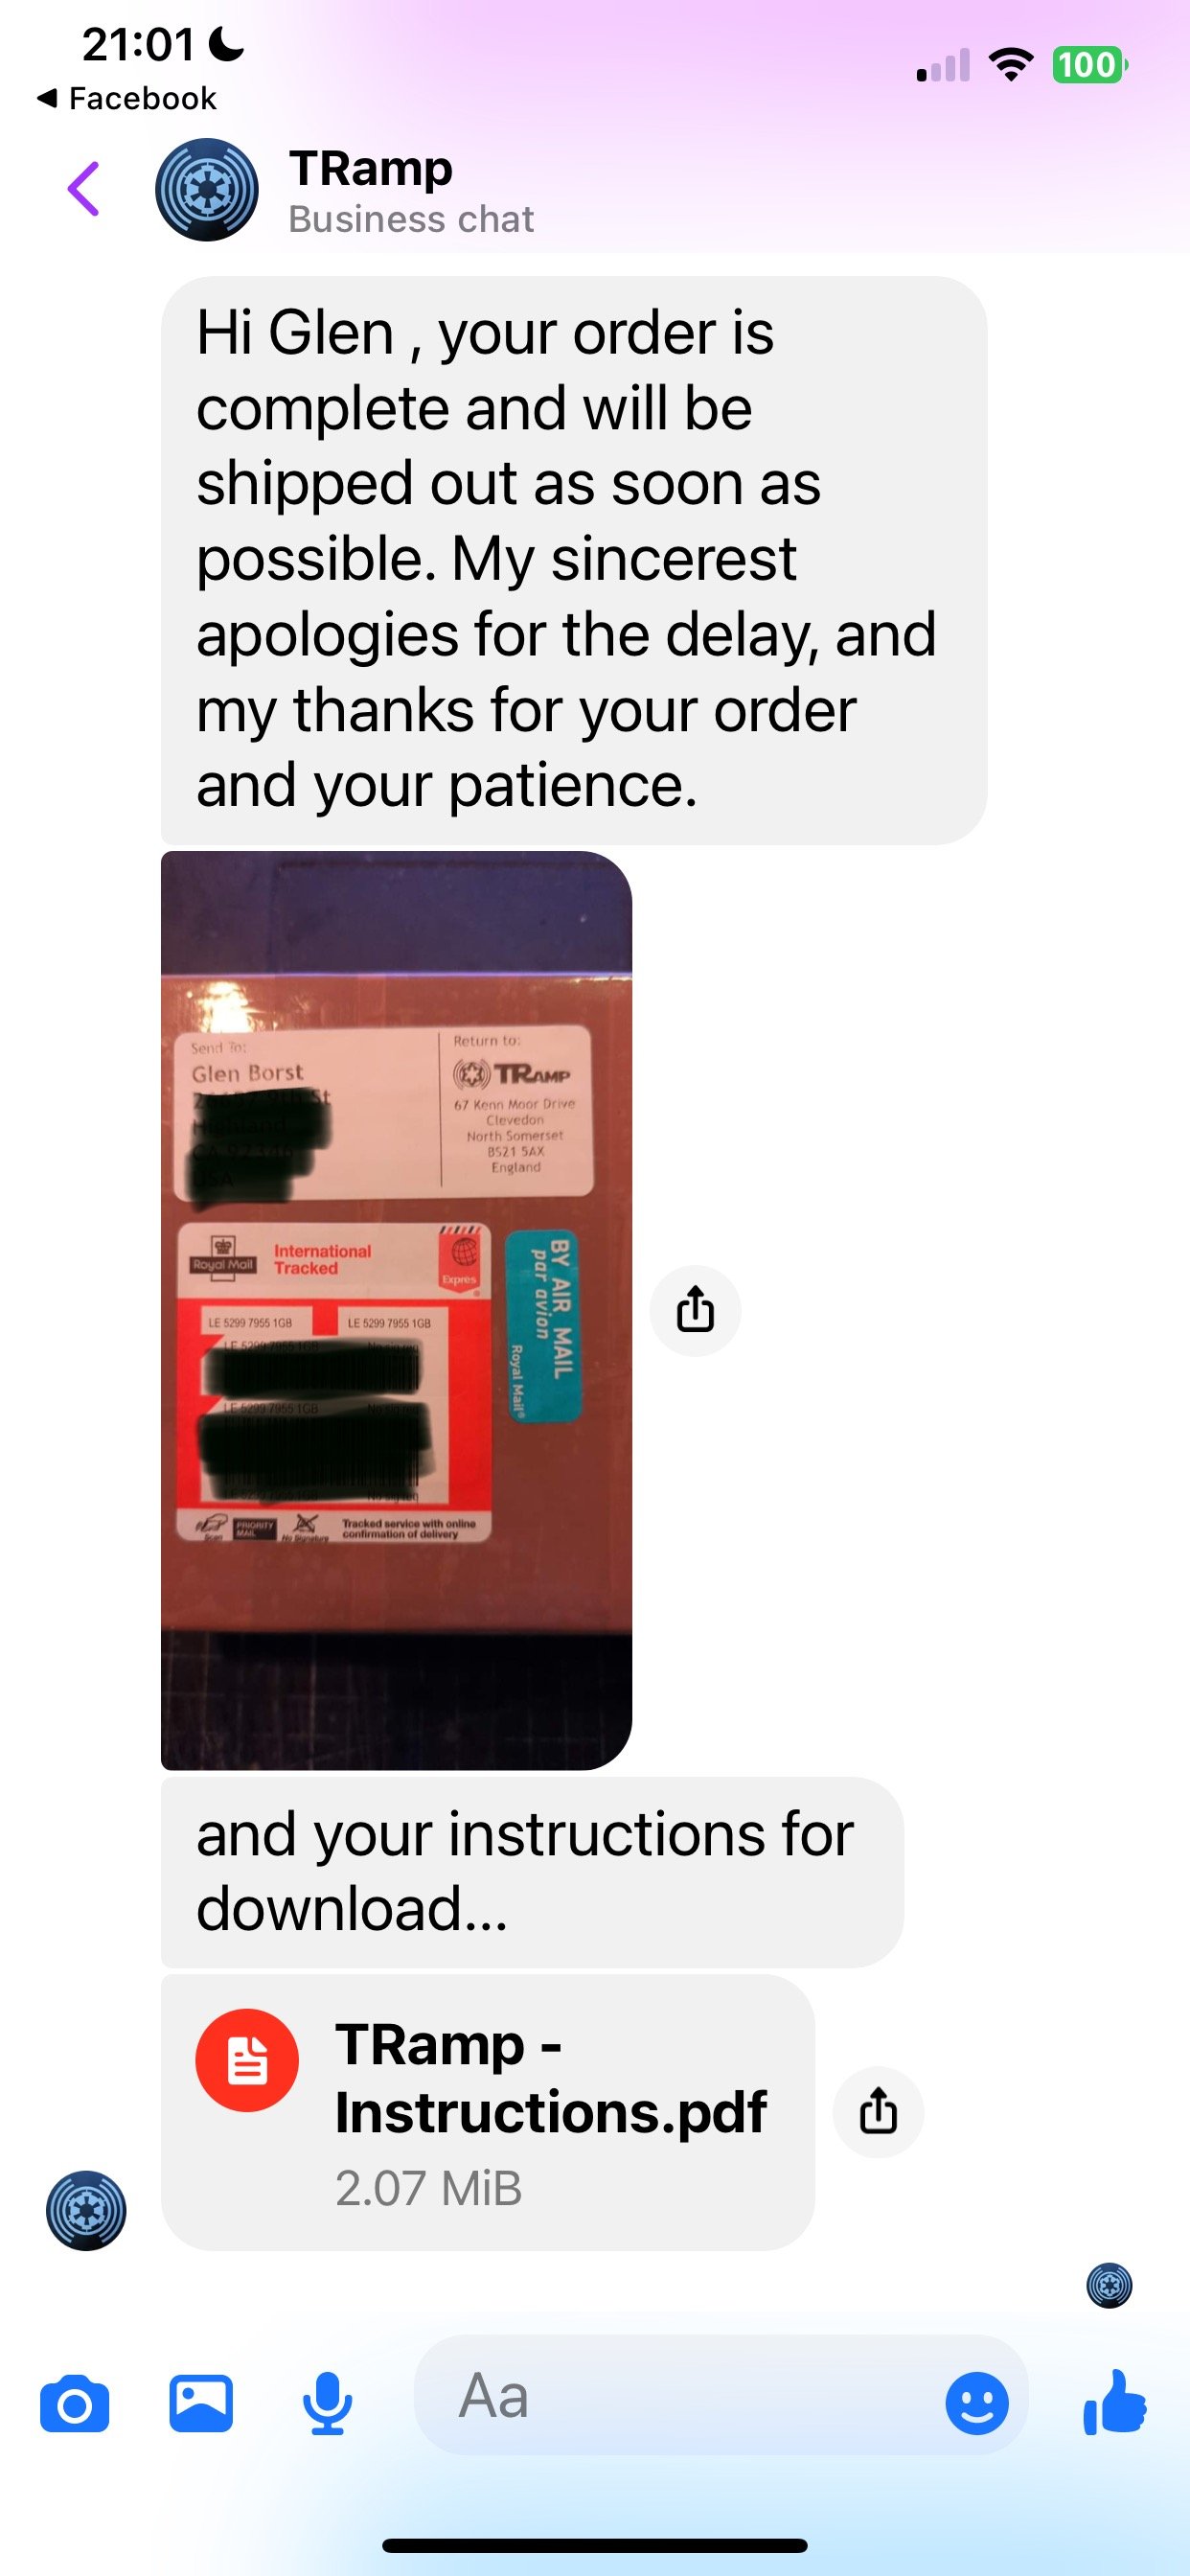
More than a year is a very long time to wait, i know it has veen seen before with other providers but still, a very long waiting time, it better not to take orders until you can fulfill them in a reasonable time Sent from my GM1900 using Tapatalk
-
 This is of tremendous help so far Francois. I'll start to add text into the first post but we can continue to look at and discuss references to bring this up to where it needs to be so we can present it to the LMO team in the near future. Glen has a good point with the reference images , they certainly are our guide to written text and description. Keep up the stellar work on this.
 -
Your image above does not show, using the link with the file extension normally will show, it's just how some forum software works, as an example I posted your image earlier using the .jpeg and it worked
-
This can happen with ordering from time to time, people get busy in their real lives, he's been a long time supplier so I really didn't think you would have any issues. Very hard to be patient when you are excited and unable to receive answers to questions
-
Ok, thanks! What does that do differently?
-
 It's much easier to add reference with the text rather than going off forum looking for a specific image, makes it easy to follow. It's also good for later when referring back to the CRL creation and updating when new reference material comes around.
 -
 Hi! Thanks for the feedback! i can certainly place specific images directly in the text for detailed areas if preferred. for ease of reading I thought it would be better to have a separate picture document. all the reference here are supported by the screenshots of the document in the gallery season 3 section in which I separated each armor section with multiple images for each. https://docs.google.com/file/d/1kyFo-slANYcMenbP4R1iwSTxfOJ2AJoJ/edit?usp=docslist_api&filetype=msword this is a detailled proposal in which I though of placing details, but if you prefer to have a more general document just remove the details references.
 -
Guess what I received in my messages today. I feel like a total jerk now. I did suggest to him that he needs to expand his disclaimer to also read “Delivery can sometimes take up to a year to receive depending global economic shortages.” That might help calm guys like me. Magni[TK] : I’d suggest you just keep reminding him. It will show up eventually.🤞
-
4/15 preapproval troop (GCO approved) at Randall Children's Hospital, Portland, OR: Wore the costume for about 1.5 hours, walking for most of it. Overall went very well. Learned that I have a few things that need adjusting.
-
What has been done in the past is to add a reference to support the text, especially for questionable areas or items and especially when we are putting a requirement on pieces/details of a particular piece. I've not had time to delve deep into this CRL at this stage as I have a convention next month and trying to get some items finished.
-
Here are some additions to the proposal list above: Holster Holster is made from white leather or synthetic leather. A rigid frame may be used under the leather/synthetic leather to give it the proper shape around the pistol but must not be visible. Features two retention straps with a snap button closure to secure the blaster pistol The front loop attaches approximately under first box on the left side of the wearers The back loop attaches approximately under the 4th boxes of the wearer’s left The two loops joint together to form a singe v-shape above the holster Level 2 The holster is made of leather Balaclava/ neck seal A balaclava is a black head sock/hood that is worn under the helmet and is used primarily to hide any view of the wearer’s skin and/or facial hair. Right Gauntlet Gauntlet is white in color. various boxes on all sides are medium grey in color that matches the medium grey color of the armor Gauntlet is a clamshell-style without any visible closure methods and has seam line present on each side. The gauntlet can be divided into 4 sections: top, inner, bottom and outer sides. The top of the gauntlet features three steps with the tallest at the beginning of the wearer’s elbow with the following features: - There is a red rectangle on the inner side the tallest step - A rounded Dart launcher sits in a rounded base atop of the tallest step. It is black and silver in color with a two-step cone with pointed tips. The main cone has holes representing the chambers for individual darts. - On the the edge of the second step, is a silver greeblie - On the last step is a recessed display near the wearer’s wrist on which all buttons are medium grey color that matches the medium grey color of the armor The outer side of the gauntlet has the following feature: - There is a large box on which 4 grey smaller boxes are attached - At the tip of this box, two circular ports of flame throwers are present and are silver color The inner and bottom sides are comprising: - a semi-circular shape on which multiple recessed trapezoidal shapes are present - A red square shape Level 2 The two red colored shapes are red illuminated The outer side large white box and its grey box are visibly separate parts The top section silver greeblie has a middle cylinder shape and dents on the top Left Gauntlet Gauntlet is white in color. various boxes on all sides are medium grey in color that matches the medium grey color of the armor Gauntlet is a clamshell-style without any visible closure methods and has seam line present on each side. The gauntlet can be divided into 4 sections: top, inner, bottom and outer sides. The top side of the gauntlet has the following feature: - a white raised box with angled extremities with the following features o On angled extremity, there is a trapezoidal shape with black color o A small black square shape near the wrist side o A square red shape toward the elbow extremity of the top box - Two cylinders silver color with rounded extremities - A rectangular grey box near the wrist The outer side of the gauntlet has the following feature: - A raised angled white box on which there are two medium grey shapes The inner/bottom sides are comprising: - A semi-circular shape on which multiple recessed trapezoidal shapes are present - A red square shape Level 2 The two red colored square shapes are red illuminated The grey boxes are visibly separate parts Jetpack All grey parts on the jetpack should be medium grey color matching the medium grey of the rest of the armor. The jetpack has anchoring points to attach to the back armor and is removable The jetpack has a recess to wrap around the back armor and hide the anchoring points when viewed from the side The Jet pack consists of a main body and two side reactors all white color. The main body is thicker than the side reactors The main body comprises the following features from top to bottom: - A black intake with grills matching the outer shape of the main body. Inside the grill is a visible red shape - A rectangular grey shape with chamfered top and bottom edges centered on the main body and extending up to the start of the grills. - A cavity in which a grey and white plate is placed. The grey portion of the plate has two rectangular shapes and the white portion has also two rectangular shapes - A white exhaust vent grill at the bottom The side reactors are symmetrical and have the following features from top to bottom: - An angled top - A large box with tapered top and 4 recessed cavities - 5 vertical cylinders attached atop of the large box - A small rectangular grey shape directly underneath the large box with two recesses, creating 3 sections - 2 small trapezoidal grey stabilizing fins located on the outside of each reactor - black directional thrusters, recessed into the bottom of the side reactors Level 2 All grey and black components are visibly separate parts The top grill has a functional red lighting The bottom grill is visibly a separate part remaining is : - flight suit - blaster pistol - blaster rifle
-
Why not use a trooper talk? Or an icomm system? Sent from my GM1900 using Tapatalk
-

[49] TK-96004 (DoggyDoc) troop log (Socials approved)
Doggydoc replied to Doggydoc's topic in Field Training Exercises
Troop 49 Niagara Falls , Ontario April 6, 2024 Niagara Falls pre Eclipse Party This was a Star Wars themed pre eclipse party put on by the City of Niagara Falls. We were asked to be there to interact and take photos with guests. Unfortunately the event was not well attended and only 20 to 30 guests came. We still had a great time dancing away in our costumes. Pre event group shot Obligatory elevator selfie There was an odd pole in the middle of the room we used to change. So I had to try it out. Got a bunch of credits for my effort from the FOTK in the back. Had to also grab a photo with my new transport vehicle. They said the barrel ride was completely safe. Not so sure - Yesterday
-
Nice, try using the link with .jpeg or .jpg on the ends
-
 Kama first pass done. The references are "not amazing" due to being very dark, and lightening them can't bring back detail that wasn't there because of that. I think only the hips are quilted, in a diamond pattern, and all the rest are plain padded panels. I also can't find a good rear angle from the left to confirm that it is actually 2 panels overlapped, some images hint it could be 1 panel with a 2 pleats to get a raised centre section. I also made a couple of minor tweaks to the belt as I was zoomed in and was able to refine. A few specifics are missing like the belt widths but otherwise the bulk done ready for further refinement.
 -
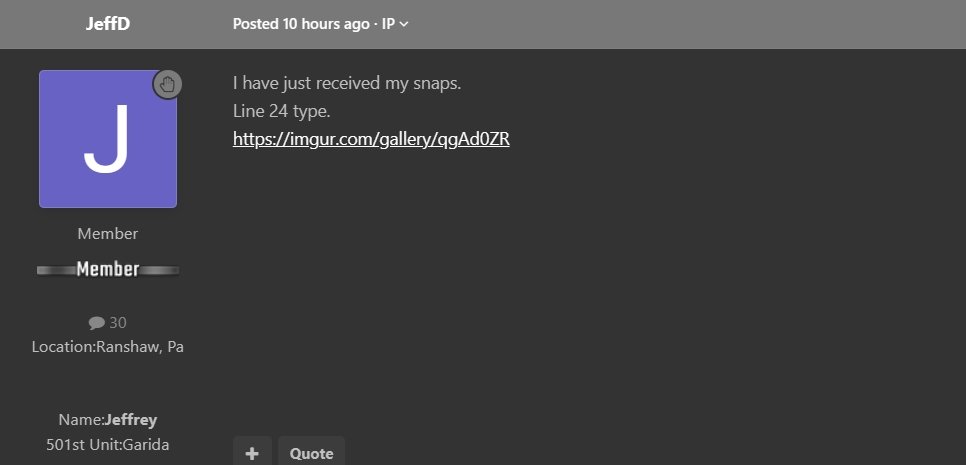
I have just received my snaps. Line 24 type. https://imgur.com/gallery/qgAd0ZR
-
.thumb.png.623307dd64aa621de7a1f62fd77c6d7c.png) IronBronson changed their profile photo
IronBronson changed their profile photo -
V-Tabs for back and butt plate.
IronBronson replied to IronBronson's topic in Hard Armor (General Discussion)
Perfect thank you! Now I can get started on this, it was one of the last things I wanted to finish. -
V-Tabs for back and butt plate.
IronBronson replied to IronBronson's topic in Hard Armor (General Discussion)
Thanks Bart just found how to do it in this thread you posted. Thanks for the help!


-
Albums
-
Promo pictures & others
- By Locitus,
- 0
- 35
-
.jpg.da3b75dcced28b94590e16b06907ce49.jpg.d3465bdfa251d57f1217de22fbf5842f.jpg)
Publicity Blaster - Nambu Type 99 LMG
- By gmrhodes13,
- 0
- 0
- 4
-

TFA F-11D Blasters
- By gmrhodes13,
- 0
- 0
- 13
-
Captain Phasma TFA References
- By gmrhodes13,
- 0
- 0
- 59
-
TLJ F-11D
- By themaninthesuitcase,
- 0
- 0
- 1
-