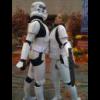
Sgt JB Posted September 28, 2009 Report Share Posted September 28, 2009 (edited) So the shoulder covers need to be put on, I need to finish the butt plate straps, Breastplate to back plate straps, and snaps for the belt, but wanted to throw up some pics and see what ya'll think... Edited February 3, 2021 by gmrhodes13 link not working, removed gmrhodes13 2021 Quote Link to comment Share on other sites More sharing options...
GosHawk[501st] Posted September 28, 2009 Report Share Posted September 28, 2009 me likey......me likey ALOT! nice job! just one thing very nit picky of me and you probably know......put a black screen behind the frown. I really do like ATA can't wait to get mine done. Quote Link to comment Share on other sites More sharing options...
Sgt JB Posted September 28, 2009 Author Report Share Posted September 28, 2009 me likey......me likey ALOT! nice job! just one thing very nit picky of me and you probably know......put a black screen behind the frown. I really do like ATA can't wait to get mine done. yea, it's on the list of finishing things to do. thx :-) Quote Link to comment Share on other sites More sharing options...
dougefresh Posted September 28, 2009 Report Share Posted September 28, 2009 yea, it's on the list of finishing things to do. thx :-) Holy crapola! Man -- you make it look easy, Eric. Wow! Dunno if this is something you haven't gotten to yet, but I'd try and pull the shoulder bells in and down a few inches, so they're nice and snug against the chest plate. Other than that -- dang, that thang's purdy! Quote Link to comment Share on other sites More sharing options...
Sgt JB Posted September 28, 2009 Author Report Share Posted September 28, 2009 Holy crapola! Man -- you make it look easy, Eric. Wow! lord no, hardest hobby project I've done in a long time, but it's been so much fun. yea, they rode up on me, and the mrs didn't catch it. when I looked in the mirror (after the pics were taken) I fixed that and the cod-piece on the right side. Quote Link to comment Share on other sites More sharing options...
Sgt JB Posted September 28, 2009 Author Report Share Posted September 28, 2009 Another thing, I'm kinda big. 6'2" 190. I got broad shoulders, so the bells need to cover alot of area. That makes the space between the bells and the breast plate a little wider. I have a strap going around my arm, that's what they got hung up on, and why they're lifted up a bit. when they're sitting where they should be it looks fine, in the pics they're riding up, and my Mrs. doesn't really know enough yet about how it's supposed to look to have corrected it, or pointed it out. Quote Link to comment Share on other sites More sharing options...
TK-2126_MD[TK] Posted September 28, 2009 Report Share Posted September 28, 2009 I would raise the thermal boxs so they almost touch the belt, other then that if u fix the other points stated looks very goood. One thing that is typical with the first timers is the "Duck feet stance" that the fact that we are not use to have shins and highs pieces and we tend to stand with our feet wide open. it is something we need to wrok on end force our self to have our feet straight ( check out other build threads and 98% of all of us have the Duck stance or would donald stance be better! looking real good!!! Quote Link to comment Share on other sites More sharing options...
Sgt JB Posted September 28, 2009 Author Report Share Posted September 28, 2009 I would raise the thermal boxs so they almost touch the belt, other then that if u fix the other points stated looks very goood. One thing that is typical with the first timers is the "Duck feet stance" that the fact that we are not use to have shins and highs pieces and we tend to stand with our feet wide open. it is something we need to wrok on end force our self to have our feet straight ( check out other build threads and 98% of all of us have the Duck stance or would donald stance be better! looking real good!!! The boxes are 1" from the belt. Thought that's the correct length. Quote Link to comment Share on other sites More sharing options...
Dargas[501st] Posted September 28, 2009 Report Share Posted September 28, 2009 the 1" distance is right my friend. and there's nothing wrong with the duck stance. the troopers in the movies do it too everytime except when close to Lord Vader so I guess it's movie accurate too LOL great work Erick! I'll let you know my final thoughts when you post the final pics! congrats so far my friend! Quote Link to comment Share on other sites More sharing options...
Madmartigan Posted September 28, 2009 Report Share Posted September 28, 2009 So the shoulder covers need to be put on, I need to finish the butt plate straps, Breastplate to back plate straps, and snaps for the belt, but wanted to throw up some pics and see what ya'll think... I think you look great! Once you adjust the shoulders, you should be good! Nice job! p.s. If you have chest to ab elastic straps in the right place and back to kidney straps, you don't really need chest to back. Don't think they had those in the movies, and I'm pretty sure when I followed Stuka and FBJs build threads, I didn't see them. My armor is fine without em! Quote Link to comment Share on other sites More sharing options...
Sgt JB Posted September 28, 2009 Author Report Share Posted September 28, 2009 I think you look great! Once you adjust the shoulders, you should be good! Nice job! p.s. If you have chest to ab elastic straps in the right place and back to kidney straps, you don't really need chest to back. Don't think they had those in the movies, and I'm pretty sure when I followed Stuka and FBJs build threads, I didn't see them. My armor is fine without em! I didn't strap the chest to the ab plate, was just going to strap it to the back, but now that you mention it, might just attach it to the ab plate. Quote Link to comment Share on other sites More sharing options...
ObiHahn[TK] Posted September 28, 2009 Report Share Posted September 28, 2009 the 1" distance is right my friend. Where's that from? I've never seen anything like that in any of the movies, so I thought I'd just ask what I might have missed. I thought that the drop boxes have to touch the belt, or almost do so... Quote Link to comment Share on other sites More sharing options...
Madmartigan Posted September 28, 2009 Report Share Posted September 28, 2009 I didn't strap the chest to the ab plate, was just going to strap it to the back, but now that you mention it, might just attach it to the ab plate. I'm pretty sure that's the accurate way and between having the back to kidney and the chest to ab, it keeps either chest or back from riding too high. Good luck! Quote Link to comment Share on other sites More sharing options...
Madmartigan Posted September 28, 2009 Report Share Posted September 28, 2009 Where's that from? I've never seen anything like that in any of the movies, so I thought I'd just ask what I might have missed.I thought that the drop boxes have to touch the belt, or almost do so... Never seen that either. I thought it should be pretty close to the belt. My boxes are maybe 1/8" max away from the belt. Quote Link to comment Share on other sites More sharing options...
ThayNerd[TK] Posted September 28, 2009 Report Share Posted September 28, 2009 That's looking great! Quote Link to comment Share on other sites More sharing options...
TK5144[TK] Posted September 28, 2009 Report Share Posted September 28, 2009 what paint did you use? Looks great. did you leave off the right leg ammo belt? Quote Link to comment Share on other sites More sharing options...
Sgt JB Posted September 28, 2009 Author Report Share Posted September 28, 2009 what paint did you use? Looks great. did you leave off the right leg ammo belt? Rusteolum high performance gloss white. the Ammo belt paint job didn't do too well first time around. so I had to sand it, and repaint. it's currently drying. But that's a simple 2 rivets to put back on. got all the snaps on the belt today, doing the butt plate straps now. only got the chest piece to ab plate straps, and the shoulder covers, then I should be 100% good, so either tonight, or tomorrow and I'll be done. Quote Link to comment Share on other sites More sharing options...
Sgt JB Posted October 4, 2009 Author Report Share Posted October 4, 2009 So, I'm finished, everything that needed to be fixed has been. I have a friend that does photography that's comming by some time this week to get my photos done for my application for the 501st, I'll post pics as soon as I have them. Only thing I need to do between now and then is get my neck seal done for my EIB application!! Just want to say thank you to all the guys here that have helped with suggestions, advice, and materials. Including, but not limited to Paul, Terrell, Smitty, Mike, Eugine. Everyone of you have been very helpful, and inspiring to me. Quote Link to comment Share on other sites More sharing options...
NAZGÛL Posted October 4, 2009 Report Share Posted October 4, 2009 Looking forward to see the pics! Grats man! Quote Link to comment Share on other sites More sharing options...
Sgt JB Posted October 6, 2009 Author Report Share Posted October 6, 2009 (edited) Here's the final product ---------- Edited February 3, 2021 by gmrhodes13 link not working, removed gmrhodes13 2021 Quote Link to comment Share on other sites More sharing options...
SuperTrooper Posted October 6, 2009 Report Share Posted October 6, 2009 Wow, you are almost ready for EIB from the start. About the only suggestions I can make are to shorten the drop box straps and add one piece of T-track to the blaster to cover the row of holes. Quote Link to comment Share on other sites More sharing options...
naatsirhc[TK] Posted October 6, 2009 Report Share Posted October 6, 2009 Great job Eric! Congratulations on your build, hope to be there next week with mine. Thanks for all your help with my build! Christaan Quote Link to comment Share on other sites More sharing options...
Sgt JB Posted October 6, 2009 Author Report Share Posted October 6, 2009 Wow, you are almost ready for EIB from the start. About the only suggestions I can make are to shorten the drop box straps and add one piece of T-track to the blaster to cover the row of holes. shortening the drop box staps is easy, I though it was 6 t-tracks for the blaster? Quote Link to comment Share on other sites More sharing options...
SuperTrooper Posted October 6, 2009 Report Share Posted October 6, 2009 shortening the drop box staps is easy, I though it was 6 t-tracks for the blaster? When the EIB requirements were on the webpage there was a footnote that Hasbros got 7 to cover the holes, when we transfered it back to being forum based it must have gotten omitted. Quote Link to comment Share on other sites More sharing options...
Rebel Doughboy[TK] Posted October 6, 2009 Report Share Posted October 6, 2009 Awesome job Eric, glad to see a finished ATA kit! Now I have reference pictures to base my build off, I hope I can get mine to look that good Quote Link to comment Share on other sites More sharing options...

Recommended Posts
Join the conversation
You can post now and register later. If you have an account, sign in now to post with your account.